| Sun Netra CP3260 Blade Server User’s Guide |
| C H A P T E R 2 |
|
Hardware Installation |
This chapter describes the hardware installation procedures for the Netra CP3260 blade server, and contains the following sections:
Refer to Important Safety Information for Sun Hardware Systems (816-7190) for general safety information.
Read the safety statements specific to the Netra CP3260 blade server carefully before you install or remove any part of the system.
The installer must be familiar with commonly accepted procedures for integrating electronic systems and with the general practice of Sun systems integration and administration. Although parts of these systems are designed for hot-swap operation, other components must not be subjected to such stresses. Work with power connected to a chassis only when necessary, and follow these installation procedures to avoid equipment damage.
This equipment is sensitive to damage from electrostatic discharge (ESD) from clothing and other materials. Use the following antistatic measures during an installation:
The other end of the strap lead should be connected to one of the following:
This section provides information on the materials and tools required to perform installation. The minimum tools required to perform installation are:
See Section 1.6.1, Hardware Requirements and Options for information on hardware requirements.
Prepare for installation by reading and performing the following steps:
1. Become familiar with the contents of the documentation referenced in the steps.
2. Verify that all listed hardware and software are available (see Section 1.6, System Requirements and Options).
3. Check power, thermal, environmental, and space requirements (see Section 2.3.1, Checking Power, Thermal, Environmental, and Space Requirements).
4. Verify that local area network (LAN) preparations are completed (see Section 3.3.3, Determining Local Network IP Addresses and Host Names).
5. Ensure that the host names and their network IP addresses are allocated and registered at the site.
Verify that you meet the following requirements:
The procedure in this section summarizes the Netra CP3260 blade server installation at a high level. Be sure to read the details in Section 2.5, Configuring On-Board Hardware before installing the blade server.
The procedure to set up and configure a Netra CP3260 blade server in a system includes the following actions:
1. Configure the on-board physical hardware. For example, add memory or optional Compact Flash.
2. Configure and install a rear transition module (RTM), if necessary.
3. Physically install the Netra CP3260 blade server into the chassis.
4. Connect the nodes to a local network. Alternatively, the blade server can be run as a standalone system without a network connection.
5. Install the operating system and patches, as necessary. See Section 3.1, Operating Systems and Patches.
6. Download firmware updates, if needed. See Section 3.4, Firmware Updates.
7. Configure the operating system for 1-GbE or 10-GbE Ethernet switches. See Section 3.5, Configuring for 1-GbE or 10-GbE Switches
This section provides the procedures for adding or replacing the on-board hardware components such as memory modules, a Compact Flash card, and the time-of day (TOD) battery. Read and perform the procedures, as necessary, before installing the Netra CP3260 blade server into the chassis.
The Netra CP3260 blade server supports a total of 8 FB-DIMMs and a maximum memory capacity of 16 Gbytes (using eight 2-Gbyte DIMMs). FIGURE 2-1 shows the location of the FB-DIMMs. The Netra CP3260 blade server accommodates the following:
| Note - You cannot mix 1-Gbyte and 2-Gbyte FB-DIMMs. All eight DIMMs must be the same density (that is, all 1-Gbyte or all 2- Gbyte FB-DIMMs). |
The Netra CP3260 blade server supports FB-DIMM memory modules that have the following characteristics:
For information about sensors, refer to the Netra CT 900 Software Developer’s Guide (819-1175).
For additional information, see Section 5.2.2, Memory Subsystem. FIGURE 2-1 shows the location of the DIMMs.
FIGURE 2-1 FB-DIMM Memory Locations

You might need to remove a FB-DIMM module from the Netra CP3260 blade server if you are returning the FB-DIMM module or the blade server for service, or if you are replacing a module with another FB-DIMM module.
| Note - Safely store the original factory-shipped FB-DIMM and related FB-DIMM packaging. You might wish to store any removed FB-DIMM in the new FB-DIMM packaging, or use the packaging for service. |
To remove a FB-DIMM from the Netra CP3260 blade server, perform the following steps:
1. Take antistatic precautions: attach and electrically ground the wrist strap.

|
Caution - Always wear a grounded antistatic wrist strap when handling modules. |
2. Place the Netra CP3260 blade server on an antistatic mat, or on the blade server’s antistatic bag if you do not have a mat available.
3. For the FB-DIMM you wish to remove, simultaneously pull both FB-DIMM retainer clips outward from the slot (see ➊ in FIGURE 2-2).
4. Grasp the FB-DIMM by the edges, and carefully pull it out of its connector (see ➋ in FIGURE 2-2). A slight rocking motion might be required.
|
|
Caution - Take extra care to prevent damage when removing the outer most FB-DIMMs. |
5. Place it in an antistatic bag.
FIGURE 2-2 Removing an FB-DIMM Memory Module

6. If you are replacing the module you removed with a new FB-DIMM, install it as described in Section 2.5.1.2, To Install FB-DIMM Memory Modules.
The following procedure provides a general guide for installing additional memory. However, for directions on the installation process of the memory FB-DIMMs on the Netra CP3260 blade server, refer to the documentation that shipped with the memory module.
1. Locate the FB-DIMM connectors on the Netra CP3260 blade server.
Select the connectors where you will install the memory module (FIGURE 2-1). If you need to replace an existing memory module with a new module, see Section 2.5.1.1, To Remove FB-DIMM Memory Modules for instructions on removing the FB-DIMM module.
2. Remove the FB-DIMM from its protective packaging, holding the module only by the edges.
3. Insert the bottom edge of the FB-DIMM into the bottom of the slot’s hinge-style connector (see ➊ in FIGURE 2-3).
The socket and module are both keyed, which means the module can be installed one way only. With even pressure, push simultaneously on both upper corners of the FB-DIMM until its bottom edge (the edge with the gold fingers) is firmly seated in the connector.
FIGURE 2-3 Installing a FB-DIMM Memory Module

|
|
Caution - Do not rock the FB-DIMM into place. Ensure that all contacts engage at the same time. You will feel or hear a click when the FBDIMM properly seats in the connector. |
4. Press the top edge of the FB-DIMM toward the blade server until the retainer clips click into place (see ➋ in FIGURE 2-3).
The small retainer clips on each side of the FB-DIMM slot click into place in the notches on the sides of the FB-DIMM.
You can install an optional Sun Compact Flash card on the Netra CP3260 blade server. The Compact Flash card is not hot-swappable and there is no access to the card once the blade server is installed in an ATCA chassis.
To install the Compact Flash card, use the arrow on the card’s label as a guide and insert the card into the Compact Flash connector (FIGURE 2-4).
FIGURE 2-4 Compact Flash Card Location

FIGURE 2-5 shows the location of the TOD clock battery and holder.
The optional TOD battery must be type CR1632, with a minimum of 4ma abnormal charging current rating (for example; a Renata CR1632).

|
Caution - Risk of explosion if the battery is replaced by an incorrect type.
Dispose of batteries properly in accordance with manufacturer’s instructions and local regulations. |
To install the battery, perform the following steps:
1. Remove the FB-DIMM closest to the front panel.
To do this, see Section 2.5.1.1, To Remove FB-DIMM Memory Modules.
2. (Optional) Remove the old battery if necessary.
3. Slide the new battery into the holder with the side labeled “+ “ facing up.
To do this, see Section 2.5.1.2, To Install FB-DIMM Memory Modules.
FIGURE 2-5 TOD Battery Location

For rear I/O access, a compatible RTM must be used with the Netra CP3260 blade server.
| Note - If you are using a Netra CP32x0 ARTM, refer to the appropriate Netra CP32x0 ARTM User’s Guide for specific installation instructions. |
In general, install the RTM from the rear of the server. Look at the front of the server and locate the slot number where the Netra CP3260 blade server is installed. Then go to the back of the server and install the RTM in that particular slot.
FIGURE 2-6 Installinga Netra CP32X0 ARTM
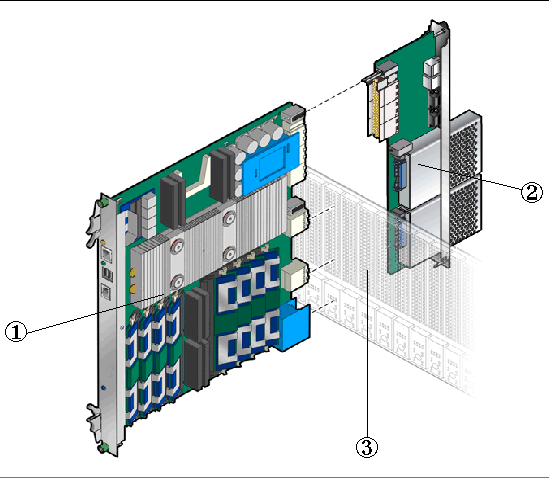
Figure showing the installation of a Netra CP3260 blade server and CP32X0 ARTM into the ATCA chassis midplane.
To verify that the fan tray upgrade is installed on a Netra CT 900 server, log into the Shelf Manager and issue the following command for fan trays 1, 2, and 3 (or fan trays 0, 1, and 2 for older chassis):
If Product Part / Model Number = 371-3033-xx is displayed, an upgraded fan tray is installed. If Product Part / Model Number is not 371-3033, an old fan tray is installed and the upgrade is required. Refer to the Netra CT 900 Server Upgrade Guide (820-3255) for more information.
To Install the Netra CP3260 blade server, perform the following steps:
1. If you have installed a Netra CP32x0 ARTM, go to the front of the system and locate the card slot where you installed the ARTM at the rear of the system.
2. Remove the filler panel, if necessary.
The filler panel is secured to the card cage using two screws, one at the top of the filler panel, the other at the bottom. Store the filler panel in a safe place; you might need to use it again if you have to remove a card for an extended period of time.
3. Prepare the blade server by opening the injector/ejector latches (FIGURE 2-8).
4. Carefully align the edges of the blade server with the card guides in the appropriate slot (FIGURE 2-7).
It might be helpful to look into the enclosure to verify correct alignment of the rails in the guides.
5. Taking care to keep the blade server aligned in the guides, slide the blade server in until the injector/ejector latches engage the card cage.
FIGURE 2-7 Installing Blade Server Into Chassis Slot

6. Push the blade server slightly into the midplane connectors, and then close the latches to seat the blade server in the connectors (FIGURE 2-8).
7. When the lower latch is closed, the blue Hot-Swap LED blinks while the blade server is initializing. The blue LED turns off and the green OK LED lights when the blade server is ready.
8. Tighten the locking screws to ensure the blade server is secured into the shelf (FIGURE 2-8).
FIGURE 2-8 Netra CP3260 Blade Server Latches and Locking Screws

External I/O cables are connected to the Netra CP3260 blade server, or to the Netra CP32x0 ARTM when a rear transition module is used.
Information on connecting each of these cables follows:
A single 10/100BASE-T Ethernet port is also available on a Netra CP32x0 ARTM when installed. Refer to the appropriate Netra CP32x0 ARTM User’s Guide for more information.
Use the Ethernet device names shown in TABLE 2-1 when configuring the Ethernet ports.
A serial port is also provided on the Netra CP32x0 ARTM. You can use either the serial port on the Netra CP3260 blade server or the serial port on Netra CP32x0 ARTM, but only one of the ports should be used at one time.
Once a serial cable is connected, use the tip utility on the host to establish a full-duplex terminal connection with the Netra CP3260 blade server.
At the UNIX prompt in a command tool or shell tool, type:
The Netra CP3260 blade server supports hot-swapping at the blade server level.
The blue Hot-Swap LED, located on the front panel of the Netra CP3260 blade server (FIGURE 1-1), blinks when a hot-swap is initiated, and lights steadily when the blade server is ready to be removed from the system.
Unlatching the bottom latch on the Netra CP3260 blade server initiates the hot-swap sequence. The LED lights steadily when the blade server can be safely removed from the system. The reverse is true when a Netra CP3260 blade server is installed into the system. Once the Netra CP3260 blade server is installed into the system and the bottom latch is latched, the blue Hot-Swap LED blinks until the blade server is ready and then turns off. The green LED lights steadily when the blade server is ready.
FIGURE 2-9 shows the hot-swap latch and Hot-Swap LED.
FIGURE 2-9 Hot-Swap Latch and Hot-Swap LED
 latch and blue Hot-Swap LED.")
| Sun Netra CP3260 Blade Server User’s Guide | 820-0457-11 |
Copyright © 2009 Sun Microsystems, Inc. All rights reserved.