|
| |
| Sun[TM] Identity Manager 8.0 Tuning, Troubleshooting, and Error Messages | |
Chapter 2
Tracing and TroubleshootingThis chapter explains how you can use tracing to help fix errors, solve performance issues, and understand how things flow within Identity Manager. This chapter also describes methods for troubleshooting problems that might occur with different Identity Manager components.
The information in this chapter is organized into the following sections:
Before You BeginReview the information in the following sections before tracing or troubleshooting Identity Manager:
Intended Audience
This chapter is intended for application server and database administrators, front line support engineers, and partners who are responsible for maintaining Identity Manager in a deployment environment.
Before troubleshooting problems with Identity Manager, you must
Important Notes
You should be aware of the following information before trying to troubleshoot Identity Manager:
- Tracing affects system performance. To ensure optimal performance, use the minimum tracing level needed or turn off tracing after debugging the systems.
- Do not enable tracing for the com.waveset class. The com.waveset class is verbose and has many classes, so tracing this class might cause your server to hang.
- Do not configure Identity Manager to trace at the advanced level unless instructed to do so by Sun Support.
- If you set exception.trace in the Waveset.properties file to debug a specific problem, do not use it for an extended period of time and be sure you disable it after debugging. Setting exception.trace in the Waveset.properties file can significantly affect system performance.
Before Calling Support
Before you call Sun Support for assistance with a problem, consider the following suggestions for narrowing the problem area:
- Try using web browser search tools to research the problem
- Use resource-specific support options when available. Your problem might be related to a resource and fixed using a resource patch.
- Remove Identity Manager from the equation by using an appropriate client tool when possible. For example, using a Java LDAP browser.
Related Documentation and Web Sites
In addition to the information provided in this chapter, consult the publications and web sites listed in this section for information related to tracing and troubleshooting Identity Manager.
Recommended Reading
See the following publications for information related to tracing and troubleshooting Identity Manager:
- See “Testing Your Customized Form” section in Identity Manager Workflows, Forms, and Views for the recommended method of tracing XPRESS functions.
- See the article titled, Using JConsole to Monitor Applications, for information about using JConsole to monitor applications that run on the Java platform. This article is available from the following location:
Useful Web Sites
The following table describes web sites related to troubleshooting Identity Manager.
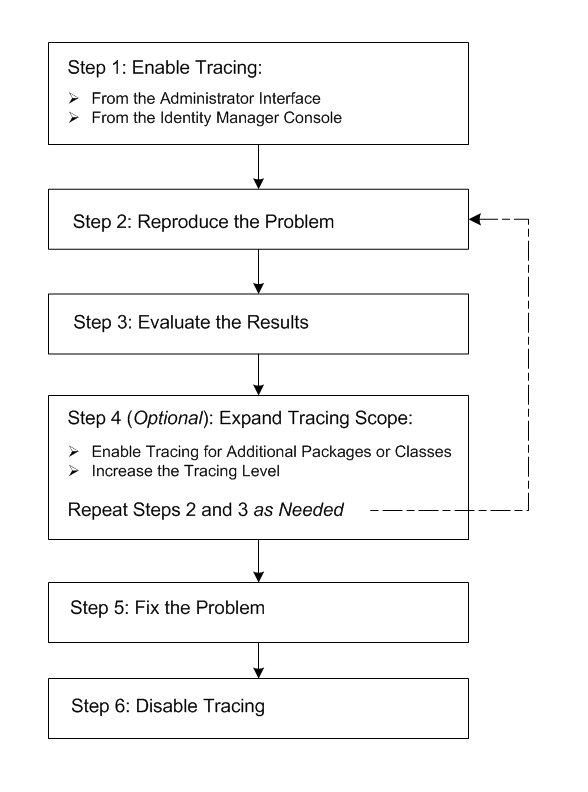
Process Overview
Generally, you can identify and resolve problems in your deployment if you follow these steps:
Figure 2-1 Tracing and Troubleshooting a Problem
See Tracing Identity Manager Objects and Activities for information about how to enable tracing for different Identity Manager objects and activities.
See Troubleshooting and Fixing Common Problems for information about how to troubleshoot problems that commonly occur for those objects and activities.
Tracing Identity Manager Objects and ActivitiesTrace output can be very helpful when you are trying to identify and resolve problems, or when you are developing custom resource adapters.
This section describes how to enable tracing for a variety of Identity Manager objects and activities. The information is organized as follows:
How To Configure Tracing
You can enable and configure tracing from several locations within Identity Manager. Instructions are provided in the following sections:
From the System Settings Page
The System Settings page is the primary Identity Manager Debug page. From this page, you can
Editing the Global Trace Configuration Object
Use the following steps to view and edit the default trace configuration object from the Identity Manager System Settings page:
- Open a browser and log in to the Identity Manager Administrative interface.
- Type the following URL into the browser:
http://host:port/idm/debug
Where:
- When the System Settings page displays, click Show Trace (located near the bottom of the page) to manage a single trace configuration, where you can create, modify, or delete up to ten trace settings.
- On the Edit Trace Configuration page, select the Trace Enabled box to enable tracing.
Note
Deselecting this box stops tracing, but keeps your configuration. You can turn tracing on and off without having to remember and retype the classes you were tracing.
- Specify which classes, packages, or methods to trace by typing their names into the table. For example:
- To trace all classes in the waveset.repository package, enter com.waveset.repository.
- To trace the AbstractDataStore class in the waveset.repository package, enter com.waveset.repository.AbstractDataStore.
- To trace the list method in the AbstractDataStore class in the waveset package, enter com.waveset.repository.AbstractDataStore#list.
- In the same table, choose a Method/Class tracing level from the Level menu.
Each level captures different types of information, as described in the following table:
Note
Method/Class tracing produces a predictable, but possibly very large volume of trace output. Try to be as specific as possible when specifying methods and classes to trace.
- (Optional) To enable subcall tracing, choose a level from the Subcall Trace menu, which uses the same trace numbering scale described in the previous step.
Note
- The default Subcall Tracing level is none, which disables subcall tracing on a per-method or per-class basis.
- Subcall Tracing levels are independent of the Method/Class tracing levels you specify for Step 6.
When you enable Subcall Tracing for a particular method that supports subcall tracing, you are automatically setting the tracing level for methods that are called by this method. Subcall Tracing enables you to produce a short, but detailed burst of trace output that is triggered by the entry into a specified method and terminated by the method’s exit.
For example, assume you created a trace configuration setting for the com.waveset.adapter.NewRes#init method, set Method/Class tracing to level one and set Subcall tracing to level three. Also, assume that the init method calls two other methods:
- NewRes#subcallA
- NewRes#subcallB
When the init method runs, the com.waveset.adapter.NewRes#init method produces trace output at level one until reaching subcallA. When subcallA begins executing, the trace level changes to three and continues at that level until subcallA exits. The com.waveset.adapter.NewRes#init method returns to the init method and restores the trace level to one. Later, when init calls subcallB, there is another burst of level three trace detail that lasts until subcallB exits. Finally, when init exits, level one tracing stops.
- Send the trace results to a specified file location or to stdout.
If you choose output to a file, the Trace File field displays. Use this field to specify an alternate location and file name for trace output files. The default location and file name is
path_to_idm_install\export\pipeline\config\WSTrace.log).
- Specify the maximum number of trace files to store (default is 2).
- Specify the maximum size for each file (default is 512K).
- Specify whether to write the trace output file as generated (synchronously) or to queue the data and then write it to the trace file (asynchronously).
- Save your changes.
To Create a New Trace Configuration Object
Use the following steps to create a new trace configuration object:
- Decide which package or method you want to trace.
Generally, you specify a resource adapter name or use information that was revealed in an error message.
- Log in to the Identity Manager Administrator interface and open the System Settings page as described on (more...) .
- On the Systems Setting page, click Show Trace List.
- When the Identity Manager Trace Configuration page displays, click New.
- On the Edit Trace Configuration page, choose one of the following options from the Trace Configuration menu:
- Select the Trace Enabled box to enable tracing for this object and configure the remaining parameters on this page as described in Editing the Global Trace Configuration Object.
- Save your changes.
From Individual Debug Pages
Use the following steps to enable or disable tracing from an Identity Manager Debug page:
For example, to trace adapter classes and methods for a custom adapter, type http://host:port/idm/debug/Show_Trace.jsp to open the Edit Trace Configuration page.
From the Identity Manager Console
Use the following steps to enable tracing from the Identity Manager console:
How to View Trace Files
By default, Identity Manager sends tracing information to a file named WSTrace#.log that is stored in the path_to_idm_install\export\pipeline\config\ directory. If necessary, you can specify alternate file names and locations when you configure tracing for an object.
Each log file is numbered sequentially, up to the maximum number of files specified on the Edit Trace Configuration page. For example, if you specify a maximum of three files, the files are named WSTrace1.log, WSTrace2.log, and WSTrace3.log.
To view these log files,
Tracing the Identity Manager Server
Identity Manager is a Java-based product whose executables consist of Java classes grouped as packages. When the code is implemented, many classes can supply trace output.
Tracing the Identity Manager server can provide helpful information such as where a server is failing, having problems, or not running. You can use the Identity Manager Debug pages to enable package-level and method-level tracing in a running Identity Manager server.
Tracing Adapters
You can use trace information to verify that an adapter has started, to verify that all setting changes were saved, and to diagnose problems with the adapter.
When you enable tracing for an adapter, you must identify the methods that you want to trace, as follows:
com.waveset.adapter.sample.MyResourceAdapter
You must also provide calls to create log entries for any new methods in your custom adapter so the adapter can write its resource settings to a log file. In some cases, you can specify additional logging parameters for the resource instance, such as:
- Maximum Log Archives
- Maximum Active Log Age
- Log File Path
- Maximum Log File Size
- Log Level
Note
- To further debug the synchronization process, you can configure synchronization logging for the adapter. (Instructions are provided in the Identity Manager online help.)
- Tracing custom Java code can also be useful when you are writing your own resource adapter. See Tracing Custom Code for more information.
- For more information about tracing specific adapter methods, see the Identity Manager Resources Reference.
Tracing Auditor
You can trace the following methods to troubleshoot issues with Identity Auditor:
To enable tracing,
- Open a browser and log in to the Administrator interface.
- Select Configure > Servers.
- When the Configure Servers page displays, click the server name in the Server column to edit the settings.
- On the Edit Server Settings page, click the Scheduler tab.
- Select the Tracing Enabled box to activate Scheduler debug tracing and write the results to stdout.
- Save your changes.
You can add the following hidden flags by modifying
Tracing Custom Code
You can use the Identity Manager tracing facility in custom-written code to provide seamless integration when troubleshooting your deployment.
Use the following classes to provide this tracing facility:
You can also use these com.sun.idm.logging.trace facilities to record trace output. See the Javadoc for more information about these facilities and classes.
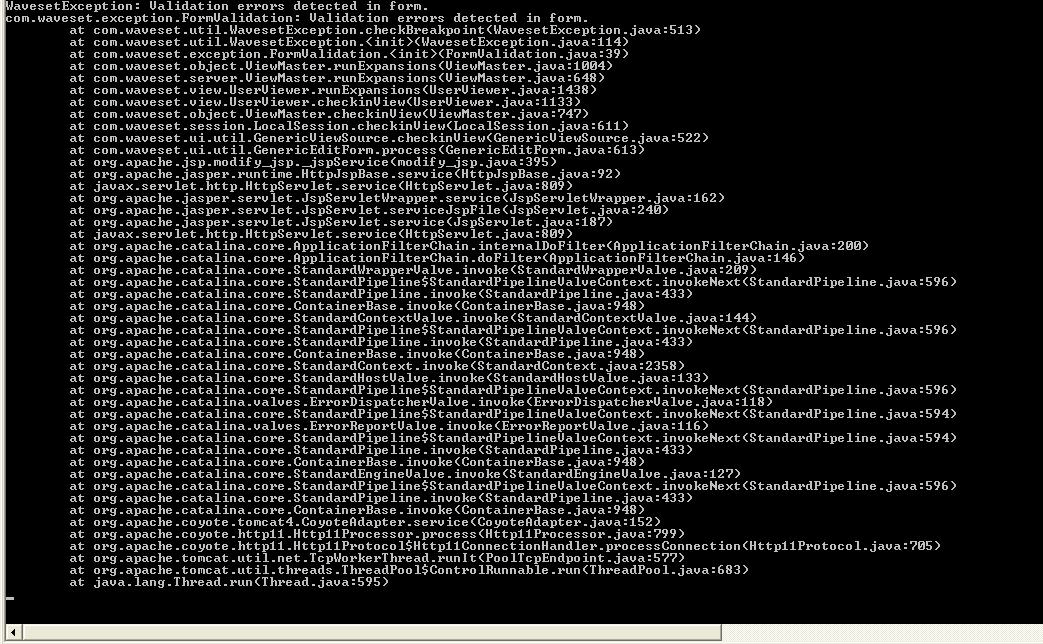
Tracing Exceptions
Exception logs are stack traces that you can view from the Identity Manager Debug pages or from the config/Waveset.properties file. Trace data does not include all exceptions by default, but exception logging can be an important and informative troubleshooting tool.
Use one of the following methods to enable exception logging:
- Open the Waveset Properties page (debug/Show_WSProp.jsp) in the Identity Manager Administrator interface. Locate the exception.trace key and change the Value to true.
- Open the config/Waveset.properties file in a text editor, and change the exception.trace key value to true. The following figure shows an example exception trace.
Figure 2-2 Exception Trace Example
Identity Manager sends exception logs to stdout on the web application instance, which is often the application server console.
Note
When you are finished, disable exception logging to stop unnecessary output to the application server logs. To disable exception logging, set the exception.trace key value back to false.
Tracing Forms
You can enable tracing to troubleshoot edited forms and to check for expression statement errors within your form fields.
Use either of the following methods to enable tracing:
Identity Manager reports any problems with form expression syntax to standard output.
Global XPRESS tracing might also be helpful while you are developing and updating forms and form processes. Although Global XPRESS tracing produces a large amount of output that affects system performance, this tracing method shows XPRESS output and might expose where problems are happening in your form.
For more information, see
Tracing Global XPRESS
While not generally recommended, you can use global XPRESS tracing to trace any and all XPRESS code, wherever the code is located. For example, you can trace XPRESS code in forms, views, and workflows. The resulting trace shows XPRESS output that can expose potential problems.
Use the following steps to enable global XPRESS tracing:
- Open a command window.
- Change directories to config/Waveset.properties in the default Identity Manager installation directory.
- Open the config/Waveset.properties file and edit the xpress.trace line to read:
xpress.trace=true
- Save the Waveset.properties file.
- Restart your application server or reload the Waveset.properties file from the Identity Manager debug pages.
- Replicate the XPRESS trace output to a file by adding this line to the Waveset.properties file:
xpress.traceFile=FileName.txt
XPRESS tracing is written to the JVM standard output.
Tracing PasswordSync
This section describes how to enable tracing for PasswordSync and how to configure tracing in Direct access or JMS modes.
To Enable Trace for PasswordSync
You can use the following methods to configure tracing for Identity Manager’s PasswordSync feature:
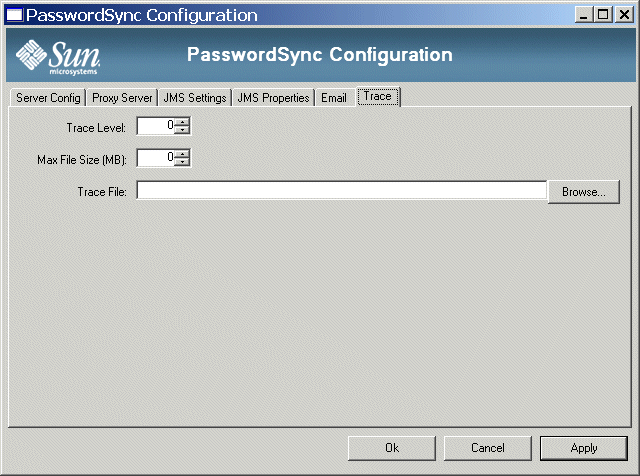
Using the PasswordSync Configuration Tool
This section describes how to configure tracing from the PasswordSync Configuration tool Trace tab.
The following figure shows the PasswordSync Configuration tool Trace tab.
Figure 2-3 Trace Tab in the PasswordSync Configuration Tool
When the trace file exceeds the size specified in the Max File Size (MB) field, PasswordSync starts a new trace file and appends .bk to the old trace file name. For example, if your trace level is set to 100 Mbytes, and your trace file writes to C:\logs\pwicsvc.log, when the trace file exceeds 100 Mbytes PasswordSync renames the file to C:\logs\pwicsvc.log.bk. PasswordSync then creates a new C:\logs\pwicsvc.log file where new trace file messages are written.
Editing the Registry Keys
To enable additional PasswordSync configuration settings, edit the following PasswordSync registry keys using the PasswordSync configuration tool.
Note
Using PasswordSync configuration tool is the safest method for editing PasswordSync registry keys. Editing these keys directly in the Windows Registry is discouraged.
Table 2-2 Registry Keys
Key Name
Type
Description
allowInvalidCerts
REG_DWORD
If this registry key is set, the client tolerates expired certificates and certificates that have an invalid CN or hostname.
You might find this setting useful when debugging test environments in which most certificates are produced from invalid certificate authorities (CAs).
These settings only apply if SSL is being used.
The default is 0.
If set to 1, this key sets the following flags on the .NET client:
dumpFilebase
REG_SZ
Enables Windows to generate a dump file if the PasswordSync DLL displays an exception.
Set the registry key to the fully qualified directory path where you want to write the memory dump. For example: c:\temp
Set the registry value to write the memory dump each time Identity Manager catches an exception during password processing.
Note: On Windows 2000 server (any service pack), you also must install in the configured directory DbgHelp.dll, which is available from Microsoft. The minimum release version for the DbgHelp.dll file must be 5.1. Download the DbgHelp.dll file here:
http://www.microsoft.com/whdc/DevTools/Debugging/default.mspx
If DbgHelp.dll is not installed, no dump files will be generated on Windows 2000.
The format for dump file names is
lhpwic-YYYYMMDD-HHmm-xxxxx.dmp
In this name, YYYYMMDD will be the date of the dump, HHmm is the time of the dump (24-hour clock), and xxxxx is the thread number of the application.
You must manually remove dump files! Dump files range in size from 20 MB to more than 100 MB, depending on the size of the Windows Local Security Authority Subsystem (LSASS) process. Over time, systems with limited disk space could fill up if these dump files are not removed.
installdir
REG_SZ
The directory where the PasswordSync application is installed.
The PasswordSync registry keys are located in the following location:
HKEY_LOCAL_MACHINE\SOFTWARE\Waveset\Lighthouse\PasswordSync
Other keys are present in this location.
To Collect Logs for the Different Modes
PasswordSync trace logs are the same, whether you are using a direct access mode or JMS mode configuration. However, these trace logs might only provide partial information. You must configure different classes for each configuration to collect logs on the server side, as described in the following sections.
Tracing in Direct Mode
When using PasswordSync with a direct access mode configuration, the trace logs show failures, but not all logged failures are real failures. For example, in some circumstances the view check-in takes a long time, which shows as a failure in the log. You must trace on the server side to see this information.
In Direct mode, PasswordSync talks to the servlet that generates the view to be checked into the repository. You can trace the com.waveset.rpc.GenericMessageHandler class at level 4 to view all phases of password synchronization — from receiving the password change to the response generated and returned to the servlet. Level 4 is the only level that supplies enough detail for troubleshooting.
Tracing in JMS Mode
When using PasswordSync with a JMS mode configuration, the logs only show successful or failed deliveries to the JMS server. From this point on, you must rely on server side logs. JMS tracing is a little more complex.
You can trace the com.waveset.rpc.PasswordSyncHandler class at level 4 to convert the messages generated by the PasswordSync dll into a JMS message and add those messages to the JMS queue. Limited tracing is available in this class, and only level 4 provides enough information to help with troubleshooting.
If PasswordSync successfully delivers the JMS message to the JMS queue, the tracing will not help you find the cause of a problem. The next, and final step is to trace the JMS adapter. See the Identity Manager Resources Reference for instructions.
Tracing Identity Manager Service Provider Delegated Administration
Enabling Identity Manager tracing at Method/Class Level 2 for the following classes allows you to trace authorization flows when listing or accessing Identity Manager Service Provider (Service Provider) users and when AdminRoles are dynamically assigned when Service Provider users log in.
- Trace com.sun.idm.idmx.view.IDMXBrowseViewer when searching for Service Provider users.
- Trace com.sun.idm.idmx.view.IDMXUserViewer when creating, editing, or deleting Service Provider users.
- Trace com.sun.idm.idmx.api.IDMXServerUtils when using both of the preceding classes.
- Trace com.waveset.security.authn.WSSPELoginModule when you are logging in as a Service Provider user.
Note
You configure Service Provider tracing from the Identity Manager debug pages. If necessary, review Tracing the Identity Manager Server for instructions.
Tracing Reconciliation
If you are having problems with a reconciliation task, you can use the standard tracing facility on com.waveset.task.Reconciler to trace the Reconciler.
Use either of the following methods to enable tracing:
You can also enable tracing from the System Settings page and trace the following reconciliation methods, at the Method/Class trace Levels noted, to view useful debugging information:
Tracing the setRepo Command
If you see errors while you are using the setRepo command to configure the Identity Manager repository, use the following flags to isolate and debug the problem:
Identity Manager sends output from the setRepo command to the default $WSHOME/config/WSTrace.log file.
Tracing SPML
This section describes methods for enabling trace for SPML version 1.0 and SPML version 2.0.
To Enable Tracing for SPML 1.0
SPML 1.0 provides the following options for turning on trace output so you can log Identity Manager’s SPML traffic and diagnose problems.
Method 1: Enable the setTrace Method
You can use the setTrace method, provided by the SpmlClient and LighthouseClient classes, to enable tracing for SPML 1.0.
When you enable this setTrace method, the XML for the request sent by the client and the XML for the response received from the server are printed to the client console as they are sent and received.
The setTrace method takes a Boolean argument. For example
SpmlClient client = new SpmlClient();
client.setURL("http://localhost:8080/idm/spml");
client.setTrace(true);
Method 2: Pass the trace Operational Attribute
You can enable tracing for an individual SPML RPC request by passing a trace operational attribute to the RPC request on the server side.
Tracing occurs during servlet initialization, and it controls how information is output for the RPC traffic of a servlet handling SPML version 1.0 requests. For example, the trace prints the raw XML that is sent back and forth on whatever the System.out is for that servlet (which is a function of the Application container). For example:
When you use the trace attribute, how the attribute affects server operation is vendor-specific. Currently, Identity Manager prints the raw request and response data to the server console, which is useful if the client application is not associated with a console window.
For more information consult your OpenSPML Toolkit product documentation.
To Enable Tracing for SPML 2.0
SPML 2.0 provides the following options for turning on trace output so you can log Identity Manager’s SPML traffic and diagnose problems.
Method 1: Initializing the SOAP rpcrouter Servlet
You can enable tracing by initializing the SOAP rpcrouter servlet, which controls the output of RPC traffic information for the servlet handling SPML requests. The rpcrouter servlet takes an <init parameter> that enables SOAP tracing on the server side. The servlet’s initialization logic checks for a trace configuration parameter and then, if the parameter’s value is true, prints the raw request and response data to the console.
For example, servlet prints the raw XML that is sent back and forth to whatever System.out has been specified for that servlet. (Where System.out is a function of the application container.)
Note
The SOAP rpcrouter servlet is a third-party, open source org.openspml.server.SOAPRouter class from the SPML organization. For more information about this servlet, refer to your OpenSPML Toolkit documentation.
Method 2: Pass the trace Operational Attribute
As for SPML 1.0, you can enable tracing for an individual SPML RPC request by passing a trace operational attribute to the RPC request on the server side.
Tracing controls what information is output for the RPC traffic of a servlet handling SPML 2.0 requests.
When you use the trace attribute, how that attribute affects server operation is vendor-specific. Currently, Identity Manager prints the raw XML request and response data to the server console, which is useful if the client application is not associated with a console window.
For more information consult your OpenSPML toolkit product documentation.
Tracing the Task Scheduler
If a Scheduler task is having problems, you can use the standard tracing facility on com.waveset.task.Scheduler to trace the task scheduler. The output shows detailed information about task scheduling.
To enable tracing,
- Open a browser and log in to the Administrator interface.
- Select Configure > Servers.
- When the Configure Servers page displays, click the server name in the Server column to edit the settings.
- On the Edit Server Settings page, click the Scheduler tab.
- Select the Tracing Enabled box to activate Scheduler debug tracing and write the results to stdout.
- Save your changes.
Note
- In a clustered environment, tracing occurs on each instance.
- See Tracing the Identity Manager Server for more information about defining and editing trace configuration objects, and about viewing trace files.
Tracing Workflows
Enabling workflow tracing can help you resolve problems with workflow activities and understand the workflow process.
Note
- In a clustered environment, tracing occurs on each instance.
- To debug workflows in a multiple server deployment environment, consider shutting down all but one server. If all servers are running, you cannot determine which server in the environment is executing the workflow, which causes troubleshooting problems.
To Enable Tracing for Workflows
Use the following steps to enable workflow tracing:
- Open a browser and log in to the Identity Manager Administrator interface.
- From the System Setting page, choose Configuration from the List Objects Type menu.
- Click the List Objects button.
- When the List Objects of type: Configuration page displays, scroll down the list of objects to locate the System Configuration object and click the edit link.
- When the Checkout Object: Configuration, #ID#CONFIGURATION:SYSTEMCONFIGURATION page displays, you can edit any of the following workflow options in the SystemConfiguration object:
Note
Typically, you enable only one option, but it is possible to enable more than one option at a time.
These attributes are not dependent on each other. You can turn on one type of trace while the other types are turned off.
- Specify workflow.consoleTrace=true to redirect workflow trace messages to the application server console, which can be useful when workflows are terminating due to a fatal exception because this attribute prints more trace output than workflow.fileTrace. (Default value is false.)
- Specify workflow.fileTrace=PathtoFile to redirect workflow trace messages to a file that is easy to read. This attribute does not have a value by default.
<Attribute name=’fileTrace’/>
Add a value tag to the workflow.fileTrace attribute and, using Unix-style forward slashes, enter the path to a log file. Identity Manager stores relative pathnames relative to the application server’s installation directory. For example,
On Windows:
<Attribute name='fileTrace' value='C:\mydir\workflow.txt'/>
On Solaris/Unix:
<Attribute name='fileTrace' value='/mydir/workflow.txt'/>
- Specify workflow.traceLevel=tracingLevel to specify the level of workflow tracing you want to see.
- Specify workflow.Trace=true to trace workflow processing. You must restart the application server to start tracing with this option. Identity Manager stores the trace results in the task’s WavesetResult object. Use this tracing option when file system access is unavailable. (Default value is false.)
- Trace messages in the task’s WavesetResult. (Default value is 1.)
Note
Specifying workflow.Trace=true appends trace messages into one long, unformatted string that is difficult to read. Use this option only when you do not have access to the file system.
- Save the SystemConfiguration object.
- Restart your application server, or reload the SystemConfiguration object from the Identity Manager debug area.
To Enable Tracing for a Designated Workflow
Use one of the following methods to enable tracing for a designated workflow:
- Editing the WFProcess definition: To enable trace unconditionally for a particular process, edit the XML of the TaskDefinition object by adding the trace='console' attribute to the <WFProcess> element.
- Editing the workflow variable: Gives you more control over the timing of tracing by using a workflow variable. The workflow engine will look for a top-level workflow variable named trace.
The following example shows how to trace a workflow variable:
Code Example 2-1 Tracing a Workflow Variable
<Variable name='trace'>
<cond><eq><ref>accountId</ref><s>jfaux</s></eq>
<s>workflowTrace.txt</s>
</cond>
</Variable>
Locating Version Information
You can use one of the following methods to get information about the Identity Manager version you are currently using:
Use the Identity Manager System Properties page (/debug/SysInfo.jsp) to get information about which JVM versions, and other system software versions, you are currently using.
Tracing the Identity Manager Gateway Objects and ActivitiesThis section describes how to trace objects and activities in Sun Identity Manager Gateway, the information is organized as follows:
Note
- When viewing or editing a Gateway trace file, use Notepad to avoid file restrictions.
- When you start the Gateway, the program appends new trace entries to the trace file instead of deleting entries. To locate the point at which the Gateway trace entries begin, look for a Gateway version string.
- The Gateway version is output in the trace automatically when you start the Gateway. You can also type gateway -v from the command line to get the version.
How to Configure Tracing
You can enable tracing from the Gateway Debug page (Gateway.jsp) or from the command line to debug problems with Windows accounts on Identity Manager.
Instructions are provided in the following sections:
From the Gateway Debug Page
Enable tracing from the Gateway Debug page (Gateway.jsp) if you cannot access the Gateway. You can specify and retrieve Gateway trace files from this debug page.
Use the following steps to enable tracing:
- Log in to the Identity Manager Administrator interface.
- Type the following URL in to your browser to open the Gateway Debug page:
http://host:port/idm/debug/Gateway.jsp
- Choose a resource to trace from the Gateway Resource list.
- Click the following buttons to modify the existing settings:
- Get Version: Returns the Gateway version and the operating system of the machine on which you are running the Gateway.
- Get Trace File: Returns the contents of the trace file.
- Get Trace Parameters: Returns the path of the trace file, the trace level, and the maximum size of the trace file.
- Set Trace Parameters: See To Create a New Trace Configuration Object for information about these options.
- Get Loaded Modules: Returns the load addresses of modules (DLLs) being used by the Gateway.
From the Command Line
Enabling trace from the command line is useful if you want a wider range of options.
To enable tracing:
- Open a command window.
- Start the Gateway, specifying the necessary trace command arguments.
See the following table for a description of these command line arguments.
Table 2-4 Gateway Tracing Command Line Arguments
Argument
Description
-f
Specify the path to the trace file
-l
Specify the level of tracing:
- Level 0: Disables tracing. (Default)
- Level 1: Traces the flow of control between components and generally defines a low-detail trace point that includes entry and exit from high-level functional methods.
- Level 2: Generally defines a medium-detail trace point that includes entry and exit from every method, and information and data trace points for high-level functional methods. Level 2 adds the flow of control within each component, major decision points, and items of information.
- Level 3: Generally defines a high-detail trace point that includes entry and exit from every method, information and data trace points for high-level functional methods, and significant subroutines. Level 3 adds lower-level decision points and items of information.
- Level 4: Generally defines a hyper-detail trace point that includes everything traced in the other trace levels. Level 4 traces at a very low level and provides a level of detail that is seldom needed but might be useful in characterizing complex behaviors of some components. NOTE: Not all components support level 4.
Trivial methods, such as getters and setters, generally do not have entry or exit trace points because they add overhead.
-m
Specify the maximum trace file size in kilobytes
When the trace file reaches -m Kbytes, Identity Manager closes the current trace file, deletes any existing back-up files, renames the current trace file to the name specified by the -f argument with .bk appended, and opens a new trace file with the -f argument name.
For example, if you specified -f beeble.trc on the command line, the following two files result after -m Kbytes are recorded:
beeble.trc.bk
beeble.trc
Where beeble.trc contains the most recent traces.
Usage: gateway -f name -l -m
For example:
cd %WSHOME%\bin\winnt
gateway -d -p 11319 -f %CD%\gateway.trc -l 2 -m 500
The preceding invocation starts the Gateway with the following characteristics:
How to Configure Tracing for the PowerShellExecutor.dll Add-On
The PowerShellExecutor.dll is an add-on that implements communication between the gateway and Microsoft PowerShell. The PowerShell is used to manage Exchange Server 2007 accounts. This add-on cannot share tracing facilities with the rest of the gateway and provides a similar stand-alone tracing facility as the rest of the gateway.
The trace configuration for the PowerShellExecutor is stored in the same registry key as the other gateway registry keys:
HKEY_LOCAL_MACHINE\Software\Waveset\Lighthouse\Gateway
This base key is created when you configure tracing through the Identity Manager debug pages or when you start the gateway with trace command arguments.
On shut down, the gateway writes the current PowerShellExecutor settings for the tracing to the registry. These settings include:
Content: File name for the trace output (registry type REG_SZ)
Default ""
Name of the trace file to generate for the PowerShellExecutor tracing.
Where the name:The full path, except the file, provided in the traceFileName must exist.
If configured, log rotation adds a timestamp, in the form "yyyyMMddHHmmss," to the configured filename after rotation, when the file is no longer active.
Content: Number of trace files (registry type REG_DWORD)
Default: 2
Minimum: 1
This setting controls the number of trace files to keep on the system. Setting the maximum number of files to keep to 1, causes the file to be overwritten when the maximum size is reached. The oldest file, based on last write time, is removed when the maximum number of files is reached.
All trace settings are re-read from the registry based on this timeout value. In a production environment, consider setting this value to a large value, such as 24 hours, to minimize overhead.
How to Capture Dr. Watson Logs
If the Gateway encounters a serious problem and exits abnormally, you can send the resulting Dr. Watson logs to Sun Support for analysis.
To capture a Dr. Watson log:
- Open the Windows Event Viewer.
- Open the application log.
- Look for an event with DrWatson source.
- Open the event to view detailed information.
- Ensure that the Bytes option is selected for Data.
- Right-click in the display dialog and choose Select all from the menu.
- Type Ctrl-C to copy the information.
- Paste the information into Notepad and save the file.
- Send the file in an email to Sun Support with a detailed description of the problem. Be sure to indicate which version of the Identity Manager Gateway you are running.
Troubleshooting and Fixing Common ProblemsUse the information provided in the following sections to help diagnose and fix problems you might encounter as you work with Identity Manager:
Note
For additional troubleshooting information, including the Identity Manager FAQ, visit the following location:
https://sharespace.sun.com/gm/document-1.26.2296/IdM_FAQ.html?
You must sign up for a Share Space ID to access information provided on this site.
Working with Debugging Tools
You can use several different debugging tools to help identify and fix problems in your Identity Manager deployment. These tools include:
Identity Manager Debug Pages
Note
You must have the Debug capability to access and execute operations from the Identity Manager Debug pages. Administrators and the Configurator are assigned this capability by default.
If you do not have the Debug capability, an error message results.
To access individual Identity Manager debug pages:
From this page, you can enable or disable tracing for various Identity Manager activities and objects and use the information displayed on these pages to troubleshoot problems in your deployment.
Some Debug pages are not linked to the System Settings page, and you must type the page’s .jsp file name into the browser to open the page, as follows:
http://host:port/idm/debug/pageName.jsp
Where pageName.jsp is the particular Debug page you want to open.
The following table describes the most commonly used Debug pages and their actual .jsp file names.
Table 2-5 Identity Manager Debug Pages
Page Name
Use This Page to
Control Timings (callTimer.jsp)
Collect and view call timer statistics for different methods. You can use this information to track bottlenecks to specific methods and invoked APIs. You can also use options on the Call Timings page to import or export call timer metrics.
- How long to fetch initial User view (with no resources) during a scan
- How long to refresh initial User view (including resources) during a scan
- How long to evaluate policy on the User view
- How long each user scan takes (including User view fetch, policy evaluation, and so forth)
- How long to fetch a list of users for an access scan
- How long to evaluate the attestation rule in access review
Note: Call timing statistics are only collected while trace is enabled.
Edit Trace Configuration (Show_Trace.jsp)
Enable and configure trace settings for the Java classes provided with your Identity Manager installation. You can specify
- Which methods, classes, or packages to trace and the level of trace.
- Whether to send trace information to a file or to standard output and how dates and times are formatted in the trace output file.
- Maximum number of trace files to store and the maximum size of each file.
- Specify the maximum number of methods to be cached.
- Indicate how to write data to the trace file and whether to write data to the trace file as data is generated or to queue and then write the data to a file.
Host Connection Pool (Show_ConnectionPools.jsp)
View connection pool statistics (if you are not using a data source), including pool version, how many connections were created, how many are active, how many connections are in the pool, how many requests were serviced from the pool, and how many connections were corrupted.
You can also use the Host Connection Pool page to view a summary of the connection pools used to manage connections to the Gateway. You can use this information to investigate low-memory conditions.
List Cache Cleared (Clear_XMLParser_Cache.jsp)
Clear recently used XML parsers from the cache and investigate low memory conditions.
Method Timings (Show_Timings.jsp)
Detect and assess hotspots at a method level. Use this page to gather information from Identity Manager methods, including:
Object Size Summary (Show_Sizes.jsp)
Detect problematically large objects that can affect your system. This page shows the size of objects (in characters) stored in the repository, including the objects’ total combined size, average size, maximum size, and minimum size. Click entries in the Type column to view the ID, name, and size of the largest configuration objects in the repository.
Provisioning Threads for Administrator Configurator (Show_Provisioning.jsp)
View a summary of provisioning threads in use by the system (a subset of the information available in Show_Threads.jsp).
System Cache Summary (Show_CacheSummary.jsp)
View the following information to investigate low-memory conditions:
System Memory Summary (Show_Memory.jsp)
View how much total and free memory is available (in MB) when you are using memory-intensive functionality, such as reconciliation, to help determine whether there is sufficient memory allocated to the JVM. You can also use this page to launch garbage collection or to clear unused memory in the JVM for investigating heap usage.
System Properties (SysInfo.jsp)
View information about your environment.
System Threads (Show_Threads.jsp)
View which processes are running to verify that automated processes are running. Includes information about the process type, process name, priority, if the process is a daemon, and if the process is still alive (running).
User Session Pool Cleared (Clear_User_Cache.jsp)
Use the Session Pool Clearer page to investigate low memory conditions.
Waveset Properties (Show_WSProp.jsp)
View and temporarily edit properties in the Waveset.properties file. Edited property settings remain in effect only until the next server restart.
XML Resource Adapter Caches Flushed and Cleared (Clear_XMLResourceAdapter_Cache.jsp)
Clear test XML resource adapters from the cache and use to investigate low memory conditions.
For a more-complete list of debug pages, open a command window and list the contents of the idm/debug directory.
See Working with Identity Manager Debug Pages for more information about these Debug pages.
Identity Manager IDE
The Sun™ Identity Manager Integrated Development Environment (Identity Manager IDE) is Java application that enables you to view, customize, and debug Sun™ Identity Manager (Identity Manager) objects in your deployment.
Specifically, the Identity Manager IDE provides a graphical Debugger that you can use to debug Identity Manager forms, rules, and workflows. You can use this Debugger to set breakpoints and watches, step through code, examine and modify variables, examine classes and the callstack, follow threads, and run multiple sessions.
Instructions for installing and configuring the Identity Manager Integrated Development Environment (Identity Manager IDE) are now provided on https://identitymanageride.dev.java.net.
Identity Manager System Monitoring
You can configure Identity Manager system monitoring to track system events. System monitoring collects and aggregates statistics at various levels to present a real-time view of system events, based on your specifications.
Viewing this information in dashboard graphs enables you to quickly assess system resources, view abnormalities, understand historical performance trends, and interactively isolate problems before looking at audit logs. Although dashboards do not provide as much detail as audit logs, dashboards can indicate where to look for problems in the logs.
For more information about dashboards and system monitoring, see the “Reporting” chapter in Identity Manager Administration.
Adapter Logs
Adapter logs capture information about the adapter that is currently processing. You can use this information to monitor the adapter’s progress and to diagnose and debug adapter problems.
Note
You must enable tracing and identify the methods for which tracing is requested before any logging can occur. Also, your customized adapter must include calls that create log entries for new methods.
Nearly every adapter has its own log file, path, and log level. You can specify the level of detail captured by the adapter log, along with these other values in the Logging section of the Synchronization Policy for the appropriate Identity Manager or Service Provider user type.
For more information about using adapter log files as s debugging tool, see Troubleshooting Adapters.
DTrace
DTrace is a comprehensive, dynamic tracing framework for the Solaris operating environment. DTrace provides more than 30,000 probes into your production system and integrates user- and kernel-level tracing. You can use DTrace to monitor JVM activity. This facility also allows you to use the D language (similar to C or awk) to trace arbitrary data and expressions.
JConsole
The Java Monitoring and Management Console (JConsole) is a Java Management Extension (JMX) technology-compliant graphical management tool bundled with JDK 5 (and later). JConsole connects to a running JVM and gathers information from the JVM MBeans in the connected JMX agent.
For example, you can use JConsole to
- Detect low memory
- Enable or disable garbage collection
- Enable or disable verbose tracing
- Detect deadlocks
- Control Identity Manager log levels
- Access information about operating systems resources (Sun's platform extension).
- Monitor and manage MBeans
- View information about the JVM and monitored values, threads running on the application, and class loading
Note
For more information about JConsole, see the article titled, “Using JConsole to Monitor Applications.” You can view this article from the following location:
http://java.sun.com/developer/technicalArticles/J2SE/jconsole.html
Debugging Errors Displayed in the Browser
If a red error message displays in the Identity Manager interface after you have performed an action, you might be able to view more complete information and further analyze the error by viewing and saving the page source.
If you still need help resolving the problem,
Troubleshooting Adapters
To troubleshoot an adapter, review the adapter’s log file. Almost all adapters write their resource settings to a log file, and you can use this information to confirm that the adapter started and that all setting changes have been saved.
Note
You must enable tracing and identify the methods for which tracing is requested before any logging can occur. Also, your custom adapter must include calls that create log entries for new methods.
If necessary, review Tracing the Identity Manager Server for instructions about how to enable tracing.
Most adapter log files are located in the $WSHOME/config directory and they are named WSTrace1.log.
Active Sync-enabled adapters that make log calls to the ActiveSyncUtil instance create a log file or set of log files in a directory specified by the Log File Path resource attribute. Be sure to check these log files for additional Active Sync-related log entries.
The information in this section is organized as follows:
To Debug an Adapter
Follow these general steps to debug your custom adapter.
- Create a test program for your adapter, and be sure this Java file performs the following basic functions:
- Set an appropriate logging level for debugging.
For example, for the first debugging pass, increase the logging level to 4 (maximum debugging output), set the log file path, and specify a maximum file size.
When you start the adapter, all of the resource settings are written to the log file. You can use this information to validate that the adapter started and that all setting changes were saved.
- Compile and test your adapter.
- To compile the test program, open a command window and enter the javac -d . test/filename.java command. This command creates the class file in the appropriate com/waveset/adapter/test directory.
- To test your new adapter using this class file, be sure that your compiled adapter is in the com/waveset/adapter directory and use the following command to run the adapter:
java –D waveset.home=path com.waveset.adapter.test.MyResourceAdapter
- Create an HTML help file for your resource.
- (For Active Sync-enabled adapters only) To reset synchronization on the last resource, delete the XmlData SYNC_resourceName object.
- Read the error log and modify the adapter.
- Reset the logging level.
For example, specifying Level 2 debugging yields information about the adapter settings and any errors, but limits the amount of log detail to a manageable level.
- Before starting Identity Manager, you must identify the new adapter in the $WSHOME/config/Waveset.properties file by placing the adapter name under the resource.adapters entry or Identity Manager cannot recognize the adapter.
- Install your adapter and its associated help file into Identity Manager.
Note
Before Identity Manager can recognize an instance of a new adapter in the display, you must create a new resource of that type from the List Resource page.
From this page, select New > new adapter and use the Resource Wizard to create the new adapter.
- Use Identity Manager to create a resource and a user on that resource.
Tip
When troubleshooting an Active Sync-enabled adapter, if you edit the XmlData SYNC_resourceName object to remove the MapEntry for the Active Sync synchronization process from the Debug page, the adapter starts over from the first detected change.
If you used the IAPI event, you must set the Property() method to store synchronization state for the resource, such as a last change processed value. Setting this method is very useful for troubleshooting adapters. You can set the adapter to run and ignore past changes. Subsequently, you can modify the adapter and see your change results in the adapter log file.
To Debug LoginConfig Changes
To debug LoginConfig-related changes to your adapter, you must
- Enable trace for the selected files and trace the following classes at Method/Class Level 1 trace:
- Test Single Sign-On (SSO) pass-through authentication login through Telnet as follows:
- After correctly configuring the SSO login module, telnet directly to the http port and send an http request to login.jsp.
- Paste the following request, which contains an SSO login module that looks for the sm_user HTTP header, into your telnet session:
HEAD /idm/login.jsp HTTP/1.0
Accept: text/plain,text/html,*/*
Accept-Language: en-us
Accept-Encoding: gzip, deflate
User-Agent: Mozilla/4.0
Host: LOCALHOST
sm_user: ConfiguratorA trace displays to indicate that your user has logged in correctly. For example,
Code Example 2-2 Sample Output
2003.07.08 14:14:16.837 Thread-7 WSResourceLoginModule#checkForAuthenticatedResourceInfo()
Found authenticated resource accountId, 'Configurator@Netegrity SiteMinder' on Identity Manager user 'Configurator'. null null 2003.07.08 14:14:16.837 Thread-7
WSResourceLoginModule#checkForAuthenticatedResourceInfo()
Exit null null 2003.07.08 14:14:16.837 Thread-7 WSResourceLoginModule#login()
Exit, return code = true null null 2003.07.08 14:14:16.847
Thread-7 LocalSession#login() Login succeeded via Netegrity SiteMinder null null
2003.07.08 14:14:16.847 Thread-7 LocalSession#login() Overall authentication
succeeded null null 2003.07.08 14:14:16.897 Thread-7 LocalSession#checkIfUserDisabled() Entry null null 2003.07.08 14:14:16.897 Thread-7 LocalSession#checkIfUserDisabled() Exit null null 2003.07.08 14:14:16.927 Thread-7 LocalSession#login() Exit null nullTo Debug Adapter Connection Problems
This section describes methods for debugging some common adapter connection problems. The information is organized as follows:
Note
Generally, you can identify adapter connection issues by tracing the adapter class com.waveset.adapter.adapter_classname. For example:
com.waveset.adapter.ADSIResourceAdapter
If necessary, review instructions for enabling trace in Tracing the Identity Manager Server.
Adapter Authentication Problems
Some common authentication problems include
If authentication succeeds for the resource adapter, but an exception occurs indicating that no Identity Manager user could be found with a matching resource account ID, be sure that the resource accountId associated with the user is the same as the accountId returned by your resource adapter’s authenticate method.
To verify the Identity Manager user’s resource accountId, review Identity Manager’s Edit Trace Configuration page (debug/Show_Trace.jsp). If a mismatch exists, change the content of the name being returned by your authenticate method or change your resource’s ID template. The template must generate a resource accountId that matches the accountId being returned by the authenticate method.
Active Sync Adapter Problems
The most common problems with custom Active Sync adapters are form-related. These errors generally occur because you have not provided necessary information, such as password or email information, in a required field.
Identity Manager prints form validation errors to the adapter log after the final XML of the view. For example,
20030414 17:23:57.469: result from submit (blank means no errors):
20030414 17:23:57.509: Validation error: missing required field password
Identity Manager also prints all messages to the adapter log. These messages include account creation and update times, adapter errors, and a summary of the schema map data.
Active Sync resource adapters store information about the last change processed in the SYNC.resourceName XMLData object.
Domino Gateway Adapter Problems
Following are some common Domino gateway and adapter configuration errors and instructions for fixing these problems:
- If an error message states the 'New Domino Gateway' resource is not accessible and the connection is refused, try stopping and restarting the Identity Manager Gateway.
- If an error message states no ID file name is specified and the path to the userID file is set incorrectly, specify a target location for the userID file and edit the resource adapter to set this attribute to a correct path. Typically, the target location for the userID file is the directory into which you installed the Gateway.
- If an error message states you are not authorized to use the server, you have not set the correct access permissions for the ID file. Specify the correct permissions for this file and retry.
Mainframe Host Adapter Problems
When RACF, ACF2, or TopSecret host adapters fail to reuse or cache connections, users are forced to log in frequently, which negatively impacts performance. Generally, the cache timeout setting causes this problem.
To check the cache timeout setting, trace Identity Manager’s adapter connection pool as follows:
- From Identity Manager’s Edit Configuration Object page, trace the com.waveset.adapter.HostConnPool#reapConnections method at level 4.
If necessary, review instructions for enabling trace in Tracing the Identity Manager Server.
- Capture trace for a sufficiently long period of time (at least 30-60 minutes), while the adapter performs operations.
- Review the trace output in the application server stdout or trace file and look for Info reaping connection entries.
If this entry occurs more than once every 30 minutes, you have a good indication that connections are being timed out unnecessarily.
To resolve this problem, increase the Idle Timeout resource attribute value to prevent connections from being reaped too frequently. The Idle Timeout attribute controls how long a connection remains idle before the connection is logged out. The default value is 90 seconds, which causes new log ins to occur frequently.
Ideally, specify a value that is greater than the average idle time for your deployment environment. For example, adjust the Idle Timeout attribute to 30 minutes (1800000 milliseconds) or more.
PeopleSoft Adapter Problems
This section describes methods for troubleshooting the following PeopleSoft adapter problems:
- Executing a “Test Connection” from the PeopleSoft resource adapter causes a failure with a generic exception.
- Open the Waveset.properties file and set exception.trace=true.
- Retry the test connection, and if you see the following results:
FormState: expansion complete
java.lang.NullPointerException: PSProperties not loaded from file
WavesetException:
WavesetException:
==> com.waveset.util.WavesetException:
FormState: derivation
- Log in to the PeopleSoft web interface to verify that you are using the correct UID and password.
- The PeopleSoft application server logs are not showing log-in attempts.
This problem generally occurs because you did not use the psjoa.jar file supplied with the PeopleSoft installation to which you are connecting. (See the Identity Manager Resources Reference for more information about the PeopleSoft resource adapter).
SAP Adapter Problems
This section contains information about debugging some common problems with SAP, SAP Enterprise Portal, or SAP HR Active Sync adapters.
The sapjco.jar command shows which version of the SAP Java Connector (JCO) is installed and whether the adapter is installed correctly. The command also returns the JNI platform-dependent and the RFC libraries that communicate with the SAP system.
If these platform-dependent libraries are not found, consult the SAP documentation to find out how to correctly install the SAP Java Connector.
Unix Adapter Problems
This section contains information about debugging some common problems with Unix adapters.
- If you see timeout errors when provisioning to a UNIX resource adapter, you can determine where the provisioning process is failing by tracing the com.waveset.adapter.ScriptedConnection method at Method/Class level 4, which gives you the maximum logging output.
- When becoming root to perform administrative commands, if the resource adapter executes a su root command instead of a su - root command, the environment does not inherit any of the custom environment variables defined for root; including any custom prompts (environment variable of PS1).
Troubleshooting Auditor
You can trace the following methods to troubleshoot issues with Identity Auditor:
In addition, you can set the following hidden flags by modifying Forms or TaskDefinitions:
- Audit Policy Scan Task - maxThreads (int): Number of concurrent threads used. (Defaults to 5)
- Audit Policy Scan Task - userLock (int): Time (in milliseconds) to wait to acquire a lock on the User object. (Defaults to 5000)
- Audit Policy Scan Task - scanDelay (int): Time (in milliseconds) to delay between launching a new scan thread. (Defaults to 0, no delay)
- Audit Policy Scan Task - clearuserLocks (boolean): If true, the scanner attempts to clear the user lock before scanning.
In addition, the Show Timings page (/debug/callTimer.jsp) provides the following information:
- How long it takes to fetch the initial User view, with no resources, during the scan
- How long it takes to refresh the User view, including resources, during the scan
- How long it takes to evaluate the policy on the User view
- How long each user scan takes, including User view fetch, policy evaluation, and so forth
- How long it takes to fetch a list of users for access review
- How long it takes to evaluate the attestation rule in access review
Troubleshooting Form Problems
This section describes some common form problems and how to fix these problems.
com.waveset.util.WavesetException: Maximum form stack depth exceeded
You are limited to pushing 1000 hard-coded elements on the stack and you exceeded this limit.
If you added a check to detect Field containers that include a FieldRef or Field that matches the name of the Field container, you might have inadvertently created a circular reference on the form. To fix this problem, change the FieldRef or Field name.
In this example, the LDAP baseContext resource field is set to dc=test,dc=com and the LDAP groups are listed as dc=test,dc=Com, which causes a problem because LDAP is not case sensitive, but the MultiSelect widget is case-sensitive.
To alleviate this problem, change the baseContext on the LDAP resource to match the case in your LDAP resource dc=test,dc=Com or use the <upcase> XPRESS function to uppercase both the left and right side displays.
Troubleshooting the Gateway
When troubleshooting the Sun Identity Manager Gateway, it is often useful to run the Gateway from the command line. Using command line options allows you to input a wider range of start-up options, which includes starting the Gateway as a normal application instead of a service and running the Gateway on a different port.
Note
You must kill the Identity Manager Gateway as a service before running it from the command line. For example, type
gateway.exe -k
The following table describes the Gateway command line arguments.
Table 2-6 Gateway Command Arguments
Argument
Description
-i
Install this program as an NT service, with specified startup
-r
Remove this program from the Service Manager
-s
Start the service
-k
Kill the service
-t
Set start-up for an existing service
-d
Debug, and run as a regular application
-p
Specify a TCP/IP port number (Default is 9278)
-f
Specify the path to the trace file
-l
Specify the level of tracing (Default is 0, no information)
-m
Specify the maximum trace file size in kilobytes
-v
Display the version
Usage: gateway -i n -r -s -k -t n -d -p n -f name -l n -m n -v
Note
- The -d and -s options are mutually exclusive.
- See From the Command Line for more information about the Gateway tracing levels.
You can also use the Identity Manager Gateway Debug page (debug/Gateway.jsp) to troubleshoot the Gateway. See How to Configure Tracing for more information.
Troubleshooting Java Code Problems
If you have the basic Java programming skills required to work with Identity Manager, you should be able to diagnose and resolve most Java code problems.
However, a fairly common problem occurs where someone opens a connection to the database but does not close the connection properly. If you do not close the connection properly, performance issues result.
Troubleshooting Low Memory Conditions
This section describes tools that you can use to investigate low memory conditions, including:
From the Identity Manager Debug Pages
Note
You must have the Debug capability to access and execute operations from the Identity Manager Debug pages. Administrators and the Configurator are assigned this capability by default.
If you do not have the Debug capability, an error message results.
You can open the following Identity Manager Debug pages from the Administrator interface to monitor how much memory is being used by your system:
- Host Connection Pool page (debug/Show_ConnectionPools.jsp): View a summary of connection pool statistics (if you are not using a data source), including the pool version, how many connections were created, how many are active, how many connections are in the pool, how many requests were serviced from the pool, and how many connections were destroyed.
- List Cache Cleared (debug/Clear_XMLParser_Cache.jsp): Clear the cache of recently used XML parsers.
- Private collection pool (debug/Show_JDBC.jsp): View a summary of the cache of JDBC connections being used by the repository and some resource adapters.
- System Memory Summary page (debug/Show_Memory.jsp): View the used and total memory in the system. You must click the Garbage Collect button to get the most current used memory value.
- System Memory Summary page (debug/Show_Memory2.jsp): View an updated Show_Memory.jsp page that allow you to clear all unused memory in the JVM so you can investigate heap usage.
- User Session Pool Cleared (Clear_User_Cache.jsp): Clear the cached sessions for recently logged in users.
- XML Resource Adapter Caches Flushed and Cleared (Clear_XMLResourceAdapter_Cache.jsp): Clear the cache of the test XML resource adapter.
From JConsole
Use the Java Monitoring and Management Console (JConsole) to detect low memory and deadlocks. JConsole is a Java Management Extension (JMX) technology-compliant graphical management tool that is co-packaged with JDK 5 (and later).
JConsole accesses the memory system, memory pools, and MBeans garbage collector to provide information about memory use such as memory consumption, memory pools, and garbage collection statistics. In addition, You can use JConsole to monitor MBeans for information about current heap memory use and non-heap memory use.
Note
For information about using JConsole to monitor applications that run on the Java platform, see Using JConsole to Monitor Applications. This publication is available from the following web site:
http://java.sun.com/developer/technicalArticles/J2SE/jconsole.html
Troubleshooting PasswordSync Problems
When you are trying to troubleshoot problems with PasswordSync, review the following logs for information:
- PasswordSync Error Logs: PasswordSync writes all failures to the Windows Event Viewer. (For more information about Event Viewer, see Windows’ Help.) The source name for error log entries is PasswordSync.
- PasswordSync Trace Logs: PasswordSync writes all trace logs to the file location specified when you configured tracing. See Using the PasswordSync Configuration Tool.
Some common PasswordSync problems and solutions include
PasswordSync relies on the registry settings when creating a connection from Active Directory to the Identity Manager Server. During startup, PasswordSync reads the registry and processes the settings, but PasswordSync does not perform any checks to see if it can create a connection.
The following example shows a registry entry for a PasswordSync server. The example includes the default registry setting values, but does not show all of the settings used by PasswordSync.
[HKEY_LOCAL_MACHINE\SOFTWARE\Waveset\Lighthouse\PasswordSync]
"clientTimeout"=dword:00000384
"lhuser"="config"
"endpointURL"="http://10.10.10.10:8080/idmboot/servlet/rpcrouter2"
"tracefile"="?"
"tracelevel"=dword:00000000
"proxyPort"="8080"
"securityFlags"=dword:00000000
"requestTimeout"=dword:00007530
"proxyServer"="?"
"lhcred"="rsVtQZpa5Ys="
"soapClientTimeout"=dword:00002710
"installdir"="C:\\Program Files\\Sun\\Identity Manager\\PasswordSync\\"
"allowInvalidCerts"=dword:00000000
"icptFile"="C:\\WINNT\\system32\\lhfiqw.tmp"
"connectionFlags"=dword:00000000
"tracemaxKB"=dword:00002710
If you have not enabled tracing at an appropriate level, PasswordSync does not log connection failures in much detail. To see more detailed trace information, edit the PasswordSync registry settings as described on (more...) . Specify tracelevel 4 to output the maximum trace information, and change the tracefile value to point to a writable file. For example:
"tracelevel"=dword:00000004
"tracefile"="C:\\Program Files\\Sun\\IdentityManager\\PasswordSync\\pwicsvc.log"
After setting these values, you must restart the PasswordSync service. The start-up routine logs the values read from the registry in the trace file. For each intercepted password change, PasswordSync logs the actions taken to push the password to Identity Manager, which includes creating the SOAP connection.
- If a connection fails during creation, you might encounter the following situations:
Note
Each of these situations has its own error code and set of log entries. Identity Manager removes the date, time stamp, and process number from these entries to keep them short.
Check that PasswordSync can access the server and page.
- Be sure the server is running and that you have configured your firewalls and routers correctly.
- Check the application server to be sure it is running, and that PasswordSync can connect to the endpointURL without the application path. If PasswordSync can does not return a page or an error, the application server is not running.
- Check the SOAP response by opening the endpointURL in a standard browser. If you do not see the ERROR: org.openspml.server.SOAPRouter: GET is unsupported message, see if the servlet is compiling and available.
- An incorrect user name error generally occurs when the userID stored in the lhuser entry is incorrect. Use the Configure.exe utility to replace the user or replace the lhuser registry key value with a valid userID.
- An incorrect password error generally occurs when the password stored in the lhcred entry is not correct when used in combination with the userID stored in lhuser. Use the Configure.exe utility to replace the password, but do not manually edit the lhcred registry key.
- A garbage in the password entry error generally occurs when the registry key is corrupted and or when the registry key is manually edited, which causes garbage in the password entry.
- This situation causes the process to hang in RAEncryptor::Decrypt3DES and PasswordSync cannot decrypt the entry. Use the Configure.exe utility to replace the password.
Troubleshooting Reconciliation Problems
When you are trying to troubleshoot problems with a reconciliation task, review the Reconciliation Status Debug page (debug/Show_Reconciler.jsp) to see what the resource threads are working on.
Some common reconciliation problems include
- Reconciliation fails for a certain user object
- If the object exists in Identity Manager, try editing the object directly. If the Identity Manager account does not exist, load the one account from the resource.
- Verify the reconciliation user has the proper access rights.
- Try extracting the object to a file using the same code path as reconciliation.
- Open the System Memory Summary Debug page (debug/Show_Memory.jsp or debug/Show_Memory2.jsp) and verify you have enough free memory.
Troubleshooting Repository Connection Problems
Identity Manager’s lh commands are very useful when you are troubleshooting connection problems. These commands use Identity Manager’s web application installation, but remove the application server from the equation.
This section describes the following
Using lh Commands to Debug Problems
This section describes how to use the lh commands; starting with using the more basic commands and progressing to using commands that exercise most of Identity Manager.
After becoming familiar with these debugging tools, you can develop your own variations for using these lh commands.
Using lh setRepo -c -n
Use the lh setRepo -c -n command to perform the most basic connection test, which allows you to examine the current repository location without connecting. You can use this command to verify that parameters, such as URL and JDBC driver, are correct.
Using lh setRepo -c -v
Use the lh setRepo -c -v command to connect to and examine the current repository location. (The -v provides verbose output.) You can use this command to exercise almost all of the Repository code without requiring the Identity Manager server.
- If the connection is successful, then you are successfully connected to the current repository location.
- If the connection fails, try to solve this problem first.
Solving your connection problem can be very helpful in resolving DNS, firewall, or remote connection privilege problems.
Note
For more information, see Testing DataSource Connections.
Using setRepo
Use the setRepo command throughout the debugging process, to specify a new repository location or to set the repository to the same location.
You can use this command to confirm that all of the necessary components, such as the JAR files, are in place. The setRepo command also lets you vary connection information, such as userid and password, to debug table ownership or privilege problems.
Using lh console
Use this command to actually start an Identity Manager Server using the JAR files in the WEB-INF/lib and the classes in WEB-INF/classes under WSHOME. The lh console command uses your Identity Manager installation environment and actually starts the Identity Manager application, but removes the application server from the equation.
- If the connection is successful, the problem is specific to the application server environment or configuration.
- If the connection fails, review the failure messages.
- If the connection failure is the same as the application server failure, you have reproduced this failure with significantly fewer variables.
- If the failure appears to be different from the application server failure, try fixing the Identity Manager connection problem first because there are fewer variables and more of these variables are under Identity Manager control.
Testing DataSource Connections
If you are testing a DataSource connection, the lh setRepo -c command might fail.
This failure is especially likely if you configured Identity Manager to use the application server's database connectivity service or the application server's directory service. These services often work only in the environment that a running application server provides to a web application.
Initially, approach the DataSource configuration you want in a step-by-step manner. Once you are comfortable with these steps, you can adapt your approach to suit your needs.
If these steps work, you have localized the problem to the application server.
Then, if useful, you can add the application server's database connectivity service or the application server's directory service, whichever service works outside of the environment that the application server provides to web applications.
Troubleshooting Server-Related Problems
You can analyze your application server logs for fatal errors and other server-related problems.
To troubleshoot server problems, use the application server’s Administrative Console to increase the logging level for each module. For more information, see the product documentation supplied with your server.
Most application servers have a standard location for standard out files (stdout) and standard error files (stderr) for the JVM running the application server. To analyze your application server logs, locate the logs directory or the log files specified for your Identity Manager application server.
This section explains how to prevent or fix common server-related problems:
This exception generally occurs if you are using more than one Java Archive file (JAR file) containing Oracle JDBC drivers.
To prevent this problem, be sure the CLASSPATH contains only one JDBC driver JAR file, and that you use the ojdbc14_g.jar provided with Oracle 10g. In addition, you must use the ojdbc14_g.jar provided by the Oracle 10g installation to ensure correct operation.
Troubleshooting an SPML Configuration
To test an SPML configuration:
If you cannot establish a successful connection
- Double-check the URL you entered.
- If the error you receive contains phrases such as “no response” or “connection refused,” then the problem is most likely the host or port used in the connection URL.
- If the error suggests that a connection was made, but the web application or servlet could not be located, the problem is most likely in the
WEB-INF/web.xml file. See “Deployment Descriptor” on page 43 for more information.Troubleshooting Upgrades
If you encounter problems during the upgrade, check the upgrade log files located in the $WSHOME/patches/logs directory. The file names for the logs are based on a timestamp and the stage of the upgrade.