Using the Community Mapper Portlet
The Community Mapper portlet provided by the OpenSSO Add-On for Web Space Server software enables Web Space Server site administrators to:
-
Map OpenSSO realm-based user roles, filtered roles, and groups to Web Space Server users and communities
-
Map OpenSSO realms to Web Space Server organizations
This section explains the following procedures:
 To Launch the Community Mapper Portlet
Before You Begin
The OpenSSO Community Mapper portlet is only available when logged in using a Web Space Server administrator account. The portlet is not available when logged in as a regular user.
-
Log in to the Web Space Server site administrator account.
The Web Space Server site administrator Home page is displayed.
-
Open the Web Space Server Control Panel from the Web Space Server Welcome menu.
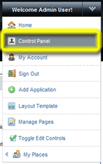
The administrator Control Panel page is displayed.
-
Choose Community Mapper from the Portal section of the Control Panel menu.
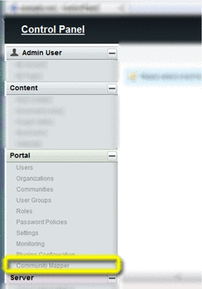
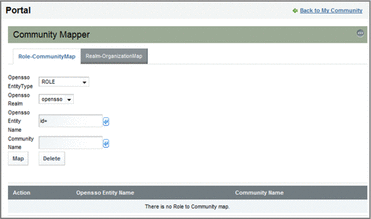
The OpenSSO Community Mapper portlet is displayed.
Figure 4–1 Community Mapper portlet
 To Map an OpenSSO Group to a Web Space Server Community
This procedure demonstrates how to map an OpenSSO group to a Web Space Server community. Note that, when using Access Manager or SunDS as the authentication provider, the general steps described in this procedure apply equally to mapping user roles and filtered roles to a Web Space Server community.
After mapping, any changes to the OpenSSO group or Web Space Server community will automatically be reflected in the mapped entity on the corresponding server.
-
Launch the Community Mapper portlet, as described in To Launch the Community Mapper Portlet.
-
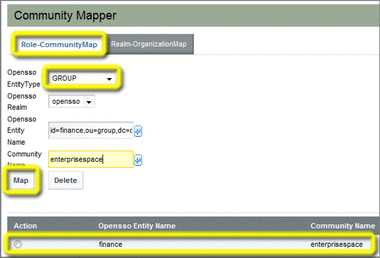
Make sure the Role-CommunityMap tab is selected, and then choose GROUP as the OpenSSO Entity Type.
-
Specify the mapping parameters you want to use.
-
OpenSSO Realm – Name of an existing OpenSSO realm; in this example, a realm named opensso is used.
-
OpenSSO Entity – Name of an existing OpenSSO group; in this example, a group named finance is used. Note that a list of available groups pops up when you pause at the id= prefix. Note that the autocomplete feature adds the fully qualified group ID parameters; in this example, id=finance,ou=group,dc=opensso,dc=java,dc=net.
-
Community Name – Name of an existing Web Space Server community; in this example, a community named enterprisespace is used.
-
-
Click Map to perform the mapping.
The mapping definition is displayed in the list at the bottom of the Community Mapper portlet.
 To Map an OpenSSO Realm to a Web Space Server Organization
This procedure demonstrates how to map an OpenSSO realm to a Web Space Server organization.
After mapping, any changes to the OpenSSO realm or Web Space Server organization will automatically be reflected in the mapped entity on the corresponding server.
-
Launch the Community Mapper portlet, as described in To Launch the Community Mapper Portlet.
-
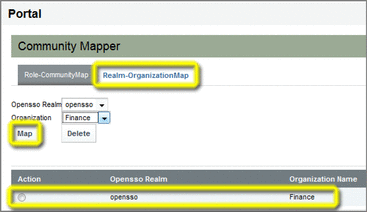
Make sure the Realm-OrganizationMap tab is selected.
-
Specify the mapping parameters you want to use.
-
OpenSSO Realm – Name of an existing OpenSSO realm; in this example, a realm named opensso is used.
-
Organization Name – Name of an existing Web Space Server organization; in this example, an organization named Finance is used.
-
-
Click Map to perform the mapping.
The mapping definition is displayed in the list at the bottom of the Community Mapper portlet.
 To Delete a Mapping Definition
This procedure describes how to delete a Role↔Community map or a Realm↔Organization map.
-
Launch the Community Mapper portlet, as described in To Launch the Community Mapper Portlet.
-
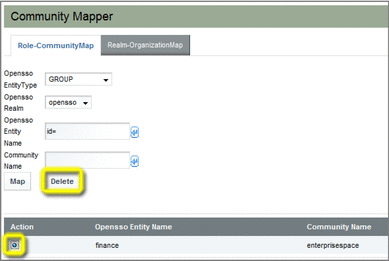
Choose the tab for the type of mapping you want to delete.
-
Select the button next to the map you want to delete in the list at the bottom of the Community Mapper pane, and then click Delete.
- © 2010, Oracle Corporation and/or its affiliates
