Using the Sharepoint Integration Admin Portlet
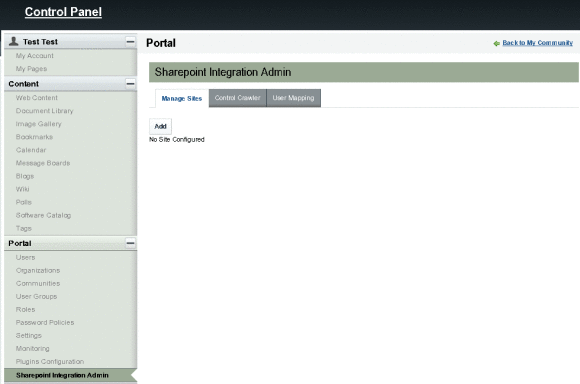
The Sharepoint Integration Admin portlet provides Manage Sites, Control Crawler, and User Mapping tabs.
Figure 3–2 Sharepoint Integration Admin Portlet

Manage Sites Tab
Manage Sites tab enables you to add/modify/delete sharepoint sites. You need to authenticate the site that you add by providing its administrator user name and password. You can enable or disable the site for crawling.
 To Add a Sharepoint Site
-
Log in to Web Space Server as the admin user.
-
From the Welcome menu, navigate to Control Panel -> Sharepoint Integration Admin under Portal category.
-
Click the Add button on the Manage Sites tab.
-
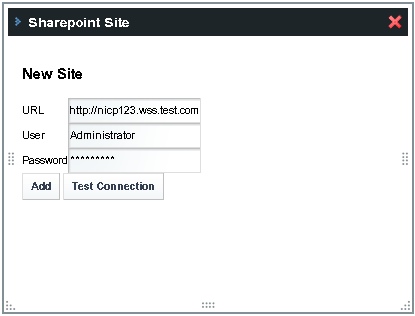
In the Sharepoint site window, type the URL of the Sharepoint site, and the user name and password of the Active Directory administrator.
This example illustrates adding a Sharepoint site named http://nicp123.wss.test.com. Administrator is the username of the Active Directory administrator.
Figure 3–3 Adding a Sharepoint Site

-
Click the Test Connection button.
-
When a site is added successfully, its URL and status are displayed in the Manage Sites tab.
The site is Enabled by default. You can switch the status from Enabled to Disabled and back again. The Actions button next to a site name enables you to edit or delete the site.
Figure 3–4 Sharepoint Site Added Successfully

Control Crawler Tab
You can start or stop the crawler from this tab. You can start the crawler after you add a Sharepoint site. The crawler crawls the information available on the Sharepoint site added from the Manage Sites tab in the Sharepoint Integration Admin portlet.
Web Space Server uses the Sharepoint search crawler to examine Sharepoint site URLs and associated network resources such as Sharepoint lists (like calendars and alerts), so that they can be indexed in a site search database and a content search database used by the membership and the search portlets.
Figure 3–5 Control Crawler Tab

The Ready status means that the crawler has not started. To start crawling Sharepoint sites, click Start Crawler from the Actions menu. After the crawling is complete, the Crawler status is Stopped.
It also displays the other information related to crawling status, including the number of sites crawled, the number of sites which are enabled for crawling, and the number of sites for which the crawling is completed.
Indexed displays the number of metadata items collected. When a new metadata item is added, all the metadata is automatically reindexed. But if changes are made only in the Active Directory, the crawler might not reindex the metadata. If this situations occurs, choose Clean Running Status, and Remove Index from the Actions menu. Then restart the crawler by selecting Start Crawler.
Figure 3–6 Crawling a Sharepoint Site

Choosing Actions Menu Options
The Actions menu has Start Crawler, Clean Running Status, and Remove Index options.
- Start Crawler
-
When you select Start Crawler, the crawler starts indexing all the metadata. The Crawler Status changes from Ready to Running, and when the crawling is completed, it changes to Stopped.
- Clean Running Status
-
The "Status" records the last-modified of a crawled object (site, list or item), so the next crawl will only update the index of those items changed since last crawl. When need to crawl all objects disregarding the time stamp, then we need to clean the status (database). Running Clean Running Status cleans the status.
- Remove Index
-
After cleaning the status, the crawler runs just as the very first time. If you want to re-index all the metadata, you need to select the Clean Running Status and Remove Index options consequently. If the Sharepoint site has no changes, you will see exactly the same number of indexed items.
User Mapping Tab
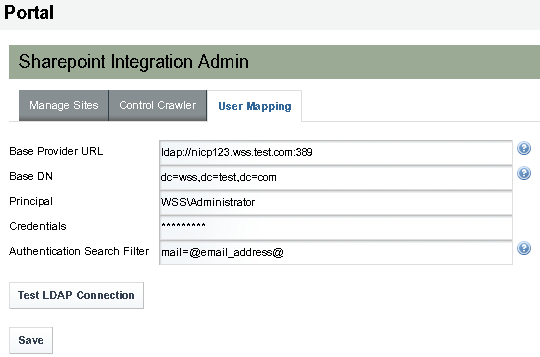
The User Mapping tab enables you to map the users on the Sharepoint site with the users on Web Space Server. This page allows you to define Active Directory authentication for the users defined in the Sharepoint Active Directory. An authentication search filter is applied to map users in Web Space Server with the users in the Sharepoint Active Directory. For example, if mail=@email_address@ is the authentication search filter, all users who have a common email address in both Sharepoint and Web Space Server are mapped together.
Figure 3–7 User Mapping Tab

Defining Active Directory Authentication
You need to provide information in the following fields in the User Mapping tab to define Active Directory authentication.
Table 3–2 Defining Active Directory Authentication|
Attribute |
Vaule |
Description |
|
Base Provider URL |
ldap://host:389 For example, ldap://nicp123.wss.test.com:389 |
Active directory URL of domain controller |
|
Base DN |
domain_name |
Base DN of Active Directory domain (such as dc=wss,dc=test,dc=com) This specify the initial search context for users. Specifying the base DN is optional. |
|
Principal |
admin_name with Domain For example, WSS/Administrator, where WSS is the domain controller domain name in wss.test.com |
Active directory administrator user name |
|
Credentials |
admin_password |
Active directory administrator password |
After you define the Active Directory Authentication, click the Test LDAP connection button. If the connection is authenticated, the Web Space has successfully connected to the Active Directory servermessage appears.
Defining the Authentication Search Filter
If @email_address@ is the search token during runtime, the system looks for the users in the Active Directory with the same email address as in their Web Space Server user account, and such users are authenticated.
In this example, type mail=@email_address@ as the Authentication Search Filter. LDAP search authentication requires selecting mail=@email_address@ as the Authentication Search Filter.
The Authentication Search Filter can also use other tokens, such as @company_id@, @screen_name@, and @user_id@.
- © 2010, Oracle Corporation and/or its affiliates
