|
|
| Sun ONE Integration Server, Secure Trading Agent 1.0 User's Guide |
Chapter 3 Sending and Receiving Messages
This chapter shows how to send and receive ebXML messages (engage in conversations) based on ebXML agreements that have been deployed by a Secure Trading Agent administrator. It contains information applicable to all Secure Trading Agent users.
All Secure Trading Agent users should read this chapter.
Conversations
An ebXML agreement defines a sequence of actions between trading partners—these actions make up a business process. The business process can be formally defined by a separate document (a Business Process Specification, or BPS) or it can simply be an informal process agreed to by the partners. Once two trading partners both deploy an ebXML agreement, the partners can begin sending and receiving messages based on actions defined in the agreement. A conversation is the series of message exchanges between trading partners as they execute the business process defined in an ebXML agreement.
Starting a conversation means sending the initial message in a sequence of transactions that comprise a complete business process. Once a conversation is started, you and your trading partner continue a conversation by sending and receiving messages based on actions specified in the agreement.
When sending a message, you typically attach one or more business documents to the message. When retrieving a message, you can download any business document attached to the message.
For more information on business processes and conversations, refer to "Business Processes and Conversations".
Starting a Conversation
You start a conversation by sending the initial message in the series of actions that make up a business process.
Note Depending on the actions specified in an agreement, you may not necessarily be the party that starts a conversation. If the other party starts the conversation, your first step would be to retrieve a message, which is described in "Retrieving Messages and Documents".
To start a conversation for an agreement
- In the Communications Center, select Send from the Messaging tab.
The Send a Message page displays a list of deployed agreements.
Figure 3-1 Communications Center, Starting a Conversation
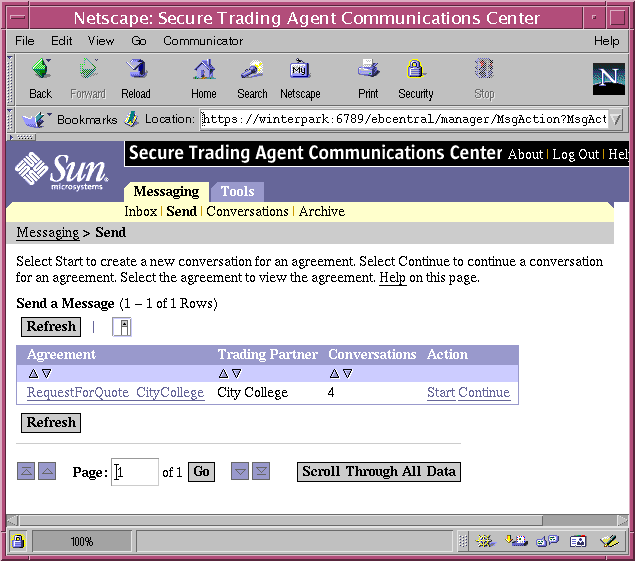
- In the table of deployed agreements, select Start for an agreement to start a conversation for that agreement.
The Conversation Details page displays.
Figure 3-2 Communications Center, Conversation Details
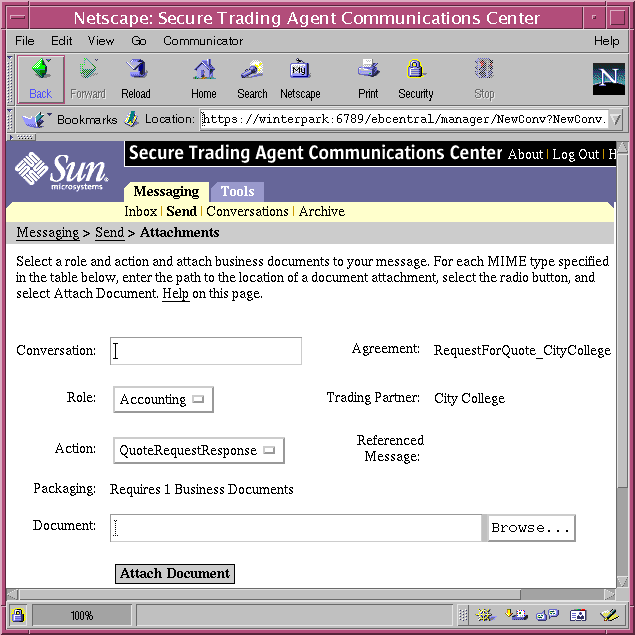
- Specify a unique Conversation Id, role, and action for the conversation.
If you do not specify a Conversation Id, one is generated for you. Typically, you specify conversation Ids that are meaningful and can be sorted to later help locate specific conversations.
- Attach any required documents for the message.
- Select Browse to specify a path to the document
- In the Attach Document table, select the radio button that matches the document's MIME type
- Select Attach Document to add the specified document
- Repeat this process to specify any additional documents
- Select Send to send the initial message.
- Select Conversations from the Messaging tab to verify that your conversation has been started.
A conversation with the conversation Id that you specified should appear in the list of active conversations.
Retrieving Messages and Documents
The Messaging Inbox lists all conversations that contain pending messages. You can download all messages and attached documents directly from the Inbox, or you can download messages on a per action or per message basis.
Downloading Messages from the Inbox
This section contains a procedure describing how to download messages directly from the Inbox.
To retrieve a message and attached documents from the Inbox
- In the Communications Center, select Inbox from the Messaging tab.
The Communications Center displays agreements that contain active conversations with pending messages. For each agreement, the action for which there is a pending message is displayed, as well as the number of conversations active for that action.
Figure 3-3 Communications Center, Inbox
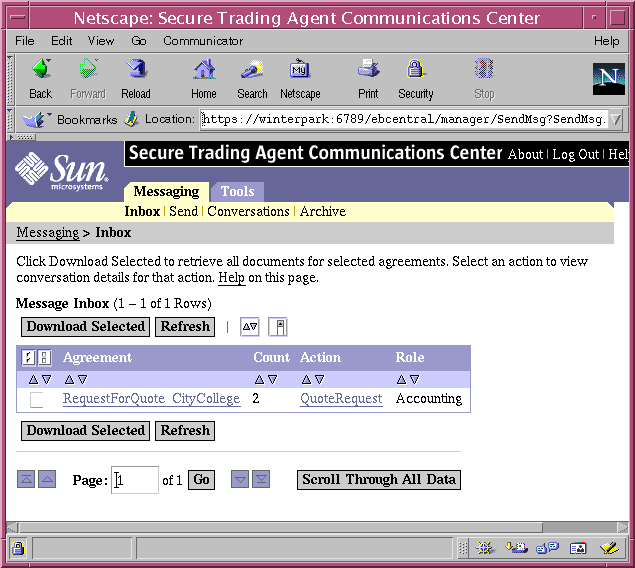
- Select the check box for each agreement/action in the table to retrieve the pending messages for that action, then select Download Selected.
The Communications Center lists the messages you are downloading, places the attached documents in a messages.zip file, and prompts you for a location to save the messages.zip file.
Figure 3-4 Communications Center, Retrieving Messages
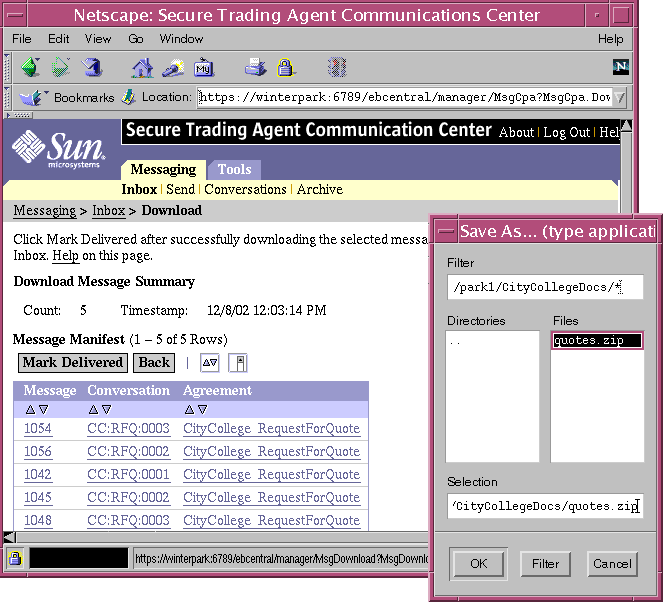
- Rename the messages.zip file to a meaningful name and save it to your file system.
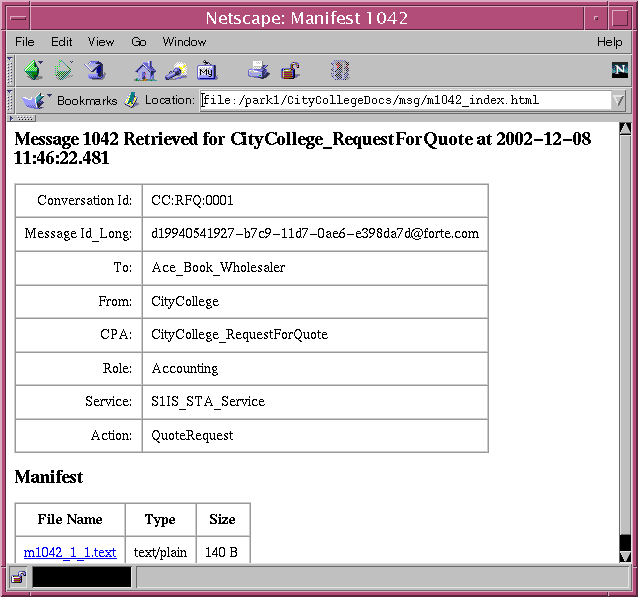
Within the messages.zip file is an mId_index.html file that contains a manifest with information about the message and links to the attached documents. Figure 3-5 displays a sample manifest index file.
Figure 3-5 Message Manifest File
- Select Mark Delivered after downloading the messages.
Marking a message as delivered removes the message from the pending messages list.
Downloading Messages for Specific Actions
This section contains a procedure for downloading messages for a specific action in an agreement. It also shows how you can navigate to a specific message to download its attached documents.
To retrieve messages and attached documents on a per action basis
- In the Communications Center, select Inbox from the Messaging tab.
The Communications Center displays agreements that contain active conversations with pending messages. For each agreement, the action for which there is a pending message is displayed, as well as the number of conversations active for that action.
- In the list of pending messages, select the action name containing the message you want to download.
The Communications Center displays the list of conversations for that action, the message key for the pending messages, and the number of documents attached to each message.
Figure 3-6 Communications Center, Received Messages for an Action
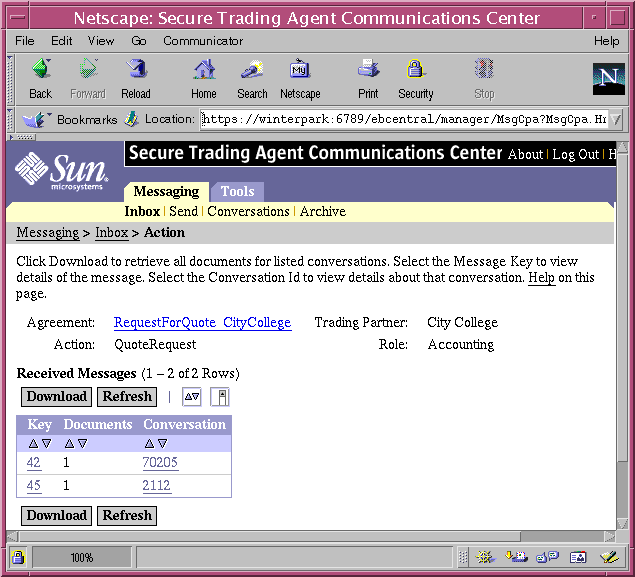
Note Secure Trading Agent creates Message Keys when receiving or sending messages to uniquely identify that message within an installation.
- Select Download to download all messages and documents for the listed conversations.
Or you can skip this step and proceed to the next step, which describes how to navigate to details of a specific message using the Message Key.
- Select a Message Key to view details about that message.
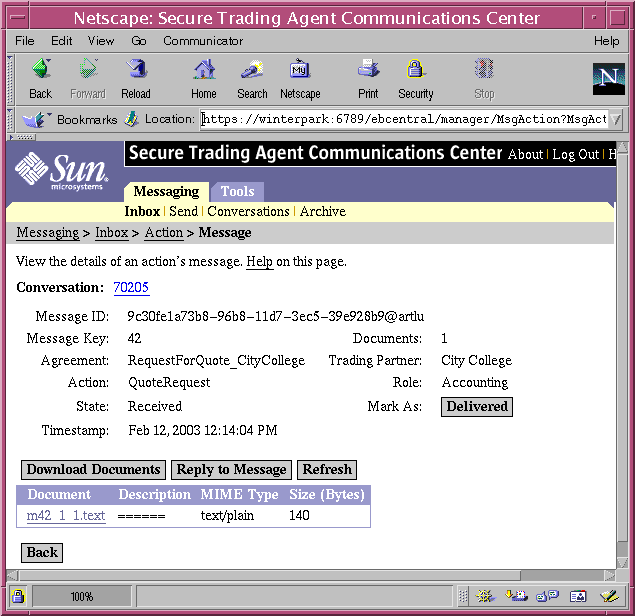
The Communications Center displays the details for the selected Message Key.
Figure 3-7 Communications Center, Message Details
- Download the attached documents as follows:
- Select individual documents to download and view documents on an individual basis.
- Select Download Documents to place all documents in a messages.zip file that can be saved locally.
Rename the messages.zip file to a meaningful name and save it to your file system. Within the messages.zip file is an mId_index.html file that contains a manifest with links to the attached documents as well as information about the message. Figure 3-5 displays a sample manifest index file.
- Select Delivered to mark the message as delivered.
Marking a message as delivered removes the message from the list of pending messages. Delivered messages are available from Messaging > Conversations page, or if the conversation has been closed, from the Messaging > Archive page.
Continuing a Conversation
You continue a conversation by sending messages according to actions specified in an agreement. Typically, these actions are in response to an action received from your trading partner, according to a business process.
There are two ways to continue a conversation:
- Reply to a retrieved message
- Continue a conversation by sending a new message
Replying to a Retrieved Message
The previous section, "Retrieving Messages and Documents," describes the procedure for retrieving messages. After you retrieve a message you can immediately send a reply, as described in the following procedure:
To reply to a retrieved message
- In the Communications Center, select Inbox from the Messaging tab.
- Select an action to retrieve the pending messages for that action.
- Select a Message Key to view details of that message.
Figure 3-8 Communications Center, Message Details
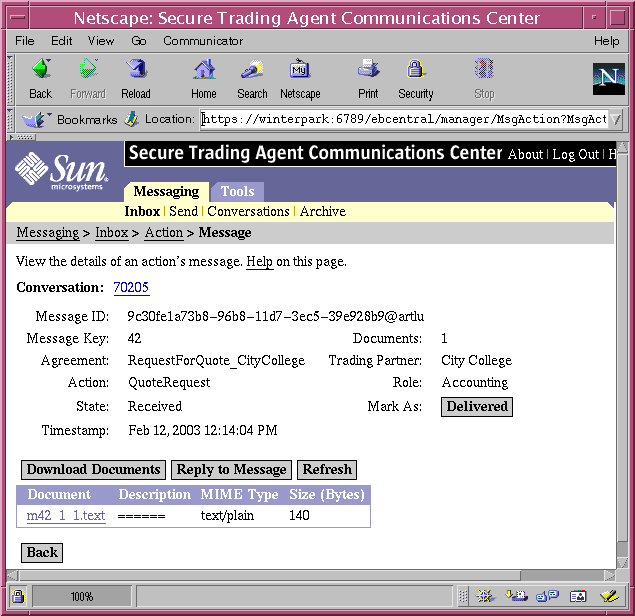
- Select Reply to Message to continue the conversation.
The Communications Center displays the Send page, which lists the Conversation Id, available roles and actions, and a list of required documents to attach.
Figure 3-9 Communications Center, Continue Conversation
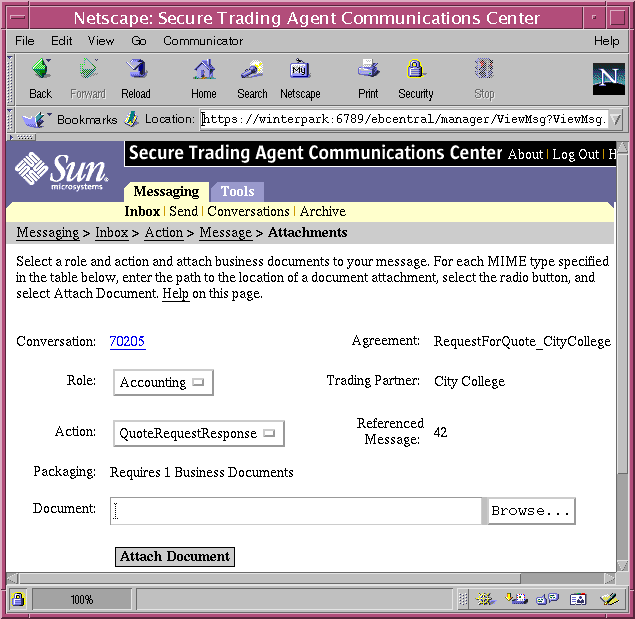
- Select a role, action, and attach business documents as described in the section "Starting a Conversation".
- Select Send to send the new message.
Continuing a Conversation by Sending a New Message
You can continue a conversation by navigating to the details of a conversation and then choosing the appropriate action for sending a new message. This procedure is similar to the procedure described in the section "Starting a Conversation".
To send a message to continue a conversation
- In the Communications Center, select Send from the Messaging tab.
- In the table of deployed agreements, select Continue for the agreement containing the conversation to which you want to reply.
The Communications Center displays a list of active conversations for that agreement, including the last action taken.
Figure 3-10 Communications Center, Active Conversations
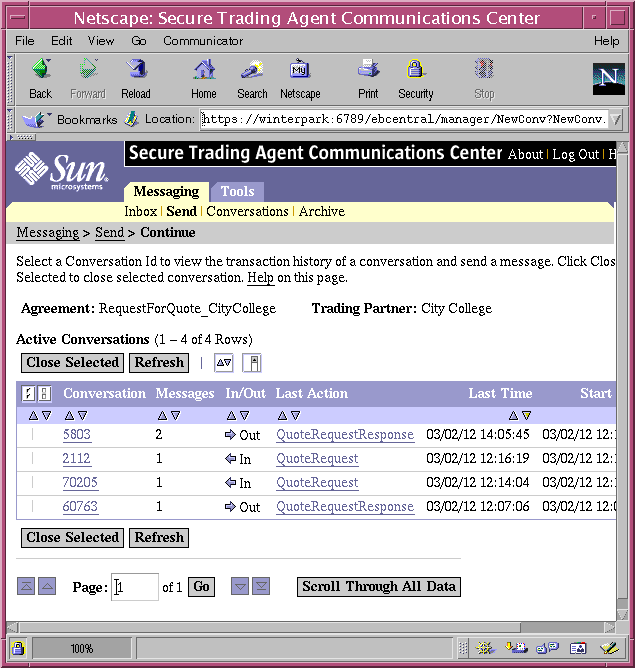
- Select the Conversation Id to view the list of actions taken for the conversation.
Figure 3-11 Communications Center, Conversation Details
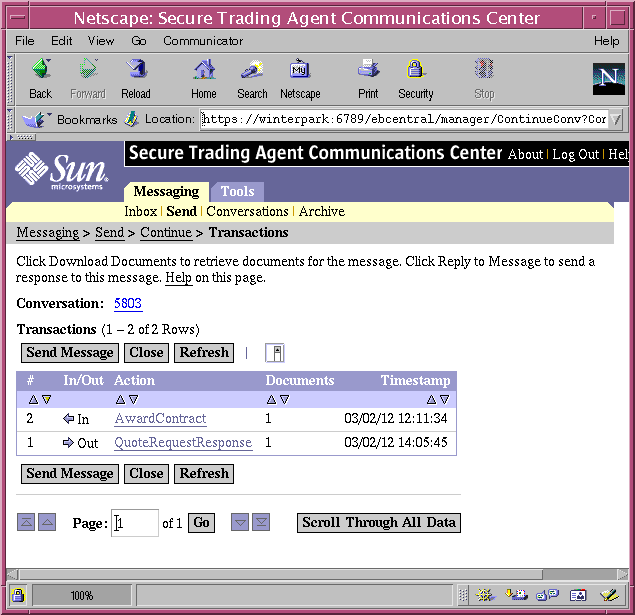
- Select Send Message to continue the conversation.
- Specify roles, actions, and documents as described in "Starting a Conversation" and select Send
- Select Send to send the message.
- From the Messaging tab, select Conversations, and then navigate to the conversation to verify that your message has been sent.
Managing Conversations
The Communications Center allows you to close conversations that have completed, and to review the history of all conversations, active and closed. When reviewing the history of conversations, you examine a list of actions for a conversation and can review details for each action.
Closing Conversations
When the actions specified in an agreement have all been completed a conversation should be closed. Currently, Secure Trading Agent cannot determine if all the actions that make up a conversation have been completed. You must determine when a conversation is complete and then close the conversation.
Closing conversations that are no longer active improves the performance of Secure Trading Agent, removes completed conversations from the list of active conversations on the Conversations page. It also prevents you from inadvertently sending a message out of context for the conversation.
To close a conversation
- In the Communications Center, select Conversations from the Messaging tab.
The Communications Center displays a list of active conversations.
Figure 3-12 Communications Center, Close Conversations
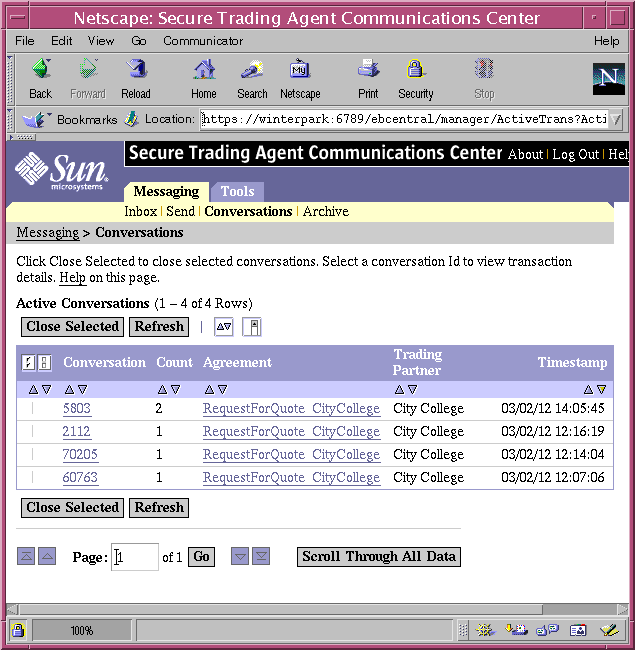
- For each conversation you want to close, select the checkbox to the left of the conversation in the list.
You may want to review the conversation before you close it. Select the Conversation Id to review its history, then select Continue from the link history at the top of the page to return to the list of active conversations.
- Select Close Selected.
The selected conversations are closed. Conversations that have been closed can be reviewed by selecting Archive from the Conversations tab, as described in "Conversation History".
Activating Closed Conversations
If all the actions that make up a business process have been completed, there is no context for additional messages in the conversation. Secure Trading Agent rejects any message sent to conversations that have been closed.
To prevent messages being sent out of context, you can close a conversation as described in the previous section, "Closing Conversations". However, if a conversation has been incorrectly closed before all the actions in the business process have completed, you can activate the conversation so additional messages can be sent.
To open a conversation that has been closed
- In the Communications Center, select Archive from the Conversations tab.
A list of closed conversations appears.
Figure 3-13 Communications Center, Closed (Archived) Conversations
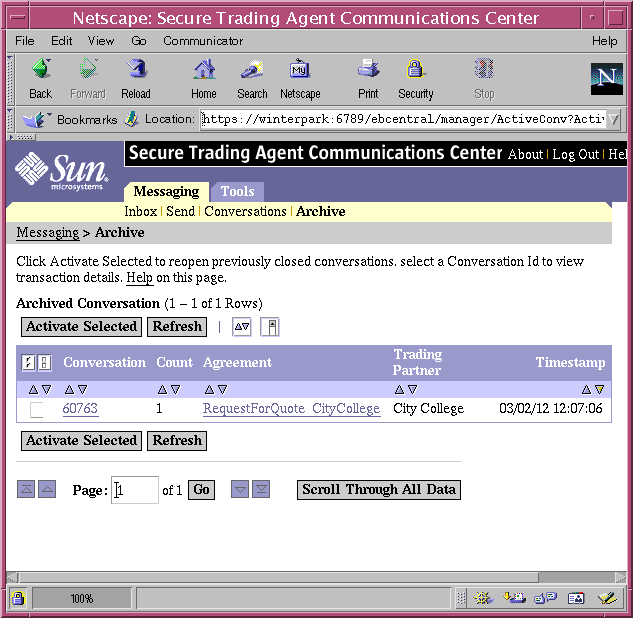
- For each conversation you want to activate, select the checkbox to the left of the conversation in the list.
- Select Activate Selected.
The selected conversations have been activated, and now appear on the Active Conversations page.
Conversation History
You can review the history of all conversations, both active and closed. The procedure is similar in both cases, differing mainly in the starting point for reviewing the history.
To view the history of a conversation
- In the Communications Center, select the Messaging tab.
- Select Conversations (for conversations currently active) or Archive (for conversations that have been closed).
The Communications Center displays a list of active or closed conversations, depending on your selection.
- Select the Conversation Id for the conversation that you want to review.
The Communications Center displays all the transactions for that conversation.
- Select an action name to view details of that action.
You can also download any documents that were attached to that action.