| Skip Navigation Links | |
| Exit Print View | |

|
Oracle Hardware Installation Assistant 2.5 User's Guide for x86 Servers |
| Skip Navigation Links | |
| Exit Print View | |

|
Oracle Hardware Installation Assistant 2.5 User's Guide for x86 Servers |
Overview of the Oracle Hardware Installation Assistant User's Guide
Getting Started With Oracle Hardware Installation Assistant
What is Oracle Hardware Installation Assistant?
Supported Provisioning Tasks List
Launching the Application and Performing Provisioning Tasks
Local and Remote Media Launch Options for Sun Fire and Sun Blade Servers
How to Perform Provisioning Tasks
How to Install Linux Using Local or Remote Media
Updating System and Component Firmware
How to Update the System BIOS and Oracle ILOM Firmware
How to Update Expander Firmware
Recovering a Service Processor
How to Recover a Service Processor
Configuring Service Processor Settings
How to Configure Service Processor Identification Information Settings
How to Configure Network Information Settings
How to Manage Oracle ILOM User Accounts
Configuring BIOS Boot Device Settings
How to Set the Boot Device Order
How to Set the Boot Device for the Next Boot
Setting Up PXE-Based Oracle Hardware Installation Assistant
How to Set Up the PXE Infrastructure
Preparing the Oracle Hardware Installation Assistant PXE Image Files
Launching an Attended PXE-Based Session
Attended PXE-Based Session Overview
How to Create the Image for a PXE-Based Session
How to Launch an Attended Installation From a PXE Server
Performing Unattended PXE-Based Provisioning Tasks
Unattended PXE-Based Provisioning Tasks Requirements
Creating a State File for Unattended Installation
How to Prepare for an Unattended Installation of Linux
How to Prepare for an Unattended Installation of Windows Server
How to Prepare for an Unattended Firmware Update
How to Create the Application Image and Prepare for a PXE-Based Launch
How to Launch an Unattended Session From a PXE-Based Server
Observing Unattended PXE-Based Provisioning Tasks
Establishing a Viewing Connection Using a Virtual Console or Secure Shell (SSH) Connection
How to Set Up Root and VNC Passwords
How to Establish a Connection Using a VNC Viewer
How to Establish a Connection Using a Serial Console
Troubleshooting Oracle Hardware Installation Assistant
No Driver Found Message Appears During Oracle VM 2.2.1 Server Installation
Oracle Hardware Installation Assistant Can Go Into a Loop at Last OS Install Screen
Oracle Hardware Installation Assistant Error Messages
How to View the Application Log File
How to Debug a PXE Image That Does Not Boot
Launching Oracle Hardware Installation Assistant Using a USB Flash Drive
How to Get the Syslinux and Oracle Hardware Installation Assistant Software
Creating an Oracle Hardware Installation Assistant USB Flash Drive
How to Boot the USB Flash Drive and Launch Oracle Hardware Installation Assistant
How to Install Service Tags in Linux
Before You Begin
If your server ships with an LSI-based integrated RAID controller and you want to include your boot drive as part of a RAID configuration, you need to configure a RAID volume on it before installing the operating system. See Configuring RAID.
If you have a Sun StorageTek RAID disk controller (Adaptec-based), you need to configure an array volume through the Adaptec RAID Configuration Utility (accessible by pressing Ctrl-A when prompted during server boot process). This must be done whether you intend to use RAID or not. Consult your platform installation guide for instructions on how to do this.
The instructions below assume local CD/DVD drive access. Be sure to modify the instructions accordingly if you are using a local USB flash drive (see Launching Oracle Hardware Installation Assistant Using a USB Flash Drive), or if you are launching the Oracle Hardware Installation Assistant application from a remote console (or KVMS) with CD-ROM redirection.

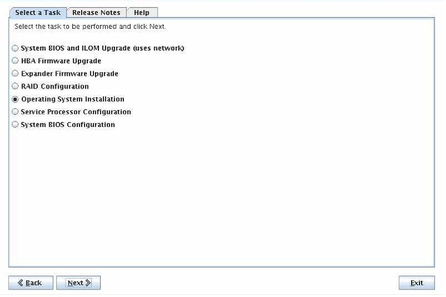
Note - The Select a Task screen only appears if your server supports additional tasks other than OS installation. It does not appear if the only available task is OS installation. Additionally, the Select a Task screen only lists task options supported for your server.
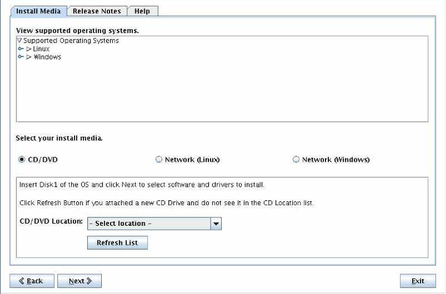
The Install Media screen appears.

Note - You cannot use the Hardware Installation Assistant application to install an unsupported version of an OS.
You have the following options for media delivery methods:
CD/DVD: This option allows you to install the OS source from a local CD/DVD, a redirected CD/DVD, or an ISO CD-ROM image.
Network (Linux): This option allows you to install the OS source from a network share on a Linux system.
Network (Windows): This option allows you to install the OS source from a network share on a Windows system.
If you booted the Oracle Hardware Installation Assistant application from a CD/DVD drive, eject the CD from this drive and insert the first disk of the OS into the drive. In the Remote Console, select the CD-ROM option from the Devices menu.
If you booted the Oracle Hardware Installation Assistant application from an ISO CD-ROM image, unmount the ISO image by deselecting CD-ROM Image from the Devices menu, then select CD-ROM Image and specify the location of the ISO OS CD-ROM image.
For operating systems requiring multiple images (for example, CD1, CD2), multiple address fields are available.
Note - The URL address can not contain spaces.
|
In the table, hostname_or_IPaddress is either the hostname or the IP address of the server containing the image file, and ISOimage.iso is the name of the Windows OS installation ISO image (.iso) file. For Windows, the complete path to the required ISO file must be included.
The Oracle Hardware Installation Assistant application checks the supplied media to ensure it is a supported version and displays the results in the Identifying Distribution screen.

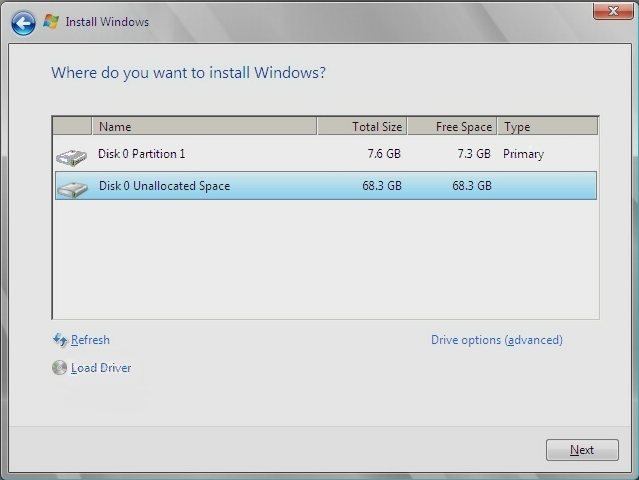
Note - This partition is required for Windows Server 2008 installation.
The WinPE partition for Windows Server 2008 installation is created.

Note - The first 8 GB of the disk is reserved for the WinPE partition and cannot be used for anything else.
The Windows boot partition is created and the OS preinstallation environment is complete.
Note - If you see an error listed during installation, check the SunInstallationAssistant.log file for more details.
The server boots from the newly installed OS. Follow the onscreen instructions to complete any additional OS setup tasks.
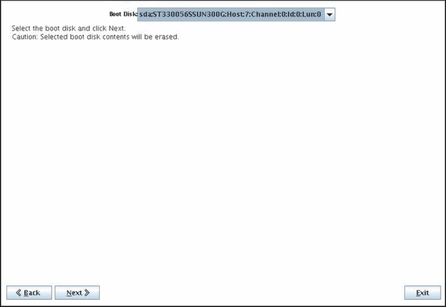
Note - If you are installing the OS on a disk other than disk 0, you need to change the system boot order to identify the correct boot disk. This can be done either through the system BIOS Setup Utility (if your disk is connected to an integrated disk controller), or an option card BIOS setup program (if your disk is connected to an optional HBA). Follow the instructions in your system or option card documentation to set boot order.
Note - The default administrator account password for Windows Server 2008 is changeme.
Next Steps
Once the OS is installed, complete the following post installation tasks, as necessary:
Install and configure additional drivers for your server not installed by the Oracle Hardware Installation Assistant application. This provides you the supported feature set for installed server components and option cards (for example, additional drivers may include ACPI, video, network and mass storage). Additional drivers can be found on the latest Tools and Drivers CD/DVD for your server.
Install Oracle-specific optional software and utilities available on the latest Tools and Drivers CD/DVD for your server.
Install Sun Service Tags. The installation files are automatically copied to your server during OS installation, but they must be run by the system administrator to be properly installed. See Installing Service Tags.