How to Add Support for a Diskless Client
The high-level steps in this procedure are:
-
Adding system information about the diskless client
-
Selecting OS services for the diskless client
-
Booting the diskless client
Note -This procedure assumes the system providing the services (the file server) has already been configured as an OS server.
-
Start Solstice Host Manager from the Solstice Launcher and select the name service, if not done already.
See "How to Start Solstice Host Manager" for more information.
-
Select Add from the Edit menu on the Solstice Host Manager main window.
The Add window is displayed.
-
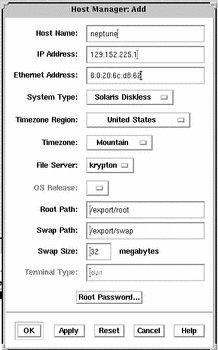
Fill in the system information, selecting Solaris Diskless as the system type.
The system information includes all the fields from the host name through the time zone. If you need information to complete a field, click on the Help button to see field definitions for this window.
-
Select a File Server.
The File Server defaults to the current host. Select Other from the Install Server menu to specify another host as the install server.
-
Select the client's architecture type and the OS release from the OS Release menu.
The architecture type must match the diskless client's architecture, and the OS release should match the Solaris release you want the diskless client to run.
-
Identify the system's root path, swap path, and swap size.
-
Click on OK on the Add window.
-
Select Save Changes from the File menu to add support for the diskless client.
The diskless client is displayed in the Host Manager main window. It takes several minutes to add the diskless client support, particularly to create the system's root and swap areas and apply any applicable patches with the admclientpatch command.
 Caution -
 For the diskless client to work properly, it needs superuser access to its /export/root directory. If Host Manager displays a message that the /export directory is already shared and has different share options than required, you need to allow superuser access to the client root area before the diskless client will function properly. The access mode for the client root is normally rw=clientname, root=clientname.
If Host Manager displays a message that the /usr directory is already shared, it is because it tried to share /usr read-only. If you have it shared with read-write permissions, then /usr is set up correctly, and you do not have to make any modifications.
-
Verify that the system has been added as a diskless client in the Host Manager Main Window.
-
Boot the diskless client.
-
Provide the following system configuration information for the diskless client during the initial boot process, if prompted.
-
Geographic region
-
Time zone
-
Date and time
-
-
Create a superuser password when prompted.
Example--Completed Host Manager Add Window for a Diskless Client
The following example shows a completed Add window for the diskless client neptune.

- © 2010, Oracle Corporation and/or its affiliates
