How to Add Support for an AutoClient System
Note -
This procedure assumes that the AutoClient server is already set up as an OS server and is already installed with the kernel architectures of the AutoClient system(s) to be added. For information on adding an OS Server or converting an existing system to an OS Server, see the online help or the Solstice AdminSuite 2.3 Administration Guide.
-
Start Host Manager from the Solstice Launcher and select the name service, if not done already.
See "How to Start Solstice Host Manager" for more information.
-
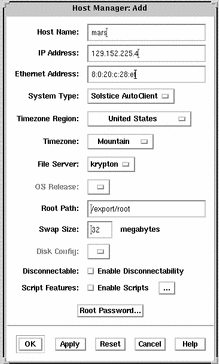
Choose Add from the Edit menu. The Add window is displayed. Note that the default system type is Solaris Standalone.
-
Choose Solstice AutoClient from the System Type menu.
The Add window for a Solstice AutoClient system is displayed.
-
Fill in the system information for the AutoClient system.
-
Click on OK after entering the required information.
If you have not enabled licensing for the Solstice AutoClient feature, you will see a message saying that the software was unable to check out a license. For information on enabling licensing, see Solstice AutoClient 2.1 Installation and Product Notes.
The AutoClient system becomes part of the list of AutoClient systems to add, and it is displayed on the Host Manager main window with a plus sign (+) next to it. The + means that the system is a "pending add."
-
Repeat Step 2 through Step 5 to add subsequent AutoClient systems to your "batch" of pending changes.
The "Total Changes Pending" status will be incremented each time you add a system.
-
Choose Save Changes from the File menu when you are ready to confirm addition of all the AutoClient systems listed in the window.
The Saving Changes message window appears. All of the AutoClient systems are added when you choose Save Changes from the File menu.
Adding each client takes several minutes, depending on server speed, current load, and the number and type of patches that will be automatically added.
As each AutoClient system is successfully added (as shown in the Saving Changes window), its corresponding entry no longer appears as a pending add in the Host Manager main window (that is, the + no longer appears next to the host name).
 Caution -
 For the AutoClient system to work properly, it needs superuser access to its /export/root directory. If Host Manager displays a message that the /export directory is already shared and has different share options than required, you need to allow superuser access to the client root area before the AutoClient system will function properly. The access mode for the client root is normally rw=clientname, root=clientname.
If Host Manager displays a message that the /usr directory is already shared, it is because it tried to share /usr read-only. If you have it shared with read-write permissions, then /usr is set up correctly, and you do not have to make any modifications.
-
Boot your AutoClient system(s) from the network.
For more information about booting your AutoClient systems, see Solstice AutoClient 2.1 Administration Guide.
-
Provide system configuration information for the AutoClient system during the initial boot process, if prompted.
-
Create a superuser password when prompted.
Example--Completed Host Manager Add Window for an AutoClient System
The following example shows a completed Add window for the Solstice AutoClient system mars.

- © 2010, Oracle Corporation and/or its affiliates
