Text Editor Menus
The control area of the Text Editor has File, View, Edit, and Find buttons. These menu buttons are included as menu items in the Text pane pop-up menu.
Text Pane Pop-Up Menu
You display the Text Pane pop-up menu by moving the pointer anywhere onto the Text pane and pressing MENU. (The Text Pane pop-up menu is also provided in the text editing panes of the Console, Command Tool, and Mail Tool applications.)
The commands for each of the items in Text Pane pop-up menu operate in the same way as the controls in the Text Editor window, described in the following sections. An additional item on the Text Pane pop-up menu, called Extras, is also described later in this chapter.
File Menu
The File menu contains items that you can use to open, save, save as, include and empty the document for your text files. For complete information on opening and saving files, refer to "Opening, Saving, Including and Attaching Files" in Chapter 1, Introduction to the Solaris User Environment.
Include File
Use the include file to include an existing file into a new text file.
-
Use the Include File item of the File menu to display the Text: Include window.
-
Locate and include your file.
Include your file in the same manner you would open or save a file. For detailed information on choosing a file to open or save, refer to Chapter 1, Introduction to the Solaris User Environment.
Empty Document
Use the Empty Document item of the File menu to clear the contents of the text pane. If you have made editing changes and have not saved them, a Notice is displayed asking you to confirm or cancel the operation.
View Menu
Use the View menu item to control the position of the cursor and the way the line wrap is used.
Select Line at Number
Use the Select Line at Number item to display the Text: Line Number window, shown in Figure 3-2. Type the number of the line that you want selected, and click SELECT on the Select Line at Number button. The text on the specified line is selected, and the insert point is moved to the end of the selected text.
Figure 3-2 Text: Line Number Pop-up Window

What Line Number?
Use the What Line Number? item of the View menu to locate the line number where the selected text begins. The line number is displayed in a Notice. When there is no current selection in the Text Editor window, the Notice displays an error message instead of a line number.
Show Caret at Top
Use the Show Caret at Top item of the View menu to scroll the document so the line currently containing the caret is the third line from the top of the text pane.
Change Line Wrap
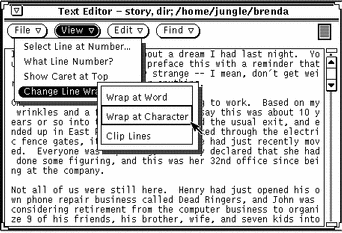
The Change Line Wrap submenu provides three choices for line wrapping: word, character, and clip lines. The text shown in Figure 3-3 is wrapped at a character, so words are broken at the end of lines.
Figure 3-3 Lines Wrapped at a Character

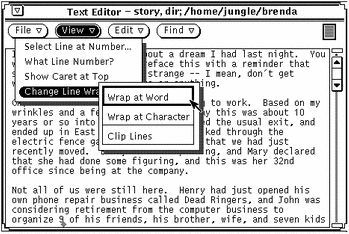
The most commonly used wrapping method is to wrap at the end of words. The text shown in Figure 3-4 is wrapped at the end of words.
Figure 3-4 Lines Wrapped at a Word

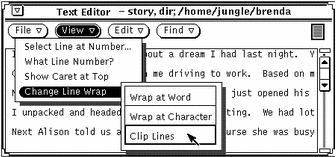
If you choose Clip Lines, the beginning of each line that ends with a Return is displayed. In Figure 3-5 each line represents a paragraph because there are no carriage returns embedded in the lines. Only carriage returns are at the end of each paragraph. That is,
Figure 3-5 Clipped Lines

Edit Menu
The Edit menu provides standard editing functions, as follows:
-
Undo undoes the last editing action or all editing actions, depending on which item you choose from the Undo submenu.
-
Copy stores a copy of the selected text on the clipboard. Only one selection at a time can be stored on the clipboard. If something is already on the clipboard and you do a Copy or Cut, the contents of the clipboard are overwritten with the new information.
-
Paste inserts the contents of the clipboard at the insertion point.
-
Cut removes the selected text and stores it on the clipboard. Only one selection can be stored on the clipboard at a time.
Find Menu
The Find menu items help you to search for specific text strings, special characters, and delimiters to find a text string and replace it with another.
Text: Find and Replace
Use Find and Replace to find specific text and replace it through the Text: Find and Replace window. If you have a current selection, it is automatically displayed in the Find text field, as shown in the example in Figure 3-6.
Figure 3-6 Text: Find and Replace Pop-up Window

To find a text string and select it, type the text in the Find field and click SELECT on the Find button. Click SELECT on the Find button again to find and select the next occurrence of the text string.
To replace the current selection with a text string, type the text in the Replace field and click SELECT on the Replace button. You can use the Replace button together with the Find button to find a string and then replace it with another, or separately to replace highlighted text. You can replace a string with nothing by leaving the Replace text field blank.
If you want to find a text string that contains tabs or carriage returns, select the text containing tabs or carriage returns in the text pane before you display the Text: Find and Replace window. You cannot type carriage returns or tabs directly in the Find or Replace text fields.
The buttons at the bottom of the Find and Replace window combine the find and replace operations, allowing you to quickly do any of these combinations:
-
Use the Find then Replace button to find the text string in the Find text field, and then immediately replace it with the text string in the Replace text field.
-
Use the Replace then Find button to replace the currently selected text with the text string in the Replace text field, and then immediately find the next occurrence of the Find text string.
-
Use the Replace All button to replace all occurrences of the Find text string with the Replace text string.
You can specify whether you want the find and replace operations to apply to all of the text, or to restrict the operation to the text between the insert point and the end of the document. Use the abbreviated menu button at the lower right corner of the window to select either All Text or To End. The current setting is listed to the right of the abbreviated menu button, as shown in Figure 3-6.
Find Selection
Use Find Selection on the Find menu to search the file for another occurrence of the text string that is highlighted as the current selection. You can search forward or backward from the insert point by choosing Forward or Backward from the Find Selection submenu.
Find Marked Text
Use Find Marked Text on the Find menu to highlight text between a matched set of delimiters provided as options in the Text: Find Marked Text window, shown in Figure 3-7.
Figure 3-7 Text: Find Marked Text Pop-up Window

You can search and highlight text for any of the matched delimiters provided as choices in the Text:Find Marked Text pop-up window. Click SELECT on one of the sets of delimiters, and then click SELECT on the Find Pair button. Use the Backward or Forward choice to direct the search either backward or forward from the current insertion point. If you have nested delimiters, such as matched parentheses in a program's code, you can use the Expand choice to select text outward from the current insertion point to the next outer pair of specified delimiters.
To surround the selected text with the selected delimiters, click SELECT on the Insert Pair button. To delete a matched pair of delimiters from the selected text, click SELECT on the Remove Pair button.
Replace Field
The Text Editor pane recognizes any text between the characters |> and <| as a text field. You can search forward through the text from the insert point to find and select each field using the Replace |>field<| item of the Find menu. The Replace |>field<| submenu provides three options: Expand, Next, and Previous:
-
When the caret in the Text Editor pane is between field delimiters, choose Expand to search in both directions and select the entire field and its delimiters.
-
Use Next to search forward from the insert point and select the next field.
-
Use Previous to search backward from the insert point and select the previous field.
Extras Menu
There is an additional item on the Text Pane pop-up menu, called Extras, that is not a button in the Control area (as File, View, Edit, and Find are). This menu contains some useful filters to format the selected text. You can customize the Extras menu and define your own set of filters available from the Extras menu. See "Customizing Your Text Editor" for information about how to define your own set of filters. This section describes the default Extras menu.
Format
Choose Format to reformat selected long lines of text into physical lines of no more than 72 characters. This is useful, for example, when reading mail with lines longer than the width of the window. Formatting text before printing is also useful to make sure the lines will not be truncated by the printer.
Format uses the UNIX fmt command. It does not split words between lines, and it preserves blank lines and the spacing between words.
Note -
Format (and fmt) work only on lines of no more than 1024 characters.
Capitalize
Use Capitalize on the Extras menu to capitalize selected text.
-
The first item on the Capitalize submenu, abcd->ABCD, capitalizes every letter of the selected text.
-
The second item on the Capitalize submenu, ABCD->abcd, turns all the letters of the selected text into lower case.
-
The last item of the Capitalize submenu, abcd->Abcd, capitalizes the first letter of every selected word. Uppercase letters within a word are not changed.
Shift Lines
Choose the Shift Lines item to insert or remove a Tab character at the beginning of each line in the selected text. Use the Shift Lines submenu to specify whether to shift right or left. Shift right inserts a Tab character, and shift left removes a Tab character.
Pretty-print C
This item uses the UNIX indent command to format C program listings. It formats the selection according to standard specifications, or to the specifications of the .indent.pro file if you have one.
Insert Brackets
You can use the Insert Brackets item to quickly insert any of the following type of brackets around the selected text, depending on which item you choose from the Insert Brackets submenu: ( ), [ ], { }, or " ".
Remove Brackets
Choose the Remove Brackets item to remove any of the following types of brackets around the selected text, depending on what item you choose from the Remove Brackets submenu: ( ), [ ], { }, or " ".
- © 2010, Oracle Corporation and/or its affiliates
