Chapter 1 Introduction to the Solaris User Environment
This chapter provides an introduction to the SolarisTM User environment, which consists of the OpenWindows environment, and the DeskSet applications. The DeskSet is a set of default programs -- such as an electronic mail application and a text editor.
"Overview of the OpenWindows Environment" describes the elements of your desktop environment (Workspace) and how to use them. "Introduction to the DeskSet Applications" describes how to choose the right application for the task you need to accomplish. The third and forth major sections talk about using on-line Help and AnswerBook. You can choose the method of learning that is most comfortable for you.
Those who have had previous experience with OpenWindows may want to skip this introductory chapter and move on to the rest of the book where a chapter is devoted to each of the DeskSet applications and the Workspace Properties.
Logging In and Logging Out
Before you start, your system must be ready to use. Your system is ready to use when Solaris is fully installed, and the login prompt is on the screen. If Solaris is not installed, refer to the installation manual for your specific platform.
When you begin working on your system, you will need to log in. Logging in tells the system who you are and what you have permission to do. Likewise, when you finish, you will log out so that no one else can access your files without permission.
Logging In
Since more than one person can have an account on a single system, each user must log in using his or her own unique user name and password. Logging in indicates who is using the system and what files they can access.
To log in:
-
Type your user name at the login prompt and press Return.
The user name tells the system who you are. Your user name should have been defined during installation. For more information, refer to the installation manual for your specific platform. The Solaris operating environment recognizes the difference between uppercase and lowercase letters, so make sure you type the user name using the correct case.
The login prompt usually consists of your machine name (assigned as the Hostname during the installation) followed by the word login:, as shown in the example in Table 1-1.
Table 1-1 The login: promptgenius login: johndoe
-
Type your password at the Password: prompt and press Return.
You do not see the characters on the screen as you type your password, as shown in the example in Table 1-2.
Table 1-2 The Password Promptgenius login: johndoe Password:
If you mistype the user name or password and have already pressed Return, the system asks you to start over with your user name. See the example in Table 1-3.
Table 1-3 Log in again with your user namegenius login: johndoe Password: Login incorrect. login:
After you type your password, OpenWindows launches automatically ( if a full installation was performed.)
Note -If OpenWindows does not launch automatically (for example, you may have OpenWindows configured differently), you can start OpenWindows manually. If you are unsure, contact your system administrator.
-
To start OpenWindows manually after you login, type openwin and press Return.
Logging Out
When you are done working on the system, you will need to log out. If you are sharing a system, this allows other people to log in to your computer under their own accounts.
To log out:
-
You must exit OpenWindows to log out. Press the MENU button and select Exit.
A Notice appears asking you to confirm that you want to exit from OpenWindows.
-
SELECT Exit.
Normally, when you exit OpenWindows, the system automatically logs you out. However, if it does not, go to Step 3.
-
Type exit (or logout) and press Return.
The login: prompt appears, as shown in the example in Table 1-4. Now another user can log in under their own account and use the system.
Table 1-4 Type Exit to Log Outgenius% johndoe genius login:
Overview of the OpenWindows Environment
When you start the Solaris software, you see the Workspace background on your screen, as well as the DeskTop Intro, described later in this chapter. The Workspace is the display area for objects such as windows, icons, and menus. Figure 1-1 shows a portion of the Workspace with several open application windows. Notice that the windows can overlap each other.
Figure 1-1 Partial View of the Workspace with Three Open Windows
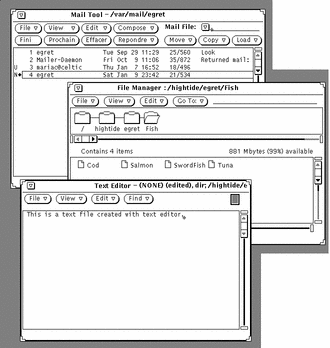
You interact with the applications using the keyboard, the mouse, and an arrow on the Workspace, called a "pointer," that moves in correspondence with the mouse.
Windows and Icons
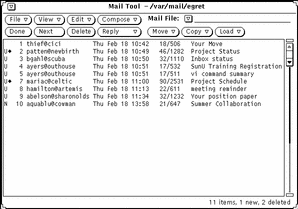
Several default applications appear on the Workspace when you start the Solaris software. Each application runs in its own window. When you use the OpenWindows environment, you open the applications that you need. You can use several applications simultaneously, such as electronic mail, your daily calendar, and a text editor.
Figure 1-2 Multimedia Mail Tool Header Window
Closing a Window to an Icon
When a window is not in use, you can close it and keep it on the Workspace for further use. When closed, an application becomes an icon--a small symbol that represents the application. If you will not be using that application for some time, you can quit it entirely--which clears it from the Workspace--and start it again later. Figure 1-3 shows the icon for the Text Editor application. (Chapter 3, Text Editor, discusses Text Editor in more detail.)
Figure 1-3 Text Editor Icon
Opening an Icon to a Window
You can open an application icon (into a window) from its closed icon by positioning the mouse pointer over the icon and pressing the MENU button and selecting Open from the Window menu, or by double-clicking SELECT. With double-clicking, the first click highlights a border around the icon, and the second click opens it into a window. For information on using the mouse, refer to "Mouse and Pointer".
Mouse and Pointer
The easiest way to access the windows in the Workspace is to use your mouse--the small electronic device that sits on a pad next to your workstation. Notice that when you move the mouse, the pointer on the Workspace moves with you to a new location. Figure 1-4 shows the pointer moving across the Workspace.
Figure 1-4 Movement of the Pointer by the Mouse

Versions of the Pointer
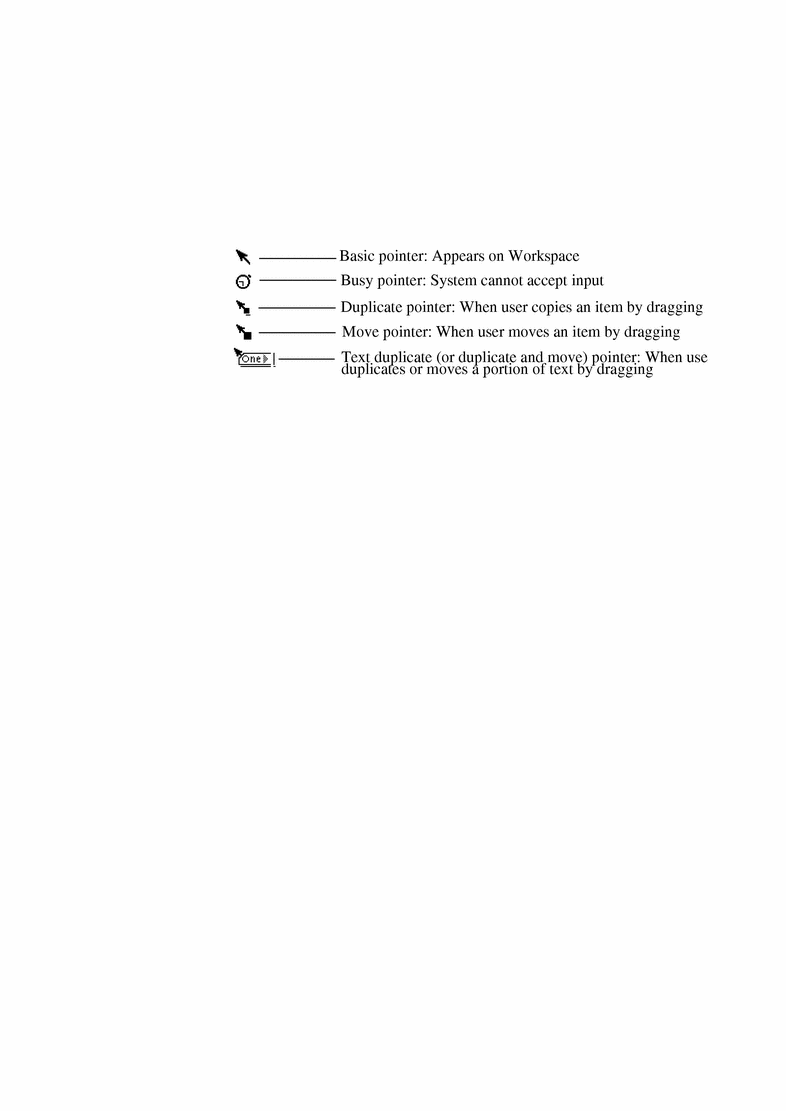
The pointer changes shape to reflect current position and system activity. Figure 1-5 shows various pointer types.
Figure 1-5 Examples of Pointer Types
Using the Mouse Buttons
The mouse buttons enable you to control the windows, icons, and menus on the Workspace. The terminology of the mouse and pointer is as follows:
-
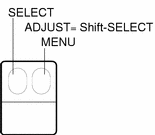
Mouse buttons are referred to by function. From left to right, on a three-button mouse, these are: SELECT, ADJUST, and MENU. A two-button mouse has only SELECT and MENU; ADJUST is peformed by pressing the keyboard Shift key and clicking SELECT.
Figure 1-6 shows the function of each mouse button. Note that you can change this default arrangement. Chapter 17, Customizing the Solaris Environment,describes how to swap SELECT and MENU for left-handed use.
Figure 1-6 Functions of the Mouse Buttons

-
You click a mouse button by pressing and releasing it quickly.
-
You double-click a mouse button by clicking twice quickly (within approximately half a second or less) without moving the pointer.
-
You click ADJUST to make a secondary choice or modify what you have chosen with SELECT.
-
You press MENU (and hold) to make a choice from a menu. Throughout this text, "press" means to press and hold.
-
You move the pointer by sliding the mouse with no buttons pressed.
-
You drag the pointer by pressing a mouse button while sliding the mouse.
Pointer and Input Area
Because you can have several windows open on the Workspace at once, the OpenWindows environment must track which window is currently active. You can choose between two methods of notifying the window system of the currently active window or input area: Move Pointer and Click SELECT.
In Move Pointer mode, the window is activated when you move the pointer onto the window pane. In Click SELECT mode, you must also click SELECT in the window to designate that window as the input area.
The default mode is Click SELECT. See the section "Setting the Active Window" for information on how to use the Workspace Properties window to change to Move Pointer mode.
The insert point in a text window changes in appearance depending upon whether that window is active or inactive. If the insert point is active it looks like a triangle. If it is inactive, it looks like a dimmed diamond, and you must move the pointer into the window, and, if in Click SELECT mode, click SELECT in that window's work area to activate the insert point. When you begin typing, the text appears at the insert point. Figure 1-7 shows an insert point that is active, and one that is inactive.
Figure 1-7 Active and Inactive Insert Points

Pointer Jumping
In most cases, you move the pointer by moving the mouse. However, in some cases, the pointer moves for you and jumps directly to a specific place on the screen. This is called pointer jumping.
For example, if you apply a change to the Workspace Properties window, a pop-up window appears with a warning that this will change a file that you may have manually customized. The pop-up window asks if you want to make these changes, and the pointer jumps to the Yes button. You must click SELECT on one of the choices in the pop-up window before you can do anything else on the desktop.
Keyboard Equivalents
In some cases you can speed up command operations by using a sequence of keystrokes, called keyboard accelerators, that duplicate the operations of the mouse and menus, and of the pre-configured keyboard keys.
The following table lists several command operations and the keyboard equivalents for SPARC, x86, and PowerPC-based machines.
Note -
The Meta key is the <> key on SPARC keyboards and is obtained on x86 and PowerPC keyboards by pressing Ctrl-Alt.
To carry out a keyboard accelerator operation, press and hold the first key (Meta or Control-Alt together) and type the second key. For example, to cut selected text, press and hold the Meta key and press x on a SPARC sytem; on an x86 system, press and hold Control and Alt together and press x simultaneously.
Table 1-5 Keyboard Accelerators|
Operation |
Keyboard Equivalent |
Action |
|---|---|---|
|
Meta - a |
Repeats the previous operation |
|
|
Meta - c |
Copies the selection to the clipboard |
|
|
Meta - x |
Cuts the selection and puts it on the clipboard |
|
|
Meta - f |
Finds the selection to the right of the caret |
|
|
Help or F1 |
Displays a help window with context-sensitive help for the object at the pointer location |
|
|
Meta - n |
Loads a new file |
|
|
Meta - o |
Opens a file (for example, if you've highlighted a file icon in File Manager) |
|
|
Meta - w |
Opens an icon or closes a window to an icon |
|
|
Meta - v |
Copies the clipboard selection to the insertion point |
|
|
Meta - p |
Sends the file to the printer (for example, if you've highlighted a file icon in File Manager) |
|
|
Meta - i |
Displays the property window for th application at the pointer location |
|
|
Shift-Meta - p |
Undoes an Undo |
|
|
Meta - s |
Save the current file |
|
|
Stop or Esc |
Stops the current operation |
|
|
Meta - u |
Note -
For instructions on remapping a SPARC or x86 keyboard, see the Solaris Advanced User's Guide.
Menus and Pushpins
A menu lists the choices you can make from the Workspace or window. For instance, to start an application, you move the pointer to any location on the Workspace background and press the MENU button. This displays the Workspace menu, which includes Programs, Utilities, Properties, Workstation Info, Help, and the option to Exit the OpenWindows environment. Figure 1-8 shows the Workspace menu.
Figure 1-8 Workspace Menu

Using the Workspace Menu
There are two ways to display the Workspace menu.
-
You can click the MENU mouse button quickly in the Workspace. The Workspace menu will pop up and stay up until you make a selection or dismiss the menu by clicking SELECT elsewhere.
-
You can press and hold MENU in the Workspace to display the Workspace menu and then slide the pointer onto an item. With this method the Workspace menu is dismissed when you release the mouse button.
Using Submenus
When you display the Workspace menu, the first two items--Programs and Utilities--each have a hollow triangle next to them, pointing to the right. This means that there is a submenu of additional choices. To display a submenu, keep pressing MENU as you drag the pointer to the right at one of the arrows. Figure 1-9 shows the Programs submenu.
Figure 1-9 Programs Submenu
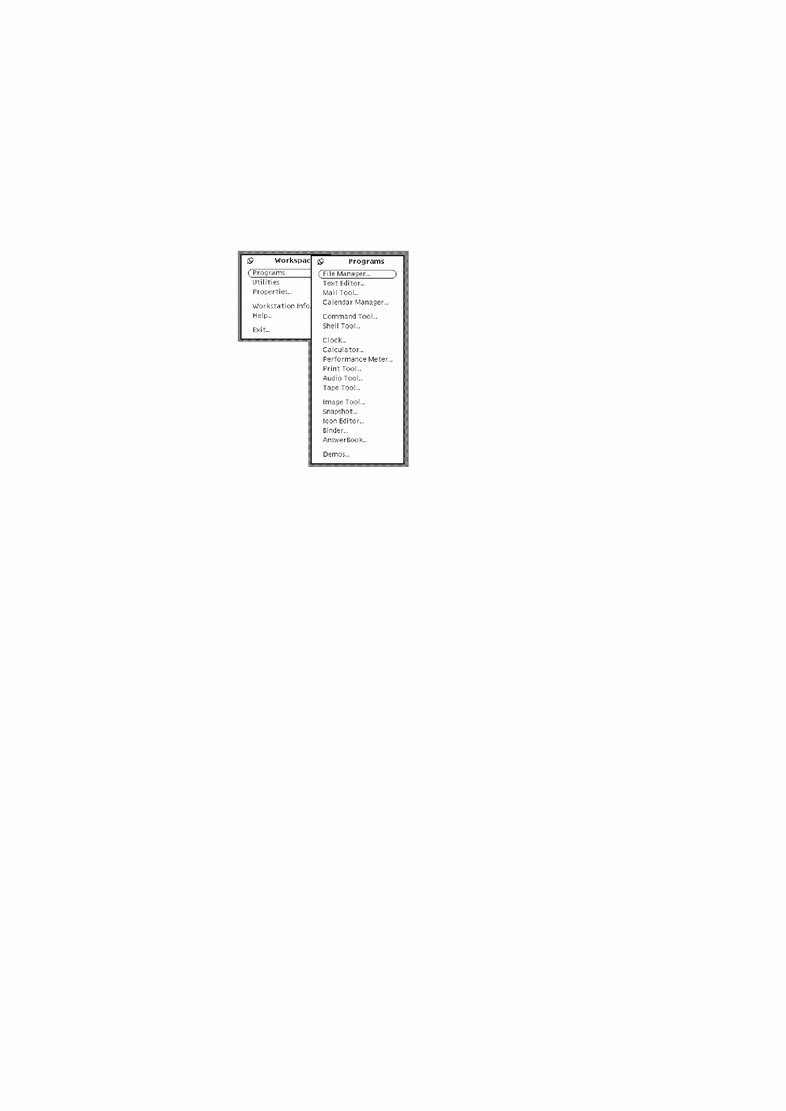
If you continue to press MENU and drag to the right at Programs, the Programs submenus is displayed containing a list of default applications (called DeskSet) available for the OpenWindows environment. To choose an item from the Programs submenu, press MENU and drag the pointer over to your choice. When the choice is highlighted, release the mouse button. In a moment, the application you chose appears on the Workspace. At some point you may want to customize the order and entries on your programs menu. For information on how to do this refer to Chapter 17, Customizing the Solaris Environment.
Pinning a Menu
You can use the pushpin in the upper left corner of the menu to "pin" the Workspace menu to the Workspace and keep it there indefinitely. Note that these instructions apply to any menu or window with a pushpin.
Figure 1-10 shows the Workspace menu pinned to the Workspace.
Figure 1-10 Menu Pinned to the Workspace

To pin the menu, press MENU to display the Workspace menu and keep the button pressed down as you drag the pointer over the pushpin. The pushpin moves into the hole and the menu stays up.
Choosing from a Pinned Menu
To choose an item from a pinned menu, you position the pointer on the item and click SELECT.
Dismissing a Pinned Menu
To unpin a menu, just click SELECT on the pushpin again.
Using Window Menus
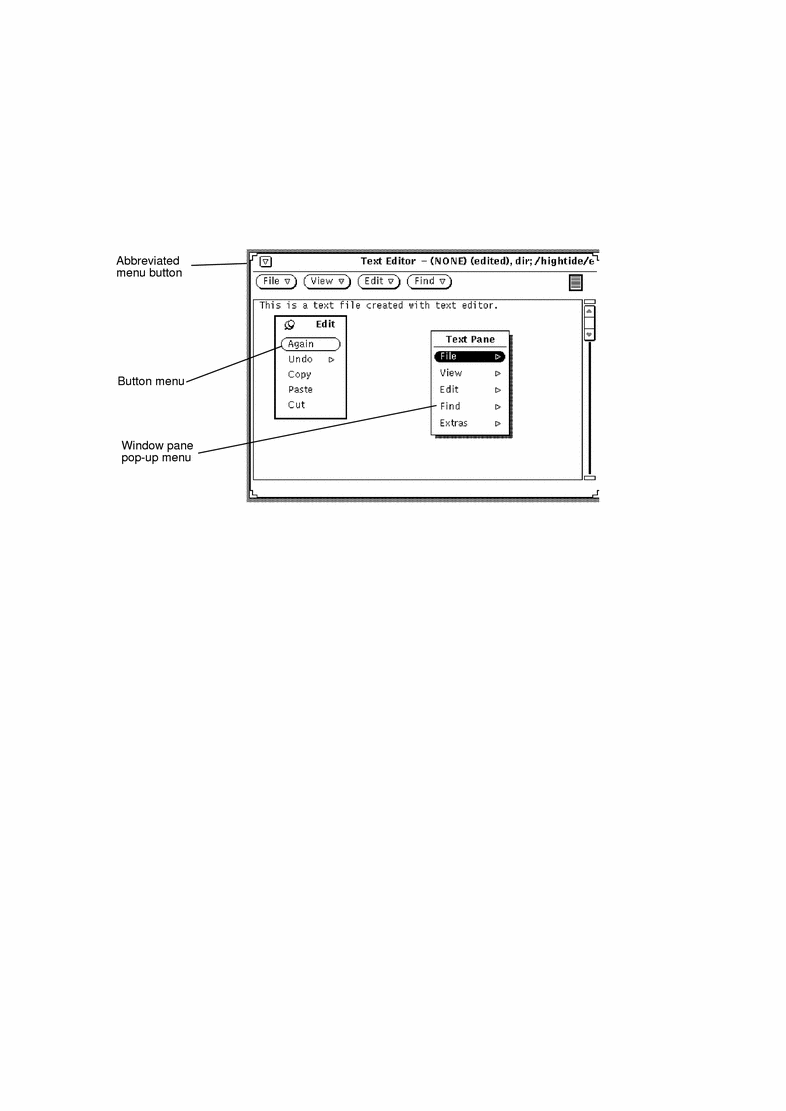
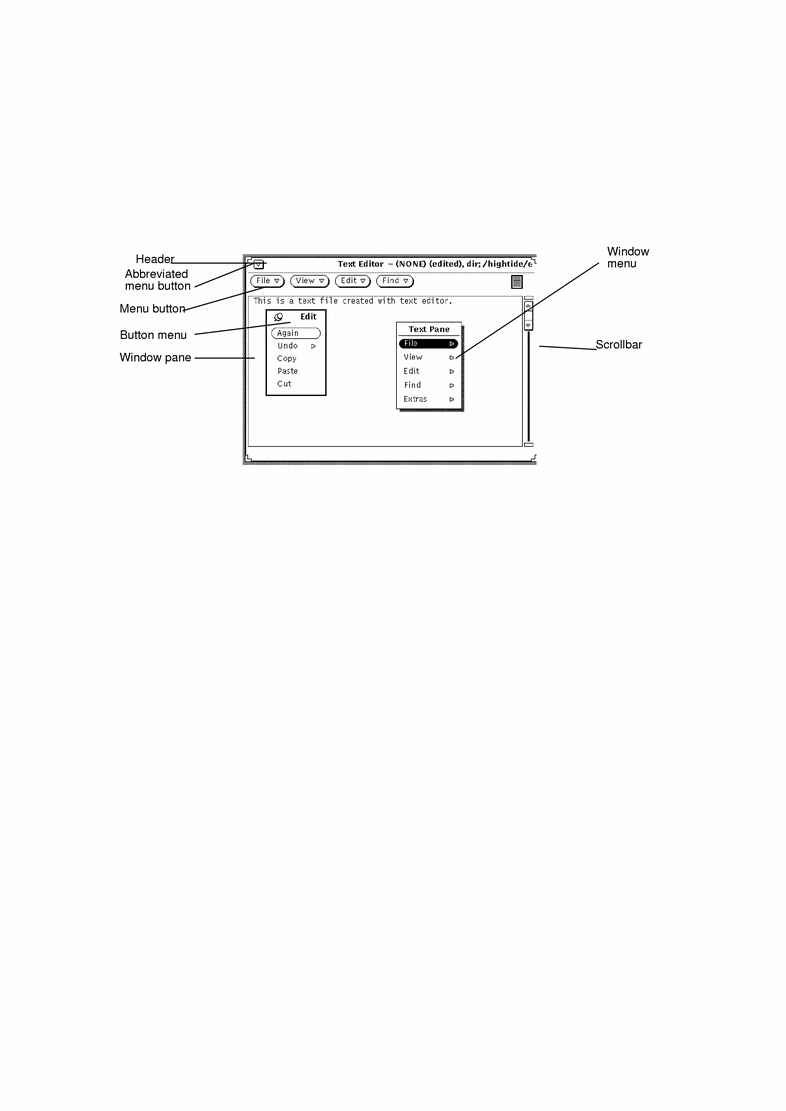
Windows can have three kinds of menus. Examples of each of the following menu types are shown in Figure 1-11.
-
The Window menu that you access from an abbreviated menu button in the window header or from the window border.
-
A button menu that you access from a menu button in the window control area--the portion of a window that contains menu buttons and other controls.
-
A pop-up menu available from the window pane (the bordered area where window data are displayed).
Figure 1-11 Three Kinds of Window Menus
Using Window Menus
To choose a menu item:
-
Position the pointer on one of the three window areas:
-
A window header's abbreviated menu button (or the header itself)
-
A menu button
-
A window pane
-
-
Press MENU, and drag the pointer down to the right to highlight the item of your choice.
-
Release MENU.
Choosing Menu Defaults
Most of the menus in the Workspace and windows have default choices. A default menu item is usually the first item in the menu. It is encircled with a small black line. The default choice on the Workspace menu, as shown in Figure 1-12, is the Programs submenu.
Figure 1-12 Default Choice on the Workspace Menu

All menus and submenus have default choices. The default choice under the Programs submenu is File Manager. When you choose Programs from the Workspace menu, the File Manager is displayed.
Changing the Menu Default
If you find that you often make a menu choice other than the default, you might want to define that item as the default choice. To change the default choice:
-
Display the menu to be modified.
Press MENU, and drag the pointer to display that menu.
-
Position the pointer on the default choice and press MENU again.
-
Press the Control key on your keyboard while pressing MENU.
-
Drag the pointer up or down until the new default menu item is highlighted.
-
Release the Control key.
-
Release the mouse button.
When you click SELECT on that menu, your chosen application is the default.
Window Controls
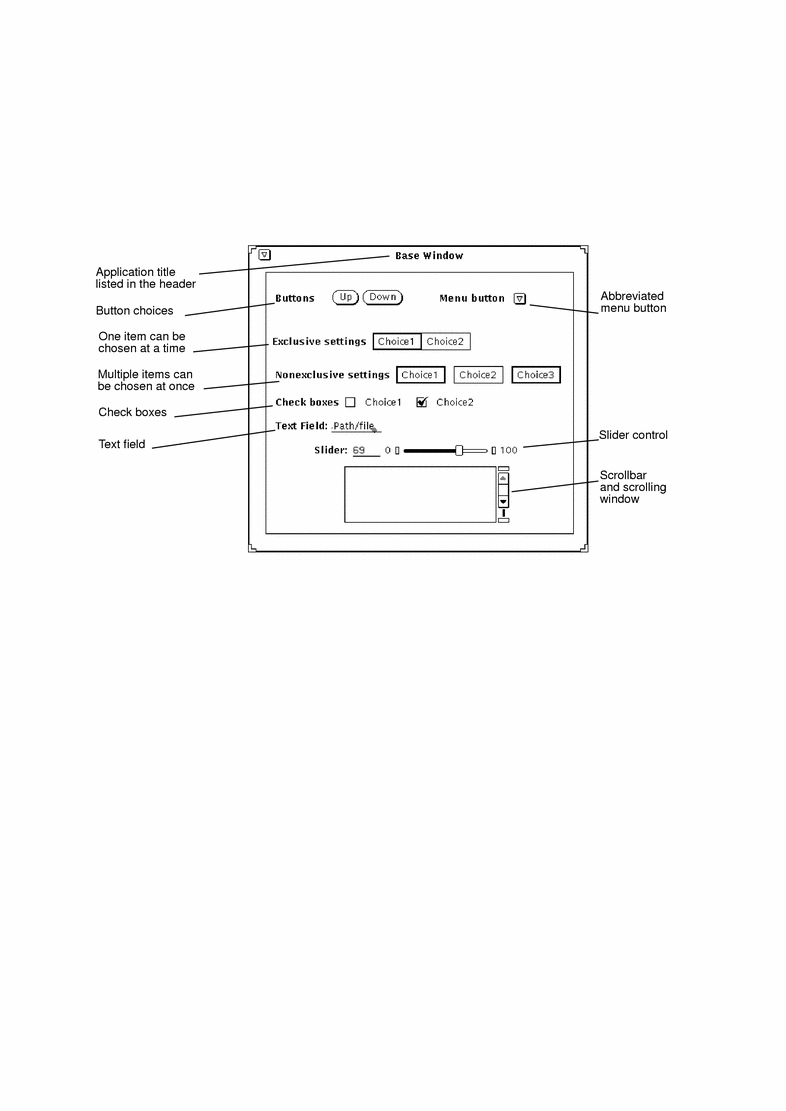
The basic controls for an application are displayed in control areas within the base window. An application can have a single control area in a single base window, or may have additional control areas elsewhere in the base window or subwindows.
Figure 1-13 shows the variety of controls possible for window applications.
Figure 1-13 Window Controls
Scrollbars
Some windows contain scrollbars that enable you to scroll though lists or see previous commands. The Text Editor is an example of a scrolling window. By default, most scrollbars appear on the right side of scrolling windows, although you can move them to the left side. See Chapter 17, Customizing the Solaris Environment, for information.
You scroll up incrementally to view previous commands by placing the pointer on an up arrow in the Scrollbar elevator and clicking SELECT. You can scroll down again by placing the pointer on the down arrow and clicking SELECT. You can also press SELECT on the drag area and slide the elevator up or down. Figure 1-14 shows Command Tool's scrollbar and its elements.
Figure 1-14 Command Tool's Scrollbar
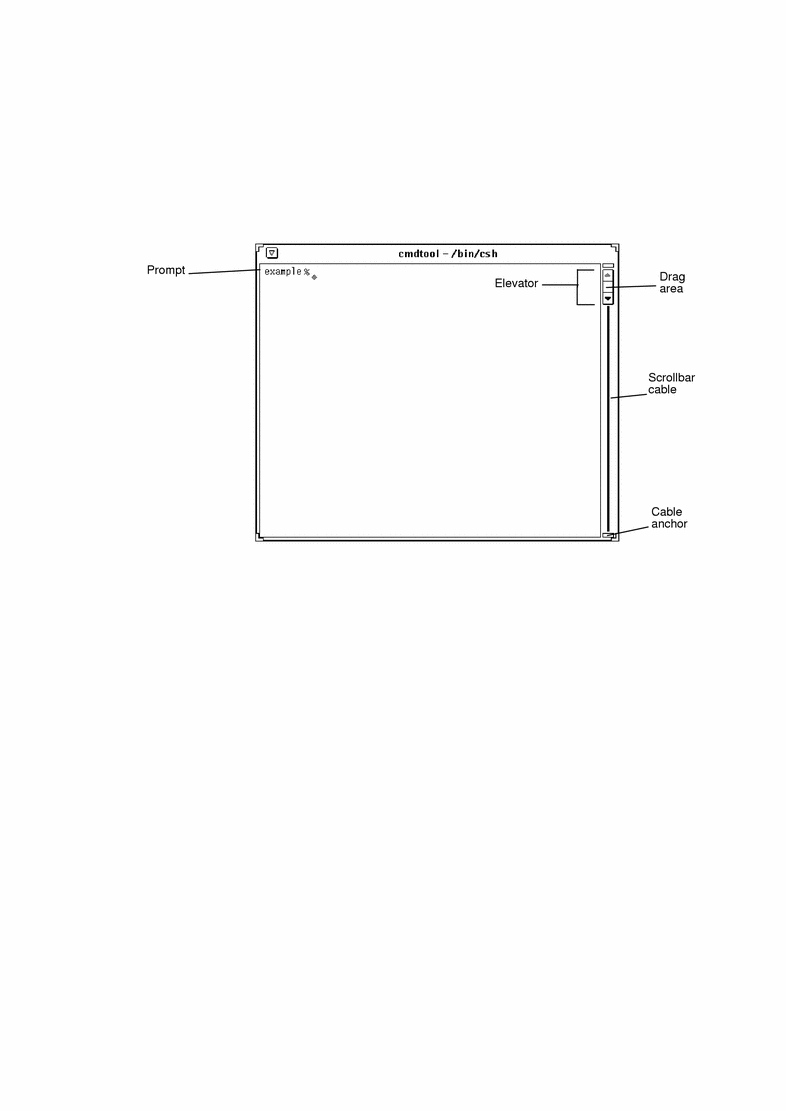
By contrast, the Shell Tool is a nonscrolling window. If you type a long series of command lines in a nonscrolling window, you cannot see lines that scroll above the top of the window.
Button Menus
Button Menus or Window buttons appear in the control areas of many applications. Some window buttons provide a single option, and others provide menus of choices. The Edit submenu in the Text Editor application, for instance, provides editing options for cutting, copying, and pasting text, as well as repeating or undoing an edit. Text Editor's abbreviated menu button, in the upper left corner, displays options common to most DeskSet applications, such as Open/Close, and Quit. The Text Editor menu buttons are shown in Figure 1-15.
Figure 1-15 Text Editor's Menu Buttons
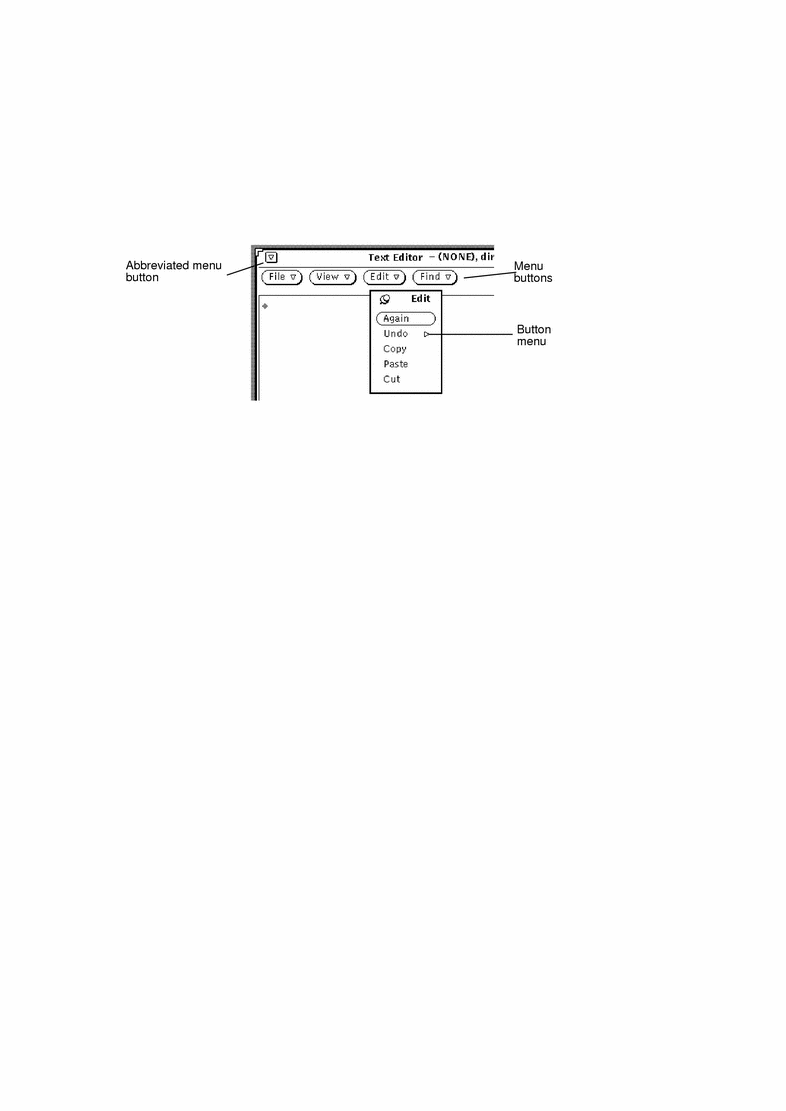
There are four buttons at the top of the Text Editor window, each with a hollow triangle pointing down, indicating that there are further menu choices beneath each button. You can see these choices by placing the pointer on one of the buttons and pressing MENU. The window buttons for all of the applications are discussed in their respective sections.
Drag and Drop
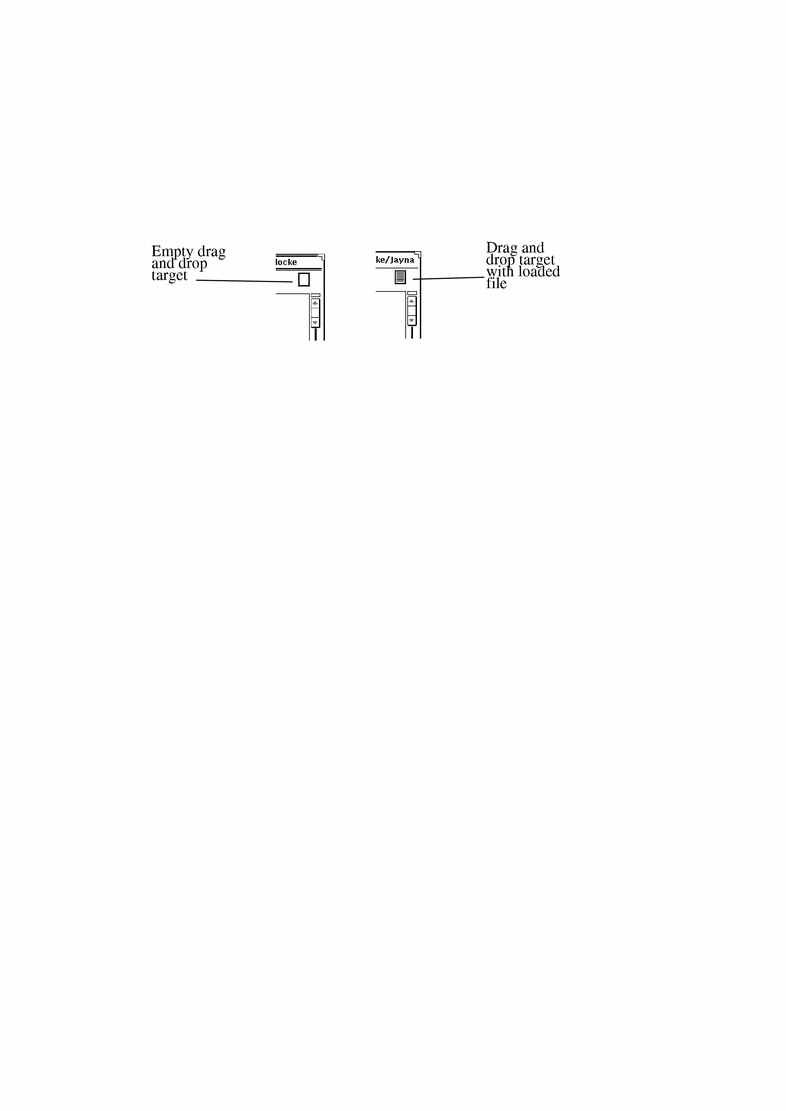
The OpenWindows drag and drop feature enables you to use your applications together. To send a file from one application to another, you drag a file (in icon form) from the first application and drop it on the second application icon or its drag and drop target--a small rectangle in the application window. (In most applications, the drag and drop target is in the upper right corner.)
An application's drag and drop target is an empty rectangle if the application does not currently contain a file. When a file is opened from the application or dropped onto the drag and drop target, the target changes in appearance. Figure 1-16 shows an empty drag and drop target and one that contains a file.
Figure 1-16 Drag and Drop Targets
Follow the steps below for any drag and drop operations:
-
Select an object or objects to be dragged.
For example, you might want to select a set of files in the File Manager by pointing at the first file and clicking SELECT, and then clicking ADJUST on the additional files. Or you might want to select a section of text from the Text Editor by pressing SELECT at the start of the desired text, dragging through the text to be moved, and releasing SELECT.
If you want to drag just one file or the contents of a drag and drop target, you can skip this first step.
-
Initiate a move by pointing at a file glyph, the shaded area in a drag and drop target, or a selected object. Then press SELECT and drag the pointer.
If you want to copy the object instead of move it, you can do so by pressing the Control key on the keyboard before pressing SELECT. Keep the Control key held down until after the drag is initiated.
-
When the hot spot of the pointer (the tip of the pointer arrow) is at an appropriate place, drop the selection by releasing SELECT.
The selection is "dropped" at the new location. Depending on the object being dragged, the location can be an icon, a drag and drop target, the window of an application, the workspace background, or a text pane.
In many cases you do not need to worry about whether you need to move an object or copy it. Whenever you use drag and drop to move an object, the DeskSet applications attempt to do the right thing based on the operation. For example, if you move a file from the File Manager into the Wastebasket, it is actually moved to the Wastebasket. (That is, the file is removed from the original location.) On the other hand, if you move a file from the File Manager onto the Print Tool, the file is only copied. The original file remains in its original location.
If it is not obvious whether an object should be moved or copied, it is moved unless the Control key is held down while the drag is initiated.
The following paragraphs list some typical drag and drop operations between the DeskSet applications. See the chapter for each application for more information about how the application supports drag and drop operations.
File Manager glyphs can be dropped onto the following DeskSet applications:
-
Mail Tool
-
Wastebasket
-
Print Tool
-
Tape Tool
-
Text Editor
-
Icon Editor (if it is an icon file)
-
Snapshot (if it is a raster or GIF file)
-
Audio Tool (if it is an audio file)
Mail messages from the Mail Tool Header window can be dropped onto the following DeskSet applications:
-
Text Editor
-
Print Tool
-
File Manager
-
Wastebasket
-
Calendar Manager (with specific format restrictions)
Mail Tool Attachments can be dropped onto these DeskSet applications:
-
File Manager
-
Wastebasket
-
Print Tool
-
Text Editor
-
Image Tool
-
Icon Editor (if it is an icon file)
-
Snapshot (if it is a raster file)
-
Audio Tool (if it is an audio file)
Text selections from Text Editor files can be dropped onto these applications:
-
Mail Tool
-
Text Editor
-
Print Tool
-
Calendar Manager (with specific format restrictions)
-
Icon Editor (if it is an icon file)
-
File Manager
-
Wastebasket
-
Command Tool
Text files from the Text Editor drag and drop target can be dropped onto these applications:
-
File Manager
-
Wastebasket
-
Print Tool
-
Mail Tool
-
Calendar Manager (with specific format restrictions)
-
Command Tool
If an error occurs during a drag and drop sequence, refer to Appendix A, Solaris Troubleshooting.
Drag and Drop Examples
Sometimes an application has a drag and drop target, typically located in the top right of an application's control area. The drag and drop target is shown in Figure 1-17. Note that on a color workstation the drag and drop target will appear lightly shaded.
Figure 1-17 Drag and Drop Target
When you drop an object onto a drag and drop target, the object is loaded into the application, replacing whatever was currently loaded. For example, if you drop a file or text selection onto the Text Editor's drag and drop target, the entire contents of the Text Editor are replaced by the dropped file or text.
Some drag and drop targets contain lines to indicate that the entire contents of the current application can be dragged out of the drop target. For example, when you drag the lined area from the Text Editor drag and drop target, the entire contents of the Text Editor are dragged.
Figure 1-18 Drag and Drop Target Containing a Draggable Object
You can sometimes drop an object directly into a pane that contains data in order to add the object instead of loading it. For example, you might want to drop text somewhere within a text pane to insert the dropped text into the existing text of the pane (instead of replacing the existing text, which would happen if you dropped the text on the drag and drop target). Another common example is to drop a file onto a folder in the File Manager to add that file to the folder.
There are many ways to drag and drop files among DeskSet Applications. The following are several examples.
-
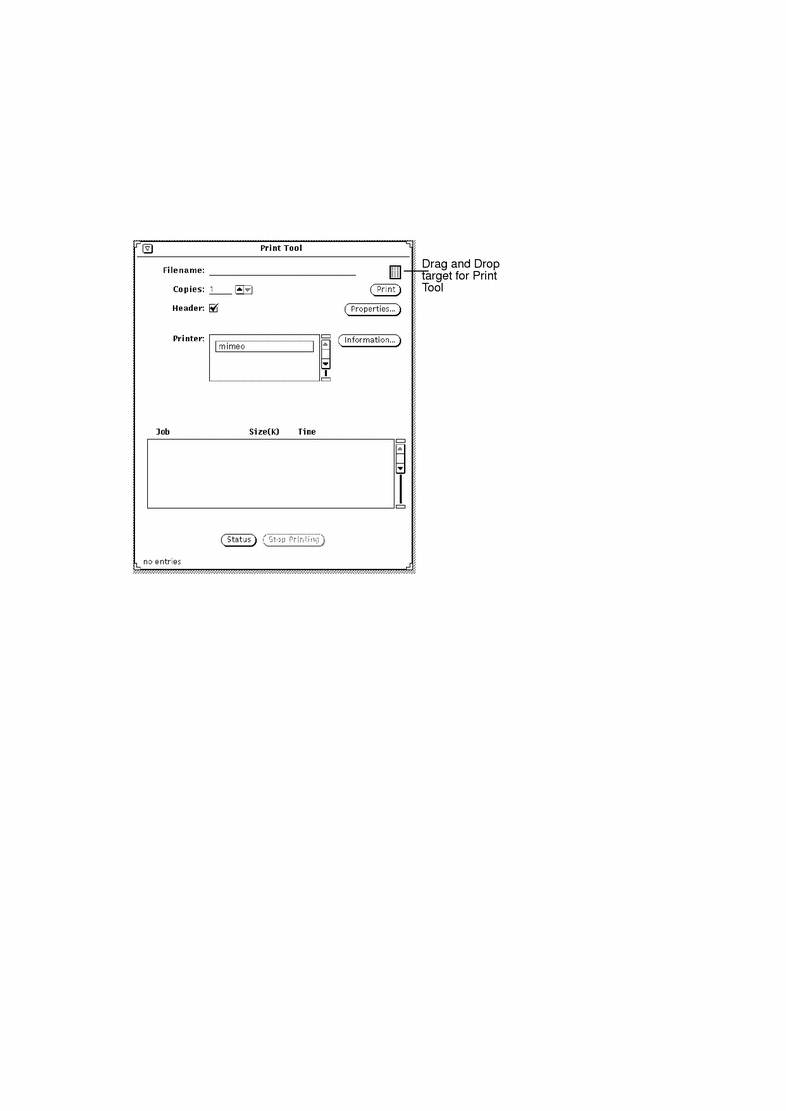
You can print a file by dragging it and dropping it onto the Print Tool icon or its drag and drop target. Figure 1-19 shows Print Tool's drag and drop target. Chapter 10, Print Tool, discusses Print Tool in detail.
Figure 1-19 Print Tool's Drag and Drop Target
-
You can delete a file you no longer need by pressing SELECT on the file icon in File Manager or in the Attachments window of a Multimedia Mail Tool message, dragging it to the wastebasket icon, and releasing the mouse button.
-
You can drag a text file, folder or other icons from File Manager and drop them on the Workspace to view it.
-
You can drag files attached to a Multimedia Mail Tool message window and drop them onto the Workspace: the application with which the file was created (such as File Manager, Text Editor, Audio Tool, or Icon Editor) is invoked and the file is opened in the application window. Refer to Chapter 2, File Manager, or Chapter 4, Multimedia Mail Tool for more information about dragging and dropping with these tools.
Positioning Windows and Pinned Menus
You can position your windows and pinned menus anywhere on the Workspace, and can move a window or menu in front of other windows. To move a window to a new location on the Workspace:
-
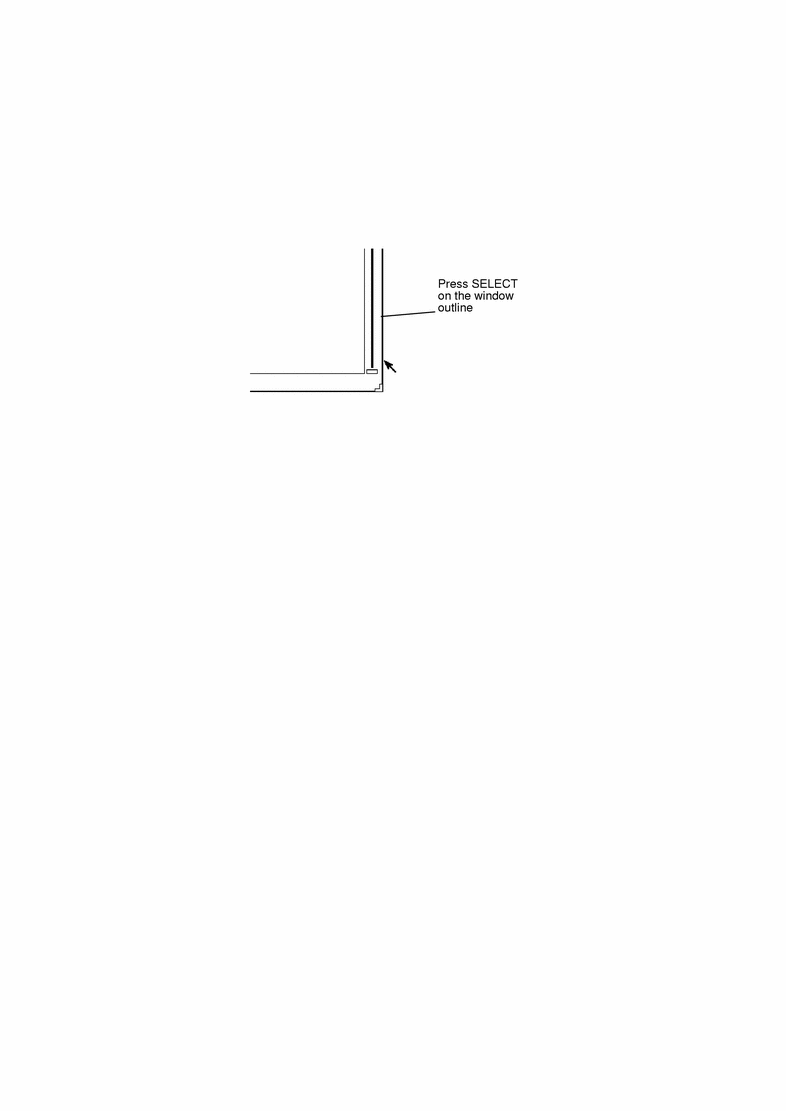
Move the pointer to the black line that surrounds an open window or pinned menu, and press SELECT.
Figure 1-20 shows the pointer on a window edge for repositioning.
Figure 1-20 Moving an Application Window
-
Drag the pointer across the Workspace to a new location.
A border box the size of the window moves with the pointer.
-
Release SELECT.
The window appears in the new location.
Moving Multiple Windows
You can group windows together so that they move as a unit. For instance, you may want to arrange several windows on the Workspace in relationship to one another, and then move the whole arrangement to a new location.
One way to group several windows is to click SELECT on one of the windows and ADJUST on each additional window. Alternatively, you can drag the pointer across the Workspace to form a box around the windows you want to group. You can do this as follows:
-
Place the pointer in the Workspace at one corner of the set of windows you want to group.
-
Press SELECT and drag the pointer diagonally to the opposite corner of the group.
This forms a rectangle around any windows and icons that are fully enclosed within the border box.
-
Release the mouse button.
The items are selected as a unit.
-
Place the pointer on the edge of one of the grouped windows as described in the last section, "Positioning Windows and Pinned Menus", press SELECT, and drag the pointer to a new location.
The group of windows moves to the new location.
-
To un-group the applications, press SELECT anywhere on the Workspace.
Moving a Window Front or Back
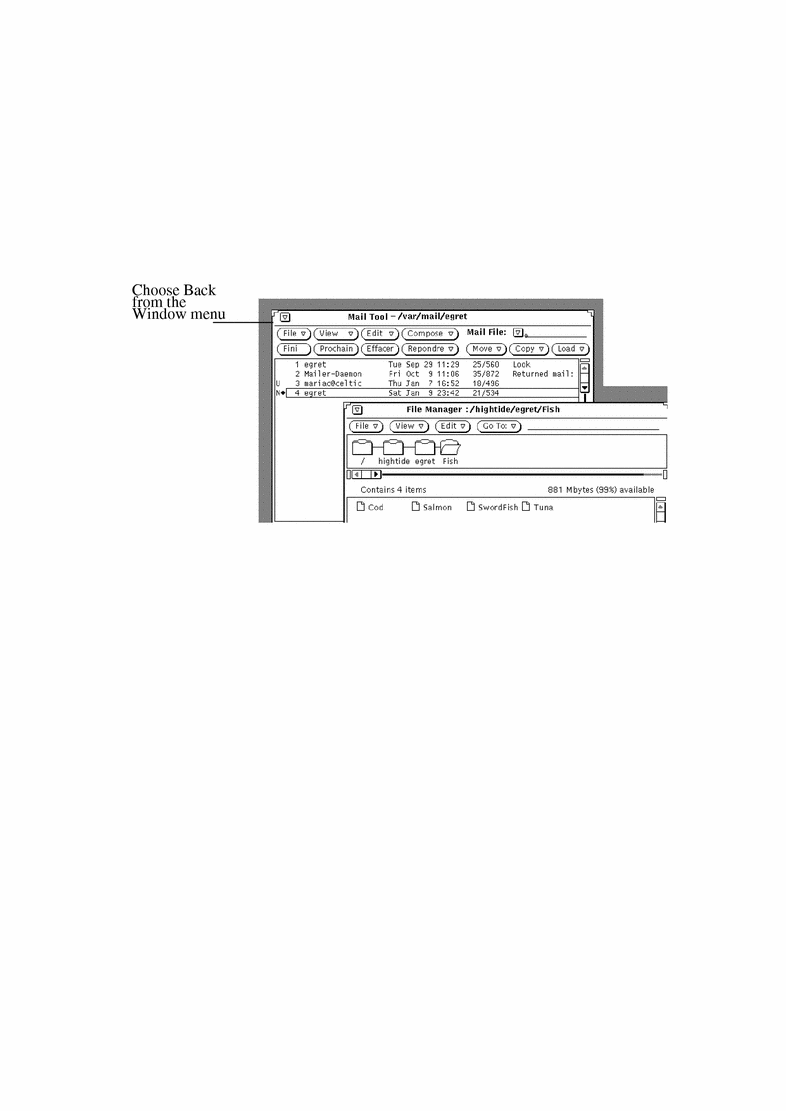
To move a window in back of another window:
-
Move the pointer onto the header of the window you wish to move in back.
-
Press MENU, drag the pointer to highlight Back.
Figure 1-21 shows the Back button highlighted on a Window menu.
Figure 1-21 Moving a Window in Back of Another Window
-
Release MENU.
That window moves to the rear.
SPARC only -Alternatively, you can use the Front key on your keyboard, which toggles back/front depending on the location of the window. (If the window is in back and you position the pointer in that window and press the Front key, that window moves to the front. But if it is already in front, it moves in back.)
Moving Icons
You position icons in much the same way as you do windows and pinned menus. To move an icon to a new location, just move the pointer onto an icon, press SELECT, and drag the outline of the icon to a new location. When you release the mouse button, the icon appears in the new place. Figure 1-22 shows an icon and the outline that appears as it is moved.
Figure 1-22 Moving an Icon to a New Location

When you first start an application and then close it to an icon the icon appears in a default location. You can change the default locations by selecting Save WorkSpace from Utilities or with the Workspace Properties window. Chapter 17, Customizing the Solaris Environment, describes the Properties window.
Resizing Windows
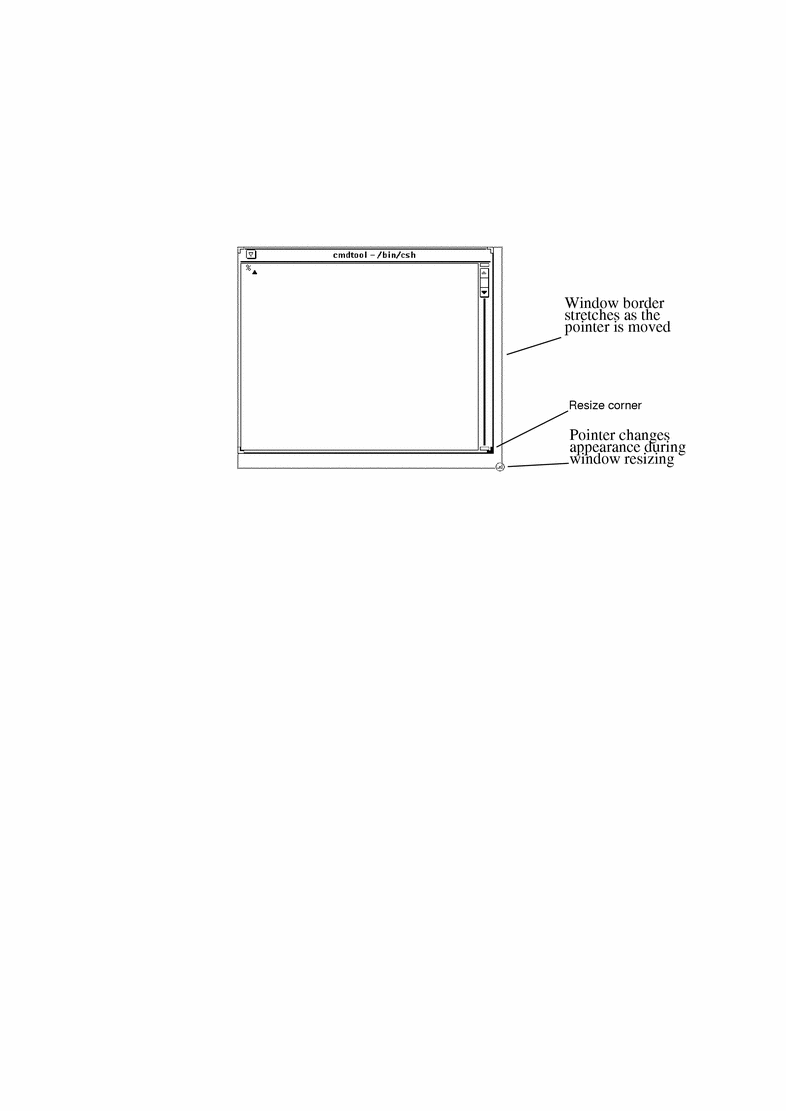
The corners of windows are the handles you use for resizing. To resize a window:
-
Position the pointer on one of the window corners.
The pointer turns into a tiny bull's eye. This means that the pointer is in the correct location for resizing.
-
Press SELECT and drag the pointer to the desired size.
An outline shows the size of the window.
-
Release SELECT.
Figure 1-23 shows the pointer positioned on a window's handle for resizing.
Figure 1-23 Stretching a Window by its Resize Corner
Closing and Quitting Windows
Each window has a Close option in its window menu. You can access this by placing the pointer in the header or on the window border, holding down the MENU mouse button, and highlighting Close, as shown in Figure 1-24.
Figure 1-24 Window Menu with Close Highlighted
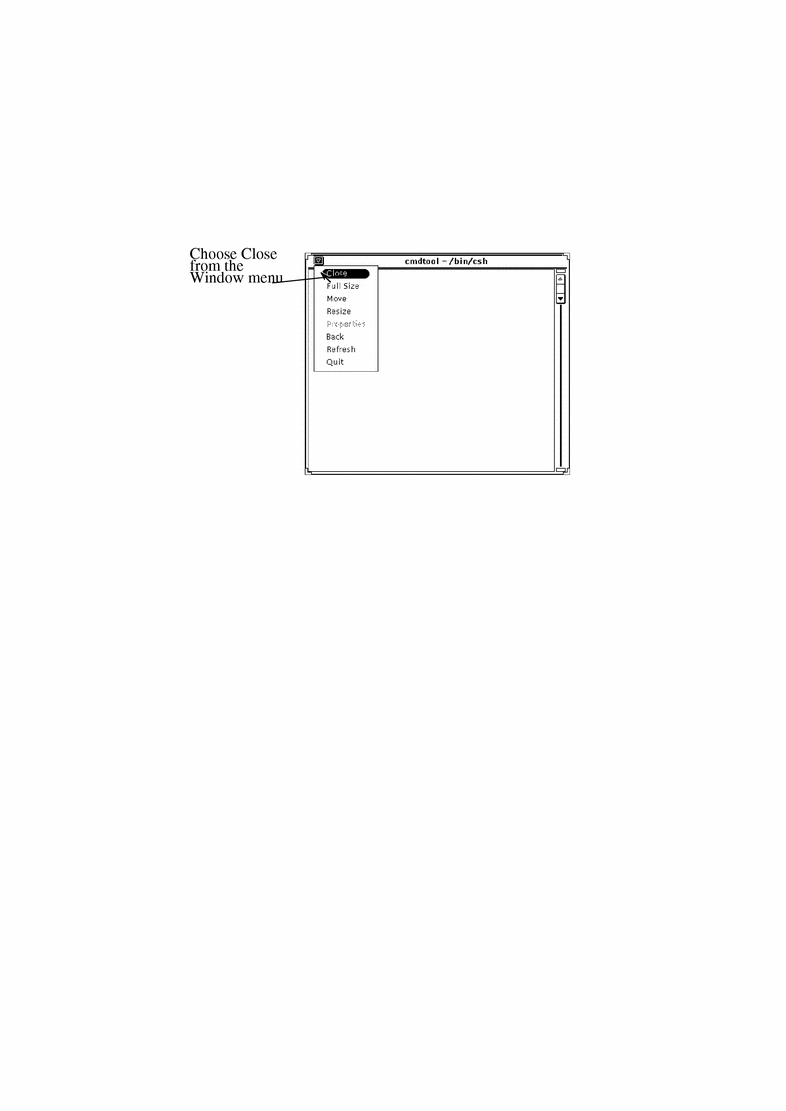
When you release the mouse button, the window closes to its icon form. Alternatively, because Close is the default choice in the window menu, you can click SELECT on the abbreviated menu button in the window header.
The menu in the window header also includes a Quit option. To quit a window from the Workspace, move the pointer onto the header or the abbreviated menu button, press the MENU mouse button, and highlight Quit. When you release the mouse button the window is dismissed from the Workspace and the application quits.
Starting an Application
You start applications from the Workspace menu, which you display by placing the pointer in the Workspace and holding down the MENU button. To start an application of your choice, you drag the pointer to the right to display the Programs submenu, and then to the name of the application. When the name is highlighted, you release the mouse button. After a moment the application is displayed on the Workspace.
Elements of an Application's Base Window
Some applications have one window, and others have one or more subwindows. The primary window that appears when you display an application is called a base window. Figure 1-25 shows the visual elements of a simple base window.
Figure 1-25 Base Window with Pop-Up Menus
Opening, Saving, Including and Attaching Files
Once you begin working with the DeskSet applications, you will at sometime need to open, save (or rename), include, or attach a file (or document). There is a standard window that looks very similar from application to application for performing these tasks throughout the DeskSet applications. Once you learn the basic elements of this window, you can easily perform these tasks.
DeskSet applications that use this type of window include: Text Editor, Mail Tool, Command Tool, Shell Tool, Audio Tool, Image Tool, Snapshot, and Icon Editor.
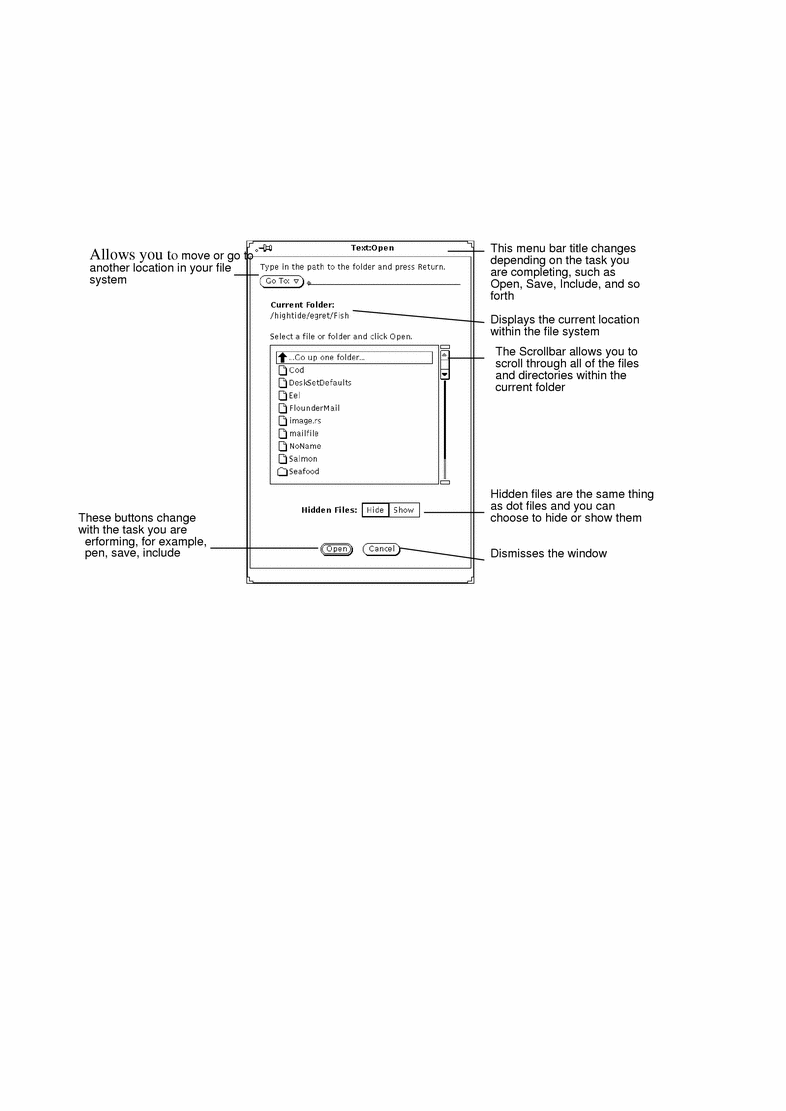
Figure 1-26 shows an example of a standard Open window. This window looks very similar from application to application, except the window header reflects the current task. For example, you'll see a reference to the application, such as Text: and the name of the task following it, like Open, Save, Save As, Include or Attach.
Figure 1-26 An example of the Open Window
Note -
You can use File Manager to keep track of documents and folders (directories and files). Refer to Chapter 2, File Manager, for information on how to use it.
Opening a Document
To open a document from an application:
-
Choose Open from the File menu.
An Open window similar to the one in Figure 1-26, is displayed.
-
Select the name of the folder from the scrolling list.
Click SELECT on the name of the folder, then click Open. Or, double-click on the name of the folder. If it is not displayed, double-click on "Go up one folder." You may need to repeat this a few times.
-
Choose the folder that contains the document you want to open.
The name of the folder must be displayed under Current Folder. To display the folder you can:
-
When the scrolling list shows the contents of the folder, select the desired document and click SELECT on Open.
You can also double-click on the name of the document.
Note -You can use the same steps as opening a document for including a file from Text Editor or Attaching a file from Mail Tool. The result will be an included or attached file (or document).
Saving a Document
You may need to save (or rename) a document in one of three stages:
-
Saving a new and untitled document
-
Saving an existing document
-
Saving and renaming an existing document (Save as)
Saving a New and Untitled Document
The first time you work with a document (or file), you have to give it a name and save it to a particular location in your file system.
-
Choose Save from the File menu.
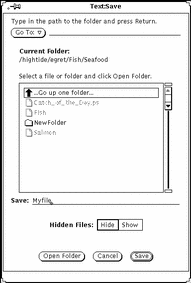
Depending on the application you are working in, you see a Save window similar to the one in Figure 1-27.
Figure 1-27 An example of the Save Window
-
Choose the folder location for saving the document.
The name of the folder must be displayed under Current Folder.
-
Select the name of the folder from the scrolling list.
Click SELECT on the name of the folder and click Open, or, double-click on the name of the folder. If it is not displayed, double-click on "Go up one folder." You may need to repeat this a few times.
or
-
Type a name for the document in the text field and SELECT Save.
When the scrolling list shows the contents of the folder, type a document name and click SELECT on Save.
Saving an Existing Document
To save changes to the contents of an existing file:
Choose Save from the File menu.
The document is saved with the same name and in the same folder.
Saving and Renaming an Existing Document
The following procedure saves a file under a name:
-
Choose Save As from the File menu.
Depending on the application you are working in, you see a Save As window similar to the one in Figure 1-27.
-
Choose the folder location for saving the document.
The name of the folder must be displayed under Current Folder. To display the folder you can:
-
Select the name of the folder from the scrolling list.
Click SELECT on the name of the folder, or, double-click on the name of the folder. If it is not displayed, double-click on "Go up one folder." You may need to repeat this a few times.
or
-
Type a new name for the document in the text field and SELECT Save As.
When the scrolling list shows the contents of the folder, type a document name and click SELECT on Save.
Note -When you rename a document without making changes to it, you will have two versions of the document, one with the old name and one with the new name. If you work with a file on a daily basis, note the name of the one you are working with so as not to overwrite the wrong one when you save your work.
Introduction to the DeskSet Applications
DeskSet is the collection of applications which come with the Solaris software. The DeskSet applications are the default set available from the Workspace Programs submenu.
The following sections discuss the tasks you will most likely perform on a regular basis, and introduce the applications you need to accomplish those tasks. Each of the applications is discussed in detail in following chapters.
-
Move the pointer onto the Workspace (the OpenWindows background).
-
Press (and hold) MENU.
-
When the Workspace menu is displayed, drag the pointer to display either the Programs or Utilities submenu.
-
Drag the pointer down to highlight the application you would like to start.
When you release the mouse button, the application appears on the Workspace. Figure 1-28 shows an application being selected from the Program's submenu.
Figure 1-28 Choosing an Application
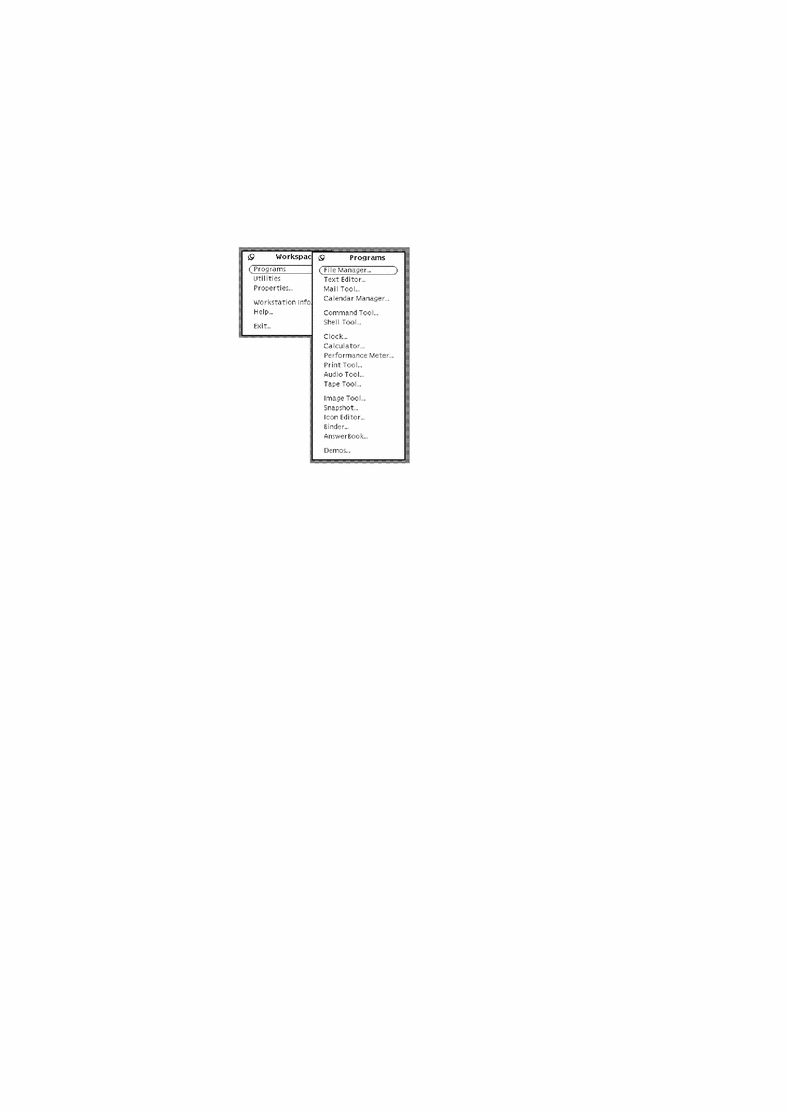
Follow these instructions whenever you want to start a DeskSet application. The instructions from now on will say "choose Workspace -> Programs -> application" (where application is the appropriate application name).
Starting DeskSet Applications
You typically access DeskSet applications from the Programs submenu of the Workspace menu. You access the Workspace menu by pressing MENU with the pointer anywhere on the background of your DeskSet environment and off of all applications. When the DeskSet applications are installed on your system, they are automatically provided as items in the Programs submenu.
You can also start any of the DeskSet applications from a system prompt in a Command Tool or Shell Tool window by typing the file name. If you want to continue doing work in the Command or Shell Tool while the DeskSet application is running, follow the application name with a space and the ampersand symbol (&). Table 1-1 shows what you should type to start each DeskSet application.
Table 1-6 What to Type to Start DeskSet Applications|
Application Name |
What you should Type |
|---|---|
|
AnswerBook |
answerbook & |
|
Audio Tool |
audiotool & |
|
Binder |
binder & |
|
Calculator |
calctool & |
|
Calendar Manager |
cm & |
|
Clock |
clock & |
|
Command Tool |
cmdtool & |
|
Console |
cmdtool -C & |
|
File Manager |
filemgr & |
|
Icon Editor |
iconedit & |
|
Image Tool |
imagetool & |
|
Mail Tool |
mailtool & |
|
Performance Meter |
perfmeter & |
|
Print Tool |
printtool & |
|
Shell Tool |
shelltool & |
|
Snapshot |
snapshot & |
|
Tape Tool |
tapetool & |
|
Text Editor |
textedit & |
Working with Text
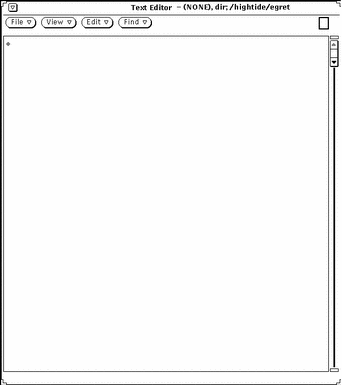
The OpenWindows Text Editor is an application for working within documents and composing, editing, cutting, copying, and pasting text. Text Editor enables you to create and compose a new document or open (load) an existing document into the application for editing. You can also work with text using a command line editor (such as vi) in a Command Tool or Shell Tool. For information on using vi, refer to Solaris Advanced User's Guide. Figure 1-29 shows the Text Editor application window.
Figure 1-29 Text Editor Application Window
Managing Your Files
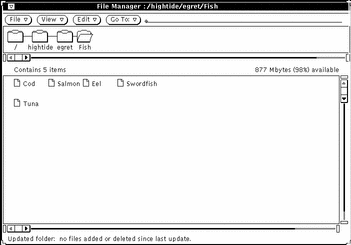
The File Manager application provides a graphical display of the structure of the folders and documents (directories and files) in your file system. Each file appears as an icon, as shown in Figure 1-30.
Figure 1-30 File Manager's Base Window
Opening a File in File Manager
You can open a file or application displayed in the File Manager base window by pressing MENU on its icon and choosing Open. When you open a text file icon, for instance, a Text Editor application is started and the chosen file is opened in the Text Editor window.
Viewing the Contents of a Folder in File Manager
To look at the contents of a folder, you can press MENU on the icon and select Open, double-click SELECT on the folder icon or press SELECT on it, drag it into the Workspace, and release the mouse button. The icon opens into a window pane displaying the items in that folder.
Moving Files in the File System
You move files from one folder to another by selecting and dragging them with the pointer (for instance, from the top level of the home directory to a folder you have opened on the Workspace) or by cutting them from one folder, opening another folder, and pasting them there.
Dragging and Dropping
File Manager works interactively with the other DeskSet applications. For example, if you want to listen to an audio file, you can drag it from File Manager and drop it onto the Workspace.
To delete a file, you can drag it from its location to the Wastebasket icon. To send a file to the printer, you drag it and drop it on the Print Tool icon. To save a file or a set of files on a tape for other processing, you can drag files from File Manager to the Tape Tool application.
Managing Your Time
The OpenWindows environment provides an icon-based Clock program and an icon-based calendar, called Calendar Manager. Figure 1-31 shows the Calendar Manager base window.
Figure 1-31 Calendar Manager Base Window
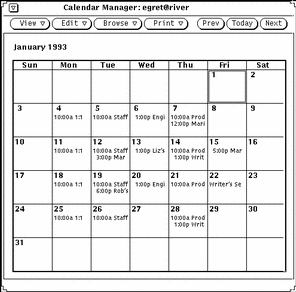
Calendar Manager is an interactive application that lets you schedule your appointments and will send you messages about them on request. For instance, you can request that Calendar Manager beep or send an electronic mail message to your mailbox to remind you of important meetings, and you can check the calendars of others on your network.
Printing Your Documents
To print documents, you use Print Tool. Print Tool enables you to print documents from a variety of formats, including ASCII, troff, PostScript text, and raster images. Figure 1-32 shows the Print Tool application window.
Figure 1-32 The Print Tool Application Window
To print a document, you can drag a file icon from File Manager and drop it on the Print Tool icon or on the open Print Tool drag and drop target. Another method is to type the file and pathname in the Print Tool text field and click SELECT on the Print button. You can also send messages and images to the printer from Multimedia Mail Tool and from Snapshot--an application that enables you to take pictures of windows and images on your workstation screen.
Communicating on the Network
Multimedia Mail Tool provides a convenient method of communicating with others electronically by sending and receiving messages, sound files, and other data files. It works together with the Calendar Manager application when you want to set up group meetings and send electronic notification and automatic reminder messages, and with Audio Tool when you want to send Voice Mail.
The Multimedia Mail Tool icon looks like a tiny in-box. The in-box is empty when there is no mail; it has stacked letters when the mail in the mailbox has been read, and overflowing letters when there is new mail. Figure 1-33 shows the Mail Tool icon in its different forms. The icon opens up into a base window for receiving, composing, and sending electronic mail messages.
Figure 1-33 No Mail; New Mail; All Mail Read
Customizing the OpenWindows Environment
You can modify many aspects of the OpenWindows environment, including the fonts used in applications and menus, the distance you need to drag the pointer from a menu to open a submenu, and the window and menu colors. Additionally, if you are left-handed, you may want to remap the keys on the left and right panels of the keyboard for ease of use.
Chapter 17, Customizing the Solaris Environment, provides instructions for customizing the OpenWindows environment, including WorkSpace Properties, keyboard and mouse customization.
Hidden Files
Hidden files or "dot" files as they are sometimes called, are distinguished in your file system with a dot (.) in front of them. These files are normally not visible to you in your home directory and you should not change or delete these files unless you have specific knowledge about the file.
Getting Help
There are two kinds of on-line help available: Magnify HelpTM or immediate assistance with an item in the OpenWindows environment, such as a menu or window element, and the help handbooks for quick reference on the elements and applications of the OpenWindows environment.
Note -
The OpenWindows "more help" facility (Help Viewer) depends on the X11 window server. Therefore, it will not work with a non-OpenWindows server (for example, the MIT X11 server). In particular, clicking the More button within a Magnify Help window, or choosing Help from the Workspace menu fails, and the following error message is displayed on the console:
XView error: NULL pointer passed to xv_set helpopen: Viewer could not display document: handbooks/...
Magnify Help
When you begin using the Solaris software, you will find that you can choose from a variety of windows and menus. When you need information on a particular window, menu, or object, Magnify Help enables you to get information quickly.
Follow these steps to get on-line help about a window or menu item:
-
Move the pointer to the item (such as a menu) that you want to know about.
-
Press the Help key on the keyboard.
This is the F1 key on some systems. A help window pops up with information about that item.
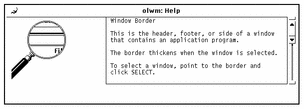
Figure 1-34 shows a Magnify Help window.
Figure 1-34 Magnify Help Window
More Help
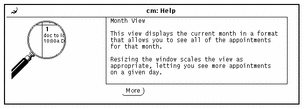
Most items on the Workspace have associated help handbooks. When an associated handbook exists, a button labeled "More" appears at the bottom of the Magnify Help window. To see more help on that topic, click SELECT on the More button. Figure 1-35 shows a help window with a More button.
Figure 1-35 Window with More Button
Dismissing a Help Window
A pop-up window is dismissed when you close or quit the application. If you would like to close the Magnify Help window before you quit the application, you can click SELECT on the pushpin in the upper left corner of the Magnify Help window.
No Help
A small pop-up window appears if no Magnify Help is available, stating that there is no help for that item. The pointer jumps to the OK button, and you must click SELECT to continue.
Help Viewer
The help handbooks provide introductory information to guide you through the OpenWindows environment. These are presented in a concise format in the Help Viewer. The "Introducing Your Desktop" handbook is a tutorial that describes basic OpenWindows operations. The other handbooks provide task-oriented steps on individual topics. In addition, there is a handbook that describes how to navigate in the on-line help system. You can browse all of the handbooks in any order you choose.
Desktop Introduction
You can access the introductory handbook, "Introducing Your Desktop" from the Workspace menu, as follows:
-
Move the pointer onto the Workspace and press MENU.
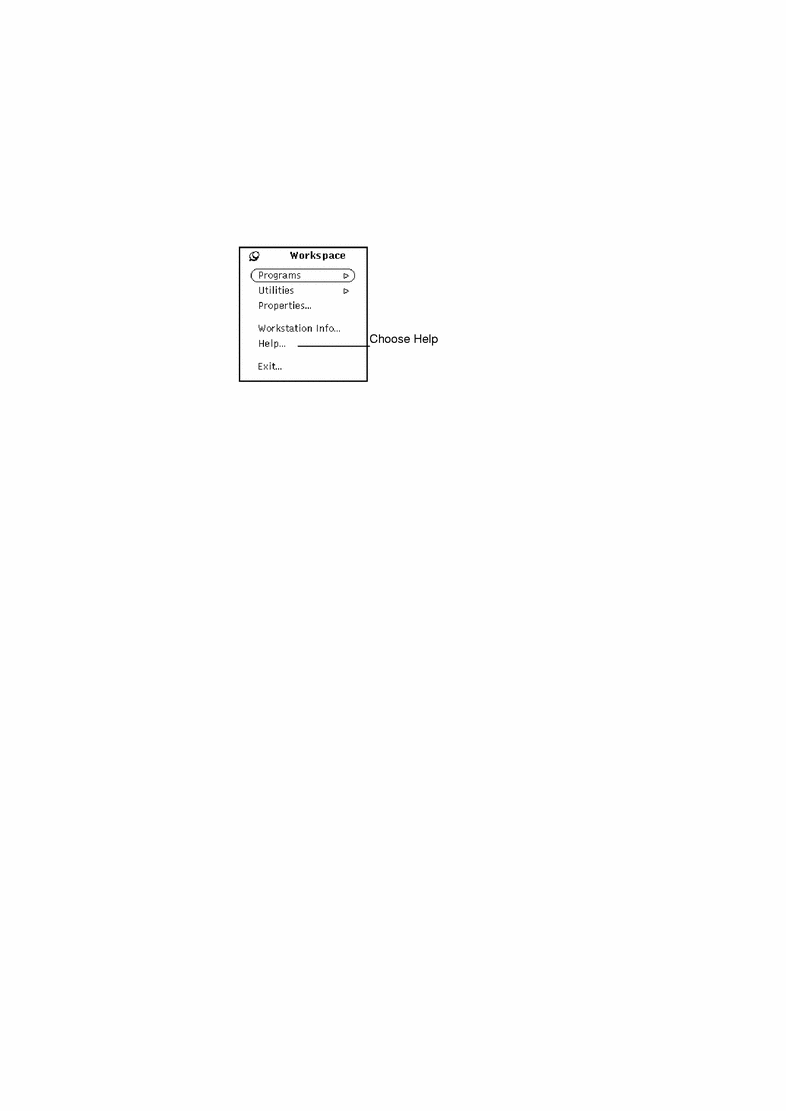
The Workspace menu appears, as shown in Figure 1-36.
Figure 1-36 Workspace Menu
-
Drag the pointer to choose Help.
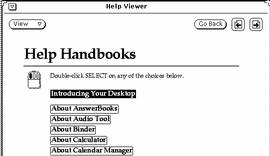
When you release the mouse button, the Help Viewer appears displaying a list of handbooks.
-
Double click SELECT on "Introducing Your Desktop".
Figure 1-37 shows the Help Viewer selection.
Figure 1-37 Selecting Introducing Your Desktop
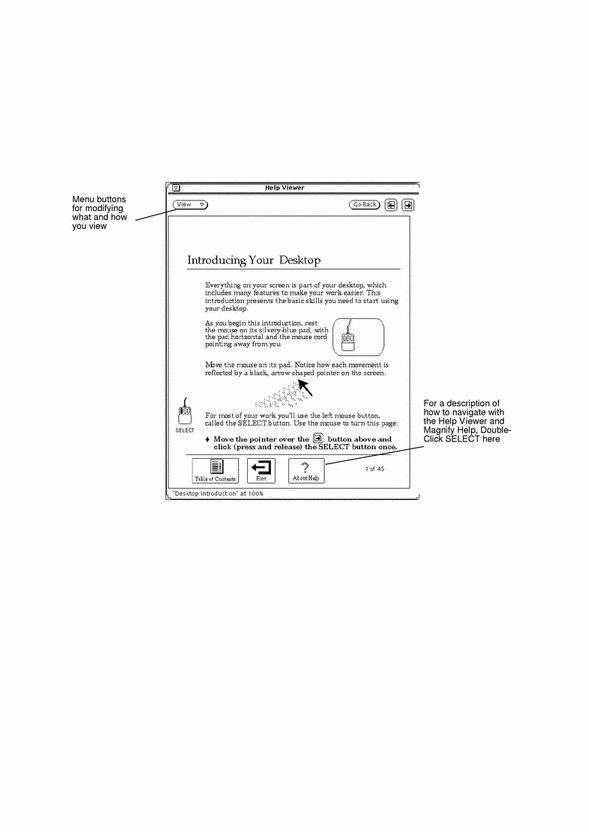
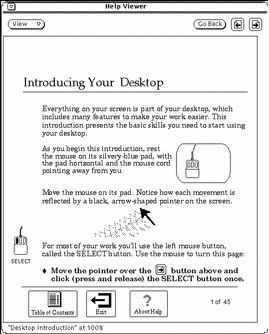
The on-line tutorial, "Introducing Your Desktop," opens in the Help Viewer, as shown in Figure 1-38.
Figure 1-38 First Page of the Desktop Intro Handbook
Help on Help
You can view a description of how to navigate in the help system. Double-click SELECT on the "About Help" icon shown in Figure 1-38. (Alternatively, you can click SELECT once on the icon and then click SELECT on the View menu button.) This option is available from any help handbook. Note also that there is Magnify Help (described in "Magnify Help") for each element on the Help Viewer.
Other Handbooks
You can access help handbooks that describe the DeskSet applications and the OpenWindows Workspace by following the steps below. Note, however, that if you are currently displaying the first page of any handbook, you can bypass these steps by double-clicking SELECT on the More Handbooks icon at the bottom of the Help Viewer.
To access the help handbooks at any time:
-
Move the pointer onto the Workspace and press MENU.
The Workspace menu appears.
-
Drag the pointer to choose Help.
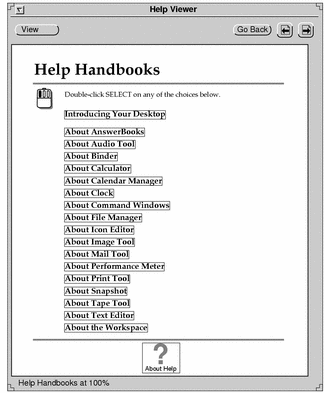
When you release the mouse button, the Help Viewer displays the help handbook table of contents that lists handbooks, as shown in Figure 1-39.
Figure 1-39 Help Viewer
-
Double-click SELECT on the topic of your choice.
The Help Viewer then displays the table of contents for the selected handbook.
Quick Access to Help Handbooks
You can accelerate access to a help handbook from any DeskSet application, icon, or menu by pressing Shift and Help (or F1) on your keyboard. As an example, position the pointer over an area of interest, such as the Mail Tool application window, and press Shift-Help. The Help Viewer appears on the Workspace, displaying the appropriate handbook, in this case "About Mail Tool."
Note -
On x86 and PowerPC machines, the Help key is the F1 key.
Navigating through Handbooks
When you display a particular handbook, you have several choices. You can:
-
Page through the handbook.
-
Double-click SELECT on a topic to access that information quickly.
-
Return to the table of contents of help handbooks.
-
Return to a handbook's table of contents from within that handbook.
The following sections describe these operations.
Paging through a Handbook
The buttons at the top of the Help Viewer enable you to move backward or forward, page by page. Clicking SELECT on the Next Page and Previous Page buttons is equivalent to pressing the PgUp and PgDn buttons on your keyboard. Figure 1-40 shows the help handbook paging buttons.
Figure 1-40 Buttons for Paging Through the Handbooks
The Go Back button gives you the option to go back to the last page viewed. Click SELECT on the Go Back button to return to wherever you were last. If you have viewed pages in various parts of a handbook or in different handbooks, you can retrace your steps by choosing Go Back as many times as necessary.
The paging features are also available from the Viewer menu, shown in Figure 1-41.
Figure 1-41 The Viewer Menu
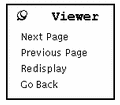
To use the Viewer menu:
-
Position the pointer in the Help Viewer window and press MENU.
The Viewer Menu appears.
-
Move the pointer to the pushpin and pin up the Viewer menu if you want to keep the menu up for repeated use.
When you release the mouse button, the menu remains.
-
Click SELECT on a menu item to page down, page up, redisplay (refresh) the window, or go back to your last location.
Alternatively, if you have not pinned the menu, just choose a menu item using the MENU mouse button.
Note -
As with any DeskSet application or pinned menu, you can move the Viewer menu by positioning the pointer on the menu outline, pressing SELECT and dragging the pointer to a new location.
Using the Handbook Hypertext Links
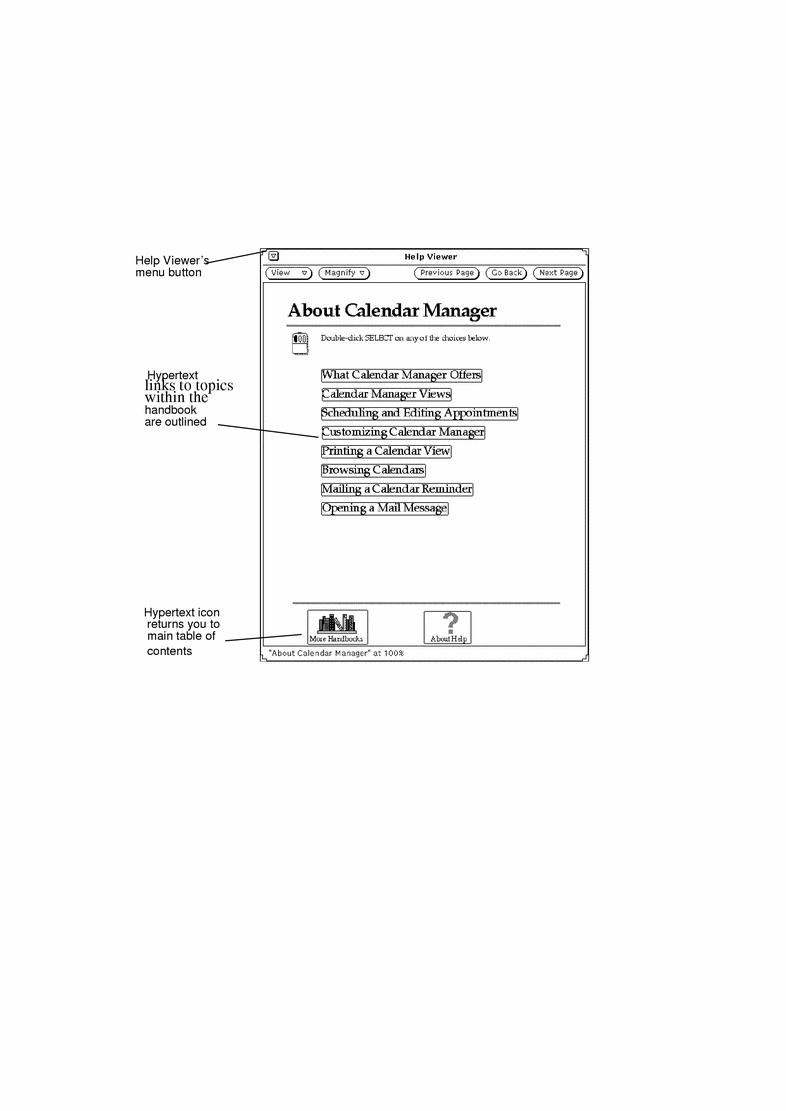
The help handbooks can be used in a non-linear fashion. When you see an outlined reference to more information, you can double-click SELECT on that portion of the text to go to the referenced location. The black outlines indicate hypertext links. From the main table of contents for the handbooks, you can access a handbook quickly by double-clicking SELECT on the handbook's title. Within a given handbook, you can double-click SELECT on one of the links within that book to go to that topic. Figure 1-42 shows the hypertext links in the table of contents for the Calendar Manager help handbook.
Figure 1-42 Table of Contents with Hypertext Links
Returning to a Handbook's Table of Contents
When you have chosen a handbook, and selected a topic within that handbook, you can return to that handbook's table of contents by double-clicking SELECT on the Table of Contents icon (see Figure 1-43) at the bottom of the handbook.
Figure 1-43 The Table of Contents Icon in a Handbook
Returning to the Main Table of Contents
To return to the main table of contents for all the help handbooks, navigate to the first page of the current handbook and double-click SELECT on the More Handbooks icon at the bottom of a page (shown in Figure 1-42).
Closing the Help Viewer
You can close the Help Viewer to an icon until you need it next. To close Help Viewer, click SELECT on the abbreviated menu button in the upper left corner of any handbook.
Figure 1-44 shows the Viewer icon.
Figure 1-44 Viewer Icon
Double-click SELECT on the Viewer icon when you want to open it again.
Exiting the Help Viewer
You can exit the Help Viewer from any location by choosing Quit from the Window menu.
Double-clicking SELECT on the Exit icon at the bottom of the page of Introducing Your Desktop handbook displays instructions for quitting the tutorial handbooks. Figure 1-45 shows the Exit icon.
Figure 1-45 The Exit Icon in Introducing Your Desktop
On-line Documentation: AnswerBooks
As you use your system and its software, you can browse, search, bookmark, and print from manuals right on your screen in your own on-line Library. Your Library may contain one or more AnswerBooks, or collections of documents covering many topics.
For more information about AnswerBooks, see Chapter 19, Using the AnswerBook Software.
Note -
To give you access to AnswerBooks, your administrator has to install and configure them for your use.
To open your on-line Library, choose Workspace->Programs->AnswerBook.
- © 2010, Oracle Corporation and/or its affiliates
