Chapter 4 Multimedia Mail Tool
Multimedia Mail Tool lets you communicate with other people on the network. You can write, send, and receive electronic mail. When you receive an electronic mail ("email") message, you can act upon it in various ways:
-
Save the message as a file anywhere in your file system
-
Delete the message
-
Reply to the sender
-
Forward the message to another recipient along with your own message
-
Print the message
You can send and receive attachments: audio files, image files, document files, executable files, or any other files.
Using drag and drop, Multimedia Mail Tool works in combination with File Manager, Text Editor, AudioTool, Calendar Manager, and other applications to provide an integrated workspace environment.
For brevity, Multimedia Mail Tool is referred to simply as Mail Tool throughout the rest of this document.
To open Mail Tool, choose Workspace -> Programs -> Mail Tool.
How Mail Tool Is Organized
Mail Tool has three key windows:
-
The Header window is a base window that lists mail messages that you have received.
-
The View Message window is a pop-up window where you read your messages.
-
The Compose window is a base window for responding to messages or writing new messages.
Each of these windows is described in detail later in this chapter.
Header Window Icons
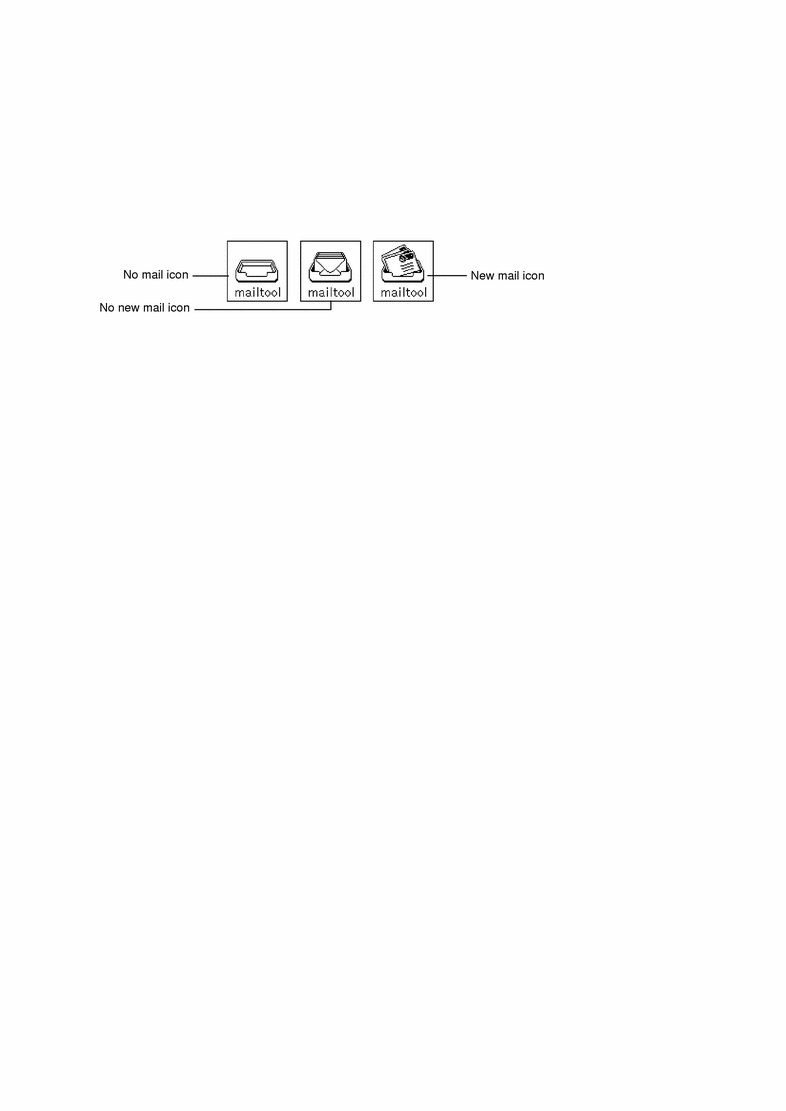
The primary Mail Tool icon, for the Header window that shows you incoming mail messages, looks like a standard office In-Box. When you don't have any mail, the In-Box on the icon is empty. When you have mail that has all been read, the In-Box contains a neatly stacked set of envelopes. When new mail arrives, envelopes are placed in the In-Box with the stamped and addressed side showing. Figure 4-1 shows these views of the mailbox icon.
Figure 4-1 Mail Tool Header Window Icons
The Mail Tool Compose window can also be closed to an icon. See "Mail Tool Compose Window" for a description and picture of the Compose window icons.
Mail Tool Header Window
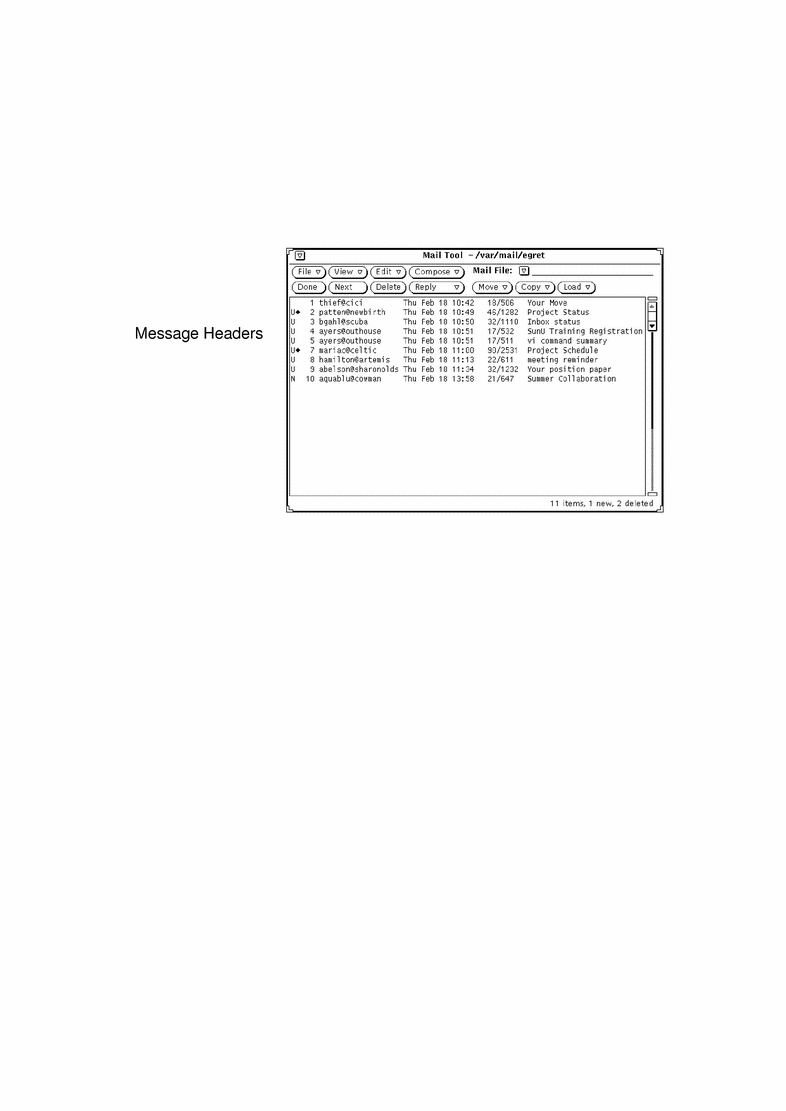
The window shown in Figure 4-2, provides a set of controls with which you access other parts of the Mail Tool application, display a list of your electronic mail messages, and see the status of your mail messages.
By default, this window shows you a scrolling list of the mail messages in your In-Box. Each line in the scrolling list of the window represents a single electronic mail message, and is called the header for the mail message.
Figure 4-2 Primary Mail Tool Header Window
Mail Message Headers
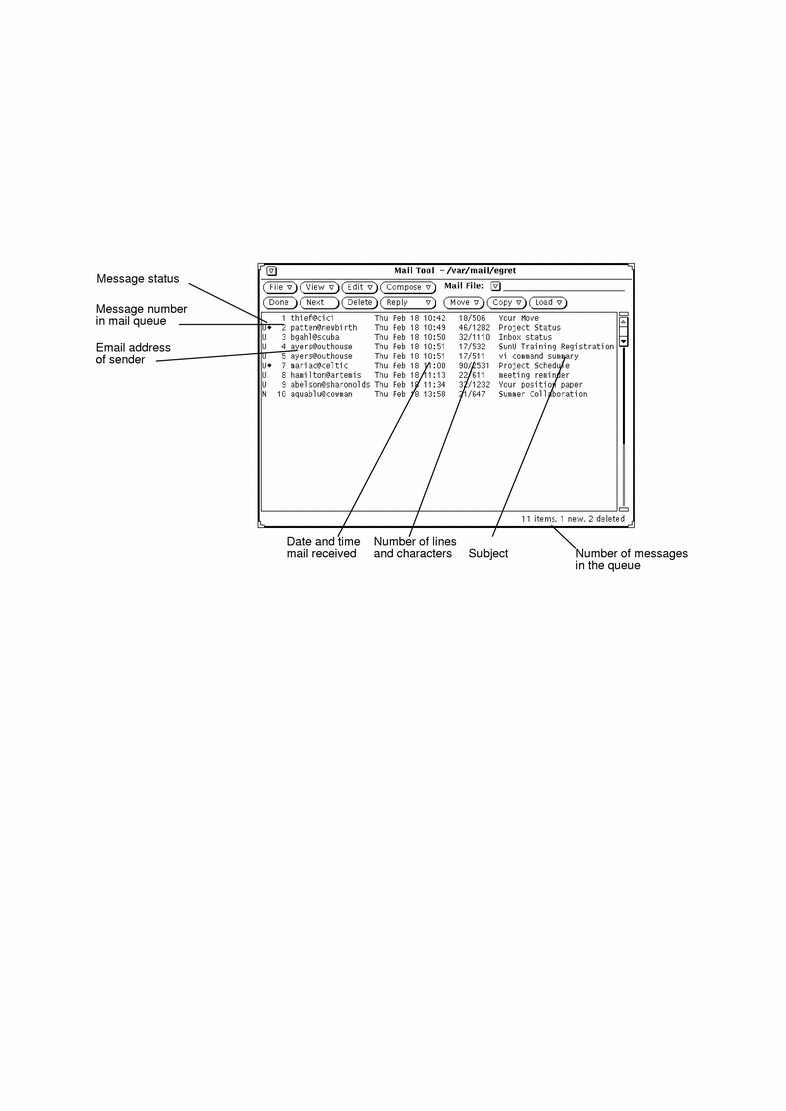
Each message header has six fields or columns of information, as follows:
-
The first field shows you the status of the mail message:
-
An arrow points to current messages (messages currently displayed).
-
An N shows you that the message is new.
-
A U shows that a message is unread, that is, it has been saved without having been read.
-
A blank is displayed after you have viewed the message.
-
-
The second field contains a message number that is automatically assigned to messages by the Mail Tool in the order in which they are loaded.
-
The third field contains the mail address of the sender of the message.
-
The fourth field contains the day, date, and time the message was received. If the message is over 11 months old, the year is shown instead of the time.
-
The fifth field tells you how big the message is. The first number tells you the number of lines in the message, and the second number tells you the number of characters. These numbers include the number of lines and characters of the full message header, as well as the text of the message.
-
The sixth field contains the subject of the message when the person who sent the message provides a subject line.
Message Header Status Messages
Status messages are displayed at the right side of the footer. These messages tell you how many messages are in your mail file, how many new messages you have, and how many you have currently deleted. In Figure 4-2, the status message tells you there are 4 items, 4 new messages, and 0 deleted messages.
Selecting Message Headers
You can select each message header by moving the pointer onto the line and clicking SELECT. A selected header has a box around it. To select additional messages, move the pointer into the line and click ADJUST. If a message is already selected, clicking ADJUST deselects it.
You can select all the messages sent by or to a particular person or alias, and/or about a particular subject by using the Mail Tool Find feature.
Mail Tool Controls and Menus
The control area, shown in Figure 4-3, has three groups of controls.
Figure 4-3 Mail Tool Control Area

The first four buttons in the top row are the standard Mail Tool menu buttons. The first four buttons in the bottom row are user-defined accelerator buttons, which you can customize to represent any of the items available from the standard menus. The items at the right side of the control area are the Mail File controls. These include the Mail File abbreviated menu button and text field, and the Mail File Move, Copy, and Load menu buttons.
The following sections provide a brief description of each of these controls.
File Menu
The File menu has choices that you use to organize mail messages, print them, or commit changes (such as deleting and sequentially renumbering messages).
-
Use Load In-Box to load and view messages from your In-Box. This is how you return to the default mail view after you are done viewing a different mail file. It is also how you can get your new mail in between mail delivery intervals. See "Organizing Your Mail Messages" for more information about mail files.
-
Use Print to print the selected messages. See "Printing Messages" for more information about printing.
-
Use Save Changes to incorporate changes. See "Saving Changes for Mail Tool" for more information.
-
Use Done to incorporate changes and to close Mail Tool to an icon.
-
Use Mail Files to display a window that helps you organize your mail messages into separate mail files. See "Organizing Your Mail Messages" for more information about mail files.
The default item of the File Menu is Load In-Box. Selecting this loads your inbox.
View Menu
The View menu has choices for different ways to view messages and move between them, and for finding particular mail messages.
-
Use Messages to view messages with an abbreviated or full header.
-
Use Previous or Next to view the message before or after the current message.
-
Use Sort By to sort messages in your In-Box or mail files. See "Sorting the Contents of a Mail File" for more information.
-
Use Find to find messages in your In-Box or mail file by sender, recipient, and/or by subject. See "Saving Changes for Mail Tool".
See "Mail Tool View Message Window" for more information about the first three items on the View menu.
The default item of the View menu is Next. When you select Next, the next message is displayed.
Edit Menu
The Edit menu has choices for editing and deleting mail messages and configuring your Mail Tool from the Mail Tool Properties window.
-
Use Cut and Copy to put selected messages onto the clipboard. You can then paste these messages from the clipboard into other windows using the Text Pane menu. These options are dimmed if you do not have any selected messages.
-
Use Delete to delete selected messages. This option is dimmed if you do not have any selected messages, or are not currently viewing any.
-
Use Undelete to restore deleted messages. When you save your Mail Tool changes, deleted messages are really deleted, and can no longer be restored. The Undelete option is dimmed if you do not have any deleted messages.
-
Use Properties to customize your Mail Tool. See "Customizing Mail Tool" for information about Mail Tool properties.
The default item of the Edit menu is Delete. When you choose Delete, the currently selected messages are deleted or the currently viewed messages are deleted if no messages are selected.
Compose Menu
The Compose menu has choices for opening Compose windows from which you can write and send mail messages.
-
Use Reply to open a Compose window to respond to a selected message. See "Replying to a Message" for more information.
-
Use Forward to open a Compose window that includes the selected message for forwarding. If the message has attachments, the attachments are also included in the forwarded message.
-
Use Vacation to initiate or stop an automatic response to incoming messages when you are away from your mail. See "Using the Vacation Notifier" for more information about Vacation options.
The default item of the Compose menu is New. When you choose New, a new Compose window is opened.
Custom Mail Tool Buttons
The first four buttons on the second row of the control area are custom Mail Tool buttons. You can change these buttons to be any of the items on the File, View, Edit, or Compose menus.
The default items of the custom buttons are Done (from the File menu), Next (from the View menu), Delete (from the Edit menu), and Reply (from the Compose menu). See "Header Window Properties" for information about how to change the items on these custom buttons.
Mail File Text Field and Menus
You use the Mail File text field and abbreviated menu button to create and view mail files, and to store messages into mail files. You use the abbreviated menu button to choose from all your available mail files. See "Mail File Menus" for information on creating and viewing mail files.
Use the last three buttons on the second row of the control area to move or copy selected messages into a mail file, or to view (load) a different mail file. Each of these buttons displays a menu of the most recently used mail files. You can customize this menu to always include particular mail files. See "Mail File Menus" for information on creating and viewing mail files. See "Mail Filing Properties" for information about customizing your mail file menus.
Pop-up Menus
A pop-up menu in the Header pane, called Messages, contains a subset of controls from the File, View, Edit, and Compose menus. Display this menu by moving the pointer anywhere in the Header window pane and pressing the MENU button. Each item on the Messages pop-up menu works the same way as it does when you choose the same item from a menu button.
The text editing panes in the View Message and Compose windows contain a pop-up menu with the standard editing commands from the Text Editor. For a description of the text editing commands, see the chapter Chapter 3, Text Editor.
Mail Tool View Message Window
To view a message, double-click SELECT on the header for the message that you want to display. Alternatively, you can SELECT the message header, and then choose Messages from the View menu.
A View Message pop-up window is displayed showing the text of the selected message with an abbreviated message header, as shown in Figure 4-4.
Figure 4-4 View Message Window
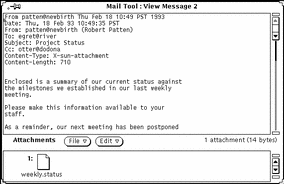
The number of the displayed message is always shown in the header of the View Message window (Message 2 in Figure 4-4).
Once you have displayed a message in a View Message window, any "New" or "Unread" flags on the message header are cleared, whether or not you have actually read the message.
The View Message window uses the standard text editing pane and pop-up menu. You can edit the text in the View Message pane. If you have made editing changes to the message, a Notice (asking if you want to save the changes), is displayed when you change messages or dismiss the window.
The View Message window can be split into two or more panes to view and edit different parts of the mail message at the same time. See Chapter 3, Text Editor for more information.
If the message you are viewing contains attachments, a separate attachment area is displayed at the bottom of the View Message window. See "Mail Tool Attachments" for information about mail attachments.
Using the Pushpin in the View Message Window
The View Message window has a pushpin that you can use to pin the window to the workspace if you want to keep a message (or several messages) visible.
If you do not pin the View Message window, it is reused for subsequent mail messages that you view. If you do pin the View Message window, a new View Message window will be displayed for the next message you view, and you can display multiple View Message windows at the same time.
Viewing the Next or Previous Message
You can view the next message by clicking SELECT on the View button, then on the Next button. If the View Message window is displayed but not pinned, the next message is displayed in the existing View Message window.
Note -
You must display the View menu and choose Next. Also note that the Next button is a custom button, and may not be available on the header control area if you have changed the value of this custom button.
To display the previous message, choose Previous from the View menu. You can also use the up and down arrow keys on your keyboard to display the previous and next messages. The Mail Tool Header window must be the currently active window for this to work.
Alternatively, you can always view any message by double-clicking SELECT on the desired message header.
Viewing Messages With a Full Header
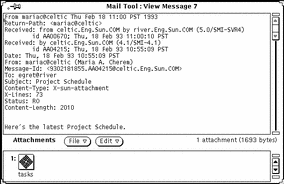
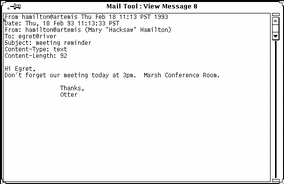
Mail Tool messages are normally displayed with an abbreviated header. To display a message with the full message header, select the desired message header and choose Full Header from the Messages submenu of the View menu. Figure 4-5 shows an example of a full message header.
Figure 4-5 Full Message Header
The contents of the abbreviated header are determined by the Hide items on the Message Window Properties scrolling list. All mail headers are displayed except those listed in the Hide scrolling list. See "Message Window Properties" for information about customizing your default abbreviated header with the Hide scrolling list.
Viewing Multiple Mail Messages
If you select multiple mail messages and display them by choosing Messages from the View menu, a View Message window is opened for each message, layered one on top of another in numerical order (not in the order that you selected them).
Another way to view multiple mail messages is to pin an existing View window, and then double-click SELECT on another mail message header. The new message will be displayed in a new View window.
Mail Tool Compose Window
Any time you choose an item from the Compose menu (except for Vacation), a Compose Message window is opened. (The Compose Message window is simply referred to as the Compose window in the rest of this document.) A Compose window operates independently from the Mail Tool Header window. You can close an opened Compose window to an icon for later use, or keep a Compose window open while the primary Mail Tool Header window is closed to an icon. The Compose window icon shows an unsealed envelope, a sheet of paper, and a label indicating the recipient of the message if the recipient has been specified. Figure 4-6 shows these views of the Compose icon.
Figure 4-6 Compose Window Icon (before and after specifying a recipient)
You can open as many Compose windows as you like at one time, while replying to or composing several messages concurrently. The Compose window is shown in Figure 4-7.
Figure 4-7 Compose Message Window
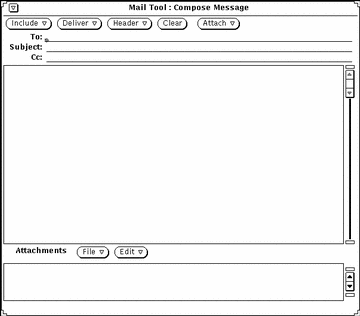
The Compose window has its own set of controls that you use to create and send mail messages:
-
The Include menu button provides choices to include selected messages as part of the message you are composing. It also provides you with a set of templates for creating different types of messages. See "Template Properties" for more information about templates. If you are not going to include any attachments, you can use the Include menu to turn off the Attachments pane at the bottom of the Compose Window, allowing recipients to see more of the mail message.
-
The Deliver menu button provides choices for how the Compose window behaves once the message is sent.
-
The Header menu button provides choices for the number and type of text fields that make up the message header. The default choice is Bcc, which allows you to add or delete the blind carbon copy (a copy of the message is sent to another recipient without the original recipient knowing) field to the message header. You can add other fields to this menu with the Custom Fields scrolling list in the Compose Window Properties sheet. See "Compose Window Properties" for more information. The Aliases item brings up the Alias properties window.
-
The Clear button clears the contents of the window. Your message is saved in the file dead.letter whenever you use the Clear button or the Clear message item from the Compose window's Deliver menu. See the man page for mailx(1) for information about dead.letter and the "save" variable.
-
The Attach menu button brings up Voice, which accesses AudioTool and allows you to compose a voice message. See Chapter 11, Audio Tool for information about Audio Tool. It also brings up Appt, an appointment editor window for creating appointments to be used with Calendar Manager. For information on how to do this, refer to Chapter 5, Calendar Manager.
-
The Log check box determines whether or not the mail you are composing is recorded in a file. You specify the file where messages are recorded using the Mail Tool Properties window. See "Compose Window Properties" for more information.
The Log check box does not appear on the Compose window if you have not specified a log file name with the Compose Window properties.
-
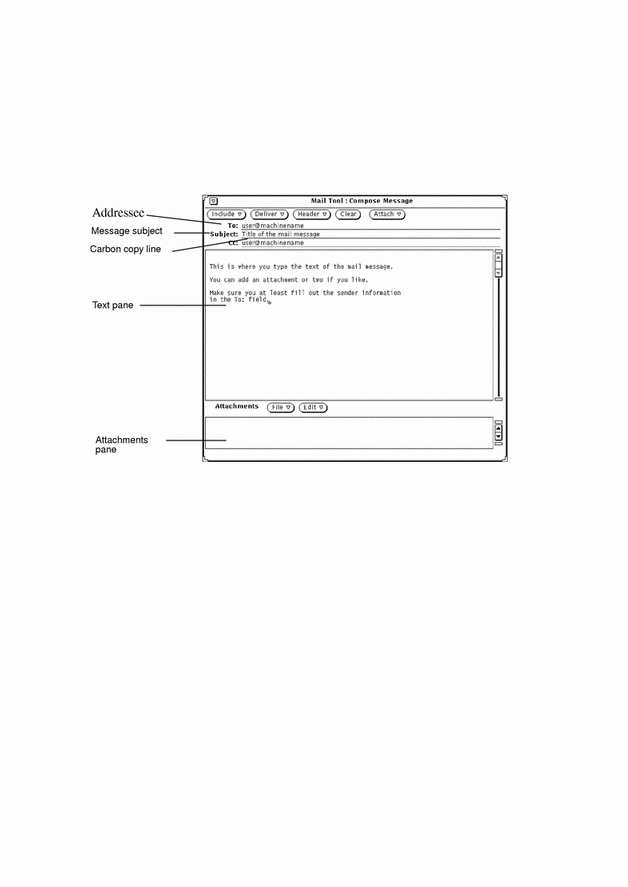
The To, Subject, and Cc text fields are used to type the email addresses of the recipients, the subject of the message, and the email addresses for those to receive copies of the message, respectively.
-
The text pane of the Compose window is used to type the text of the message you want to send. The text pane uses the standard text editing conventions available from the Text Editor. See the chapter Chapter 3, Text Editor for more information about editing.
-
The Attachments pane at the bottom of the Compose window is used to add attachments to your mail. Attachments can be any kind of file, and can be used to send images, voice mail, documents that retain their word-processor file formats, Calendar Manager appointments, and so forth. See "Mail Tool Attachments" for information about mail attachments.
Reading Messages
You can tell you have new mail in two ways:
-
If Mail Tool is closed, the Mail Tool icon shows the status. An overflowing in-box means you have new mail.
-
If Mail Tool is open, new message headers, preceded by "N" (for New) are displayed in the Header window. Additionally, a counter in the lower right corner tracks the number of new messages.
Figure 4-8 Header window
To read a message, double-click SELECT on the message header.
The header you select is outlined, as shown in Figure 4-9, and the View Message window displays the message.
Figure 4-9 Message Headers in the Mail Tool Window
To read a message:
-
If Mail Tool is closed, double-click SELECT on icon.
The Header window is displayed.
-
Double-click SELECT on the header of the message you want to read.
The message is displayed in the View Message window.
Printing Messages
You can print your mail messages using either Mail Tool or Print Tool.
Printing Mail Messages Using Mail Tool
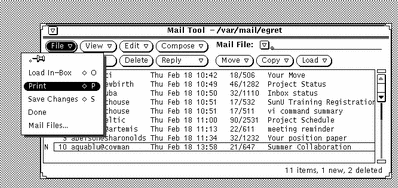
To print your messages from Mail Tool, select the headers for the messages you want to print, and choose Print from the File menu. Figure 4-10 shows these steps.
Figure 4-10 Printing Multiple Mail Messages
The messages are printed using the print script specified in the Message Window Properties sheet. See "Message Window Properties".
If a message has attachments, the attachments are not printed. A message is printed that tells you how many attachments the message has.
To print an attachment, open the attachment and print it using the attachment's application, or drag the attachment to the Print Tool.
Printing Mail Messages Using Print Tool
You can use Print Tool to print your mail messages using these steps:
-
With both Mail Tool and Print Tool running, select the headers for the messages you want to print.
-
Press SELECT and drag the headers until the hot spot of the pointer is on the Print Tool drag and drop target.
The drag and drop target is the box in the upper left corner of the Print Tool window.
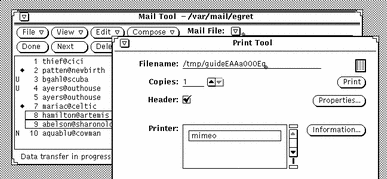
The pointer changes to a document glyph if you are dragging one mail header to indicate that what is being dragged is document. The pointer changes to three document glyphs if you are dragging several mail headers. In the example shown in Figure 4-11, two files have been selected for printing.
Figure 4-11 Printing by Using Drag and Drop
-
Release SELECT to drop the headers.
Messages are displayed in the footer of the Print Tool window displaying the printing status.
If a selected mail message has attachments, and the message is dropped on the Print Tool, the attachments are not printed. A message is printed that tells how many attachments are with the message. To print an attachment, open the attachment and print it using the attachment's application, or drag just the attachment to the Print Tool.
Composing Messages
Your email address is typically your login ID and your machine's host name, combined like this: name@host. If there is more than one domain on your network, you may need to append a domain name to the address as well. For instance, the name would appear in this format: name@host.domain. Check with your system administrator to make certain.
Others on your network will typically have the same address format. When you are certain of your email address, try sending a test message to yourself.
Composing a New Message
To compose a new message:
-
In the Header window control area, click SELECT on Compose.
The Compose Message window is displayed.
-
Click SELECT on the To text field, and fill in the message header information.
-
Press Return as you complete each line
-
In the To and Cc text fields, separate multiple email addresses with a comma, a space, or both. For example: here@machine, there@elsewhere, outside@somewhere
-
-
Move to the Text pane either by pressing Return or clicking SELECT in the Text pane.
The dimmed insert point darkens to indicate it is active.
-
Type your message.
The Compose window Text pane uses standard text editing functions.
Figure 4-12 shows a sample message.
Figure 4-12 Addressing a Message
To include an attachment, see "Sending Mail Attachments".
-
To send the message, click SELECT on Deliver.
The message is delivered, and the Compose window closes.
Replying to a Message
Replying to a message is similar to composing a message.
-
In the Header window control area, press MENU on Reply.
-
Choose the appropriate item for your recipient(s).
The Compose Message window is displayed. Note the following:
-
The To and Subject text fields are filled out.
-
A copy of the original message is included only if you chose Reply To Sender, Include or Reply To All, Include.
-
-
Type or edit your message and its header, and send the message.
Refer to the section "Composing Messages".
Forwarding Messages to Third-Parties
You can forward a message to another person in two ways, depending on where you start from:
-
Forwarding a message from the Header window.
-
Including a message from the Compose Message window.
Forwarding a Message
To forward a message from the Header window:
-
Select the message(s) you want to forward.
-
Click SELECT on the first message header.
-
Click ADJUST on additional message headers.
-
-
Choose Forward from the Compose menu.
The Compose Message window is displayed. Note the following:
-
The Subject text field is filled in. You need to fill in the other To text field, and if desired, the Cc text field.
-
The Text pane displays the original message.
-
The Attachments pane includes any attachments to the original message..
-
-
Type your message, and send the entire new message.
Refer to the section "Composing Messages".
Including a Message
To include a message from the Compose window.
-
Compose your message.
-
In the Header window, click SELECT on the header of the message(s) you want to include.
-
In the Compose window, choose Bracketed or Indented (as you prefer) from the Include menu.
Your choice determines the formatting of the original message:
-
Bracketed labels the beginning and end of the message.
-
Indented indents each line of the message and marks each line with a greater-than sign (>).
-
-
To send the message, click SELECT on Deliver.
Using Templates
A template is a file you can include in a mail message that contains text you frequently use when composing messages. Mail Tool allows you to create your own template files. You might, for example, want to create a standard table format for status report information or a standard signature and closing message. See "Template Properties" for information about how to create and store templates. When you have created a template file and added it to Mail Tool, it is displayed as an item on the Templates submenu. The menu in the left margin shows a Templates submenu with three templates.
The default Templates submenu contains only the Calendar template. The Calendar template creates messages in a form that Calendar Manager interprets when the message header is dragged and dropped onto the Calendar Manager. See the chapter Chapter 5, Calendar Manager for more information.
Any template available from the Templates submenu can be added to a message at any time while you are composing it. When you choose the item from the Include menu, the template is inserted at the caret location.
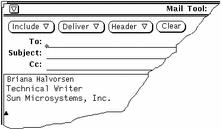
Figure 4-13 shows an example of a signature template.
Figure 4-13 Example of a Signature Template
Using the Vacation Notifier
When you are away from your office, you can use the Vacation notifier on the Compose menu to automatically respond to each email message you receive. Mail Tool provides you with a generic message form that you can edit and customize to suit your individual needs. Figure 4-14 shows the Vacation Setup pop-up window with the generic message. Choose the Start/Change item on the Vacation submenu to display the Vacation Setup window.
Figure 4-14 Vacation Setup Pop-up Window
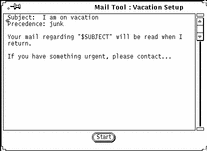
You can edit this message in the same way you edit messages in the Compose window. The string $SUBJECT in the message text automatically extracts the subject from the message being responded to, and includes it in the reply message. The Precedence:junk line tells the mail delivery agent to set this mail to a lower priority and not to return any error messages to this mail message. Figure 4-15 shows an example of a vacation message that has been customized.
Figure 4-15 Modified Vacation Message
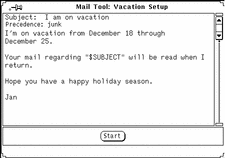
To start the vacation message, click SELECT on the Start button. The word "Vacation" is displayed in the header of the Mail Tool window to remind you that the vacation notifier is turned on.
While the vacation notifier is turned on, incoming mail messages are stored in your In-Box and are readily available when you return to the office. When the vacation notifier is turned on, it replies to each person who sends mail to you. Each sender receives a reply from the vacation notifier, but it replies to the same sender only once in each seven day period.
If your name is listed in a public alias and a message is sent to the alias, the vacation notifier does not respond to the sender of that message. The vacation notifier will respond to names included as part of a private alias. See "Alias Properties" for information about mail aliases.
Once you have activated the vacation notifier, the Stop item on the Vacation submenu is also activated. To stop the vacation notifier and remove the word "Vacation" from the header, choose Stop from the Vacation submenu.
Deleting Messages
It is a good idea to periodically delete obsolete messages from your In-Box. To delete one or more mail messages, select the message headers that you want to delete, then choose Delete from the Edit menu. The selected mail messages are deleted from the display, and the status message in the footer updates to reflect the current state of your In-Box, as shown in the example in Figure 4-16.
Figure 4-16 Status Message after Deleting Two Mail Messages
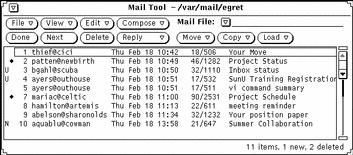
Delete is also the default value of the third custom button. It is also available from the header pane pop-up menu, described in the section "Pop-up Menus".
Undeleting Messages
As long as you do not incorporate changes to Mail Tool by switching to another Mail File or by choosing either Save Changes or Done from the File menu, your deleted messages remain available and you can "Undelete" them.
When there are no deleted messages available, the Undelete item on the File menu is inactive.
To undelete the message most recently deleted, choose Undelete from the Edit menu.
To undelete a different message, or to undelete more than one message at a time, choose From List on the Undelete submenu to display the Undelete window. The Undelete window contains a scrolling list of messages that you have deleted since you last incorporated changes in Mail Tool. Select the headers of the messages that you want to undelete, then click SELECT on the Undelete button.
To save your undeleted messages in your Inbox, click SELECT on Done in the Mail Tool Message window control area, or choose Save Changes on the File menu.
Finding Messages
To find messages, you can search your In-Box or mail files for messages with a particular subject, messages that have been sent to or from a specific person, or both. You can use this feature to find one particular message, or to find a group of messages. For example, if you come back from vacation and find a lot of mail messages about a topic you are not interested in, you can find all the messages about that subject and quickly delete them.
To find a message, first display the Find pop-up window by choosing Find from the View menu. The Find pop-up window is displayed, as shown in Figure 4-17.
Figure 4-17 Find Pop-up Window
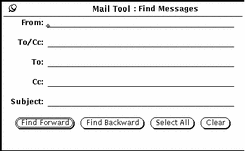
You can search for messages based on the mail header's From field, To field, Cc field, or Subject field, or by any combination of these fields. The Search text fields are case-insensitive and match partial words and phrases. You do not need to type a complete sender name, and you can use keywords to match subjects. For example, typing the name robles in the From text field will find messages sent by robles@oak as well as manual.robles.
To search for messages by sender, type the sender name in the From text field. Clicking SELECT on the Find Forward button selects the next message header with the sender name you specify. Clicking SELECT on the Find Backward button selects the previous message header. Clicking SELECT on the Select All button selects all message headers with the sender name. A message is displayed in the footer of the Find Messages window telling you how many messages are selected.
If you want to find mail sent to a person or alias either directly or by Cc list, type the name in the To/Cc field. If you only want to find mail sent directly to a person or alias (but not carbon copied), type the name in the To field. If you only want to find mail carbon copied to a person or alias (but not sent directly), type the name in the Cc field.
To search for messages by subject, type a word or phrase in the Subject text field.
To search for messages by sender, receiver, and by subject, type the appropriate information in each text field and click SELECT on one of the buttons at the bottom of the Find window. Only mail messages that satisfy all the conditions will be found.
Clicking SELECT on Clear removes all the text typed in the Find Messages window text fields.
Mail Tool Attachments
A mail message can contain attachments, which are files of any type in their own file formats. For example, a mail message might contain an image attachment and an audio attachment, providing an illustration and voice mail.
When a message contains attachments, the View Message pop-up window displays a separate Attachments pane at the bottom, as shown in Figure 4-18.
Figure 4-18 View Message Pop-up Window with Attachments
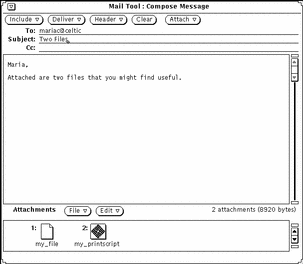
You can move attachments to the File Manager or any other application that accepts files of the attachment's file type. You can also open the attachments without moving them out of the Mail Tool. You can add new attachments to a mail message, delete attachments, or rename them.
Opening Mail Attachments
There are two groups of mail attachments:
-
Ordinary attachments, which are bound to their applications. You open them (and their applications) directly from the Attachments pane. For example, Calendar Manager appointments, mail messages, icons and images, voicemail, and executable files.
-
Special attachments, which are not bound to their application. You cannot open these files directly from the Attachments pane. For example, specially-formatted text files created with desktop publishing software.
Note -If there are more attachments than can be displayed in one row, you need to scroll down with the Attachments pane scrollbar to see all the files.
Opening Ordinary Attachments
To open most attachments:
Double-click SELECT on an icon in the Attachments pane.
"Launching..." appears in the message area beneath the Attachments pane, and in a moment the application opens, and the file is displayed.
When starting an executable from the Mail Tool Attachments pane, you receive a warning message asking if you want to run the executable program or cancel. Before you click SELECT on "Run it," make sure you know what the outcome will be and that the sender is someone you trust. Executables such as shell scripts can be used to perform operations on the files in your file system.
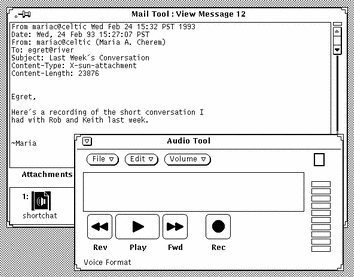
Figure 4-19 shows a mail message with a voice mail attachment opened up in the AudioTool application. See the chapter Chapter 11, Audio Tool for information about using AudioTool to listen to the message.
Figure 4-19 Mail Message with an Opened Voice Mail Attachment
Note -
PostScript attachments are displayed in Image Tool. For complete information on how to use Image Tool, refer to Chapter 13, Image Tool.
Viewing Special Attachments
You will need access (on your system or file server) to the software used to create the attachment. Also, you probably need to be running the same version of the software. If you do not have access to the correct software, you might want to request that the sender convert the file into PostScript format and resend the file.
To view specially-formatted text files:
-
Copy the attachment into File Manager.
-
Open the file from the application in which the file was created.
Consult the user manual that came with the application for details.
Sending Mail Attachments
To include attachments in a mail message you are composing, select the file icons that you want to include from the File Manager, and drag and drop them onto the Attachments pane of the Compose window. You can also drag and drop files or data from the Text Editor or any other application that supports drag and drop.
Alternatively, you can use the Attachments pane Add Attachments popup to include attachments in your message, as described in "Adding Mail Attachments".
Follow these steps to drag and drop a file from the File Manager onto Mail Tool to be included in a mail message:
-
Open the File Manager application and the Mail Tool Compose window of the message you are sending.
If the Attachments pane is not showing at the bottom of the Compose window, choose Show Attachments from the Compose window Include menu.
-
In the File Manager, click SELECT on the file that you want to include as a mail attachment.
Click ADJUST on any additional files that you want to include.
-
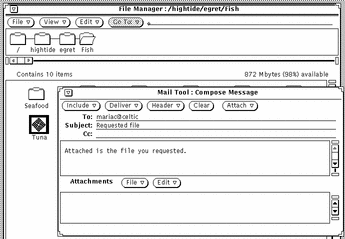
Press SELECT on one of the highlighted files, and drag the pointer to the Attachments pane of the Compose window, as shown in Figure 4-20.
The pointer changes while the file is being dragged.
Figure 4-20 Selecting a File for dragging onto the Compose Window Attachments Pane
-
Release SELECT.
The file is displayed in the Attachments pane as an icon, and will be included as part of the mail message.
Note -If you drag and drop a file onto the text area of the Compose window, the file is included in the text as ASCII text. Some types of files, such as binary program files, are unreadable in the text pane. If you want to include the file as a separate attachment in its native format, make sure to drag and drop the file onto the Attachments pane.
If you drag data that is not a file onto the Attachments pane, the name of the icon that appears in the Attachments pane is the data type. For example, if you want to drag and drop the text in the Text Editor pane, you can press SELECT on the drag and drop target that appears in the Text Editor header, drag the pointer to the Compose window Attachments pane, and release SELECT. The new icon in the Attachments pane is named "default."
Adding Mail Attachments
You can add new mail attachments to a message using drag and drop, as described in the previous section, or the Add Attachment pop-up window.
Note -
Keep in mind that when you add attachments to a mail message, it is easy to construct very large messages without realizing it.
To add a new mail attachment using the Add Attachment popup window, follow these steps:
-
Choose Add from the File menu at the top of the Attachments pane.
The Add Attachment popup window is displayed.
-
Select the directory name of the file to be attached.
Alternatively, you can type the path in the Go To text field.
-
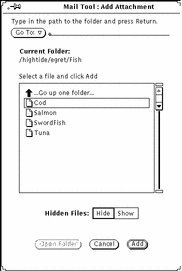
Click SELECT on the Add button, as shown in Figure 4-21.
Figure 4-21 Adding an Attachment with the Add Attachment Popup Window
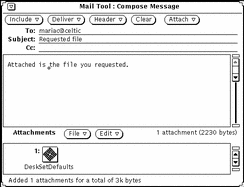
The file is added to the mail message attachment pane, as shown in Figure 4-22.
Figure 4-22 Attachment Added to a Mail Message Attachment Pane
Renaming Mail Attachments
Follow these steps to rename a mail attachment in the View Message or Compose window Attachments pane:
-
Select the attachment that you want to rename.
You can only rename one attachment at a time.
-
Choose Rename from the Edit menu at the top of the Attachments pane.
The Rename Attachment popup window is displayed.
-
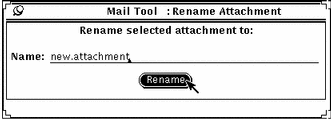
In the Rename Attachment popup window, type the new attachment name in the Name text field and click select on the Rename button, as shown in Figure 4-23.
The attachment in the Attachments pane is renamed.
Figure 4-23 Renaming an Attachment in the Rename Attachment Popup Window
Note -The name of an attachment should never contain the slash (/) character. This can cause confusion between file and directory names.
Moving Mail Attachments
You can drag and drop attachments to the File Manager, or any other application that accepts files of the attachment's file type. See "Using Drag and Drop with Mail Tool" for more information.
Alternatively, you can use the Attachment pane's controls to copy an attachment to a directory:
-
In the Attachments pane, click SELECT on the attachment to be copied.
The file is highlighted.
-
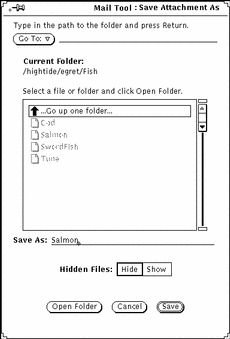
In the control area of the Attachments pane, choose Save As from the File menu.
You see the Mail Tool: Save Attachment As popup window, as shown in Figure 4-24.
Figure 4-24 Save Attachment As Popup Window
Deleting Mail Attachments
To delete attachments from a message in the View or Compose window, select the attachment or attachments you want to delete and choose Delete from the Edit button in the control area of the Attachments pane.
Use the Undelete item to restore the most recently deleted attachment. This item is grayed out if there are currently no deleted attachments.
Saving Changes for Mail Tool
To improve system performance, Mail Tool does not automatically save changes that you make when you close it to an icon. Messages that you have deleted remain available to you when you open the Mail Tool Header window.
To free up disk space and keep your mail box a manageable size, it is a good idea to periodically delete obsolete messages and save changes.
You save changes using either Save Changes or Done from the File menu.
-
Use Save Changes to commit changes and incorporate new mail without closing the primary Mail Tool Header window.
-
Use Done to commit changes, close the primary Mail Tool Header window to an icon, and incorporate new mail the next time you open the icon. Using Done leaves Mail Tool in a condition that lets you read mail using another mail program without creating conflicts in the mail spooling files.
Mail Tool automatically checks and incorporates new mail messages using a time period specified from the Mail Tool Properties window. If you have a long time period set and want to see if you have new mail, you can use Load In-Box from the File menu. Choosing either Save Changes or Done also checks for new mail messages. See "Customizing Mail Tool" for more information about Mail Tool properties.
When you quit the Mail Tool application, a Notice is displayed, as shown in Figure 4-25, asking you whether you want to save changes, quit without saving changes, or cancel the quit notice.
Figure 4-25 Quit Notice
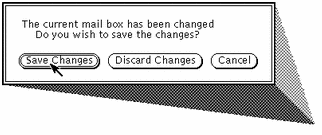
Choosing Save Changes commits the changes and quits Mail Tool. Choosing Discard Changes discards changes, reincorporating any deleted messages as part of the In-Box, and quits Mail Tool. Choosing Cancel cancels the quit operation, and leaves Mail Tool running.
Organizing Your Mail Messages
A convenient way to organize your mail is to group related messages together in a mail file. A mail file is a file that can contain multiple mail messages. If you view a mail file outside of Mail Tool, it looks like a single file with multiple mail messages appended to one another. When you view a mail file using Mail Tool, each separate message header is displayed in the header pane, and you can view, edit, delete, and respond to each message individually.
You can use the Mail Files pop-up window to create, delete, and rename mail files and subdirectories of mail files, to add messages to mail files, or to view mail files. To display the Mail Files window, shown in Figure 4-26, choose Mail Files from the File Menu.
Figure 4-26 Mail Files Window
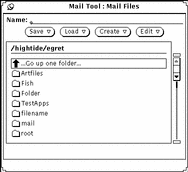
The Mail Files popup window contains a scrolling list of all your mail files (or mailfolders). There are three groups of entries listed in the mailfolder scrolling list, as follows:
-
Double-click SELECT on that entry to display the mail files up one directory level.
-
The next entries in the mailfolder scrolling list are your subdirectories (or folders) of mail files. You can double-click SELECT on these entries to display the mail files of each subdirectory.
-
The last entries in the mailfolder scrolling list are the regular mail files that you can load or save messages to.
You specify the directory where the mail files reside in your file structure using the Mail Filing category in the Properties window. See "Mail Filing Properties" for more information. Any mail files that you create in this directory are displayed as items in the Mail File menu on the Header window control area (described in the section "Mail File Menus"). The default mail file directory is your home directory. If you want to specify a different directory, it's a good idea to do so before you create new mail files.
In addition to using the Mail Files window, you can also create new mail files, add messages to mail files, or view a mail file using the Mail File menu and the Move, Copy, and Load menus on the Mail Tool Header window control area. These menus are described in the next section.
Mail File Menus
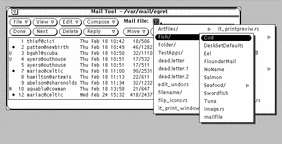
The Mail File menu of the Header window contains a list of files and subdirectories in your mail file directory, as shown in Figure 4-27. Use this menu as an easy way to fill in the name of a mail file in the Mail File text field.
Figure 4-27 Mail File Menu Showing Mail Files and Subdirectories of Mail Files
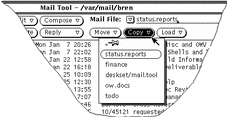
As you access a mail file, it is added to the Move, Copy, and Load menus of the Header window. Each of these three menus contains an identical list of recently accessed mail files. The first item on each menu is the entry in the Mail File text field. If no entry is in the text field, the first item is called Entry, and is dimmed. Figure 4-28 shows a Copy menu after several mail files have been accessed, and when there is an entry in the Mail File text field.
Figure 4-28 Copy Menu with the Most Recently Accessed Mail Files
If you have a set of mail files that you want to always appear on the Move, Copy, and Load menus, you can specify these files in the Mail Filing category of the Properties window. You can also control the maximum height of these menus. See "Mail Filing Properties" for information.
Creating a New Mail File
You can create a new mail file using only the controls on the Header window, or using the Mail Files popup window.
Creating a New Mail File Using the Header Window Controls
Follow these steps to create a mail file using only the Header window controls:
-
Select one or more messages to move or copy to the new mail file.
-
Type the name of the new mail file in the Mail File text field on the Header window, and then click SELECT on the Move or Copy button.
When you just type a file name, such as projectreports, Mail Tool puts the mail file in the Mail File directory that you specify from the Mail Filing Properties window. Alternatively, you can type a complete path name, such as /home/username/projects/projectreports, to put the mail file somewhere else in your file structure, or you can type a relative path name, such as projects/projectreports, to put the mail file in a subdirectory of your Mail File directory.
The new mail file becomes the first and default item of the Move, Copy, and Load menus.
-
Click SELECT on the Move or Copy button.
The new mail file is created, the selected messages are moved to the new file, and a message is displayed in the footer of the Header window.
Creating a New Mail File Using the Mail Files Popup Window
Follow these steps to create a new mail file using the Mail Files popup window:
-
Choose Mail Files from the File menu to display the Mail Files popup window.
-
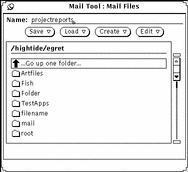
Type the name of the new mail file in the Name text field.
For example, type projectreports to create a project report mail file, as shown in Figure 4-29.
Figure 4-29 New Mail File Typed in the Mail Files Name Field
You can also type the name of a new mail file subdirectory if you'd like to create a subdirectory of mail files.
If you already have a subdirectory where you want to put the new mail file, you can type a relative path name in the Name field, starting with the subdirectory. For example, type projects/projectreports to create a mail file in the subdirectory called projects.Alternatively, you can double-click SELECT on the projects subdirectory in the scrolling list to display that mail directory, and then type the name of the new mail file in the Name field.
-
Choose Mail File or Directory from the Create menu to create the new mail file or subdirectory.
Adding Messages to an Existing Mail File
You can add messages to an existing mail file using only the controls on the Header window, or using the Mail Files pop-up window. Both of these methods are described in the following sections.
Adding Messages to a Mail File Using the Header Window Controls
Follow these steps to add messages to a mail file using only the controls on the Header window:
-
Select the mail headers that you want to move or copy to the mail file.
-
Move or copy the selected messages to an existing or new mail file as follows:
-
If the desired mail file already exists and is listed in the Move and Copy menus, simply choose the mail file from the Move or Copy menu.
-
If the desired mail file already exists but is not listed on the Move and Copy menus, choose the desired mail file from the Mail File menu, and then click SELECT on the Move or Copy button.
The new mail file becomes the first and default item of the Move, Copy, and Load menus.
-
Adding Messages to a Mail File Using the Mail Files Popup Window
Follow these steps to add messages to a mail file using the Mail Files window:
-
Select the headers of the mail messages that you want to move or copy.
-
Choose Mail Files from the File menu to display the Mail Files window.
-
Select a mail file in the Mail Files window scrolling list.
If the desired mail file is in a subdirectory, double-click SELECT on the subdirectory to display its contents in the scrolling list.
-
Choose Move Message into Mail File or Copy Message into Mail File from the Save menu.
The selected messages are moved or copied to the selected mail file.
Viewing a Mail File
You can view the messages stored in a mail file using either the Mail Files window or the Load menu of the Mail Tool Header window. Once the mail file is loaded, you access the messages of the mail file exactly the same way as you access the messages of your In-Box.
To return to the In-Box after you are done viewing a mail file, choose Load In-Box from the File menu.
Viewing a Mail File Using the Header Window Controls
Follow these steps to view the messages in a mail file using the Header window controls:
-
If the desired mail file is not already on the Load menu, choose the desired mail file from the Mail File menu.
Alternatively, you can type the name of the mail file in the Mail File text field.
-
Choose the mail file from the Load menu on the Mail Tool Header window.
If the desired mail file is listed in the Mail File text field, you can just click SELECT on the Load button.
Viewing a Mail File Using the Mail Files Window
Follow these steps to view mail file messages using the Mail Files window:
-
Choose Mail Files from the File menu to display the Mail Files popup window.
-
Select the mail file that you want to view on the Mail Files popup window scrolling list.
If the desired mail file is in a subdirectory, double-click SELECT on the subdirectory to display its contents in the scrolling list.
-
Choose Mail File from the Load menu.
The mail file is loaded into the Mail Tool Header window.
Alternatively, you can just double-click SELECT on the mail file in the Mail Files scrolling list to load that mail file.
Editing a Mail File (Emptying, Renaming, Deleting)
You can empty a mail file, rename it, or delete it with the Edit menu of the Mail Files window.
To empty, rename, or delete a mail file, you first need to select the mail file in the scrolling list on the Mail Files window. If the mail file is in a subdirectory below the one displayed on the scrolling list, double-click SELECT on that subdirectory to display it. If the mail file is in a directory higher up from the one displayed in the scrolling list, double-click SELECT on the ..(Go up one folder) folder item until the mail file is in the scrolling list. When the mail file is in the scrolling list, click SELECT on the mail file to select it.
To delete a mail file, select the mail file in the Mail Files scrolling list, then choose Delete from the Edit menu. Mail Tool will give you a notice asking you to confirm that you really want to delete the mail file.
To empty a mail file, select the mail file in the Mail Files scrolling list, then choose Empty from the Edit menu. Mail Tool will give you a notice asking you to confirm that you really want to empty the mail file.
To rename a mail file, select the mail file in the Mail Files scrolling list, type the new name in the Name field, and then choose Rename from the Edit menu.
Sorting the Contents of a Mail File
You can sort items in your In-Box or the currently viewed mail file by choosing an item from the Sort By submenu of the Header window View menu:
-
Sort by time and date of receipt, placing the most recently received messages at the bottom.
-
Sort alphabetically by name of sender. This is useful for grouping together all the messages from a particular person.
-
Sort alphabetically by subject of mail, to group together all the messages about a particular subject.
-
Sort by the size of mail messages, from smallest to largest.
-
Sort by the "read" status of the mail. This puts the messages you have read first, the unread messages next, and the new messages last. This is useful to group together all your unread mail after you have read your messages in a non sequential order.
-
Sort by the message numbers.
Loading Saved Messages Back into Mail Tool
You can load saved messages back into the Mail Tool base window and view them as you would new mail messages. When you load previously saved messages, they temporarily replace the current messages contained in your in-box.
Loading a Message from the Mail Files Directory
If the message you want to view is in the default Folder directory:
-
Press MENU on the abbreviated menu button to the left of the Mail File text field.
A menu pops up listing the messages in the Folder directory.
-
Drag the pointer to the message you want to load, highlight it, and release MENU.
-
Choose Load.
All messages saved to that file appear in the Mail Tool base window as separate messages, just as they did when first received in the In-Box.
Loading a Message from Another Directory
To load a message saved to another directory:
-
In the Mail Tool base window, type the path to the message file in the text field.
Use the same path that you used to store it initially.
-
Choose Load.
All messages saved to that file name appear in the Mail Tool base window as separate messages, just as they did when first received in the In-Box.
Alternatively, you can drag a file of saved mail from File Manager and drop it onto the Mail Tool base window. The message or messages in that file will appear in the base window just as they did when you first received them. This method is especially helpful if you have forgotten the path to the file.
Loading the In-Box
To reload your In-Box messages:
In the Header window, choose Load In-Box from the File menu.
All of the message headers in the In-Box are again displayed in the Mail Tool Header window.
Using Drag and Drop with Mail Tool
You can use the OpenWindows drag and drop capability to drag mail messages out to other applications, and to drop information from other applications onto your Compose window to be included as text or as a separate attachment. This section gives an overview of the ways you can use drag and drop with Mail Tool and the other DeskSet applications described in this guide.
Dragging Mail to Other Applications
You can select single or multiple headers in the Mail Tool window and drag them to other DeskSet applications. When you drag a mail header, the entire mail message is moved along with it, including any mail attachments.
You can also select single or multiple mail attachments and move just the attachments to other applications.
Dragging Message Headers to Other Applications
You can drag and drop message headers onto the File Manager, Text Editor, Print Tool, Calendar Manager, or any other application that accepts files via drag and drop.
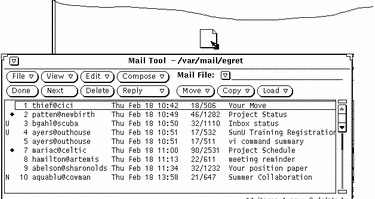
To drag and drop a copy of a mail message, select the message header, then drag the pointer to the destination. A small Text file glyph moves with the pointer to show that you are dragging a Text file, as shown in the example in Figure 4-30. When you select multiple message headers, a group of Text glyphs is dragged with the pointer.
Figure 4-30 Dragging a Copy of a Message Header
You can schedule appointments in Calendar Manager by using the Appointment Editor Attachment. See the Chapter 5, Calendar Manager for more information.
Dragging Attachments to Other Applications
You can drag individual attachments onto the following destinations:
-
File Manager
-
Print Tool (See "Printing Mail Messages Using Print Tool".)
-
Any application that accepts drag and drop data of the attachment's file type. For example, you can drag audio attachments onto AudioTool, Icon Editor attachments onto Icon Editor, ASCII attachments onto Text Editor, and so forth.
-
A Calendar Manager appointment attachment to Calendar Manager.
To drag and drop attachments onto other applications, follow these steps:
-
Click SELECT on the attachment to be copied.
Click ADJUST on any additional attachments that you want to drag at the same time.
-
Press SELECT on one of the highlighted attachments, drag the pointer to the destination, and release SELECT.
Dropping Files onto the Mail Tool
The Mail Tool Compose and View windows accept dropped files from the File Manager and Text Editor in the text panes. The Compose and View windows accept dropped files of any type in the Attachments pane. See the section "Sending Mail Attachments" for more information.
The Header window pane accepts dropped mail files. When you drop a mail file onto the Header pane, it is loaded into the Mail Tool and becomes the current mail file.
Customizing Mail Tool
You can customize the properties of Mail Tool from the Mail Tool Properties window. Display this window by choosing Properties from the Edit menu.
The Properties window has seven categories: Header Window, Message Window, Compose Window, Mail Filing, Template, Alias and Expert properties.
To display a particular category of properties, choose the category from the Category menu located at the top of the Properties window. When you release MENU, the contents of the Properties window shows the properties you can set for that category. The new properties take effect immediately in most cases. In a few cases (such as number of Headers to display in the Header Window Properties), you must quit and restart Mail Tool before the changes take effect.
You must apply changed properties for each category by clicking SELECT on the Apply button.
Header Window Properties
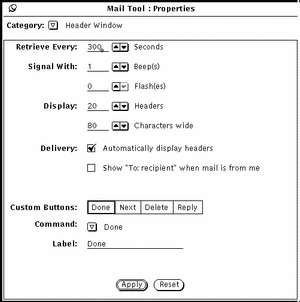
The Header Window properties are shown in Figure 4-31 and described in the following sections. After you change any of the Header Window properties, click SELECT on the Apply button to apply them to the Mail Tool application.
Figure 4-31 Header Window Properties
Mail Arrival Properties
Use the Retrieve Every field to determine how often new mail is retrieved. The default value is 300 seconds, or 5 minutes. You can retrieve mail at any time between this interval by choosing Load In-Box or Save Changes from the File Menu.
Use the Signal With fields to determine how Mail Tool signals new incoming mail. The Beep setting causes Mail Tool to beep the specified number of times. The Flash setting causes the icon to flash or the Header window to flash, depending on whether the Mail Tool is closed to an icon or open.
Mail Tool Window Size
Use the Display Headers field to determine how many headers are displayed in your primary Mail Tool Header window. You can increase the setting to display more headers at one time, or decrease the setting to display fewer headers to make the Header window smaller.
Use the Display Characters field to determine the width of all Mail Tool panels and windows.
After you make changes to the Display fields, you need to quit the Mail Tool application and restart it in order to see the change.
Delivery Properties
If you want Mail Tool to automatically display the headers for incoming mail messages, check the Automatically Display Headers option. If you do not choose this option, Mail Tool does not display headers for incoming messages unless you specifically request them by choosing Load In-Box or Save Changes from the File menu.
If the Show "To: recipient" ... option is checked, the Mail Tool header of a message sent by you will display the recipient of the message instead of your mail address.
Mail Tool Custom Buttons
The first four buttons on the second row of the Mail Tool Header window are custom buttons. You can change the value of these buttons to be any of the items from the File, View, Edit, or Compose menus. If there are items on these menus that you use very frequently, you can change your custom buttons to activate those commands.
-
The Custom Buttons choices indicate the current value of the four custom buttons. You select one of these choices to change the value of that custom button.
-
The Command setting shows you the command of the currently selected button, that is, what the button does.
-
The Command menu button provides a menu of all of the available commands from the File, View, Edit, and Compose menus.
-
The Label text field determines what the custom button says. Usually this is the same as the command, but it doesn't have to be. Sometimes the command is too long to fit in the button, so the Label might be an abbreviation of the actual command.
To change the value of a custom button, follow the steps below.
-
Select the Custom Buttons choice that you want to change.
The first choice represents the first button on the second row of the Header window, the second choice represents the second button, and so on.
-
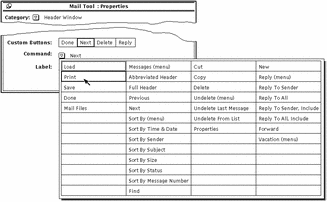
Choose the desired command from the Command menu shown in Figure 4-32.
The first column in the Command menu displays all the choices available from the Mail Tool File menu, the second column displays the choices from the View menu, the third displays the choices from the Edit menu, and the last column displays the choices from the Compose menu.
Figure 4-32 Header Window Properties Command menu
-
If you want to select a new label to go with the selected command, type a new label.
Try to keep the label as small as possible in order to keep the custom button to a reasonable size.
-
Click SELECT on Apply to change the custom button in the primary Mail Tool Header window.
The custom button on the Mail Tool Header window is changed to the new label and command. Figure 4-33shows the Header window with the second custom button changed to Print.
Figure 4-33 A New Custom Button (Print) on the Header Window

Message Window Properties
You use the Message Window Properties to specify the number of lines in the View Message pop-up window text pane, a different print script for printing messages, and the headers that are not displayed when viewing a message with abbreviated headers.
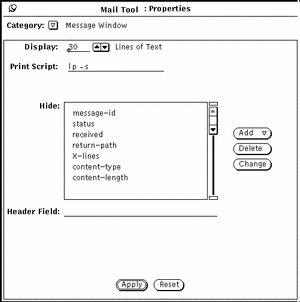
To see the Message Window Properties, shown in Figure 4-34, choose Message Window from the Category menu at the top of the Properties popup window.
Figure 4-34 Message Window Properties
-
The Display field determines the number of Lines of Text displayed in each View Message or Compose window text pane. After you make a change and click SELECT on the Apply button, you will need to quit the Mail Tool and start it again for this change to take effect.
-
The Print Script field determines the script used to print your messages via the Print item on the File menu or the header pane pop-up menu. The default print script is lp -s.
-
The Hide scrolling list determines which headers are not displayed when you view your messages with abbreviated headers. You can add any header to this list by typing the header in the Header Field text field, and clicking SELECT on the Add button.
Use the Add menu to place the header either before or after the currently selected header. Use the Delete button to delete the currently selected header, and use the Change button to change the currently selected header to the text typed in the Header Field text field.
Some of the headers that you might commonly want to hide are displayed in the scrolling list in Figure 4-34. You can add any header to the Hide list that you see when viewing messages. You can type the header in any case. For example, adding the header "content-length" hides the headers "Content-Length", "content-length", "CONTENT-LENGTH", and so forth.
When you have changed Message Window properties, click SELECT on the Apply button. The Print Script and Hide property settings become effective immediately.
Compose Window Properties
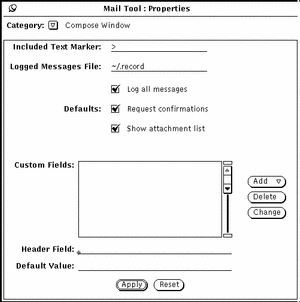
You use the Compose Window Properties category to customize items on the Compose window. To see the Compose Window Properties, shown in Figure 4-35, choose Compose Window from the Category menu at the top of the Properties popup window.
Figure 4-35 Compose Window Properties
Included Text Marker
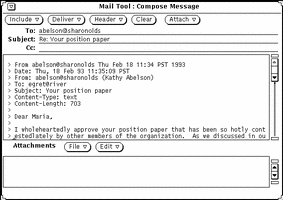
Use the Included Text Marker field to specify the characters that precede each line of an included text message. The default value is "> ". This puts the right-arrow character at the start of the included message when you choose Indented from the compose window Include menu. Tabs are not accepted as an indent character (but spaces are). Figure 4-36 shows the Compose window with an included message indented with ">".
Note -
The right angle bracket is at the start of the included message when you select Reply to Sender, Include or Reply to All, or Include from the compose menu in the Header window.
Figure 4-36 An Indented Included Message
Logged Messages File for Outgoing Mail
If you want to log outgoing mail messages in a file, type the name of the desired log file in the Logged Messages File text field of the Compose Window Properties Category. If a log file name is specified, a Log check box appears on the Compose window, as shown in Figure 4-36 above. When the Log option is checked on your Compose window, the message is logged in the log file when it is sent.
Use the Log all messages setting on the Compose Window Properties Category to determine whether the Log checkbox on the Compose window is checked by default.
Viewing the File of Logged Messages
To view the messages you have logged, do the following:
-
In the Mail Tool base window, type the name of the file in which you have logged your messages in the text field.
Using the example above, for instance, you would type ~/.record.
-
Click SELECT on the Load button.
The messages you have logged will appear in your Mail Tool Base window (in place of the current mail messages), and each has the message header.
Request Confirmations
If the Request Confirmations setting is checked, a Notice is displayed in the following cases:
-
When you have text or attachments in the Compose window, and you select Clear on the Compose window control panel, a message is displayed asking if you really want to clear the Compose window.
-
When you have text or attachments in the Compose window, and you quit the Compose window, a confirmation message is displayed asking if you really want to quit.
-
When you have made changes to a message in the View window, and you then display a new message, unpin the View window, or receive new incoming mail, a message is displayed asking if you want to save the changes.
If the Request Confirmations setting is not checked, any editing changes in the View window are automatically incorporated without notification. If you remove or change the From header of a message. The message that lost the From header will appear to be lost. You can find it appended to the previous message.
Show Attachment List
By default, a Compose window includes a pane at the bottom of the text area where you can add attachments to your message. If you never or rarely use attachments, you can turn off the Attachments pane for new Compose windows. Use the Show Attachment List setting of the Compose Window Properties Category to determine if the Attachments pane is shown by default.
If you turn off the default Show Attachments List setting, you can display the Attachments pane on an as-needed basis by choosing Show Attachments from the Include menu of the Compose window.
Compose Window Custom Header Fields
The header of your Compose window always has To, Subject, and Cc fields. In addition, Bcc is available via the Header menu. You can add custom headers to the Header menu by adding them to the Custom Fields scrolling list on the Compose Window Properties category.
Some useful headers that you might want to use are the following:
-
Precedence: junk -- If the mail system cannot send a message with this header, the message will not be "bounced" back to you. This is handy if you are sending out a message to a large alias, and you do not wish to receive notices whenever the message cannot be delivered to an individual.
-
Reply-To: email address -- When you reply to a message with this header, the reply is sent to the email address in the Reply-To: header field (instead of being sent to the sender of the message).
-
Return-Receipt-To: email address -- When you send a message with this header, you will receive a "Return Receipt" from the mail system when the message is successfully delivered.
To create a custom header field, follow these steps:
-
Type the label for the field in the Header Field line of the Properties window.
Do not type a colon following the label. The colon is automatically provided by Mail Tool.
-
If you want the field to be filled in with a default value, type this value in the Default Value field.
-
Choose either Before or After from the Add menu to add the new header field to the scrolling list.
-
To apply the change to Mail Tool, click SELECT on the Compose Window Properties Apply button.
-
To include the new header field in a mail message, choose the item from the Compose window Header menu, as shown in the menu at the left.
Figure 4-37 shows an example of a custom header field added to the Compose window.
Figure 4-37 Example of a Custom Field Added to the Compose Window

To delete a custom field, click SELECT on the item in the Custom Fields scrolling list, click SELECT on the Delete button, and click SELECT on Apply.
To change a custom field, click SELECT on the item in the Custom Fields scrolling list, type the new values in the Header Field and Default Value text fields, click SELECT on the Change button, then click SELECT on Apply.
Automatically Storing Copies of Messages You Send
You can set up Mail Tool so that you record a copy of each email message you send. To do this, follow these steps:
-
From the Mail Tool base window, choose Edit Properties.
A Properties window appears.
-
In the Properties window, position the pointer on the abbreviated menu button labeled Category, and choose the Compose Window category.
The properties choices for the Compose Window appear in the Properties window.
-
In the text field labeled Logged Messages File, type the name of a file in which you would like to log copies of your mail messages.
For instance, to save the mail in an invisible file in your home directory, you could name the file $HOME/.mail.save.
Note -$HOME is a variable that points to your home directory. You can also use the tilde (~) symbol to indicate your home directory.
-
Click SELECT on the Apply button at the bottom of the Properties window.
Now, when you send a message, a copy is logged in the file you created; additional messages you send are appended to the end of the file.
Mail Filing Properties
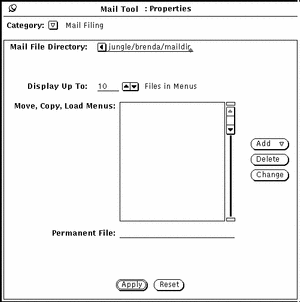
You use the Mail Filing Properties category to choose where your mail files are stored, and to customize the Move, Copy, and Load menus of the Mail Tool Header window. To see the Mail Filing Properties, shown in Figure 4-38, choose Mail Filing from the Category menu at the top of the Properties popup window.
Figure 4-38 Mail Filing Properties
Mail File Directory
Use the Mail File Directory text field to specify the directory where mail files are stored when you move or copy messages from your In-Box to mail files. For example, you might want to name the directory mail, maildir, or mail_files. Unless a full path name is specified, the directory is considered a subdirectory of your home directory. If the directory name you specify does not exist, a Notice is displayed asking if you want to create the directory when you click SELECT on the Apply button. See "Organizing Your Mail Messages" for more information about using the Mail File directory.
Mail File Move, Copy, and Load Menus
The Move, Copy, and Load menus on the Mail Tool Header window display up to 10 of the most recently accessed mail files. You can change the maximum number of files on the menus with the Display Up To setting of the Mail Filing Properties category. Click SELECT on Apply after changing the setting.
When you start up a new Mail Tool application, the Move, Copy, and Load menus are empty. Mail files are added to these menus as you access the mail files. You can specify mail files that you always want to appear at the top of these menus by adding them to the Move, Copy, Load Menus scrolling list.
You can add any mail file to this list by typing the name of the mail file in the Permanent File text field, and clicking SELECT on the Add button.
Use the Add menu to place the mail file either before or after the currently selected mail file. Use the Delete button to delete the currently selected mail file, and use the Change button to change the currently selected mail file to the mail file typed in the Permanent File text field.
See "Organizing Your Mail Messages" for more information about using mail files.
When you have changed Mail Filing properties, click SELECT on the Apply button.
Saving Mail to Another Location
You can save mail to any location in your file system by typing in an absolute pathname. This means that the location you specify is an exact location within your file system rather than one that is relative to the Folders directory.
Saving to an Absolute Path in Your Home Directory
To save mail to an absolute location in your home directory, you can precede the path with the variable $HOME, or with the tilde (~) on your keyboard, followed by your user account name (or that of another user's home directory where you have write permission). The tilde indicates the top level of your home directory.
To save a mail message in a location under your home directory, follow the instructions in the section "Saving Mail to the New Default Location", but use the form in one of the examples below to type the path on the Mail File text field:
~username/Subdirectory/filename $HOME/username/Subdirectory/filename |
When you choose Move or Copy, the chosen mail file in your mailbox is stored in a file named filename in a subdirectory named Subdirectory under your home directory.
Saving to an Absolute Path Relative to the Root Directory
To save a mail message to an absolute location starting from the top level directory in your file system, you use a slash (/) to indicate the root directory, and follow that with an absolute path.
To save a mail message in a location under your root directory, follow the instructions in the section "Creating a New Mail File", but use the following form on the Mail File text field:
/Subdirectory/filename
where / is the root directory, and Subdirectory is an existing directory under root.
For example, you could type:
/tmp/myfile
The /tmp directory is a directory that contains some system files.
You should only use the /tmp directory for temporary file storage. When you reboot your system, these files will be purged.
When you choose Move or Copy, the chosen mail file in your mailbox is stored in a file named myfile in the subdirectory named tmp under the root directory.
Modifying the Default Location
Using Mail Tool's Properties window, you can permanently change the default location for your saved mail. For instance, you could change the name of the Folders directory, or you could save your mail to a location directly relative to your home directory.
To change the default location for your saved mail, follow these steps:
-
From the Mail Tool base window's control area, choose Edit Properties.
The Mail Tool Properties window appears.
-
Position the pointer on the Category menu button and choose Mail Filing.
The Mail Filing properties appear in the Properties window.
-
Double-click SELECT on the word Folders on the text field.
Folders is highlighted, for example.
-
Choose the default location for your saved mail:
-
Click SELECT on the Apply button.
A pop-up message asks if $HOME should be expanded to the path name of your home directory.
-
Click SELECT on the Expand String button.
The Properties window is dismissed.
Saving Mail to the New Default Location
Saving mail messages to the new default that you have specified is just like saving mail to the Folders directory. To save mail, do the following:
-
Type the file name, or a subdirectory name and then the file name, on the text field in the Mail Tool base window.
Note that if you have changed the default location to your home directory there is no need to type a tilde to specify your home directory as the destination.
-
Click SELECT on the message you want to save.
-
Choose Move or Copy.
The chosen mail message is saved to the directory name of your choice under your home directory (e.g. the directory name you substituted for Folders, the top level of your home directory, or a specified subdirectory).
Template Properties
Mail Tool allows you to create your own template files containing text that you frequently use for composing messages. Each template is an individual file that you create outside of Mail Tool, using any editor such as Text Editor or vi.
You can add a created template to Mail Tool using the Template Properties category, shown in Figure 4-39. Display the Template properties by choosing Template from the Category menu at the top of the Properties popup window.
Figure 4-39 Template Properties
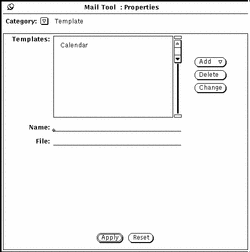
To add a template to the Include Templates submenu of the Compose window, follow these steps:
-
Type the name of the template in the Name field on the Properties window.
-
Type the path and name of the file containing the template in the File field.
-
Choose Before or After from the Add menu.
-
Click SELECT on the Apply button.
The items in the scrolling list are added to the Templates submenu of the Compose window Include menu.
A Calendar template is automatically provided when you have no other templates installed. Otherwise, if you want to use the Calendar template you must add it to the Template menu yourself following the steps above. Your template can contain text to be included in a message, and it can also include header information. If you include header information, make sure that there are no lines in the template file before the header lines. Figure 4-40 shows an example of a template that contains both header information and text. Make sure there is at least one blank line between the header lines and the message text.
Figure 4-40 Contents of a Template File with Text and Header Information

To use a template, choose the item from the Templates submenu of the Compose window Include menu. The text from the template file is then displayed in the Compose text pane. If your template contains headers, the headers in the Compose window are automatically filled out.
To delete a template name, click SELECT on the name in the scrolling list of the Template Properties window, click SELECT on the Delete button, then click SELECT on the Apply button.
To change a template, click SELECT on the item in the Template Properties window scrolling list, type the new values in the Name and File text fields, click SELECT on the Change button, then click SELECT on Apply.
Alias Properties
You can create your own distribution lists containing groups of user names. Then, instead of typing a distribution list of many names, you can type the single name that you specify as the name of the alias in the To text field.
There are two kinds of distribution lists, or aliases, you can create:
-
Aliases in your /etc/aliases file that anyone can use. See "Creating and Using Public Aliases in /etc/aliases" for information about this kind of alias.
You use the Alias Properties category, shown in Figure 4-41, to create your own private distribution list aliases. Display the Alias properties by choosing Alias from the Category menu at the top of the Properties window.
Figure 4-41 Alias Properties
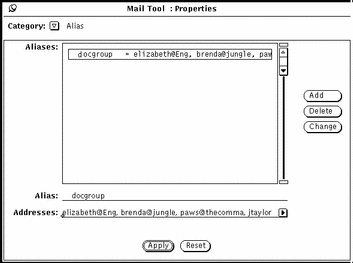
To add a private distribution list alias, follow these steps:
-
Type the name of the alias in the Alias text field.
In Figure 4-41, the alias name is docgroup.
-
In the Addresses field, type the email address of each person in the distribution list.
Separate each name by either a comma, a space, or both.
-
Click SELECT on the Add button.
The item is added to the scrolling list in alphabetical order.
-
Click SELECT on the Apply button.
The items in the scrolling list are added to your private aliases.
To use the alias, simply type the name of the alias (for example, docgroup) in the To, Cc, or Bcc line of the Compose Messages window. The names you typed in the field are expanded and included as part of the outgoing message. Use the Delete button to delete the currently selected alias, and use the Change button to change the currently selected alias to the text typed in the Alias Field text field.
Creating and Using Public Aliases in /etc/aliases
To create an alias that anyone can use, you must have root access to your system. Edit your /etc/aliases file using any text editor. Under the Local Aliases category, on a separate line, type aliasname:username,username. Separate each item with a comma and end the group with a Return. You can include a space after each comma, if desired.
Figure 4-42 shows an example of an alias group in /etc/aliases.
Figure 4-42 Example of an Alias Group in /etc/aliases

To use the alias, type the name of the alias in the To, Cc, or Bcc line of the Compose Messages window. The names you typed in the field are not expanded as part of the outgoing message. The alias group itself is displayed as the user name when the message is received. To use an alias on someone else's system, type the alias name, @, and their machine name in the To, Cc, or Bcc line of the Compose Messages window. For example, someone else could send mail to the "friends" alias in the example by typing friends@castle, because the "friends" alias is on the machine "castle".
Expert Properties
You use the Expert Properties category to set some advanced mail defaults that are provided for mailx(1) compatibility. To see the expert default settings, shown in Figure 4-43, choose Expert from the Category menu at the top of the Properties popup window.
Figure 4-43 Expert Properties
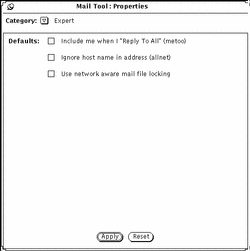
The expert settings determine what happens when you choose Reply to All or Reply to All, Include from the Compose menu.
These settings only apply when your email address appears in the To or Cc list of the message you are replying to.
The following sections describe what happens when these settings are checked or not checked. Only the names listed in parentheses are used below when referring to the options. That is, the options are called "metoo", "allnet", and use network aware mail file locking. These are the names used in the .mailrc file, as described in the mailx(1) manual page.
When Metoo is Checked
When the metoo option is checked, and your email address appears in the To or Cc field when you do a Reply to All, you will receive the reply. Your mail address is recognized in all forms that include your login address, such as yourname@machine and yourname@host. Where machine is the name of your machine and host is the name of any host that is not your machine.
For example, suppose you Reply to All to a message with the following header:
From:salmon@sea Fri Aug 23 10:36:21 1991
To: yourname@machine, yourname@host, tuna@ocean
Your reply will include the following To line:
To: yourname@machine, yourname@host, tuna@ocean, salmon@sea
When Metoo is Not Checked
If the metoo option is not checked, the message header of your reply depends on the allnet option. The allnet option determines whether your mail address is recognized in all forms that include your login address, or only in the form yourname@machine.
Note -
The allnet option only has an effect when the metoo option is not checked.
When Allnet is Checked and Metoo is Not Checked
If the allnet option is checked and the metoo option is not checked, and you do a Reply to All, your address is not included in any form in the To or Cc fields of your reply.
For example, suppose you receive a message with this header:
From: salmon@sea Fri Aug 23 10:36:21 1991
To: yourname@machine, yourname@host, tuna@ocean
The To field of your reply would look like this:
To: tuna@ocean, salmon@sea
When Neither Allnet Nor Metoo is Checked
When neither the allnet nor the metoo options are checked, your email address is only included in the To and Cc fields of a Reply to All in the form yourname@host.
For example, suppose you receive a message with this header:
From: salmon@sea Fri Aug 23 10:36:21 1991 To: yourname@machine, yourname@host, tuna@ocean
The To field of your reply would look like this:
To: yourname@host, tuna@ocean, salmon@sea
When Use Network Aware Mail File Locking is Checked
Mail Tool tries to prevent two different instances of Mail Tool from opening the same mail file at the same time. By default, a technique that successfully detects this access when both Mail Tools and the file are all on the same machine.
As an option you can use a network aware locking protocol that uses ToolTalkTM to coordinate the Mail Tools. This ensures consistency if running MailTool from more than one machine, or if mail files are accessed over the network.
Mail Tool can only change this option when first opening a mail file. If you change this option when a mail file is open you are given three choices:
-
You can save the current mail file and reopen it, making the new locking technique take effect immediately.
-
You can continue editing the current mail file. The new locking technique will take effect the next time you open a mail file.
-
You can abort the apply and return to editing the property sheet.
- © 2010, Oracle Corporation and/or its affiliates
