Chapter 5 Calendar Manager
Calendar Manager is an appointment and resource scheduling tool. Calendar Manager can help you schedule and keep track of your daily appointments. Upon request, Calendar Manager can send you reminders in advance of your appointments.
Your system must be set with the accurate date and time for you to receive these advance notices when you need them. Additionally, you must keep Calendar Manager running on your system--open or in icon form--for this message system to work properly. With Calendar Manager, you can:
-
Display appointments and To Do items for a day, week, month, or year at a glance
-
Schedule a single or repeating event
-
Provide reminders of events
-
Access, browse, and edit the calendar appointments of other users who have given you permission to do so
-
Browse calendars of many users at one time in order to find meeting times available to everyone
-
Schedule appointments for several users at one time
-
Send mail to other users notifying them of new appointments
-
Print high-quality calendar output for reference
Calendar Manager opens to icon form.
To open Calendar Manager, choose Workspace -> Programs -> Calendar Manager.
Calendar Manager Icons
Calendar Manager provides different ways to view your calendar. You can view your schedule a day, week, month, or year at a time. You can also view a daily, weekly, monthly, or yearly list of appointments or To Do items. This section describes all the ways you can view the calendar.
Icons
When Calendar Manager is displayed as an icon, it shows the current date, as shown in Figure 5-1.
Figure 5-1 Calendar Manager Icon
Calendar Manager Base Window
Views by Day, Week, Month, and Year
To view the full calendar, double-click SELECT on the calendar icon. Calendar Manager opens up into a full-sized window containing the current month. Figure 5-2 shows the Calendar Manager window. Note that one appointment is displayed for each line, and the text for the appointments is clipped to fit the size of the date box.
Figure 5-2 Default Calendar Manager Window
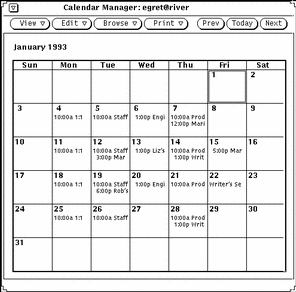
The default Calendar Manager display is the current month at a glance, which shows appointment scheduling for a one-month period. (You can, however, change the default from the Properties window.)
The current day is automatically selected when you open the Calendar Manager window. The selected day has a double border. On color workstations, the inside border is the color of your Windows, as determined by the Workspace Properties Color category. In Figure 5-2, August 6th is the selected day. You can select any other day by pointing to the day and clicking SELECT.
Calendar Manager Controls and Menus
There are four menu buttons at the top of the Calendar Manager window: View, Edit, Browse, and Print and three Navigation Controls. The related menu functions are listed here.
View Menu
The View menu allows you to alternate between day, week, month, and year views; change time zones; locate an appointment; and go directly to a selected date.
-
Day displays a view of the currently selected day, list of scheduled appointments for the day, and a daily To Do list.
-
Week displays a mini view of the current week, list of scheduled weekly appointments, and weekly To Do list items.
-
Month displays a full month view with the current date highlighted, a list of scheduled monthly appointments, and a monthly To Do list.
-
Year displays a view of the current year, a list of appointments scheduled throughout the year, and a yearly To Do list.
-
Time Zone lets you change your time zone to another time zone, and allows you to view another user's calendar in their native time zone.
-
Find lets you search for an appointment. See the section "Finding a Calendar Appointment".
-
Go To allows you to search through your entire calendar for a specific date. For complete information refer to "Finding a Calendar Appointment".
The View menu allows you to change the view. For information on displaying more detail as well as displaying past, present, and future time, see "Resizing Your Calendar" and "Navigation Controls".
For information on using appointment and To Do lists, see "Displaying an Appointment or To Do List".
Edit Menu
The Edit menu items have the following functions:
-
Appointment allows you to schedule appointments and To Do items. The Appointment Editor pop-up window is displayed.
-
Properties lets you customize various features of the Calendar Manager, including settings for the appointment and calendar display, date format, printing, and security access.
Browse Menu
The Browse menu allows you to view Multiple calendars: browse a single Calendar; set up the Browse list and the Browse menu pulldown which allows quick access to a calendar. For more information refer to "Multiple Calendars Base Window".
Print Menu
The print menu allows you to print the currently selected view as well as Day, Week, Month, Year views and corresponding Appointment and To Do lists.
Navigation Controls
Figure 5-3 The Calendar Navigation Controls
The right side of the control area has three buttons for changing to past, present, or future views:
-
Prev displays the previous day, week, month, or year.
-
Today displays a view that contains the current date.
-
Next displays tomorrow or the upcoming week, month, or year.
Resizing Your Calendar
For all views and lists, the Calendar Manager window has resize corners that you can use to change its size to see greater detail. For information on resizing, see "Resizing Windows".
To display more information on each line, use one of the resize corners to stretch the window horizontally.
To increase the number of lines for appointments, use one of the resize corners to stretch the window vertically.
Calendar Views
The following sections describe the views you can choose from the View menu: Day, Week, Month, and Year.
Day View
The day-at-a-glance view is useful when you have many appointments scheduled for a single day.
To change the view in the Calendar Manager window so that it displays appointments for one day, choose View -> Day.
The view in the Calendar Manager window changes to display the currently selected day. If the current view is the year view, the day displayed is the first day of the currently selected month. Figure 5-4 shows an example of the day view.
Figure 5-4 Day View
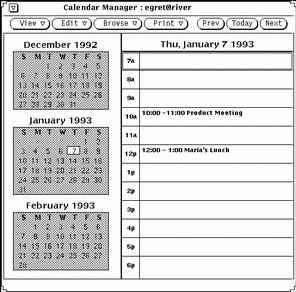
If the current view is the week view, an accelerated way to change to the day display is to move the pointer into the date box at the top of the day you want to view and click SELECT.
You can set the range of hours that are displayed for the day view from the Properties window. See "Customizing Your Calendar Manager" for more information.
You can also display a daily list of Appointments or To Do items. Displaying these lists next to the day view is particularly useful because Appointments and To Do items without times associated with them do not appear on the regular day view. See the section "Appointment List and To Do List Views" for more information.
Week View
To change the view in the Calendar Manager window so that it displays appointments for one week, choose View -> Week.
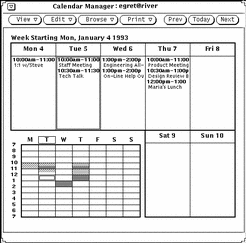
The view in the Calendar Manager window changes to display the week containing the current date, as shown in Figure 5-5. The chart in the lower left corner of the window shows you the blocks of time allocated for appointments during the week. The darkly shaded area indicates overlapping appointments.
You can also display a weekly list of Appointments or To Do items. See the section "Appointment List and To Do List Views".
You can also display to the Day View by selecting the date header in the Week View.
Figure 5-5 Week View
Month View
To change the View in the Calendar Manager window so that is displays appointments for a month, choose View -> Month.
Alternatively, from the Month view, place the pointer over the number for an individual day and click SELECT to change the view to the week containing that day. Make sure to click SELECT directly on the number of the day within Month view. Clicking SELECT anywhere else on the day just selects that day. When you click SELECT directly on the number of a day, the entire week containing that day is highlighted when the SELECT button is down, and the view changes to the Week view when the SELECT button is released.
You can also display a monthly list of Appointments or To Do items. See "Appointment List and To Do List Views" for more information.
Year View
To change the view in the Calendar Manager window so that it displays the calendar for the current year, choose View -> Year.
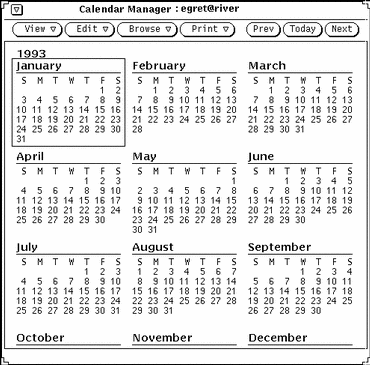
The view in the Calendar Manager window changes to display the current year. Figure 5-6 shows the Calendar Manager window with a year display.
Figure 5-6 Year View
You can also display a monthly list of Appointments or To Do items. See "Appointment List and To Do List Views".
Appointment List and To Do List Views
In addition to displaying your schedule for a day, week, month, or year, you can also display separate windows of lists of all the Appointments and To Do items for a particular day, week, month, or year. (The appointments and To Do items also appear on your base window schedule.) Figure 5-7 shows a day view displayed along with the Appointment and To Do lists for that day.
Figure 5-7 Day View with an Appointment List and To Do List
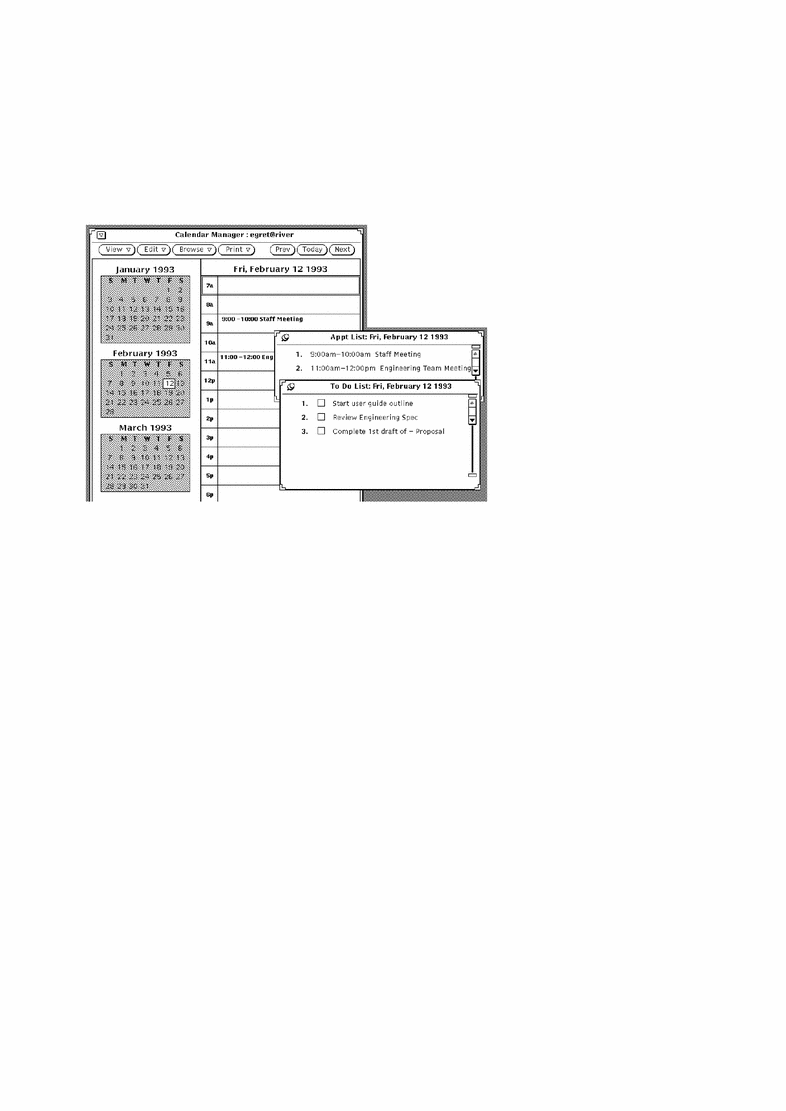
An Appointment List displays all the appointments for a particular time period, while a To Do list displays all the To Do items for a particular time period. To help you keep track of tasks that need to be done, the To Do list includes check boxes where you can check off an item when you have completed it. To check off a To Do item, click SELECT on the check box of the completed list item. To erase a check mark, click SELECT on the check box containing the check mark.
An appointment, such as a meeting, typically has a time associated with it, but it doesn't have to. A To Do item, such as "Create status report," typically does not have a time associated with it, but you can give it a time if you want to. It's entirely up to you which items on your calendar are Appointments and which are To Do items. See "Edit Menu" for information about creating and changing calendar items.
Displaying an Appointment or To Do List
To display an Appointment List or To Do list, follow these steps:
-
Select or view the day, week, month, or year that you want to display a list for.
-
Choose Appt List or To Do List from any of the View submenus.
A pop-up window with the selected list appears next to the Calendar Manager base window.
Edit Menu
You schedule Appointments and To Do items from the Appointment Editor pop-up window. You can display the Appointment Editor window by selecting a day and choosing Appointment from the Edit menu.
Alternatively, you can double-click SELECT on an hour (for Day view) or a day (for Week or Month view) to display the Appointment Editor.
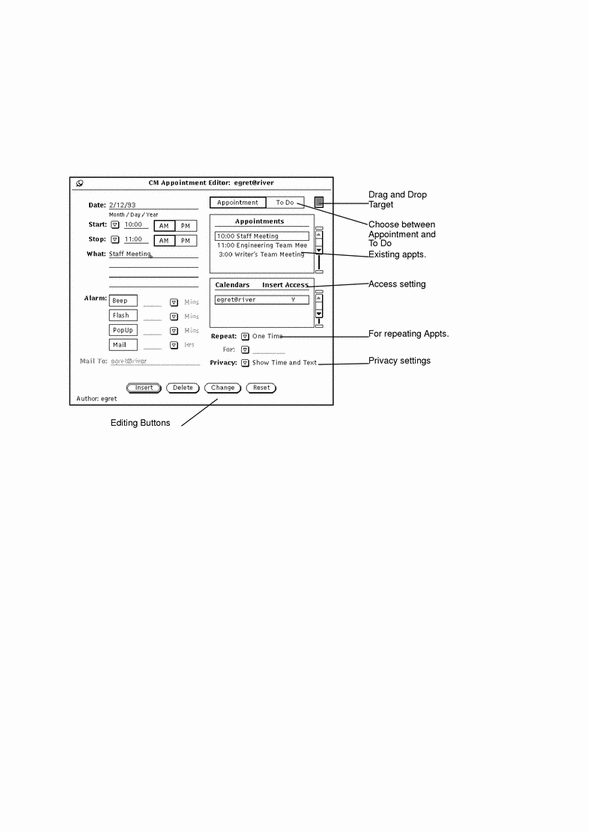
The Appointment Editor window automatically displays the selected day and lists scheduled appointments in the scrolling list, as shown in Figure 5-8.
Figure 5-8 Appointment Editor Pop-up Window
Appointment Editor Options
The Appointment Editor window contains the following controls:
-
A Date field that automatically displays the selected date. You can type in another date to schedule additional appointments. You can change the format of the Date field with the Calendar Manager Properties window. See "Date Format Properties" for more information.
-
A Start and Stop set of controls that you use to set the time of the appointment. You can either use the time menu or type in a number in the text fields.
The time menu is available through the Start and Stop abbreviated menu buttons. The choice of times on this menu is determined by the Day Bounds settings from the Properties window. See "Customizing Your Calendar Manager" for more information.
When you set a start time, the stop time is automatically set to one hour later. If the appointment is longer than an hour, you can set a new stop time by choosing a time from the time menu or by typing a time in the text field.
The last choices on the time menu are Time and No All Day. Use No Time if you don't want a time associated with an appointment. When you choose All Day, the appointment is set for 12:00 a.m. to 11:59 p.m. This is useful for appointments that refer to the entire day, such as "Vacation Day."
-
A What field in which you type information about the appointment or To Do item. The first line of this field is displayed in the Day, Week, and Month views, so the first line should describe the appointment. You can also include details about the appointment, such as the appointment place, a brief meeting agenda, or a reminder to bring something to the appointment.
-
A scrolling list that displays existing appointments for the selected date.
-
An Appt/To Do setting, that lets you choose whether the item is to be considered an Appointment or a To Do item. See "Displaying an Appointment or To Do List" for more information.
-
Calendars and Insert access tells you what permissions you have for the selected calendar. See "Customizing Your Calendar Manager".
-
A setting called Privacy Setting, which lets you create a private appointment. If you select the options: Show Time Only or Show Time and Text (only the time of the appointment and what fields are displayed) or Show Nothing (nothing from the appointment is displayed). If you select Show Nothing the appointment, including the appointment time, is completely hidden from everyone else. You can change the default in the Properties menu. Refer to "Customizing Your Calendar Manager".
If you create a Show Nothing appointment by using the Privacy setting, nobody else will be aware that you have an appointment scheduled in that time slot when they browse your calendar. There is a possibility that someone else will schedule another appointment for you in that time slot because they cannot see that time slot filled when using Multiple Calendars. (See "Multiple Calendars Base Window" for information.)
-
Alarm controls determine how you are reminded of an appointment. You can use as many of the alarm controls as you like for each appointment. Each alarm setting allows you set an advance alarm in intervals of minutes, hours, or days, by using the abbreviated menu buttons and typing a number in the text field.
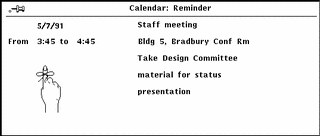
The Beep and Flash settings cause the Calendar Manager icon to beep and flash if it is closed. The Calendar Manager window itself will beep and flash if it is open. If you choose PopUp, at the time specified for PopUp the appointment Reminder window is displayed, showing the appointment information. Choosing the Mail setting automatically mails a reminder to the email addresses you type into the Mail To text field.
-
Repeat controls specify the following: if the appointment is individual, Daily, Weekly, Every Two-Weeks, Monthly By Date (this is the date of the appointment such as the first or the fifteenth of the month), Monthly By Weekday (this is the weekday of the appointment such as every third Tuesday of the month), Yearly, Monday thru Friday, Mon., Wed., Fri., Tuesday-Thursday, or repeat the appointment for a set amount of days, weeks or months (Repeat Every...). When an appointment repeats, use the For: field to set the number of times the appointment is repeated during the day, week or month. You can also set a limit on the amount of day(s), week(s), or month(s) it is repeated.
-
You can drag and drop appointments from Mail Tool onto the Appointment Editor.
You can change the default settings for the Appointment Editor window from the Calendar Manager Properties window. See "Customizing Your Calendar Manager" for more information about properties.
Use the set of buttons at the bottom of the default Appointment Editor window to create and edit appointments. For information about using the Insert, Delete, Change, and Reset buttons, see the sections "Scheduling Appointments and To Do Items", "Deleting an Appointment",and "Editing an Appointment".
Scheduling Appointments and To Do Items
To schedule an appointment on your calendar, do the following:
-
Double-click SELECT on the day you would like to schedule an appointment.
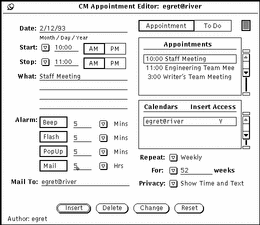
This opens an Appointment Editor window, shown in Figure 5-9.
Figure 5-9 Calendar Manager Appointment Window
-
If the commitment is a task rather than an appointment click SELECT on the To Do box.
The Appt (appointment) box is selected by default.
You may enter a To Do item with or without an associated time.
-
To set the time, move the pointer onto the Start abbreviated menu button and press MENU to display a menu from which you can choose times.
The hours displayed on this menu are determined by the setting of day boundaries from the Properties window.
Each hour item has a submenu with 00, 15, 30, and 45 minute items.
Highlight the time you want and release MENU to enter the time in the text field. When you choose a time from the menu, the correct a.m. or p.m. setting is automatically chosen for you. If you choose the menu item None, no time is associated with the appointment. If you choose All Day, the appointment is set from 12:00 a.m. to 11:59 p.m.
Alternatively, you type a time in the Start text field. If necessary, click SELECT on the PM setting.
The time in the Stop text field is automatically set to one hour later than the time in the Start text field.
-
To change the duration for the appointment from the default of one hour, move the pointer onto the Stop menu button and press MENU to display the time menu as described in Step 2.
Alternatively, you can type a time in the Stop text field. If necessary, click SELECT on the PM setting.
-
If the appointment is one that is repeated on a regular basis, choose the appropriate Repeat setting from the menu displayed through the Repeat abbreviated menu button.
You can use the Repeat menu to choose a variety of intervals. These are outlined in the "Appointment Editor Options". When Repeat is set to One Time, the For text field is inactive and is dimmed to show you that it will not accept input. When you choose a repeating appointment, the For text field and abbreviated menu button are active and the units are displayed in the text field.
You use the For menu and text field to choose the time frame you want the appointment to repeat. For example, you may know that a weekly meeting will be scheduled for the next ten weeks.
The default number in the For text field usually sets the appointment to repeat for a year. For example, the default number is 365 when the repeat interval is Daily, or 52 when the repeat interval is Weekly. The default number for the Yearly setting is two years. If you want the appointment to repeat indefinitely, you can choose forever from the For menu or type the word "forever" in the text field.
-
Choose a Privacy setting, if applicable.
If this is a private appointment that you do not want anyone to view, you can use the abbreviated menu button from the Privacy field to select Show Time Only or Show Nothing about the appointment. For complete information refer to "Appointment Editor Options".
-
Choose the way you want to be reminded of this appointment.
You can set none, some, or all of the Alarm options. Beep and Flash cause the Calendar Manager icon to beep and flash if it is closed. The Calendar Manager window itself will beep and flash if it is open. If you choose PopUp, at the time specified for PopUp the appointment Reminder window is displayed showing the appointment information. Figure 5-10 shows an example of the Reminder pop-up window.
Figure 5-10 Example of the Reminder Pop-up Window
Choosing the Mail setting automatically mails a reminder to the email addresses you type into the To text field.
-
Change the Alarm times, if necessary by typing a new number into the appropriate text field.
Decimals and fractions are not accepted formats.
You can also change the default Alarm times from the Properties window. See "Customizing Your Calendar Manager" for information.
-
When you have entered all the information for the appointment, click SELECT on the Insert button.
The appointment is added to the scrolling list in the Appointment Editor window and to the Calendar Manager window.
If you want to enter appointments for another day, double-click SELECT on the new day in the Calendar Manager window or type a new date in the Date field.
Deleting an Appointment
To delete an existing Appointment or To Do item, follow these steps:
-
Select a date and display the Appointment Editor pop-up window.
-
Select the appointment in the scrolling list that you want to delete.
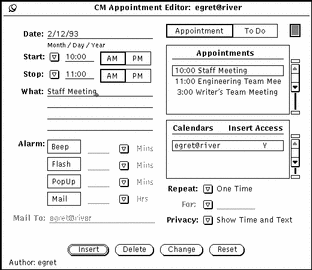
The appointment is highlighted, as shown in Figure 5-11, the appointment information is displayed in the Appointment Editor fields, and the author of the appointment is displayed in the footer.
Figure 5-11 Appointment Editor Window with a Highlighted Appointment
-
Click SELECT on the Delete button at the bottom of the Appointment Editor window.
The appointment is deleted from both the scrolling list and the Calendar Manager window.
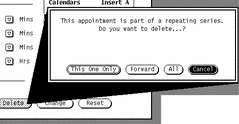
If you try to delete a repeating appointment, a Notice is displayed, as shown in Figure 5-12, allowing you to delete the appointment for the selected date only, for (forward) future dates, all dates, or to cancel the operation.
Figure 5-12 Notice for Repeating Events
Editing an Appointment
To edit an existing Appointment or To Do item, follow these steps:
-
Select a date and display the Appointment Editor window.
-
Select the appointment in the scrolling list that you want to edit.
-
Change the information in the Appointment Editor window to reflect the new information for the appointment.
-
Click SELECT on the Change button at the bottom of the Appointment Editor window.
If you change a repeating appointment, a Notice is displayed allowing you to change the appointment for the selected appointment only, for all future appointments in the repeating series, for all scheduled appointments, or to cancel the operation.
Appointment Reminders
You may want to receive a reminder before a scheduled appointment. You can make your system beep, flash, or send you an electronic mail message, or you can set your calendar to display a pop-up window containing the appointment details. You can also choose some combination of those events.
To receive a reminder, do the following:
-
Begin a new appointment, or edit an existing appointment in the Appointment Editor.
-
Click SELECT on the button or buttons for the Alarm reminders you would like to receive before that appointment.
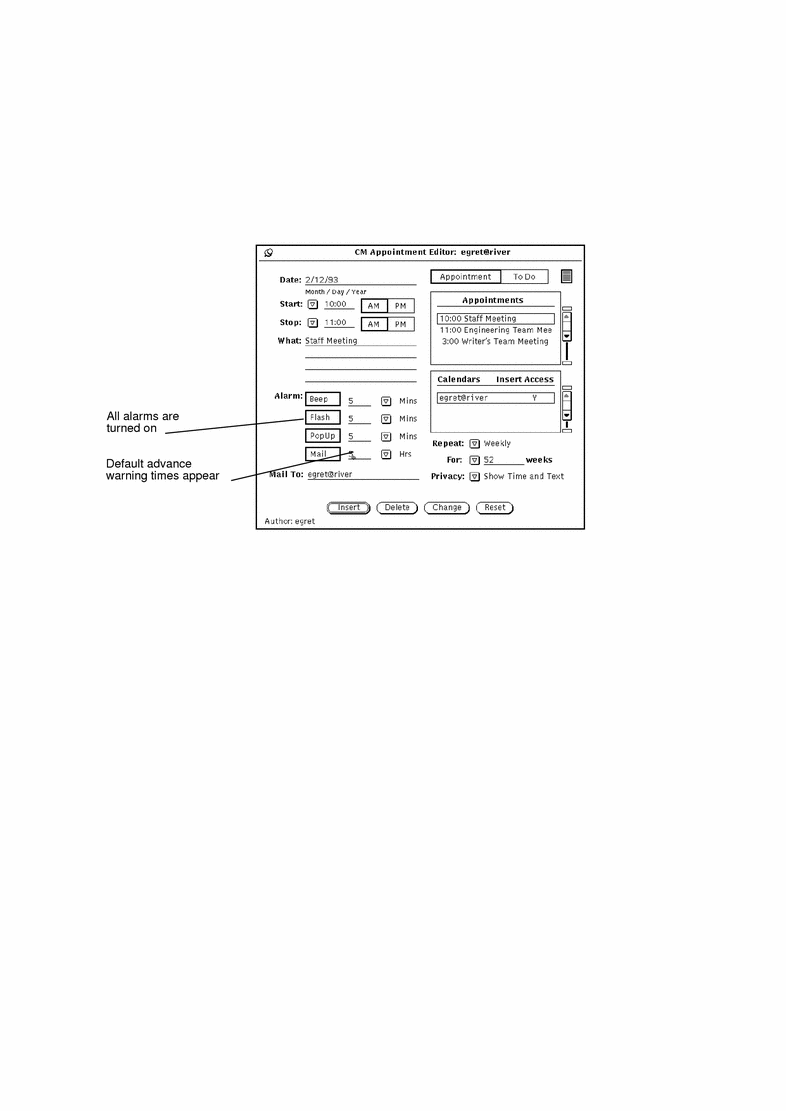
The buttons you choose are highlighted. Figure 5-13 shows the appointment reminders when they have been selected.
Figure 5-13 All Appointment Reminders Selected
-
If needed, change the default advance warning times, as follows:
-
Add mail addresses to the Mail To text field, as needed.
By default, your own mail address appears on the text field. If you add more addresses, the names will scroll out of sight. You can scroll them back into view using the arrow keys on your keyboard.
-
Save the appointment, in one of the following ways.
Finding a Calendar Appointment
If you want to find an appointment, but you can't remember exactly when it was scheduled, you can use the Calendar Manager Find feature.
To display the Find window, choose View -> Find.
From the Find window type the appointment you want to search for in the text field. The Find window contains a text field where you type in the appointment that you want to search for. The text that you type can be any part of the appointment description, and can be in upper or lower case. For example, Figure 5-14 shows a Find window with the word "Dentist" typed in the Match Appt text field. This will find the next appointment with the word "dentist" (upper or lower case) in the What field, including "Dentist appointment", "See the dentist", "DENTIST", "Pay dentist bill", and so forth.
Figure 5-14 Calendar Manager Find Window

Use the Months text field and increment/decrement buttons to specify the number of months that you want to search for an appointment, starting with the currently displayed month. Clicking SELECT on Find Forward searches forward for the number of months specified, and clicking SELECT on Find Backward searches backward for that number of months.
Finding a Specific Calendar Date
Sometimes you may need to look at or "go to" a specific date very quickly. Instead of using the navigator buttons to do this, you can use the Go To function.
-
Choose View-> GoTo.
You see the Go To Date window.
-
Type the exact date on the Date: line, and SELECT the GoTo button.
The date must be in the format specified in the Date Format Properties. Depending on the view selected, the day is shown or highlighted.
Dragging an Appointment Message from Mail Tool
When you receive a mail message that has an appointment icon attached to it, or a mail reminder generated by another Calendar Manager application, you can drag and drop the message (or appointment icon) onto Calendar Manager to schedule your appointment by following these steps:
-
Open the Mail Tool window that displays your mail message headers.
-
Point to the header and click SELECT to select it.
-
Press the SELECT mouse button and drag the pointer a short distance.
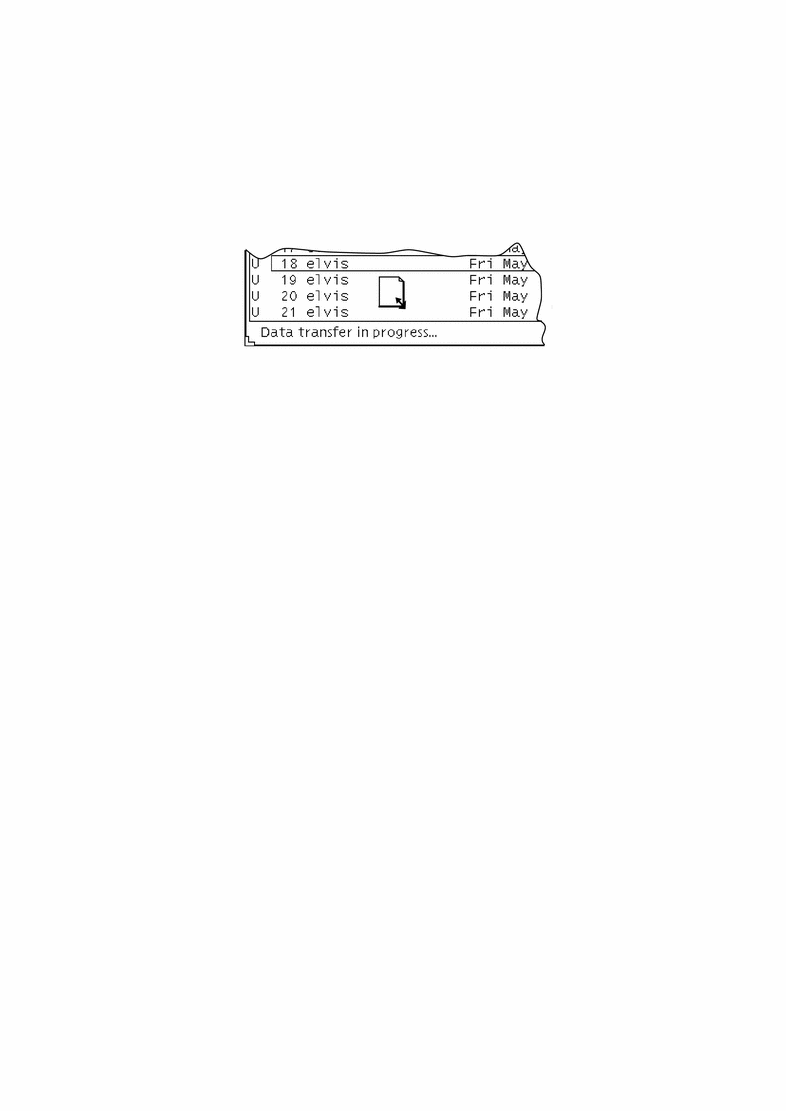
The pointer changes to the duplicate pointer, and a small envelope representing the mail message is displayed, as shown in Figure 5-15.
Figure 5-15 Dragging a Mail Message
-
Drag the envelope onto the Calendar Manager.
You can drop it onto the Calendar Manager icon or anywhere on the open Calendar Manager window.
-
Release SELECT.
When the appointment has been successfully scheduled, a message is displayed in the footer of the Calendar Manager window. Figure 5-16 shows an example of such a message.
Figure 5-16 Example of a Message for a Scheduled Appointment

For complete information on the appointment icon, refer to Chapter 4, Multimedia Mail Tool. If the appointment is in a format that Calendar Manager cannot understand, a Notice is displayed informing you that the appointment cannot be scheduled.
Multiple Calendars Base Window
Calendar Manager allows you to access the calendars of other users if you are included on their Access List. This convenient feature allows you and your coworkers to coordinate scheduling of appointments. You can use the Show Multiple Calendars menu item to overlay the calendars of many users at one time in order to find the best time to schedule a meeting. Once you have found a convenient meeting time, you can schedule the meeting in everyone's calendar, and/or send each user mail about the new appointment.
You can also see all the public appointments on another user's calendar, and insert, delete, or change existing appointments, as long as you have the appropriate access list permissions. See "Access List and Permissions Properties" for information about creating the access list for your personal calendar.
Using Multiple Calendars
The Show Multiple Calendars menu item allows you to view many people's calendars overlaid onto the same display at one time. It lets you see how many and which users are busy during any particular hour, and quickly tells you if there is a time slot in which all the users are free. If there is not a time slot when all the users are free, you can determine a time when the majority or a particular subset of users are available. This makes it much easier to figure out the best time for a meeting.
Once you have figured out the best time for a meeting, you can schedule the appointment for all the users who have given you Insert access to their calendars. In addition, you can send mail to the meeting participants in a format that the users can drag from the Mail Tool and drop onto their Calendar Manager in order to schedule the appointment themselves.
Multiple Calendars Window
You access Multiple Calendars by choosing Show Multiple Calendars from the Browse menu. This displays the Multiple Calendars window. Figure 5-17 displays the Multiple Calendars icon and the default window with one calendar displayed. Using Show Multiple Calendars to display multiple calendars is described later in this section.
Figure 5-17 Multiple Calendars Icon and Window
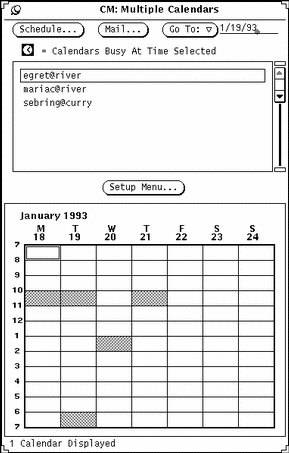
The Multiple Calendars window has the following controls:
-
Schedule, Mail, and Go To buttons that you use to schedule appointments for many users at once, mail information about new appointments, and change the display of Multiple Calendars to show a different week or month.
-
Setup menu button from which you type the user names (login and system name) of the calendars that you want to add to the browser scrolling list
-
Multiple Calendars display, on which any number of calendars can be overlaid to show a composite schedule
In Figure 5-17there is one calendar displayed. A footer message tells you how many calendars are being displayed at any time.
The gray areas of the calendar display indicate the times that the selected user has scheduled an appointment. If several calendars are being displayed, the gray blocks have varying shades. Darker blocks indicate more existing appointments during that time slot. (There are only up to three shades of gray, so a time slot with four existing appointments will not appear any darker than a time slot with three appointments.) The white areas indicate times in which none of the selected users are busy.
Figure 5-18 shows Multiple Calendars with five calendars displayed. The calendars displayed are those of the five users selected in the scrolling list. The unshaded white area on Monday at 11:00 indicates that this is a time when the five selected users are all available.
Figure 5-18 Multiple Calendars with Five Calendars Displayed
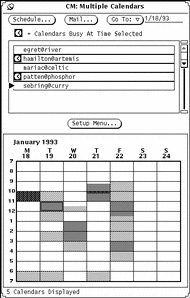
One hour in the Multiple Calendars display has a double border. On color workstations, the inside border is the color of your Windows, as determined by the Workspace Properties Color category. This indicates the selected time.
Every user who has an appointment scheduled during the selected time has a clock symbol to the left of their name in the scrolling list. You can use these clock symbols to see who is busy during a desired time slot. For example, if you have to schedule a meeting and there is no time that everyone is available, you can use the check mark display to find out who is scheduled during a time slot for which only one person is busy.
The selected time in Figure 5-18 is Tuesday at 11:00. You can see by the check marks in the scrolling list that users hamilton@artemis and patten@phosphor both have appointments scheduled on Tuesday at 11:00 a.m.
Adding a Calendar to Multiple Calendars and the Browse Menu
The scrolling list of the Multiple Calendars displays all the calendars that are available to be browsed. The Browse menu (from the Browse button of the Calendar Manager control panel) is also made up of this same list of calendars. In order to browse a calendar, you must first add it to the Multiple Calendars scrolling list.
New calendars are displayed on the Browse menu in the order you enter them in the Multiple Calendars scrolling list. This list can be sorted alphabetically after adding the name to the list.
To add calendars to the browse list and menu follow these steps:
-
If the Multiple Calendars window is not currently displayed, choose Browse Setup Menu.
If the Multiple Calendars window is displayed, click SELECT on the Setup Menu... button. You see the Setup Menu window.
-
In the User Name text field, type the calendar address of the user whose calendar you want to add.
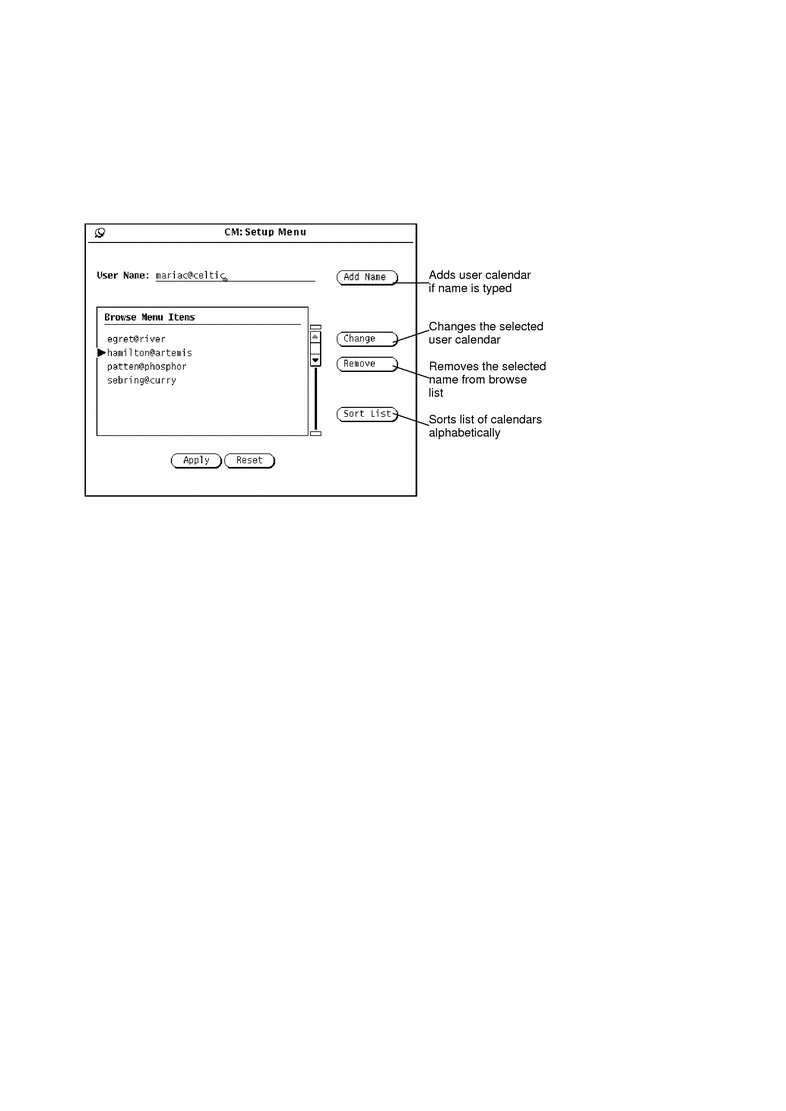
The calendar address is the user's login name, followed by @, followed by the user's host machine name. For example, the calendar address mariac@celtic is in the Calendar field of Figure 5-19.
If you are using the NIS or DNS system, which uses the concept of domains, make sure you are either browsing a calendar in your domain, or that you specify the remote domain.
For example, if you are trying to browse the calendar for user egret in your own domain, the correct calendar address is egret@host. However, if egret is in another domain, the calendar address needs to be in the format egret@host.domain.
Figure 5-19 Adding a Calendar to Multiple Calendars and the Browse Menu
-
Select Add Name to add the name.
If you enter an invalid host name or an invalid user name, while attempting to browse, you see an "Unable to access Calendar" error message.
Note -To improve system and network performance, Calendar Manager does not confirm that the user name is valid or that you have browse permission for that calendar when you enter the user name in the scrolling list. Calendar Manager does this checking when you select the calendar in the Multiple Calendars scrolling list, or when you choose the calendar from the Browse menu.
-
Click Apply.
Deleting/Removing a Calendar from Multiple Calendars and the Browse Menu
To delete a calendar from your Multiple Calendars scrolling list and from your Browse menu, follow these steps:
-
Choose Setup Menu from the Browse Menu pulldown or Setup Menu from the Multiple Calendars window.
-
Select each calendar that you want to delete in the Browse Menu Items scrolling list.
-
Choose Remove from the Setup menu to delete all the selected names in the scrolling list.
Note -You cannot delete your calendar name or "initial calendar view".
-
Click Apply.
Selecting a Week to Browse
When you display the Multiple Calendars window, the week shown in the Multi-Browser calendar display is determined as follows:
-
If the current view is the Day view or Month view, the week containing the currently selected day is displayed.
-
If the current view is the Week view, the current week is displayed.
-
If the current view is the Year view, the first week of the currently selected month is displayed.
To change the week displayed in Multiple Calendars, use the Go To menu and text field.
To display a specific week, type a date during the desired week in the Go To text field, and click SELECT on the GoTo button. Type the date using the format set on the Date Format Properties window. The default format is MM/DD/YY. See the section "Date Format Properties" for more information.
You can also use the items of the Go To menu to change the Multiple Calendars week display, as follows:
-
Choose Prev Week or Next Week to display the previous or next week.
-
Choose This Week to display the week of the day currently selected in the Calendar Manager base window.
-
Choose Prev Month or Next Month to display a week one month before or after the current Multiple Calendars week.
Finding a Time Slot for a New Appointment for Many Users
If you want to schedule a meeting or other appointment that involves many users, follow these steps:
-
Choose Multiple Calendars from the Browse menu, if the Multiple Calendars window is not currently displayed.
-
Add the calendars to the Multiple Calendars scrolling list for all the meeting participants.
See "Adding a Calendar to Multiple Calendars and the Browse Menu"for information.
-
Select all the calendars of the meeting participants by clicking SELECT on each user's calendar in the scrolling list.
Each selected calendar is overlaid in the Multiple Calendars display area.
-
If the week you want is not currently displayed, use the Go To menu or text field to display the desired week.
See "Selecting a Week to Browse" for more information.
-
When all calendars are selected and overlaid, find an unshaded block of time for the meeting.
This represents a time when everyone is available. For example, in Figure 5-20 all selected calendars have an open time slot on Tuesday from 1:00 to 2:00 and from 3:00 to 5:00.
Figure 5-20 Multiple Calendars window with Five Users Selected

-
If there is not a large enough available time slot for all the selected calendars, select a time slot that is lightly shaded and look at the clock(s) in the scrolling list to see who has a time conflict.
Keep trying this until you find a time slot with the least number of conflicts, or where only the people who don't have to be at the meeting have conflicts.
Alternatively, you can deselect the calendar of a user who does not have to be at the meeting by clicking SELECT on that calendar in the scrolling list. The Multiple Calendars display is then updated, and you may now be able to find an available time slot.
Scheduling Appointments for a Group of Users
Once you have found a good time for a new appointment for many users, you can use the Appointment Editor to schedule the appointment in the calendars of all users who have given you Insert access.
For complete information on scheduling an appointment with the CM Appointment Editor see "Appointment Editor Options".
Note -
If a question mark "?" appears in the Calendars Insert Access field it means that the user you are trying to access is running an older version of Calendar Manager. You may or may not have access to this user's calendar, and you can determine this by attempting to access the calendar.
The Appointments scrolling list on the CM Appointment Editor displays appointments for all of the calendars selected in the Calendars scrolling list, at the time selected in the Multiple Calendars window. When you select an appointment on the Appointments scrolling list, the appointment information is displayed in the CM Appointment Editor fields, and the Calendars scrolling list is updated to display only the owner of the appointment.
To schedule an appointment for a group of users at one time, follow these steps:
-
Use Show Multiple Calendars to find a time slot for the new appointment.
If you are unsure how to do this, see the section "Finding a Time Slot for a New Appointment for Many Users" for complete information.
-
Move the pointer to the block of time that you want to schedule the appointment for and click SELECT.
The selected time must be for one hour in the Multiple Calendars display, but you can change the time or duration when you schedule the appointment.
-
Click SELECT on Multiple Calendars Schedule.
Alternatively, you can just double-click SELECT on the block of time in step 2. The CM Appointment Editor is shown in Figure 5-21.
Figure 5-21 CM Appointment Editor
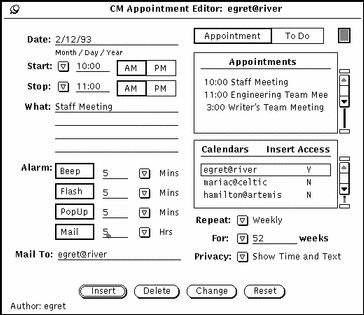
The CM Appointment Editor is displayed. The selected date and time are filled in and the selected calendars are listed on the Calendars scrolling list. If you have Insert Access to any of these calendars, that calendar is automatically selected. If any of the selected calendars has an appointment at the selected time, that appointment is added to the Appointments scrolling list.
If you change the time or selected calendars in the Multiple Calendars window, that information is automatically updated in the CM Appointment Editor window.
Sending Mail about Appointments from Multiple Calendars
You can use the Multiple Calendars Mail facility to send mail about an appointment to other users. The mail is sent with an appointment icon that, for easy scheduling, can be dragged and dropped on the Calendar Manager main window. See "Using Calendar Manager with Mail Tool" for information about using drag and drop with Mail Tool to schedule Calendar Manager appointments.
This feature is particularly useful when you have used the Multiple Calendars to schedule a new appointment. After scheduling the appointment, you may want to send mail about the appointment to all the participants. In addition, there may be users who have not given you Insert access to their calendar, in which case you can send them mail and let them schedule the appointment themselves.
To use the Multiple Calendars mail feature:
Click SELECT on the Mail button at the top of the Multiple Calendars window.
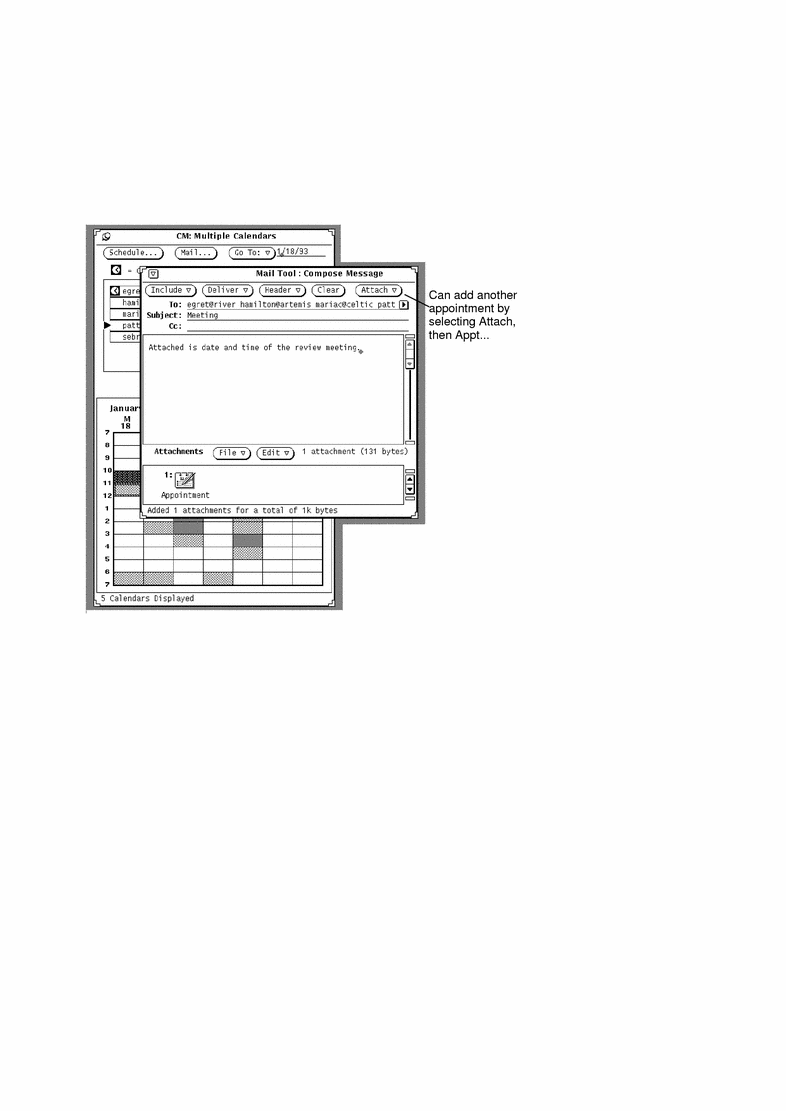
This displays a Mail Tool Compose window that contains an appointment icon in the attachment area. Refer to "Using Calendar Manager with Mail Tool" for more information. See "Mail Tool Compose Window" in Chapter 4, Multimedia Mail Tool for information about creating and sending mail.
If you have calendars selected in the Multiple Calendars scrolling list, the Mail Tool Compose window displayed by the Mail button is automatically addressed to those users. The subject field is "Meeting".
The Calendar Manager appointment icon in the Compose window attachments area is automatically filled out with the appropriate date and time, as follows:
-
If the Appointment Editor window is or has been displayed, the Date, Start, End, and What fields are included with the appointment attachment with the corresponding fields from the most recent session of the Appointment Editor. For complete information on using the Appointment Editor, refer to "Appointment Editor Options".
-
If the Mail Tool Compose window is displayed before the Appointment Editor window is displayed, the Date, Start, and End fields are included in the appointment attachment with the date and time of the currently selected time in the Multiple Calendars display.
You can change any of the information that is automatically filled out, and add more information. Figure 5-22 shows the Mail Tool Compose window displayed when the Mail button is selected from the Multiple Calendars window. Attaching the appointment saves your changes.
Figure 5-22 Multiple Calendars Compose Message Window
Browsing a Single Remote Calendar
Once a calendar has been added to the Browse menu, you can display and/or edit the appointments for that user (depending on the access permissions that user has given you) by choosing the calendar from the Browse menu.
If Calendar Manager cannot find the user name or access the appointments for that user, the error message Unable to access user@machine... is displayed in the footer of the Calendar Manager window. The appropriate user and machine names are displayed in the error message.
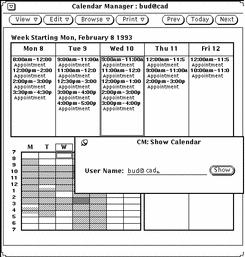
If Calendar Manager can access the user's appointments, they are displayed in the window, and the name of the user is shown in the header. If you do not have browse access for that user you cannot see or edit their appointments, but you can see blocks of scheduled time as shown in Figure 5-23.
Figure 5-23 Browsing a Week View Calendar When You Don't Have Browse Access
To change back to your own calendar, choose your user name from the Browse menu.
Browsing a Single Remote Calendar One-Time Only
Sometimes you may need to browse a single user's calendar just for a certain appointment only. It does not make sense to add this user to your list of frequently browsed calendars. To show a single calendar one-time only:
-
Choose Browse Show Calendar.
You see the Show Calendar window.
-
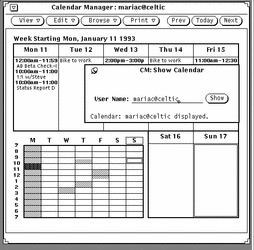
Type the user's name for the calendar to be displayed in the User Name: text field, and select Show.
Depending on which view is displayed, you see the calendar of the user name you entered. Figure 5-24 shows a calendar selected from the Show Calendar window.
Figure 5-24 A One-Time Selected Calendar
Setting the Calendar Manager Time Zone
When you browse another calendar, Calendar Manager automatically adjusts the times to your time zone. For example, if you are on the west coast of the United States, and you are browsing the calendar of someone on the East Coast, a 9:00 a.m. appointment will appear as 6:00 a.m. to you.
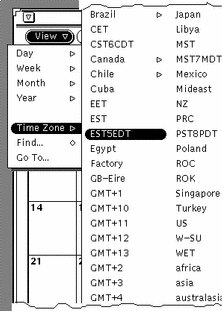
This is an important feature when using Multiple Calendars because it assures that all calendars are synchronized. If you are just browsing a single calendar, however, you might want to view the appointments in their native time zone. You can do this easily by using Time Zone from the View menu to change your time zone to that of the calendar you are browsing. If you change your time zone to something other than your own, the name of the time zone is displayed in the right side of the footer of the Calendar Manager base window. Figure 5-25shows the Time Zone menu with US Mountain Time selected.
Note -
If you change your time zone in order to browse another calendar, make sure to change it back to your native time zone when you are done. This is important in order to keep your appointment times synchronized with each other and your system. You can change back to your native time zone by selecting Time Zone from the View menu.
Figure 5-25 A portion of the Time Zone Menu
Customizing Your Calendar Manager
You can customize the following parts of Calendar Manager from the Properties window:
-
Editor Defaults, for the Appointment Editor pop-up window
-
Display Settings, to specify default display options
-
Access List and Permissions, to specify security access defaults
-
Printer Settings, to specify default print options
-
Date Formats, to specify the format for the date on the Appointment Editor
The Properties window has five separate displays (selected from the category field) that you use to modify the five different sets of properties.
To display the Properties window:
Choose Edit Properties
or move the pointer into the control area or pane of the Calendar Manager window and press the Properties key (L3) on the keyboard to display the Properties window, shown in Figure 5-26.
Figure 5-26 Properties Window
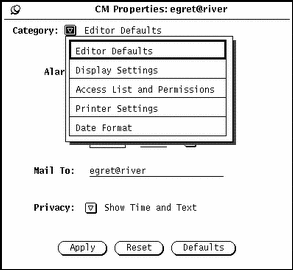
To display a particular category of properties:
When you release MENU, the contents of the Properties window show the properties you can set for that category.
When you have changed properties, you must apply them by clicking SELECT on the Apply button. This only applies the properties currently displayed. To change properties of a different category, display the new category, change the desired settings, and click SELECT on the Apply button again.
Alternatively, you can click SELECT on the Reset button to reset all the options to be the same as they were since the last time you applied changes. Click SELECT on the Defaults button to reset all the options to their default settings.
Editor Defaults Properties
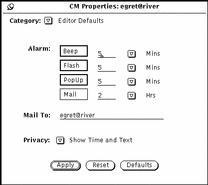
The Editor Defaults properties, shown in Figure 5-27, specify the defaults for the Appointment Editor pop-up window. When you set the editor defaults from the Properties window, they are automatically set each time you display the Appointment Editor window. The Mail To text field determines who receives reminder mail when you use the Mail Alarm.
Figure 5-27 Editor Defaults Properties
To change the defaults:
-
Click SELECT on the settings you want to change.
-
Click SELECT in the text field and type a new number.
Use the abbreviated menu buttons to indicate minutes, hours, or days. Figure 5-27 shows an example of the Alarms with Beep, Flash, and PopUp set. You can change the default Privacy setting to Show Time Only or Show Nothing.
When you click SELECT on the Apply button, the new defaults become effective immediately. Changing the Alarm settings does not affect any appointments that have already been scheduled using the old default choices.
Display Settings Properties
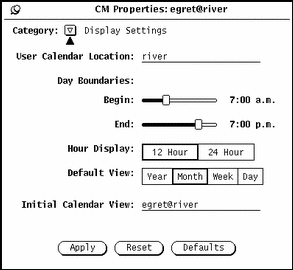
The Display Settings controls, shown in Figure 5-28, specify the location of the default user calendar; the boundary times for the day; 12 or 24-hour time display; the default calendar view and the initial calendar to be viewed in the Calendar Manager window. To display this set of controls, choose Display Settings from the Category menu.
Figure 5-28 Display Settings Properties
Changing the User Calendar Location
You can change user calendar location by specifying a different machine name. Just type the machine name. The new user calendar location becomes the first name (or default) in the Browse menu pulldown. Any properties applied are added to the new calendar.
Changing Day Boundaries
You can specify the range of hours for your workday using the Day Boundaries sliders shown in Figure 5-28. This determines the hours displayed by Calendar Manager in these places:
-
Calendar Manager Day view
-
Week chart in the Calendar Manager Week view
-
Multiple Calendars display
-
Start and End time menus in the Appointment Editor window
The current value of the day boundaries is displayed to the right of each slider. To change the setting, follow these steps:
-
Move the pointer to the slider drag box and press SELECT.
-
Drag the pointer to the left or to the right.
Note that the time changes as you drag the slider.
-
When the time you want is displayed, release SELECT.
Alternatively, you can move the pointer onto the slider bar to the left or right of the drag box and click SELECT to change the time hour by hour.
You cannot set a day boundary that ends before it begins. When the values overlap, the drag boxes are synchronized and move together so that the end time is always at least one hour after the start time.
-
When you have set the day boundaries, click SELECT on the Apply button to record them.
Your new boundaries are now in effect.
Changing the Hour Display
You can specify the way hours are displayed with the Hour Display setting on the Properties window. The default setting is 12 Hour, which displays the hours from 1:00 to 12:00, with an "a.m." or "p.m." extension. You can use the 24-Hour setting to display the hours in 24-hour time. An appointment that goes from 11:30 am to 1:00 pm with the 12-Hour setting will go from 1130 to 1300 with the 24-Hour setting.
To change the hour display, click SELECT on the setting you want and then click SELECT on the Apply button. The change takes effect immediately.
Changing the Default View
You can set the default view of the Calendar Manager window to Year, Month, Week, or Day using the Default View settings on the Properties window. After you have changed the default view, click SELECT on the Apply button. The changes take effect immediately.
Changing the Initial Calendar View
You can specify the default calendar (initial calendar to be viewed) with the Initial Calendar View text field, the first time Calendar Manager is started.
After you have changed the calendar view, click SELECT on the Apply button. The changes take effect immediately.
Access List and Permissions Properties
Calendar Manager allows you to browse the appointments of others, as well as allowing other users to browse your appointments. See "Multiple Calendars Base Window" for more information about browsing.
TheAccess List and Permissions properties let you specify who may browse, insert, delete or change your appointments.
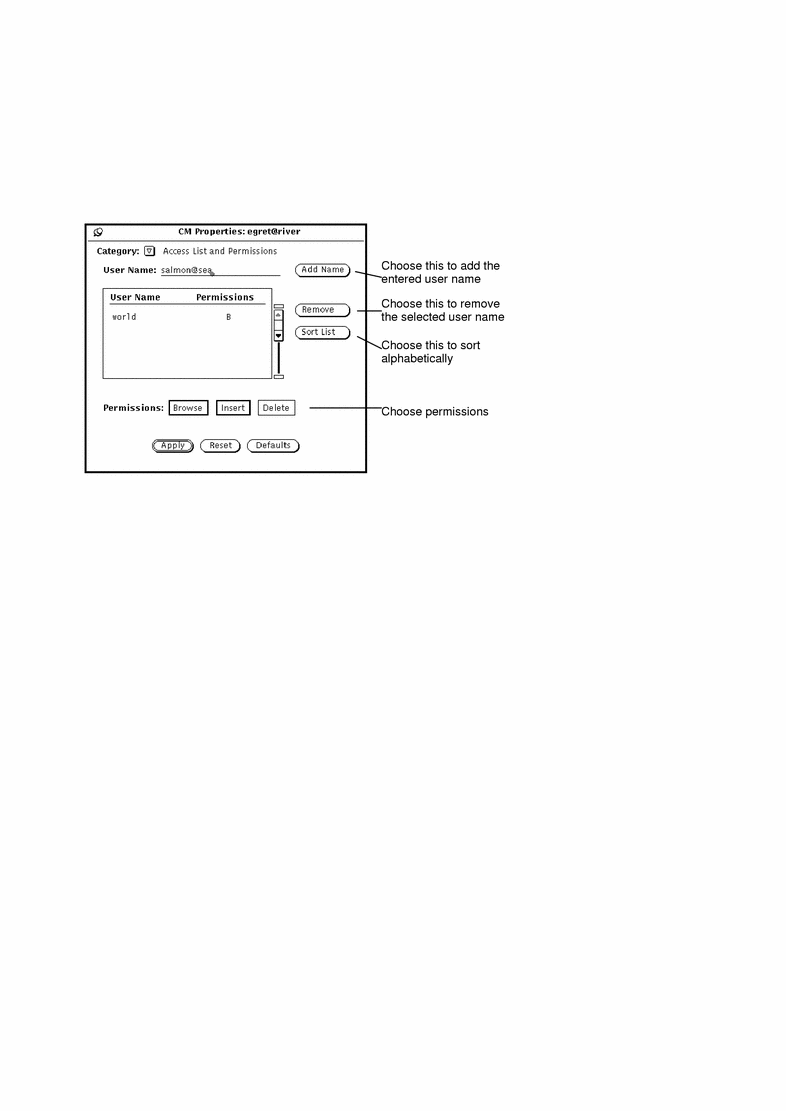
The default access list, shown in Figure 5-29, gives all users permission to browse your calendar.
To display the Access List controls, choose the Access List and Permissions item from the Category menu.
Figure 5-29 Access List and Permissions Properties
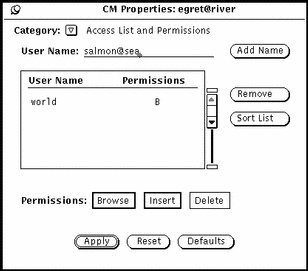
The scrolling list displays everyone who has access to your calendar. The entry "world" means everyone who is using the DeskSet environment. The default is that the world has Browse access permissions. If you delete the world entry, only the users you specifically add will be able to access your appointments.
To the right of each name in the scrolling list are letters indicating the permissions that user has. The available permissions are:
-
"B" for Browse, meaning the user can read your appointments.
-
"I" for Insert, meaning the user can add new appointments in your calendar.
-
"D" for Delete, meaning the user can delete existing appointments from your calendar.
If you give more permissions to the world than you give to an individual, that individual will still have the world permissions. For example, if you give a user named Jim permission to browse your calendar, but the world has permission to browse and insert, Jim will inherit the world permissions and will be able to insert appointments as well as browse your calendar.
To give someone the ability to edit or change appointments, you must give them both Insert and Delete permissions. That person then has full permissions to insert new appointments, and delete or modify existing appointments they own. After you have entered the list of users, you can sort the list alphabetically using the sort list button.
Adding Users to the Access List
To add a user, follow these steps:
-
In the User Name text field, type the email address of the user you want to add.
Names in the access list can either be in the form name@host or simply name. Note that if you just specify the user name, you are giving access to any user on your network with that name.
If you are using the NIS or DNS system, which uses the concept of domains, make sure names on the access list do not use the format name@domain or name@host.domain. Just use name@host.
-
Select the permissions you want to give the user.
-
To add the name, enter a name in the User Name: text field, choose Add Name, as shown in Figure 5-30.
Figure 5-30 Adding a Name to the Access List
-
Click SELECT on the Apply button to record the changes.
Deleting Users from the Access List
To delete a user from the access list, select the user name in the scrolling list, choose Remove from the Properties menu or the scrolling list pop-up menu, and click SELECT on the Apply button to record the changes.
Changing the Access List
To change the existing permissions for a user already on the Access List, follow these steps:
-
Click SELECT on the user name in the scrolling list.
If you want to change several users at one time, click SELECT on each additional user name you want to change.
-
Select the new permissions you want to give the user.
In Figure 5-30, Browse and Insert are selected to replace the existing permission of Insert forsalmon@sea.
-
Click SELECT on Add Name from the Calendar menu or the scrolling list pane menu.
Add Name is used to add a new user, and it's also used to change the access permissions of an existing user.
-
Click SELECT on the Apply button to record the changes.
Printer Settings Properties
You can set printing options from the Printer Settings Properties window.
To display this set of controls, choose the Printer Settings item from the Calendar Manager Properties window Category menu.
Figure 5-31 shows the default settings for the Printer Settings window.
Figure 5-31 Printer Settings Properties Window
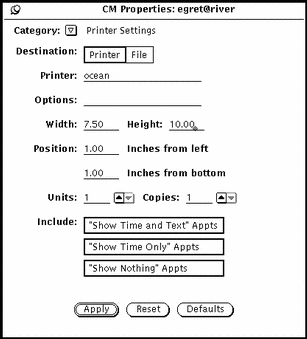
You can specify the following options from the Printer Options window:
-
Destination of the printed output (Printer or File)
-
Printer name and printer options, or file destination and file name
If the Destination is Printer, as in Figure 5-31, a field called Options is displayed. You can type in UNIX print options in this field to customize your printer option defaults.
If the Destination is File, the Printer and Options fields are replaced by Directory and File fields. Use these fields to type in the directory and file name of the file that you want to print to.
-
Width and height of the printed image
-
Left and bottom margins (position)
-
Number of units that print
The "unit" is the number of calendar views to print: day, week, month, or year. When a day view is printed, the unit is Days, and so on. The selected unit always begins the sequence. For example, if February 13th is selected, and the number of units is three, then February 13th, 14th and 15th are printed.
-
Number of copies to print
-
Whether or not to include appointments created for Privacy Type (Show Time and Text, Show Time Only, Show Nothing) on the printed output
When you're done choosing your Printer Settings, click SELECT on the Apply button to record the changes.
Date Format Properties
The Date Format properties, shown in Figure 5-32, determine how the date is displayed in the Appointment Editor window, in the Go To text field of the Multiple Calendars window, and in the Browser Editor window.
To display this set of controls, choose the Date Format item from the Calendar Manager Properties window Category menu.
Figure 5-32 Date Format Properties
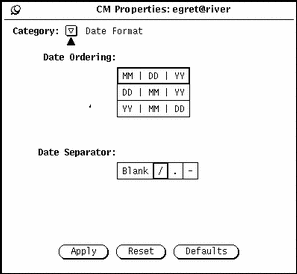
The Date Ordering item determines the order in which the month, day, and year appear in the various date fields. The Date Separator item determines what character separates each element of the date.
To change the defaults, click SELECT on the settings you want. When you click SELECT on Apply, the new date format becomes effective immediately.
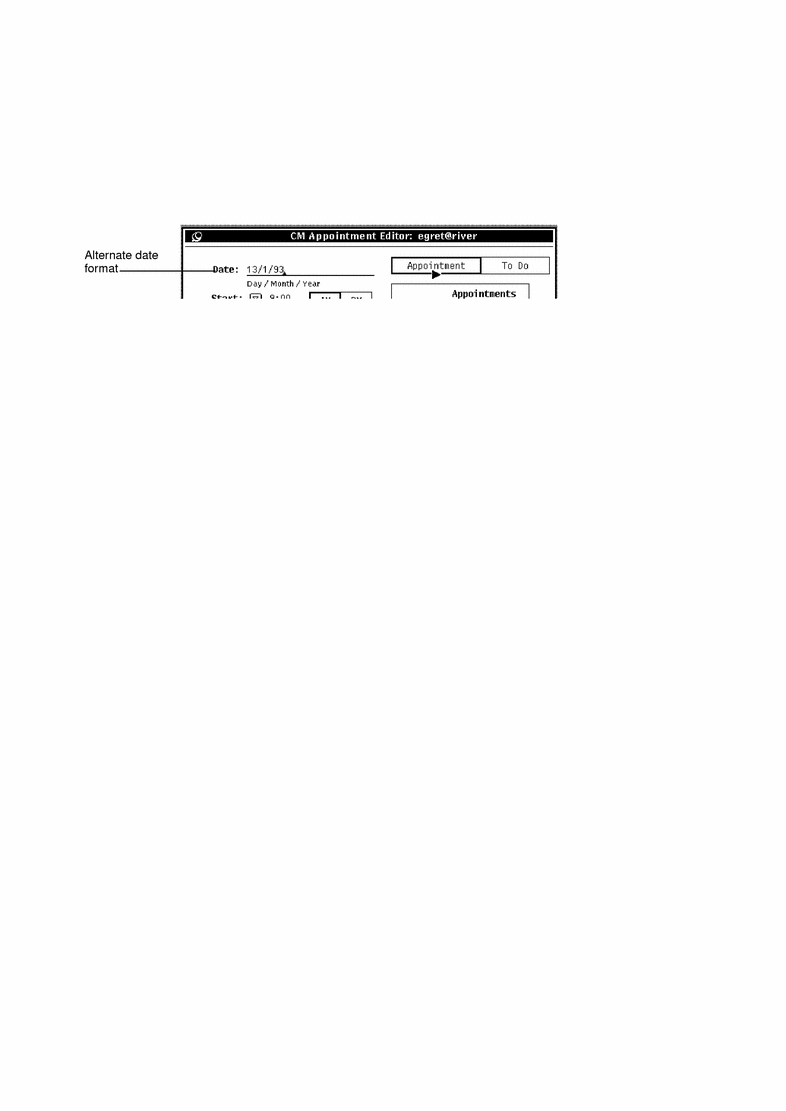
Figure 5-33 shows the Appointment Editor with the DD|MM|YY date ordering and the / date separator.
Figure 5-33 Appointment Editor with an Alternate Date Format
Printing Calendar Views
Calendar Manager provides high-quality printed output for day, week, month, and year views, as well as daily, weekly, monthly, or yearly appointment and To Do lists. You set the printer name and options from the Printer Settings Property window described in "Printer Settings Properties". You use the Print menu to print specific views, appointment lists, and To Do lists.
Current View
This allows you to print the view you have selected.
Day View
To print the Day view for the current day, choose Day from the Print menu.
To print appointments for a day other than the current one, move the pointer onto the day you want to print and click SELECT. Then choose Day from the Print menu. The schedule for the day is printed in the format shown in Figure 5-34.
Figure 5-34 Printed Day View
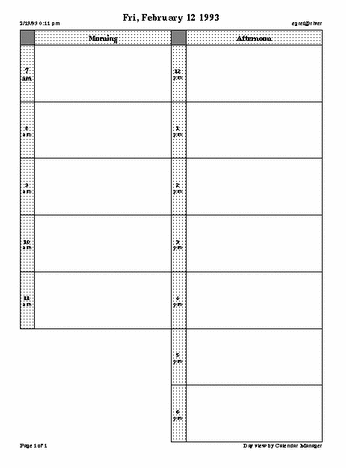
You can also print a daily list of Appointments or To Do items. See "Printing Appointment and To Do Lists" for more information.
Week View
To print the Week view for the current week, choose Week from the Print menu.
Appointments for the week are printed in the format shown in Figure 5-35. Note that all the information about an appointment is printed, not just the first line.
Figure 5-35 Printed Week View
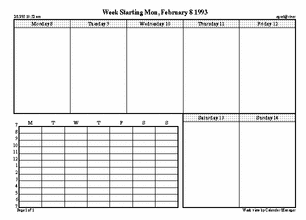
You can also print a weekly list of Appointments or To Do items. See "Printing Appointment and To Do Lists" for more information.
Month View
To print the Month view for the current month, choose Month from the Print menu.
Appointments for the month are printed in the format shown in Figure 5-36.
Figure 5-36 Printed Month View
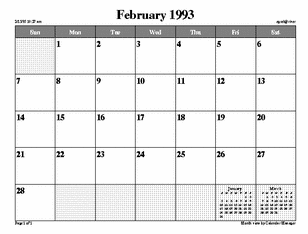
You can also print a monthly list of Appointments or To Do items. See "Printing Appointment and To Do Lists" for more information.
Year View
To print the currently displayed year, choose Year from the Print menu.
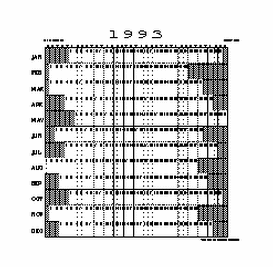
You can print a standard view of the year, shown in Figure 5-37, or a schedule view of the year, Yr view (Alt), as shown in Figure 5-38. These figures were printed using a height and width of 2.5 inches on the Print Properties window.
Figure 5-37 Printed Standard Year View
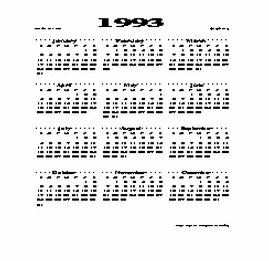
Figure 5-38 Printed Schedule Year View
Printing Appointment and To Do Lists
In addition to printing the schedule for a day, week, month, or year, you can print any Appointment or To Do list. To print an Appointment list or To Do list, follow these steps:
-
Select the day that you want to print a list for, or a day in the week, month, or year that you want to print a list for.
-
Choose the list that you want to print from any of the Print submenus.
Using Calendar Manager with Mail Tool
You can enter appointments into Calendar Manager from Mail Tool by dragging and dropping a Calendar Manager appointment attachment, if it is included in the attachment area of the mail message. You can create a mail message with the appropriate format by using the Mail pop-up window in Multiple Calendars. Or create a Calendar Manager appointment that can be attached in the attachment area of a mail message by:
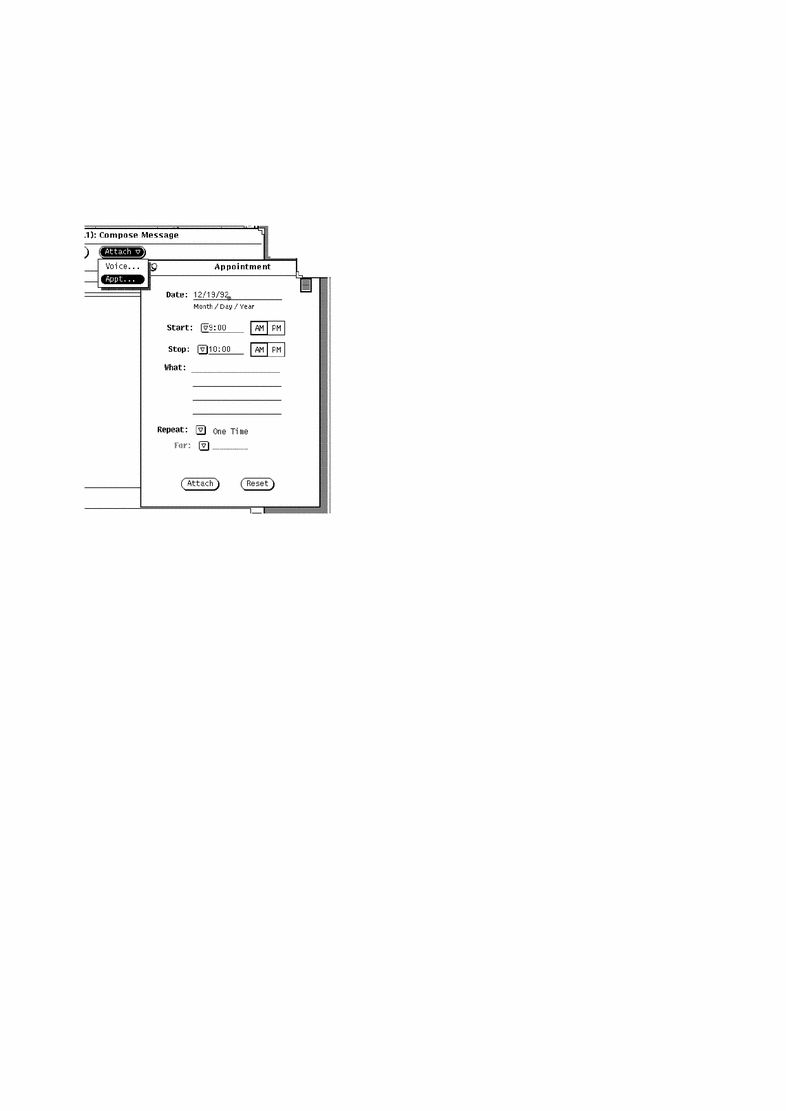
Selecting Attach -> Appt... from the Compose window in Mail Tool.
Sending Appointment Mail from Calendar Manager
The easiest way to generate a message about an appointment is to use the Mail feature of Multiple Calendars. This will automatically generate a compose window with an appointment icon attached. See "Sending Mail about Appointments from Multiple Calendars" for information about this feature.
Creating an Appointment Message from Mail Tool
Mail Tool provides a template that you can use to create mail messages in the format that Calendar Manager can accept. See "Template Properties" in Chapter 4, Multimedia Mail Tool for more information about Mail Tool template. The section, Figure 5-39 shows the Appointment window. If all the information you need has not automatically been filled in, add it at this time. This works just like the appointment editor. For information on the appointment editor, see "Appointment Editor Options". You can however, drag and drop from the appointment panel (using the drag and drop target) to a Calendar Manager canvas. You can drop another appointment icon onto the drop target of the appointment panel and the fields are automatically filled in. RESET returns you to the last appointment attached.
Figure 5-39 Mail Tool Template for Calendar Manager Messages
Displaying the Calendar Manager Monthly Icon
If you want your Calendar Manager icon to display the entire current month with the current date highlighted, as shown in Figure 5-40, you can start Calendar Manager from a Command Tool or Shell Tool by typing cm -i 2 &.
Figure 5-40 Alternate Calendar Manager Icon
Accessing Your Calendar from a Shell Tool or Command Tool
There are three Calendar Manager programs that you can run from a Shell Tool or Command Tool in order to view, insert, or delete appointments. This may be useful, for example, if you are logging into your machine from a remote destination and are therefore unable to run the Calendar Manager window-based application. These programs are called cm_lookup, cm_insert, and cm_delete.
Use cm_lookup to display your appointments for the current day. You can use command line options to specify the calendar that you want to see, a different date, or an alternate view (such as week or month). See the cm_lookup man page for more information.
Use cm_delete to delete your appointments. You are shown a list of your appointments for the current day, and you are prompted for the number of the appointments that you want to delete. You can also use command line options to specify the calendar, date, and view. See the man page for cm_delete for more information.
Use cm_insert to add new appointments to your calendar. You can use command line arguments to specify the calendar, date, start and end times, and a description of the new appointment. See the man page for cm_insert for more information.
- © 2010, Oracle Corporation and/or its affiliates
