Customizing Mail Tool
You can customize the properties of Mail Tool from the Mail Tool Properties window. Display this window by choosing Properties from the Edit menu.
The Properties window has seven categories: Header Window, Message Window, Compose Window, Mail Filing, Template, Alias and Expert properties.
To display a particular category of properties, choose the category from the Category menu located at the top of the Properties window. When you release MENU, the contents of the Properties window shows the properties you can set for that category. The new properties take effect immediately in most cases. In a few cases (such as number of Headers to display in the Header Window Properties), you must quit and restart Mail Tool before the changes take effect.
You must apply changed properties for each category by clicking SELECT on the Apply button.
Header Window Properties
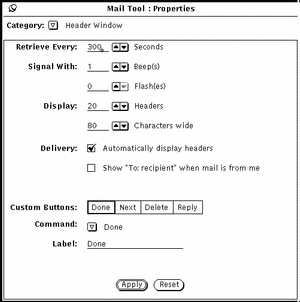
The Header Window properties are shown in Figure 4-31 and described in the following sections. After you change any of the Header Window properties, click SELECT on the Apply button to apply them to the Mail Tool application.
Figure 4-31 Header Window Properties
Mail Arrival Properties
Use the Retrieve Every field to determine how often new mail is retrieved. The default value is 300 seconds, or 5 minutes. You can retrieve mail at any time between this interval by choosing Load In-Box or Save Changes from the File Menu.
Use the Signal With fields to determine how Mail Tool signals new incoming mail. The Beep setting causes Mail Tool to beep the specified number of times. The Flash setting causes the icon to flash or the Header window to flash, depending on whether the Mail Tool is closed to an icon or open.
Mail Tool Window Size
Use the Display Headers field to determine how many headers are displayed in your primary Mail Tool Header window. You can increase the setting to display more headers at one time, or decrease the setting to display fewer headers to make the Header window smaller.
Use the Display Characters field to determine the width of all Mail Tool panels and windows.
After you make changes to the Display fields, you need to quit the Mail Tool application and restart it in order to see the change.
Delivery Properties
If you want Mail Tool to automatically display the headers for incoming mail messages, check the Automatically Display Headers option. If you do not choose this option, Mail Tool does not display headers for incoming messages unless you specifically request them by choosing Load In-Box or Save Changes from the File menu.
If the Show "To: recipient" ... option is checked, the Mail Tool header of a message sent by you will display the recipient of the message instead of your mail address.
Mail Tool Custom Buttons
The first four buttons on the second row of the Mail Tool Header window are custom buttons. You can change the value of these buttons to be any of the items from the File, View, Edit, or Compose menus. If there are items on these menus that you use very frequently, you can change your custom buttons to activate those commands.
-
The Custom Buttons choices indicate the current value of the four custom buttons. You select one of these choices to change the value of that custom button.
-
The Command setting shows you the command of the currently selected button, that is, what the button does.
-
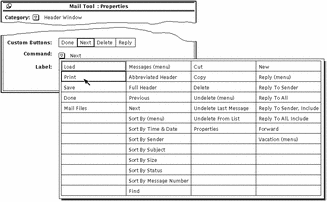
The Command menu button provides a menu of all of the available commands from the File, View, Edit, and Compose menus.
-
The Label text field determines what the custom button says. Usually this is the same as the command, but it doesn't have to be. Sometimes the command is too long to fit in the button, so the Label might be an abbreviation of the actual command.
To change the value of a custom button, follow the steps below.
-
Select the Custom Buttons choice that you want to change.
The first choice represents the first button on the second row of the Header window, the second choice represents the second button, and so on.
-
Choose the desired command from the Command menu shown in Figure 4-32.
The first column in the Command menu displays all the choices available from the Mail Tool File menu, the second column displays the choices from the View menu, the third displays the choices from the Edit menu, and the last column displays the choices from the Compose menu.
Figure 4-32 Header Window Properties Command menu
-
If you want to select a new label to go with the selected command, type a new label.
Try to keep the label as small as possible in order to keep the custom button to a reasonable size.
-
Click SELECT on Apply to change the custom button in the primary Mail Tool Header window.
The custom button on the Mail Tool Header window is changed to the new label and command. Figure 4-33shows the Header window with the second custom button changed to Print.
Figure 4-33 A New Custom Button (Print) on the Header Window

Message Window Properties
You use the Message Window Properties to specify the number of lines in the View Message pop-up window text pane, a different print script for printing messages, and the headers that are not displayed when viewing a message with abbreviated headers.
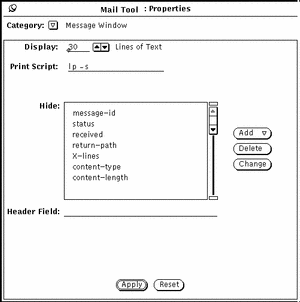
To see the Message Window Properties, shown in Figure 4-34, choose Message Window from the Category menu at the top of the Properties popup window.
Figure 4-34 Message Window Properties
-
The Display field determines the number of Lines of Text displayed in each View Message or Compose window text pane. After you make a change and click SELECT on the Apply button, you will need to quit the Mail Tool and start it again for this change to take effect.
-
The Print Script field determines the script used to print your messages via the Print item on the File menu or the header pane pop-up menu. The default print script is lp -s.
-
The Hide scrolling list determines which headers are not displayed when you view your messages with abbreviated headers. You can add any header to this list by typing the header in the Header Field text field, and clicking SELECT on the Add button.
Use the Add menu to place the header either before or after the currently selected header. Use the Delete button to delete the currently selected header, and use the Change button to change the currently selected header to the text typed in the Header Field text field.
Some of the headers that you might commonly want to hide are displayed in the scrolling list in Figure 4-34. You can add any header to the Hide list that you see when viewing messages. You can type the header in any case. For example, adding the header "content-length" hides the headers "Content-Length", "content-length", "CONTENT-LENGTH", and so forth.
When you have changed Message Window properties, click SELECT on the Apply button. The Print Script and Hide property settings become effective immediately.
Compose Window Properties
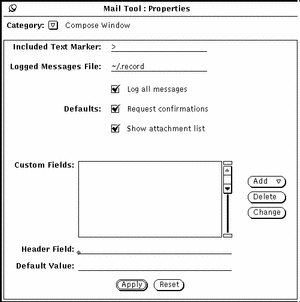
You use the Compose Window Properties category to customize items on the Compose window. To see the Compose Window Properties, shown in Figure 4-35, choose Compose Window from the Category menu at the top of the Properties popup window.
Figure 4-35 Compose Window Properties
Included Text Marker
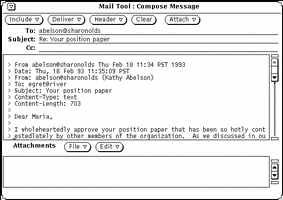
Use the Included Text Marker field to specify the characters that precede each line of an included text message. The default value is "> ". This puts the right-arrow character at the start of the included message when you choose Indented from the compose window Include menu. Tabs are not accepted as an indent character (but spaces are). Figure 4-36 shows the Compose window with an included message indented with ">".
Note -
The right angle bracket is at the start of the included message when you select Reply to Sender, Include or Reply to All, or Include from the compose menu in the Header window.
Figure 4-36 An Indented Included Message
Logged Messages File for Outgoing Mail
If you want to log outgoing mail messages in a file, type the name of the desired log file in the Logged Messages File text field of the Compose Window Properties Category. If a log file name is specified, a Log check box appears on the Compose window, as shown in Figure 4-36 above. When the Log option is checked on your Compose window, the message is logged in the log file when it is sent.
Use the Log all messages setting on the Compose Window Properties Category to determine whether the Log checkbox on the Compose window is checked by default.
Viewing the File of Logged Messages
To view the messages you have logged, do the following:
-
In the Mail Tool base window, type the name of the file in which you have logged your messages in the text field.
Using the example above, for instance, you would type ~/.record.
-
Click SELECT on the Load button.
The messages you have logged will appear in your Mail Tool Base window (in place of the current mail messages), and each has the message header.
Request Confirmations
If the Request Confirmations setting is checked, a Notice is displayed in the following cases:
-
When you have text or attachments in the Compose window, and you select Clear on the Compose window control panel, a message is displayed asking if you really want to clear the Compose window.
-
When you have text or attachments in the Compose window, and you quit the Compose window, a confirmation message is displayed asking if you really want to quit.
-
When you have made changes to a message in the View window, and you then display a new message, unpin the View window, or receive new incoming mail, a message is displayed asking if you want to save the changes.
If the Request Confirmations setting is not checked, any editing changes in the View window are automatically incorporated without notification. If you remove or change the From header of a message. The message that lost the From header will appear to be lost. You can find it appended to the previous message.
Show Attachment List
By default, a Compose window includes a pane at the bottom of the text area where you can add attachments to your message. If you never or rarely use attachments, you can turn off the Attachments pane for new Compose windows. Use the Show Attachment List setting of the Compose Window Properties Category to determine if the Attachments pane is shown by default.
If you turn off the default Show Attachments List setting, you can display the Attachments pane on an as-needed basis by choosing Show Attachments from the Include menu of the Compose window.
Compose Window Custom Header Fields
The header of your Compose window always has To, Subject, and Cc fields. In addition, Bcc is available via the Header menu. You can add custom headers to the Header menu by adding them to the Custom Fields scrolling list on the Compose Window Properties category.
Some useful headers that you might want to use are the following:
-
Precedence: junk -- If the mail system cannot send a message with this header, the message will not be "bounced" back to you. This is handy if you are sending out a message to a large alias, and you do not wish to receive notices whenever the message cannot be delivered to an individual.
-
Reply-To: email address -- When you reply to a message with this header, the reply is sent to the email address in the Reply-To: header field (instead of being sent to the sender of the message).
-
Return-Receipt-To: email address -- When you send a message with this header, you will receive a "Return Receipt" from the mail system when the message is successfully delivered.
To create a custom header field, follow these steps:
-
Type the label for the field in the Header Field line of the Properties window.
Do not type a colon following the label. The colon is automatically provided by Mail Tool.
-
If you want the field to be filled in with a default value, type this value in the Default Value field.
-
Choose either Before or After from the Add menu to add the new header field to the scrolling list.
-
To apply the change to Mail Tool, click SELECT on the Compose Window Properties Apply button.
-
To include the new header field in a mail message, choose the item from the Compose window Header menu, as shown in the menu at the left.
Figure 4-37 shows an example of a custom header field added to the Compose window.
Figure 4-37 Example of a Custom Field Added to the Compose Window

To delete a custom field, click SELECT on the item in the Custom Fields scrolling list, click SELECT on the Delete button, and click SELECT on Apply.
To change a custom field, click SELECT on the item in the Custom Fields scrolling list, type the new values in the Header Field and Default Value text fields, click SELECT on the Change button, then click SELECT on Apply.
Automatically Storing Copies of Messages You Send
You can set up Mail Tool so that you record a copy of each email message you send. To do this, follow these steps:
-
From the Mail Tool base window, choose Edit Properties.
A Properties window appears.
-
In the Properties window, position the pointer on the abbreviated menu button labeled Category, and choose the Compose Window category.
The properties choices for the Compose Window appear in the Properties window.
-
In the text field labeled Logged Messages File, type the name of a file in which you would like to log copies of your mail messages.
For instance, to save the mail in an invisible file in your home directory, you could name the file $HOME/.mail.save.
Note -$HOME is a variable that points to your home directory. You can also use the tilde (~) symbol to indicate your home directory.
-
Click SELECT on the Apply button at the bottom of the Properties window.
Now, when you send a message, a copy is logged in the file you created; additional messages you send are appended to the end of the file.
Mail Filing Properties
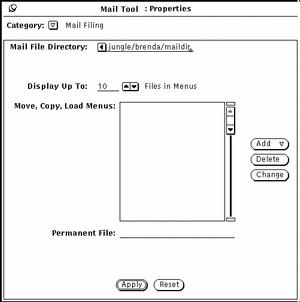
You use the Mail Filing Properties category to choose where your mail files are stored, and to customize the Move, Copy, and Load menus of the Mail Tool Header window. To see the Mail Filing Properties, shown in Figure 4-38, choose Mail Filing from the Category menu at the top of the Properties popup window.
Figure 4-38 Mail Filing Properties
Mail File Directory
Use the Mail File Directory text field to specify the directory where mail files are stored when you move or copy messages from your In-Box to mail files. For example, you might want to name the directory mail, maildir, or mail_files. Unless a full path name is specified, the directory is considered a subdirectory of your home directory. If the directory name you specify does not exist, a Notice is displayed asking if you want to create the directory when you click SELECT on the Apply button. See "Organizing Your Mail Messages" for more information about using the Mail File directory.
Mail File Move, Copy, and Load Menus
The Move, Copy, and Load menus on the Mail Tool Header window display up to 10 of the most recently accessed mail files. You can change the maximum number of files on the menus with the Display Up To setting of the Mail Filing Properties category. Click SELECT on Apply after changing the setting.
When you start up a new Mail Tool application, the Move, Copy, and Load menus are empty. Mail files are added to these menus as you access the mail files. You can specify mail files that you always want to appear at the top of these menus by adding them to the Move, Copy, Load Menus scrolling list.
You can add any mail file to this list by typing the name of the mail file in the Permanent File text field, and clicking SELECT on the Add button.
Use the Add menu to place the mail file either before or after the currently selected mail file. Use the Delete button to delete the currently selected mail file, and use the Change button to change the currently selected mail file to the mail file typed in the Permanent File text field.
See "Organizing Your Mail Messages" for more information about using mail files.
When you have changed Mail Filing properties, click SELECT on the Apply button.
Saving Mail to Another Location
You can save mail to any location in your file system by typing in an absolute pathname. This means that the location you specify is an exact location within your file system rather than one that is relative to the Folders directory.
Saving to an Absolute Path in Your Home Directory
To save mail to an absolute location in your home directory, you can precede the path with the variable $HOME, or with the tilde (~) on your keyboard, followed by your user account name (or that of another user's home directory where you have write permission). The tilde indicates the top level of your home directory.
To save a mail message in a location under your home directory, follow the instructions in the section "Saving Mail to the New Default Location", but use the form in one of the examples below to type the path on the Mail File text field:
~username/Subdirectory/filename $HOME/username/Subdirectory/filename |
When you choose Move or Copy, the chosen mail file in your mailbox is stored in a file named filename in a subdirectory named Subdirectory under your home directory.
Saving to an Absolute Path Relative to the Root Directory
To save a mail message to an absolute location starting from the top level directory in your file system, you use a slash (/) to indicate the root directory, and follow that with an absolute path.
To save a mail message in a location under your root directory, follow the instructions in the section "Creating a New Mail File", but use the following form on the Mail File text field:
/Subdirectory/filename
where / is the root directory, and Subdirectory is an existing directory under root.
For example, you could type:
/tmp/myfile
The /tmp directory is a directory that contains some system files.
You should only use the /tmp directory for temporary file storage. When you reboot your system, these files will be purged.
When you choose Move or Copy, the chosen mail file in your mailbox is stored in a file named myfile in the subdirectory named tmp under the root directory.
Modifying the Default Location
Using Mail Tool's Properties window, you can permanently change the default location for your saved mail. For instance, you could change the name of the Folders directory, or you could save your mail to a location directly relative to your home directory.
To change the default location for your saved mail, follow these steps:
-
From the Mail Tool base window's control area, choose Edit Properties.
The Mail Tool Properties window appears.
-
Position the pointer on the Category menu button and choose Mail Filing.
The Mail Filing properties appear in the Properties window.
-
Double-click SELECT on the word Folders on the text field.
Folders is highlighted, for example.
-
Choose the default location for your saved mail:
-
Click SELECT on the Apply button.
A pop-up message asks if $HOME should be expanded to the path name of your home directory.
-
Click SELECT on the Expand String button.
The Properties window is dismissed.
Saving Mail to the New Default Location
Saving mail messages to the new default that you have specified is just like saving mail to the Folders directory. To save mail, do the following:
-
Type the file name, or a subdirectory name and then the file name, on the text field in the Mail Tool base window.
Note that if you have changed the default location to your home directory there is no need to type a tilde to specify your home directory as the destination.
-
Click SELECT on the message you want to save.
-
Choose Move or Copy.
The chosen mail message is saved to the directory name of your choice under your home directory (e.g. the directory name you substituted for Folders, the top level of your home directory, or a specified subdirectory).
Template Properties
Mail Tool allows you to create your own template files containing text that you frequently use for composing messages. Each template is an individual file that you create outside of Mail Tool, using any editor such as Text Editor or vi.
You can add a created template to Mail Tool using the Template Properties category, shown in Figure 4-39. Display the Template properties by choosing Template from the Category menu at the top of the Properties popup window.
Figure 4-39 Template Properties
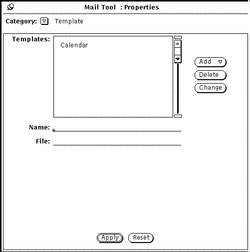
To add a template to the Include Templates submenu of the Compose window, follow these steps:
-
Type the name of the template in the Name field on the Properties window.
-
Type the path and name of the file containing the template in the File field.
-
Choose Before or After from the Add menu.
-
Click SELECT on the Apply button.
The items in the scrolling list are added to the Templates submenu of the Compose window Include menu.
A Calendar template is automatically provided when you have no other templates installed. Otherwise, if you want to use the Calendar template you must add it to the Template menu yourself following the steps above. Your template can contain text to be included in a message, and it can also include header information. If you include header information, make sure that there are no lines in the template file before the header lines. Figure 4-40 shows an example of a template that contains both header information and text. Make sure there is at least one blank line between the header lines and the message text.
Figure 4-40 Contents of a Template File with Text and Header Information

To use a template, choose the item from the Templates submenu of the Compose window Include menu. The text from the template file is then displayed in the Compose text pane. If your template contains headers, the headers in the Compose window are automatically filled out.
To delete a template name, click SELECT on the name in the scrolling list of the Template Properties window, click SELECT on the Delete button, then click SELECT on the Apply button.
To change a template, click SELECT on the item in the Template Properties window scrolling list, type the new values in the Name and File text fields, click SELECT on the Change button, then click SELECT on Apply.
Alias Properties
You can create your own distribution lists containing groups of user names. Then, instead of typing a distribution list of many names, you can type the single name that you specify as the name of the alias in the To text field.
There are two kinds of distribution lists, or aliases, you can create:
-
Aliases in your /etc/aliases file that anyone can use. See "Creating and Using Public Aliases in /etc/aliases" for information about this kind of alias.
You use the Alias Properties category, shown in Figure 4-41, to create your own private distribution list aliases. Display the Alias properties by choosing Alias from the Category menu at the top of the Properties window.
Figure 4-41 Alias Properties
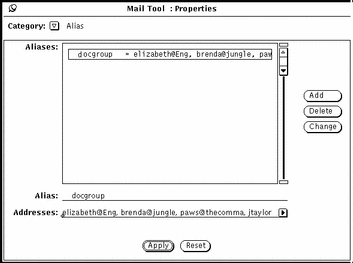
To add a private distribution list alias, follow these steps:
-
Type the name of the alias in the Alias text field.
In Figure 4-41, the alias name is docgroup.
-
In the Addresses field, type the email address of each person in the distribution list.
Separate each name by either a comma, a space, or both.
-
Click SELECT on the Add button.
The item is added to the scrolling list in alphabetical order.
-
Click SELECT on the Apply button.
The items in the scrolling list are added to your private aliases.
To use the alias, simply type the name of the alias (for example, docgroup) in the To, Cc, or Bcc line of the Compose Messages window. The names you typed in the field are expanded and included as part of the outgoing message. Use the Delete button to delete the currently selected alias, and use the Change button to change the currently selected alias to the text typed in the Alias Field text field.
Creating and Using Public Aliases in /etc/aliases
To create an alias that anyone can use, you must have root access to your system. Edit your /etc/aliases file using any text editor. Under the Local Aliases category, on a separate line, type aliasname:username,username. Separate each item with a comma and end the group with a Return. You can include a space after each comma, if desired.
Figure 4-42 shows an example of an alias group in /etc/aliases.
Figure 4-42 Example of an Alias Group in /etc/aliases

To use the alias, type the name of the alias in the To, Cc, or Bcc line of the Compose Messages window. The names you typed in the field are not expanded as part of the outgoing message. The alias group itself is displayed as the user name when the message is received. To use an alias on someone else's system, type the alias name, @, and their machine name in the To, Cc, or Bcc line of the Compose Messages window. For example, someone else could send mail to the "friends" alias in the example by typing friends@castle, because the "friends" alias is on the machine "castle".
Expert Properties
You use the Expert Properties category to set some advanced mail defaults that are provided for mailx(1) compatibility. To see the expert default settings, shown in Figure 4-43, choose Expert from the Category menu at the top of the Properties popup window.
Figure 4-43 Expert Properties
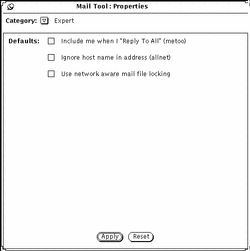
The expert settings determine what happens when you choose Reply to All or Reply to All, Include from the Compose menu.
These settings only apply when your email address appears in the To or Cc list of the message you are replying to.
The following sections describe what happens when these settings are checked or not checked. Only the names listed in parentheses are used below when referring to the options. That is, the options are called "metoo", "allnet", and use network aware mail file locking. These are the names used in the .mailrc file, as described in the mailx(1) manual page.
When Metoo is Checked
When the metoo option is checked, and your email address appears in the To or Cc field when you do a Reply to All, you will receive the reply. Your mail address is recognized in all forms that include your login address, such as yourname@machine and yourname@host. Where machine is the name of your machine and host is the name of any host that is not your machine.
For example, suppose you Reply to All to a message with the following header:
From:salmon@sea Fri Aug 23 10:36:21 1991
To: yourname@machine, yourname@host, tuna@ocean
Your reply will include the following To line:
To: yourname@machine, yourname@host, tuna@ocean, salmon@sea
When Metoo is Not Checked
If the metoo option is not checked, the message header of your reply depends on the allnet option. The allnet option determines whether your mail address is recognized in all forms that include your login address, or only in the form yourname@machine.
Note -
The allnet option only has an effect when the metoo option is not checked.
When Allnet is Checked and Metoo is Not Checked
If the allnet option is checked and the metoo option is not checked, and you do a Reply to All, your address is not included in any form in the To or Cc fields of your reply.
For example, suppose you receive a message with this header:
From: salmon@sea Fri Aug 23 10:36:21 1991
To: yourname@machine, yourname@host, tuna@ocean
The To field of your reply would look like this:
To: tuna@ocean, salmon@sea
When Neither Allnet Nor Metoo is Checked
When neither the allnet nor the metoo options are checked, your email address is only included in the To and Cc fields of a Reply to All in the form yourname@host.
For example, suppose you receive a message with this header:
From: salmon@sea Fri Aug 23 10:36:21 1991 To: yourname@machine, yourname@host, tuna@ocean
The To field of your reply would look like this:
To: yourname@host, tuna@ocean, salmon@sea
When Use Network Aware Mail File Locking is Checked
Mail Tool tries to prevent two different instances of Mail Tool from opening the same mail file at the same time. By default, a technique that successfully detects this access when both Mail Tools and the file are all on the same machine.
As an option you can use a network aware locking protocol that uses ToolTalkTM to coordinate the Mail Tools. This ensures consistency if running MailTool from more than one machine, or if mail files are accessed over the network.
Mail Tool can only change this option when first opening a mail file. If you change this option when a mail file is open you are given three choices:
-
You can save the current mail file and reopen it, making the new locking technique take effect immediately.
-
You can continue editing the current mail file. The new locking technique will take effect the next time you open a mail file.
-
You can abort the apply and return to editing the property sheet.
- © 2010, Oracle Corporation and/or its affiliates
