Chapter 11 Audio Tool
Audio Tool is an application that is used to record, play, and edit audio files. Audio Tool works in conjunction with the Audio Control application, which controls and configures the desktop's audio capabilities. Audio Tool also works with Multimedia Mail Tool to provide the audio capabilities for composing, sending, and receiving Multimedia Mail.
About This Chapter
The first part of this chapter explains how to perform common Audio Tool tasks, such as playing, recording, editing, and saving audio files. The rest of the chapter, which is in a reference format, contains detailed descriptions of Audio Tool's base window and the File, Edit, and Volume menus. Refer to these reference sections for more information about a particular button or menu option.
Audio Tool Capabilities
Before using Audio Tool, make sure that your machine supports, at a minimum, basic (monaural) audio capabilities and that a speaker and microphone are installed. Refer to your system's documentation for this information.
Many computers support stereo and higher-quality audio, such as CD and DAT quality. Audio Tool automatically recognizes the capabilities of the computer's audio devices. Therefore, the features of Audio Tool that you can use depend on your particular system configuration. This chapter describes all of the features and controls of Audio Tool. However, if your computer supports only monaural audio, you will not see some controls, such as a balance slider.
Required Accessories
For recording (creating) voice audio files, use the microphone that is shipped with your computer or a commercial-variety microphone. Connect the microphone to your computer's microphone jack.
You can listen to audio output in one of these ways; either from your computer's speaker, or headphones, or from externally powered speakers connected to the speaker output.
Invoking Audio Tool
You can invoke Audio Tool in several ways:
-
from the desktop menu by choosing Workspace -> Programs -> Audio Tool...
-
from the Mail Tool by choosing Attach -> Voice... from the Compose window
-
from an audio file attachment to a mail message by double-clicking SELECT on the audio file glyph
-
from the File Manager by double-clicking SELECT on an audio file glyph
-
from the command line with the audiotool command
Refer to the audiotool(1) manual page for information about the Audio Tool command's syntax.
About Audio Tool's Base Window
The Audio Tool base window, shown in Figure 11-1, contains all of the controls needed to play, record, and edit a sound file.
Figure 11-1 Audio Tool Base Window
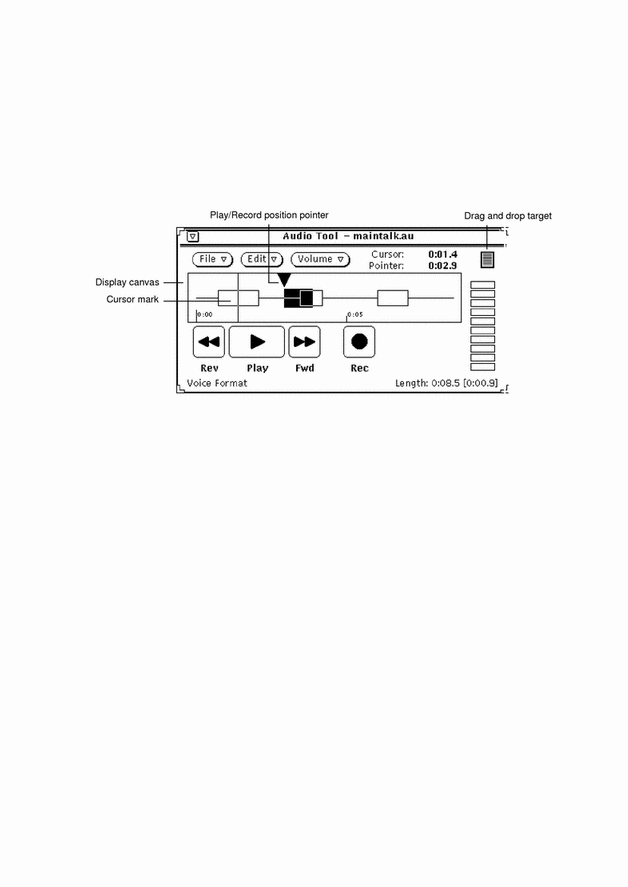
The top center of the Audio Tool window displays the name of a sound file along with the file's status.
Three menu buttons are located near the top of the window (File, Edit, and Volume). Use these buttons to edit audio files and the audio configuration parameters, such as play and record volume. The four buttons located near the bottom of the window (Rev, Play, Fwd, and Rec) function like buttons on a tape recorder.
Loading and Playing an Audio File
To load and play an audio file, do the following:
-
With the pointer inside Audio Tool, choose File -> Open....
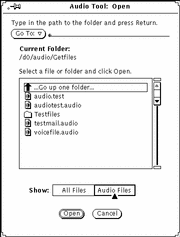
The Audio Tool: Open window is displayed, as shown in Figure 11-2.
Figure 11-2 Open Window
-
Double-click SELECT on the directory that contains the audio file you want to hear.
-
Click SELECT on the name of the audio file.
-
Click SELECT on the Open button.
The audio file appears in Audio Tool's base window.
-
Press MENU on the Volume button and choose Play...
The Audio Control: Play window appears (Figure 11-3).
Figure 11-3 Audio Control: Play Window

Note -Depending on the audio capabilities of your computer, you may or may not see all of the choices shown in the figure (e.g., if your computer does not support stereo, the balance slider is not displayed)
-
Click SELECT on the Play button in Audio Tool`s base window.
-
To adjust the volume, press SELECT on the Play Volume: slider in the Audio Control: Play window and move the slider left (to lower the volume) or right (to raise the volume).
Note that you can choose just a small segment of the sound file to be played. To do this, click SELECT on the location in the recording where you want to start, and click ADJUST at the end of the segment that you want to hear.
Recording Sound
To record an audio file, do the following:
-
If you're recording from a microphone, place the microphone near the sound source.
-
Press MENU on the Volume button and choose Record...
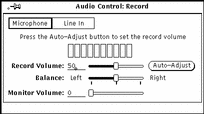
The Audio Control: Record window appears (Figure 11-4).
Figure 11-4 Audio Control: Record Window
-
In the Audio Control: Record window, select a source; either click SELECT on the Microphone button or on the Line In button.
-
Click SELECT on the Auto-Adjust button, and speak into the microphone for three to five seconds. Or, play a selection from the sound source that's connected to your audio hardware's "line in."
Auto adjust automatically sets the recording level. You can also move the Record Volume: slider to adjust the recording level manually.
-
Click SELECT on the Rec button in Audio Tool's base window.
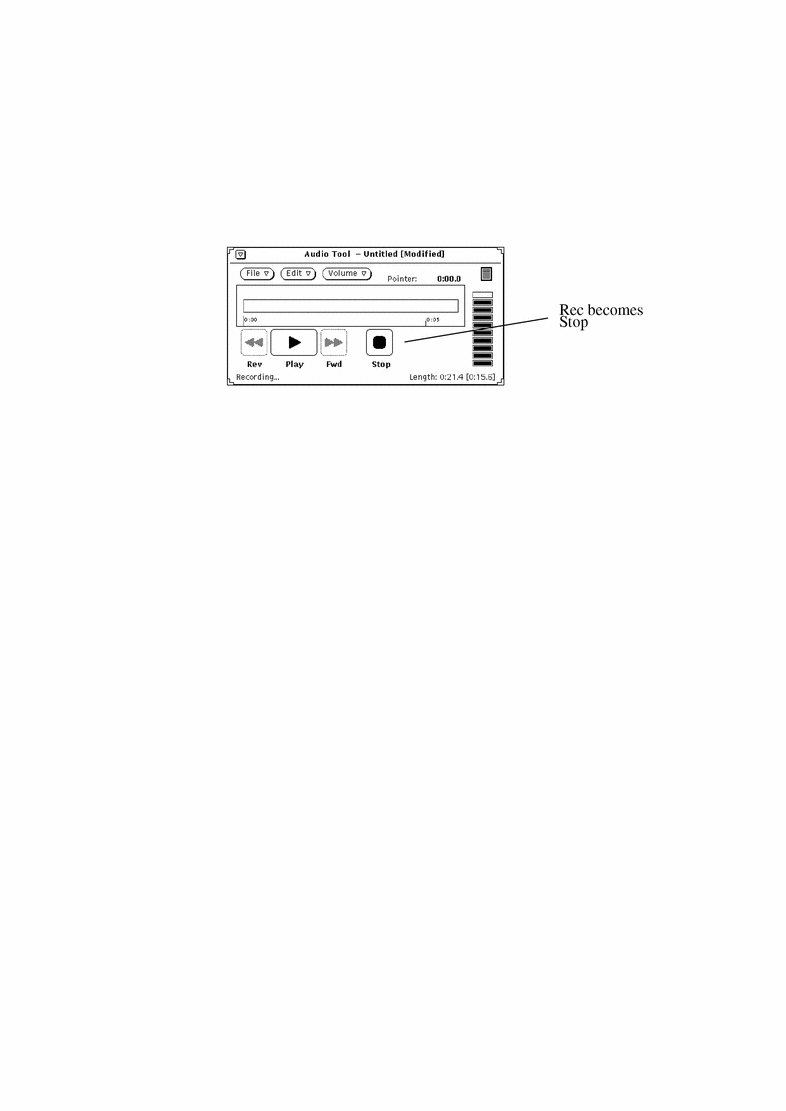
The Rec button changes to Stop, as shown in Figure 11-5.
Figure 11-5 Record Button Changed to Stop
-
Begin speaking into the microphone or playing the music (or other sound source).
-
When you have finished recording, click SELECT on the Stop button.
If you make a mistake, you can either choose File -> New (which cannot be undone) to clear all the sound data and start over, or you can edit the sound later. Refer to "Editing an Audio File" for information on how to do this.
Saving an Audio File
To save your file, do the following:
-
Choose File -> Save As...
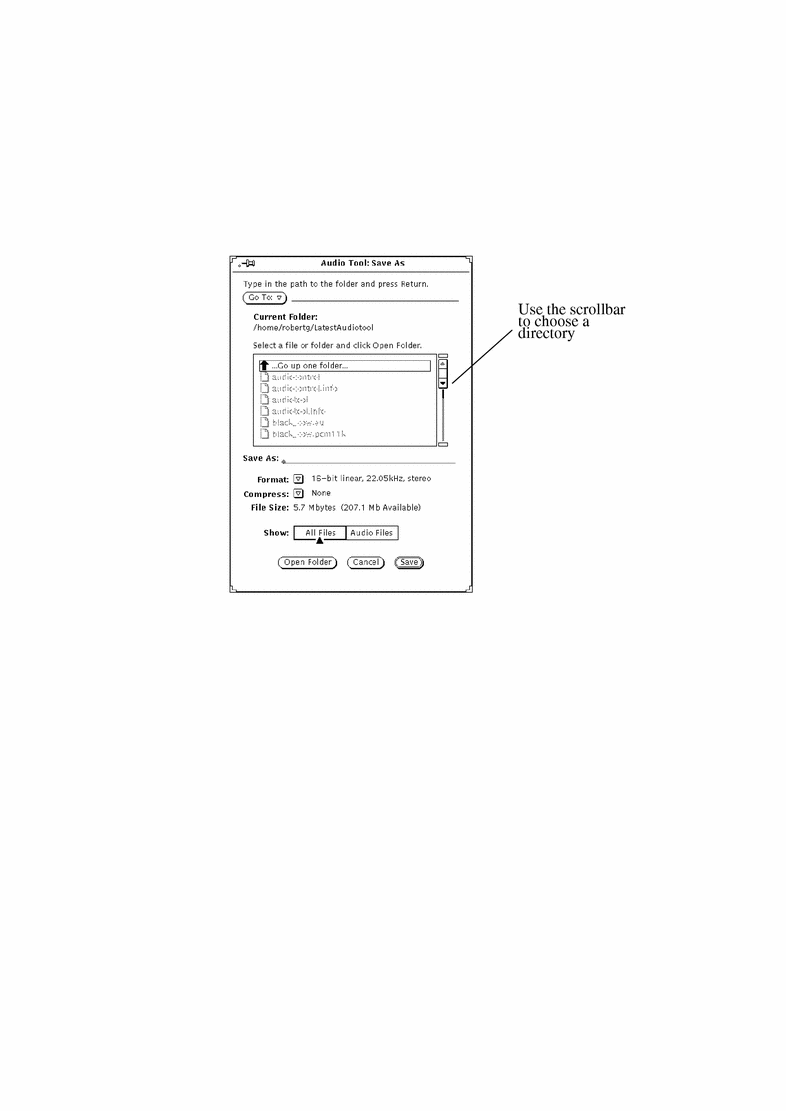
The Audio Tool: Save As window appears, as shown in Figure 11-6.
Figure 11-6 Saving a File in the Save As Window
-
Double-click SELECT on the directory destination for the file from the scrolling directory list.
-
Type the file name in the Save As text field.
-
Click MENU on the Format: menu button to choose an appropriate format.
The current format is displayed next to the menu button.
-
Click MENU on the Compress: menu button to make a compression choice.
The current compression setting is displayed next to the menu button.
-
Click SELECT on the Save button.
The file you named is saved in the selected directory.
You can cancel a file-save operation by clicking SELECT on the Cancel button in the Save As window. Or, you can press the keyboard's Stop key while the mouse cursor is in Audio Tool's base window.
To update the file that is being edited, follow the previous steps to modify the file, then choose File Save from Audio Tool's base window.
Editing an Audio File
Because you can see an audio file graphically, you can determine which portions are sound and which are silence. This feature allows you to edit audio files such as voice messages. For instance, you might want to edit out long pauses (silence) between sentences or phrases. To modify the sound file, you edit the audio file as you would edit a text file in Text Editor, using cut, copy, and paste commands from the Edit menu.
To cut a portion of sound from one location and paste it in another, do the following:
-
Click SELECT at the beginning of the sound portion you want to cut.
-
Click ADJUST at the end of the portion you want to cut.
Or, instead of steps 1 and 2, position the hairline cursor at the beginning of the sound portion, hold down the SELECT mouse button, and drag the pointer to the end of the portion.
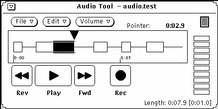
That portion is highlighted, as shown in Figure 11-7.
Figure 11-7 Selecting a Portion to Cut
-
Choose Edit -> Cut.
-
Click SELECT on the destination point for the portion of sound you cut.
-
Choose Edit -> Paste.
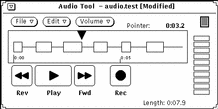
The cut portion of sound is pasted into the new location, as shown in Figure 11-8.
Figure 11-8 Pasting the Sound Portion Back Into a File
Undoing an Edit
You can undo the last edit you made by choosing Edit -> Undo.
Tips for Editing Audio Files
-
In the display canvas, the granularity of selections is based on pixel width, which depends on the length of the file that is loaded. You can stretch Audio Tool's base window to see more detail when you are selecting segments.
-
You may find it useful to use multiple Audio Tools. For example, you can edit a small region of a large file by selecting a segment that is somewhat larger than the region and copying the segment to another Audio Tool display canvas. Then, you can easily edit the segment in the other Audio Tool by stretching the tool to provide better pixel resolution. When you're finished editing, you can copy the edited region back into the original Audio Tool.
-
You can also use multiple Audio Tools to assemble an audio track from multiple sources.
Sending a Voice Mail Message
You can create an audio file from Mail Tool by selecting Attach Voice... in the Mail Tool Compose window. The audio file you create is automatically bound to Audio Tool and to an audio file glyph. The glyph is automatically attached to an electronic mail message when you notify the application that you have finished recording. The mail recipient can hear the contents of the audio file by double-clicking SELECT on the audio attachment glyph from Mail Tool. Refer to Chapter 4, Multimedia Mail Tool for information on using Mail Tool.
To record an audio file and attach it to a mail message, do the following:
-
Click SELECT on the Compose button in the Mail Tool control area, and address the mail.
-
Click SELECT on the Attach... -> Voice... button in the Mail Tool Compose window control area.
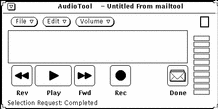
The Audio Tool window appears, as shown in Figure 11-9. Note that the mail button labeled "Done" appears only when Audio Tool is invoked from the Mail Tool Attach button.
Figure 11-9 Audio Tool Window Opened From the Mail Tool Compose Window
-
Record your voice message as described in the section, "Recording Sound".
-
Make any editing changes, as described in the section, "Editing an Audio File".
-
Click SELECT on the Done button.
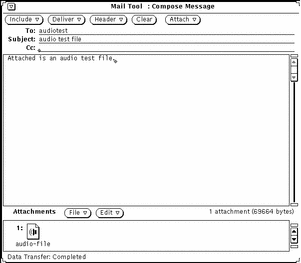
The audio attachment glyph appears in the Attachments window (Figure 11-10).
Note also that if you have a pre-recorded message in Audio Tool that you want to attach to a mail message, you can drag the file's glyph from Audio Tool's drag and drop target to the Compose window's Attachments subwindow.
Figure 11-10 Audio File Attached to a Mail Message
-
If needed, type in an additional message in the Compose text region.
-
Click SELECT on the Deliver button in the Mail Tool Compose window.
Listening to a Voice Mail Message
If you have a machine equipped with a built-in speaker or an attached speaker, you can listen to the audio file by doing the following:
-
Open Mail Tool.
-
Double-click SELECT on the message header containing the attached audio file in the Mail Tool base window.
The mail message containing the file is displayed in the View Message window.
-
Double-click SELECT on the audio attachment glyph in the view window Attachments area.
The audio file opens and begins playing.
Audio Tool Reference
This part of the chapter provides information about Audio Tool's File, Edit, and Volume menus.
Base Window
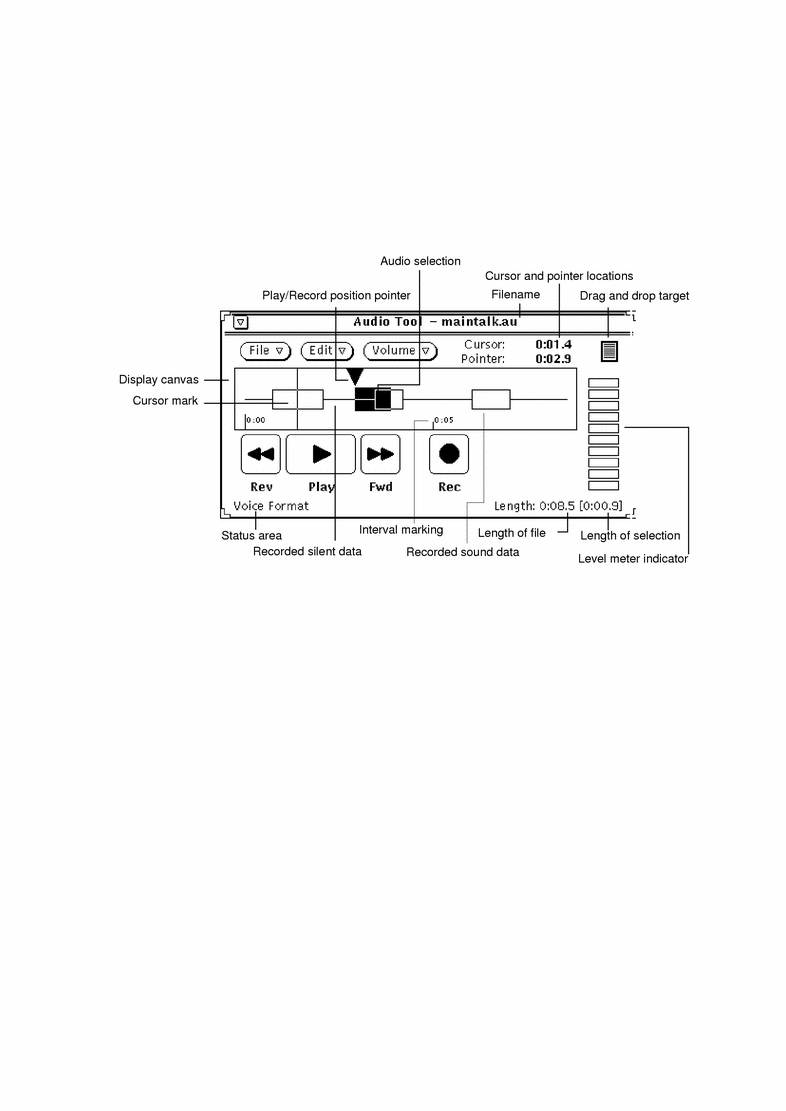
The Audio Tool base window, shown in Figure 11-11, contains all of the controls needed to play, record, and edit a sound file.
Figure 11-11 Audio Tool Base Window
Audio Tool Icon
When you iconize the Audio Tool base window, you'll see the icon shown in Figure 11-12. Double click SELECT on the icon to restore the window.
Figure 11-12 Audio Tool Icon
Display Canvas
The display canvas provides a region for the graphic representation of audio data. Sound data is represented graphically as a box. Silence is represented as a thin horizontal line.
Sound and silence data can be selected using the SELECT and ADJUST mouse buttons. An entire sound or silence segment is selected by double-clicking SELECT in the segment. Using ADJUST extends the selection to segment boundaries or to the hairline cursor position. Triple-click SELECT to select the entire audio file. (Audio selection in Audio Tool follows the same general conventions that are used for text selection throughout the Open Windows environment.)
In Figure 11-11, the selected audio data includes both sound and silence. Once a segment has been selected, clicking SELECT on Play activates only that selection.
Selected data can be dragged and dropped into other applications, such as Mail Tool and File Manager, or other invocations of Audio Tool. Using multiple Audio Tool windows enables you to assemble audio data from multiple files or break large files into smaller sections. Audio attachments to a mail file are discussed earlier in this chapter, as well as in the Mail Tool chapter.
Cursor and Pointer Location
Cursor and Pointer locations are displayed in the upper right corner of the Audio Tool window with time offset of (MM:SS.d), where MM is minutes, SS is seconds, and d is tenths of seconds. Whenever the mouse position marker is moved into the display canvas (and when a file is loaded) the marker is shown as a thin vertical line (hairline cursor), and its location is displayed as a time offset. In Figure 11-11, the cursor is located near the beginning of the audio file, location 0:01.4.
The Play/Record pointer information shows the location of the play/record position pointer in the display canvas. The position pointer marks the data that is currently being played, recorded, or where playing or recording will begin when the Play or Rec button is pressed. It also marks where include, drag and drop, and paste operations will occur. Clicking SELECT while the cursor is in the canvas moves the pointer to the hairline cursor location.
Drag and Drop Target
The drag and drop target is where you can drop sound data into or drag sound data out of Audio Tool. For example, you can drag and drop sound data to and from the File Manager. Sound data dropped on the drag and drop target replaces any data in the display canvas.
Press SELECT on the drag and drop target and drag out of the target to copy the current audio file to another application.
When sound data is dropped directly into the display canvas, the data is inserted at the play position pointer location. If data is selected (highlighted) in the display canvas, the insertion occurs at that specific location, replacing the selected data.
Level Meter
The level meter, which looks like an LED indicator, is active during play and record. On color monitors, the indicators are green and red. During recording, there should generally be 5-to-7 green LEDs displayed. If the red LEDs are lit all of the time, the recording level is too high.
Status Information
The lower left corner of the Audio Tool window is the status message display area. If any status information or error messages occur while using Audio Tool, the information is displayed here. For example, the current audio format is displayed there.
The lower right corner of the Audio Tool window displays the length of a recorded file (e.g., Length: 0:08.5). Whenever a sound segment is selected in the display canvas, brackets appear indicating the length of the selection (e.g., Length: 0:08.5 [0:00.9]). These brackets also appear when recording is initiated, and display the length of the newly recorded data (which is updated periodically).
Rev (Reverse) Button
This button controls the backward movement of the play position pointer. Click SELECT on the Rev button to move the play position pointer backward.
If there is no selection in the canvas, clicking SELECT on the Rev button causes the pointer to jump backward, segment by segment, until it reaches the beginning of the file. (A segment is the start of a sound "box" in the display canvas.)
If there is a selection, the pointer's movement is constrained to the selection.
Hold down SELECT on the Rev button to play the selection in reverse at an accelerated speed until you release SELECT or until the play position pointer reaches the beginning of the selection.
Play Button
This button controls the playing of an audio file. If you've selected part of an audio file, only that part of the file is played. Otherwise, the entire file is played.
Click SELECT on the Play button to start playing from the current play position pointer location to the end of the selection or file. If the play position pointer is at the end of a selection or file, clicking SELECT on the Play button moves the pointer to the beginning of the selection or file before playing starts. Once selected, this button changes from Play to Stop, so to stop playing, click SELECT on the Stop button.
If Auto Play on Selection in Audio Tool: Properties options is set "on," playing starts automatically whenever you make a selection.
Fwd (Fast Forward) Button
This button controls the forward movement of the play position pointer. Click SELECT on the Fwd button to move the play position pointer forward.
If there is no selection in the canvas, clicking SELECT on the Fwd button causes the pointer to jump forward, segment by segment, until it reaches the end of the file.
If there is a selection, the pointer's movement is constrained to the selection.
Hold down SELECT on the Fwd button to play the selection at an accelerated speed until you release SELECT or until the play position pointer reaches the end of the selection.
Rec (Record)/Stop Button
This button controls the starting and stopping of recording. Click SELECT on the Rec button to start recording at the current play position pointer location.
Recorded audio data is inserted into the sound file at the play position pointer. The existing data is moved forward in the file--it is not overwritten. However, if a sound segment is selected when record is activated, the selected segment is cut from the audio file and placed on the clipboard.
Once selected, this button changes from Record to Stop, so to stop recording, click SELECT on the Stop button.
You can click SELECT on New from the File menu to delete the current sound and record from scratch.
Note -
Clicking SELECT on the Play button during a recording session causes the recording to stop and the segment that was just recorded to be automatically selected and played back.
File Menu
Items on the File menu handle opening, including, and saving files. Click MENU on the File button to display the File menu.
Whenever a command cannot be performed, the corresponding menu item is dimmed. For example, Save is dimmed when there is no new data to be saved.
New
Use the New menu to clear the current audio file or select a new audio data format. Press MENU on New and drag to the right to display a pop-up menu with format choices. (If you click SELECT on New, the display canvas is cleared and retains the current format.) The selected audio format stays in effect until the next New operation (or other operation that loads a new audio file, such as Open). When recording a new file, you have the option of saving in the current format or in a new format.
If there is an unsaved sound file in the display canvas, a confirmation message appears, saying that the file is modified and asking if you want to discard the edited data. Click SELECT on the Continue button to clear the display canvas and begin recording. The confirmation message can be disabled in the Edit Properties... window.
You cannot undo a New operation.
Audio Format Choices
Click SELECT on the format of your choice. You can retain the current format or choose one of the standard formats--Voice, CD, or DAT. (If an audio format is not supported by the audio hardware, the corresponding menu item is disabled.) User defined formats may also be included and you can choose New Format... to define a new format.
New Format...
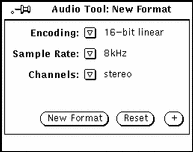
Click SELECT on the New Format... choice in the New menu to select, create, or edit the characteristics of a recording format. The Audio Tool: New Format window, shown in Figure 11-13, is displayed.
Figure 11-13 Audio Tool: New Format Window
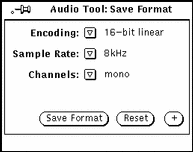
Encoding:
Open this menu with a MENU click to select a type of encoding. Then, click SELECT on your choice of 8-bit m-law, 8-bit A-law, or 16-bit linear. The 16-bit linear encoding provides better accuracy (signal-to-noise ratio) than the two 8-bit encodings. However, the 16-bit linear encoding requires twice the storage capacity. Stereo audio data must use 16-bit linear encoding to play on a machine with stereo capability.
Sample Rate:
Open this menu with a MENU click to select a sample rate. Higher sample rates provide better high-frequency response (at the cost of larger file sizes). Click SELECT on your choice.
Channels:
Open this menu with a MENU click and click SELECT on your choice of channels (mono or stereo).
New Format Button
Click SELECT on the New Format button to clear the current audio file and reset the data format to match the currently selected audio format.
Reset Button
Click SELECT on the Reset button to restore the panel so that it displays the current audio format.
+ Button
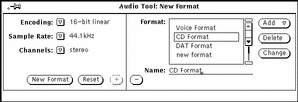
Click SELECT on the + button in the New Format window to display an extended window, shown in Figure 11-14. The Format scrolling list displays the formats available to you. Note that formats are stored on a per-user basis, so that the formats listed (other than the standard Voice, CD, and DAT) have been created under your user name.
Note -
Audio formats and preferences are stored in the $HOME/.audiorc file (where $HOME is the name of your home directory).
You can use the New Format window to name a format type to appear in the New and Save As... menus. You can also use this window to add, change, or delete an audio format.
Click SELECT the - button to close the extended part of the New Format window.
Figure 11-14 New Format Window Extensions
To create a new format:
-
Select the new format's encoding, sample rate, and number of channels from the lefthand part of the window.
-
Type the new format's name in the Name: field.
-
Click SELECT on the Add button.
The new format is added to the bottom of the list. To add the new format elsewhere, click MENU on Add and choose Before, After, Top, or Bottom. The new format will appear in the list of formats.
Open...
Open... enables you to open a directory or file. Click SELECT on the Open... menu item to display the Audio Tool: Open window, shown in Figure 11-15. This window contains a "browser" that can be used to locate particular directories within a file system.
Figure 11-15 Audio Tool: Open Window

Go To:
To change directories, type the pathname of the new directory in the Go To: field, then click SELECT on the Go To: button or press Return. Notice that if you click MENU on the Go To: button, a directory stack is displayed that includes the recently visited directories, as well as the directories specified in the AUDIOPATH environment variable.
Path Scrolling List
The scrolling list displays the names of directories and files. Double-click SELECT on the first item in the scrolling list to move to the parent directory. Double-click SELECT on any of the directories in the scrolling list (indicated by folder icons) to change the current directory.
All Files Button and Audio Files Button
If you click SELECT on the All Files button, the path scrolling list displays the names of all directories and files. However, non-audio files are dimmed and cannot be loaded.
If you click SELECT on the Audio Files button, the scrolling list displays the names of audio files only; other file types are omitted from the display.
Open Button
Click SELECT on this button to open the specified audio file and load it into Audio Tool's display canvas. If the selected item is a directory, click SELECT to open the directory.
You can also open a sound file by following these steps.
-
Scroll to the directory that contains the specific file.
-
Double-click SELECT on the directory.
-
Double-click SELECT on the audio file icon glyph.
The specified file is loaded into the display canvas.
Note -If the audio hardware of your computer does not support the audio format of a file that you're trying to open, Audio Tool displays the conversion pop-up shown in Figure 11-16.
Figure 11-16 File Conversion Pop-Up

Click SELECT on the Convert button to convert the file into a format that is supported by your computer's hardware. Click SELECT on the Load button to load the file into Audio Tool's canvas. If you load the file, you will not be able to play it. However, you can perform editing operations on the file (such as cutting and pasting segments) and save the result into a new format.
Cancel Button
Click SELECT this button to close the Open window.
If you open a compressed audio file, the conversion can take a long time. The Cancel button remains active and can be used to cancel the in-progress load conversion.
Save
Save enables you to save changes made to the current audio file. Click SELECT on the Save menu item to save the file.
If a file has been named and previously saved, clicking SELECT on Save replaces the old copy with the current version.
If the audio data has not been saved previously, or has not yet been edited, the Audio Tool: Save As window is displayed. The Save item is dimmed if no audio file is loaded (following a New operation, for example) or if the audio file has not been edited since a previous Save.
Save As...
Save As... enables you to save a copy of the current sound file to a new file. Click SELECT on the Save As... menu item to display the Audio Tool: Save As window (Figure 11-17). To save a file, enter its name into the Save As field and click SELECT on the Save button.
Figure 11-17 Audio Tool: Save As Window
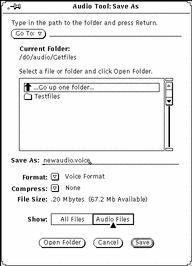
The Go To: button and field, Current Folder: field, scrolling list, All Files and Audio Files buttons, and the Cancel button work the same as their counterparts in the Open window. The Save As window has additional items that the Open window does not have. Use the Format: and Compress: menus to save an audio file in different formats.
Format:
Click MENU on the Format button to display the list of formats. The standard formats are Current, Voice, DAT, or CD. Click SELECT on Current Format to match the format that is being used in the display canvas.
In the list of formats, click SELECT on New Format... to display the Audio Tool: Save Format window (Figure 11-18). Use the selections in this window to save the audio data in a different format. The buttons in the window work the same as the buttons in the Audio Tool: New Format window (described on "New Format...").
Figure 11-18 Audio Tool: Save Format Window
Compress:
Click MENU on the Compress button to display a list of compression techniques. The choices are:
-
None--no compression. This choice provides the best audio quality, loads and saves files the fastest, but consumes the most disk space.
-
4-bit G.721 ADPCM--2:1 compression. This is a good choice for voice files and adequate for music. It uses 50% less disk space than no compression.
-
3-bit G.723 ADPCM--8:3 compression. This is an adequate choice for voice files, but may be unacceptable for some music. It uses 62.5% less space than no compression.
If the size of a file is a concern, choose compression. If loading time is a concern, choose no compression. A compressed file uses less disk space but requires additional loading time because it must be decompressed before it is used. Also, if you choose to compress a file, the audio encoding specified by New Format... is ignored. When you load a compressed file, the format may change from its previous choice (e.g., if you compress an A-law file and reload, the file format changes to m-law).
File Size:
The File Size field displays the storage requirements of the file (when Audio Tool writes it to disk) and the amount of free disk space that you have available in the file system that contains the selected folder.
Open Folder
Click SELECT on the Open Folder button to open a folder that you have selected in the file scrolling list.
Cancel Button
Click SELECT on the Cancel button to close the Save As window.
If you save a compressed audio file, the conversion can take a long time. The Cancel button remains active and can be used to cancel the in-progress save conversion.
Save Button
Click SELECT on this button to save the specified audio file. If the file selection is not made, this button is dimmed.
Include...
Include... enables you to insert audio data from another file into the current file. Click SELECT on the Include... menu item to display the Audio Tool: Include window. This window is similar to the Open window shown in Figure 11-15, with the Include button replacing the Open button, and the addition of the Open Folder button. Choose the file you want to include, then click SELECT on the Include button to insert the selected file into the display canvas at the play position pointer. Note that if the file selection is not made, the Include button is dimmed.
Note -
You can include only files whose formats match the current audio format. All other files are dimmed (if All Files is selected) or are removed from the scrolling list (if Audio Files is selected).
Edit Menu
The commands on the Edit menu are common to most DeskSet tools. Click MENU on the Edit button to display the Edit menu.
Whenever a command cannot be performed, the corresponding menu item is dimmed. For example, Undo is dimmed when there are no editing operations to undo.
Clear
The Clear command removes the current sound data from the display canvas. Click SELECT on Clear when you want to delete all the data in the canvas.
Note -
The clear operation does not change the name of the file that's being edited. Take care not to accidentally save an empty canvas to an audio file.
The clear operation can be undone, and the audio data is retained so that it can be used by a Redo operation. However, since newly recorded data consumes space in the temp file directory, you might consider using the File New operation. This operation, which cannot be undone, recovers the unused space in the filesystem.
Undo
The Undo command reverses the effects of the last editing command issued. Click MENU on Undo to display the Undo submenu, which has the following options:
-
Last Edit--Restores the previous data prior to the last change. This is the default action for Undo. -
All Edits--Restores all edited changes to their state as of the last time the audio file was saved, loaded, or cleared.
Redo
The Redo command restores the effects of the Undo command. Click MENU on Redo to display the Redo submenu, which has the following options:
-
Last Undo--Restores the previously revised data. This is the default action for Redo. -
All Undos--Restores all edited changes.
Making edits to the audio buffer clears any subsequent editing history in the redo list.
Cut
The Cut command removes the current selection from your sound file and places it on the clipboard. Click SELECT on Cut to cut the selection.
Copy
The Copy command copies the current selection to the clipboard, without modifying the original sound file. Click SELECT on Copy to copy the selection.
Paste
The Paste command pastes data currently stored on the clipboard into the current audio file at the location specified by the play position pointer. For example, after doing a Cut or Copy, the next step is often to paste the stored data to some new location. Click SELECT on Paste to paste the selection.
Delete
The Delete command removes the current selection from the sound file, without modifying the contents of the clipboard. Use Delete instead of Cut when something is on the clipboard that should not be overwritten or when you are sure you do not want to use the selection again.
Click MENU on Delete to display the Delete submenu with the following options:
-
Selection--This is the default, which deletes the current audio selection. -
Unselected--This option deletes everything that is not selected. This enables you to select the part of an audio segment that you want, then delete the parts that you don't want. -
All Silence--This option deletes all silent segments, which are indicated by horizontal lines. This is useful, for example, when you are sending or storing voice mail. -
Silent Ends--This option deletes only the silent segments at the beginning and end of the file. This enables you to remove a pause that occurs between the time you press the Rec button and start talking, or the pause between the time that you stop talking and press the Stop button.
Properties
Properties... enables you to modify the functionality of Audio Tool. Click SELECT on this menu item to display the Audio Tool: Properties window, shown in Figure 11-19.
Figure 11-19 Audio Tool: Properties Window
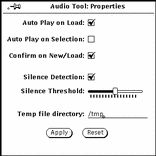
The controls on the Audio Tool: Properties window are described in the following paragraphs.
-
Auto Play on Load:--Causes Audio Tool to begin playing files as soon as they are loaded or dragged and dropped onto the drop target.
-
Auto Play on Selection:--Causes selections to be played immediately after a selection is made. This option can be useful when you are working on a specific editing task because the entire selection replays each time that you make or change a selection.
-
Confirm on New/Load:--Causes a confirmation message to be displayed if a file contains unsaved data when a New or Load operation is performed.
-
Silence Detection:--Turns silence detection ON or OFF. If this option is turned off, no silence detection occurs and the entire audio file is displayed as a single sound segment. Turning off this option speeds up the time it takes to load an audio file.
Note -
Silence detection is automatically suppressed for audio file formats that have a sample rate greater than 16kHz, regardless of the silence detection setting in the Edit Properties... window.
-
Silence Threshold:--Changes the parameters for silence detection. Moving the slider to the left increases the sensitivity to short pauses. This should increase the number of sound and silence segments. Moving the slider to the right decreases the sensitivity to short pauses. This should decrease the number of segments.
-
Temp file directory:--This displays the name of the directory where temporary sound files are placed. All newly recorded data is stored in this directory until the data is saved.
Note -
Recorded audio can quickly use up disk space. Set the temp file directory to a file system that contains adequate disk space. Also, if you are using high sampling rates (e.g., CD or DAT format), you may have difficulty recording to a remotely mounted temp file system.
In addition, there are two buttons at the bottom of the Properties window, Apply and Reset. Use these buttons as follows:
-
Click SELECT on
Applyto apply all changes made in the Properties window. -
Click SELECT on
Resetto restore all parameters to their original value, as set by the last Apply operation.
Edit Pop-Up Menu
A pop-up menu with commonly-used audio editing commands is available when you click MENU in the display canvas (Figure 11-20). Note that many of these choices also appear in the Edit menu under Clear and Delete.
Figure 11-20 Edit Pop-Up Menu
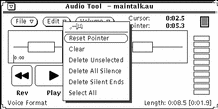
Reset Pointer
This command clears the current selection and places the pointer at the beginning of the file.
Clear
This command removes the current sound data from the display canvas.
Delete Unselected
This command deletes everything in the display canvas that is not selected.
Delete All Silence
This command deletes all silent segments (which are indicated by horizontal lines).
Delete Silent Ends
This command deletes only the silent segments at the beginning and end of the file.
Select All
This command selects all of the audio data in the display canvas. This is the same as triple-clicking SELECT in the display canvas.
Volume Menu
The Volume menu has options for controlling play volume and recording level. These functions are part of Audio Control--a separate application that cooperates with Audio Tool. Click MENU on Volume to display these options.
Play...
Play... controls audio output. Click SELECT on Play... to display the Audio Control: Play window, shown in Figure 11-21. The controls on this panel affect the entire desktop audio environment.
Figure 11-21 Audio Control: Play Window

Note -
Depending on the audio capabilities of your computer, you may or may not see all of the choices shown in the figure (e.g., if your computer does not support stereo, the balance slider is not displayed)
Speaker, Headphone, and Line Out Buttons
Click SELECT on these buttons to select audio output devices.
The buttons that are available depend on your hardware configuration. For example, some configurations support only speakers and headphones. Other configurations support all three devices, and some configurations allow you to select more than one device at a time. Also, some configurations recognize whether a plug has been inserted into a jack. In these configurations, the corresponding button is dimmed when no plug is inserted into a jack.
Play Volume
This slider controls the audio output volume. You can also type in a volume level (0-100).
Balance
If your computer has stereo capability, use the Balance slider to adjust the balance. The slider has a "detent" at the 50-50 balance point.
Record...
This button displays the Audio Control: Record window, which is described in "Record...".
Mute
This button mutes the audio output to the selected devices. The audio file or selected audio segment continues to play. Click SELECT on the button to turn off muting so that you can hear the audio. Audio Tool turns muting off when you adjust the play volume.
Record...
Record... controls the adjustment of volume gain during recording. Click SELECT on Record... to display the Audio Control: Record window, shown in Figure 11-22.
Note -
If recording difficulty is experienced with a commercial microphone, use an external pre-amp to boost the recording gain level.
Figure 11-22 Audio Control: Record Window

Microphone and Line In Buttons
Click SELECT on one of these buttons to select an audio input device (if they are supported by your hardware configuration).
Record Volume:
This slider controls the recording volume gain. You can also type in a volume level (0-100).
Balance:
If your computer has stereo capability, you can use the Balance slider to adjust the balance. The slider has a "detent" at the 50-50 balance point. Typically, you'll only want to change the record balance if your audio inputs are not at the same level.
Before adjusting the record balance, make sure that the play balance is calibrated for your output configuration. You can do this by using the Audio Tool: Save As window to convert a monaural file to stereo and then adjusting the play balance until the left and right speakers produce the same output level.
Once the play balance is calibrated, you can record a segment of audio data and play it back to determine if the record balance is correct.
Note -
On systems that support the monitor function, the record balance may not affect the monitor output. To determine the actual effect of record-balance changes, you must record and play back a sample of stereo audio.
Monitor Volume:
This slider controls the volume of the audio input signal that is channeled through the output port. (You can also type in a monitor-volume level (0-100).) This is useful when an audio source, such as a CD player or tape deck, is connected to the selected input jack. By adjusting the monitor volume, the audio input is heard without having to record any data.
Auto-Adjust Button
This button enables you to automatically set the optimum recording level. This is recommended before a recording session begins or whenever the microphone is moved or the input source is changed.
Click SELECT on Auto-Adjust to initiate scanning of the input sound data to determine its loudness. The current level of the input signal is examined and, if necessary, minor adjustments are made to set a Record level. If no signal is found, the Record level jumps to the maximum, then automatically adjusts down until the optimal level is achieved. An LED-like input level meter displays the sound level. During the auto-adjust operation, no data is recorded. The auto-adjust procedure continues until a satisfactory level has been maintained for three to five seconds.
To adjust the level of your voice, talk into the microphone in a normal speaking voice. Speak continuously during the entire time (for instance, counting) until the auto-adjust operation ends. If the input signal does not register on the level meter, check the ON/OFF switch on the microphone or replace the microphone battery.
You should also use the auto-adjust operation to set the optimal recording level for input sources connected directly to the microphone jack, such as a CD player or tape deck. For best results, play the loudest section of your audio source during the auto-adjust operation. You can use the Monitor Volume to listen to the source while you are setting the volume level (as well as while you are recording).
Note -
If you cannot achieve a satisfactory signal level with a commercial microphone, it may be necessary to speak closer to the microphone, or to obtain a microphone preamplifier.
Using the Audio Control Status Panel
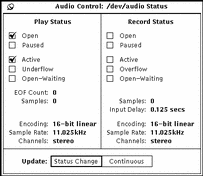
The Audio Control application includes a status window that displays the current state of the audio device. The status window provides information that can be useful for debugging audio applications and for determining whether applications are holding an audio device open.
To display the status window (Figure 11-23), click MENU in the background of the Audio Control: Play or Audio Control: Record windows, then click SELECT on the Status... button. The check boxes display the status of the tool. (The check boxes are informational; you cannot modify them.)
Click SELECT on the Status Change button to cause the displays to be updated only when one of the status items changes. Click SELECT on the Continuous button to cause the displays to be updated continuously. Refer to the audio(7) manual page for a description of status indicators.
Figure 11-23 Audio Control: Status Window
- © 2010, Oracle Corporation and/or its affiliates
