Volume Menu
The Volume menu has options for controlling play volume and recording level. These functions are part of Audio Control--a separate application that cooperates with Audio Tool. Click MENU on Volume to display these options.
Play...
Play... controls audio output. Click SELECT on Play... to display the Audio Control: Play window, shown in Figure 11-21. The controls on this panel affect the entire desktop audio environment.
Figure 11-21 Audio Control: Play Window

Note -
Depending on the audio capabilities of your computer, you may or may not see all of the choices shown in the figure (e.g., if your computer does not support stereo, the balance slider is not displayed)
Speaker, Headphone, and Line Out Buttons
Click SELECT on these buttons to select audio output devices.
The buttons that are available depend on your hardware configuration. For example, some configurations support only speakers and headphones. Other configurations support all three devices, and some configurations allow you to select more than one device at a time. Also, some configurations recognize whether a plug has been inserted into a jack. In these configurations, the corresponding button is dimmed when no plug is inserted into a jack.
Play Volume
This slider controls the audio output volume. You can also type in a volume level (0-100).
Balance
If your computer has stereo capability, use the Balance slider to adjust the balance. The slider has a "detent" at the 50-50 balance point.
Record...
This button displays the Audio Control: Record window, which is described in "Record...".
Mute
This button mutes the audio output to the selected devices. The audio file or selected audio segment continues to play. Click SELECT on the button to turn off muting so that you can hear the audio. Audio Tool turns muting off when you adjust the play volume.
Record...
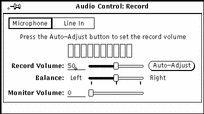
Record... controls the adjustment of volume gain during recording. Click SELECT on Record... to display the Audio Control: Record window, shown in Figure 11-22.
Note -
If recording difficulty is experienced with a commercial microphone, use an external pre-amp to boost the recording gain level.
Figure 11-22 Audio Control: Record Window

Microphone and Line In Buttons
Click SELECT on one of these buttons to select an audio input device (if they are supported by your hardware configuration).
Record Volume:
This slider controls the recording volume gain. You can also type in a volume level (0-100).
Balance:
If your computer has stereo capability, you can use the Balance slider to adjust the balance. The slider has a "detent" at the 50-50 balance point. Typically, you'll only want to change the record balance if your audio inputs are not at the same level.
Before adjusting the record balance, make sure that the play balance is calibrated for your output configuration. You can do this by using the Audio Tool: Save As window to convert a monaural file to stereo and then adjusting the play balance until the left and right speakers produce the same output level.
Once the play balance is calibrated, you can record a segment of audio data and play it back to determine if the record balance is correct.
Note -
On systems that support the monitor function, the record balance may not affect the monitor output. To determine the actual effect of record-balance changes, you must record and play back a sample of stereo audio.
Monitor Volume:
This slider controls the volume of the audio input signal that is channeled through the output port. (You can also type in a monitor-volume level (0-100).) This is useful when an audio source, such as a CD player or tape deck, is connected to the selected input jack. By adjusting the monitor volume, the audio input is heard without having to record any data.
Auto-Adjust Button
This button enables you to automatically set the optimum recording level. This is recommended before a recording session begins or whenever the microphone is moved or the input source is changed.
Click SELECT on Auto-Adjust to initiate scanning of the input sound data to determine its loudness. The current level of the input signal is examined and, if necessary, minor adjustments are made to set a Record level. If no signal is found, the Record level jumps to the maximum, then automatically adjusts down until the optimal level is achieved. An LED-like input level meter displays the sound level. During the auto-adjust operation, no data is recorded. The auto-adjust procedure continues until a satisfactory level has been maintained for three to five seconds.
To adjust the level of your voice, talk into the microphone in a normal speaking voice. Speak continuously during the entire time (for instance, counting) until the auto-adjust operation ends. If the input signal does not register on the level meter, check the ON/OFF switch on the microphone or replace the microphone battery.
You should also use the auto-adjust operation to set the optimal recording level for input sources connected directly to the microphone jack, such as a CD player or tape deck. For best results, play the loudest section of your audio source during the auto-adjust operation. You can use the Monitor Volume to listen to the source while you are setting the volume level (as well as while you are recording).
Note -
If you cannot achieve a satisfactory signal level with a commercial microphone, it may be necessary to speak closer to the microphone, or to obtain a microphone preamplifier.
- © 2010, Oracle Corporation and/or its affiliates
