Chapter 13 Image Tool
Image Tool is an application that you can use to view multiple page documents (such as PostScript files) and single page image files (such as Sun Raster). You can also use it to manipulate or translate a file. Image Tool works with other DeskSet applications such as Mail Tool and Snapshot.
Image Tool is the default viewer for Mail Tool, so if you receive (and open) an attached multiple page document (for example), Mail Tool launches Image Tool to display the attachment. Once you have taken a picture of an image with Snapshot, you can view it, manipulate it, or print it using Image Tool. For complete information on Snapshot, refer to Chapter 14, Snapshot.
Image Tool works with color and monochrome monitors. Color monitors vary in their ability to display color, so Image Tool adapts color images to suit the type of monitor. Monochrome monitors display all images in black and white. Color monitors may display images in fewer colors than the original. For example, a 24-bit image appears on an 8-bit color monitor as an 8-bit color image.
This Chapter describes how to use Image Tool to:
-
Open an image or document for viewing
-
Save an image file (in the same or different format)
-
Print an image or document
-
Use the Image Tool palette to manipulate a document
To open Image Tool, choose Workspace -> Programs -> Image Tool.
Image Tool Icon and Window
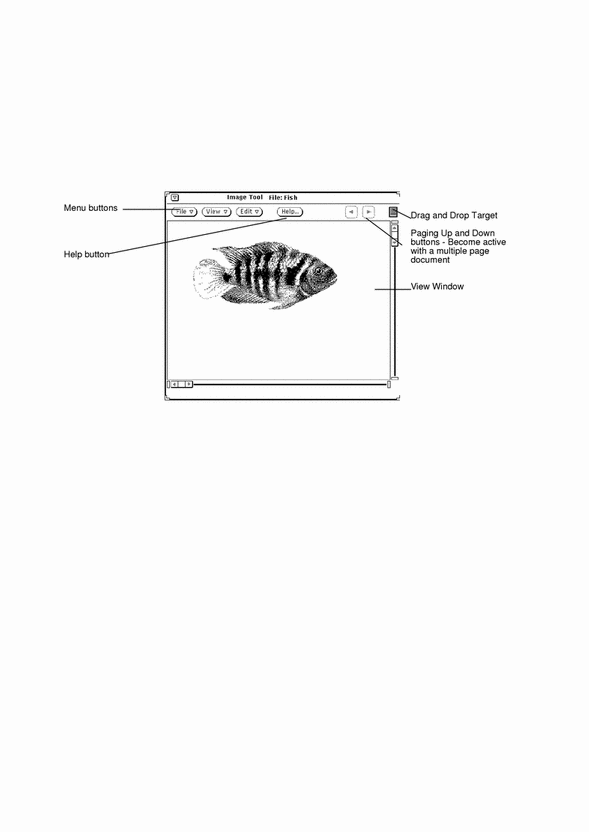
The Image Tool icon is shown in Figure 13-1, and the Image Tool View window is shown in Figure 13-1. The icon includes a file name if the View window contains an image.
Figure 13-1 The Image Tool Icon
Figure 13-2 Image Tool Base Window
Opening Image Files and Documents
There are several ways to open (or display) an image for viewing, depending on your starting point:
Open an image by selecting File -> Open.
See Chapter 1, Introduction to the Solaris User Environment, for standard information on opening a file.
In Mail Tool, open an attached image file or multiple page document.
Drag and drop a file from another application to the Image Tool View window.
In Snapshot, after an image has been snapped, choose the View option.
Once Image Tool is launched from Mail Tool or Snapshot you don't have to open Image Tool again to view other images.
Viewing Single Page Images and Multiple Page Documents
If the image you opened is a single page image, the View window resizes to the size of the image (unless the image extends beyond the size of the screen.)
You can now save your image as described in "Saving an Image", print your image as described in "Printing Images", or use the palette with your image as described in "Using the Image Tool Palette".
If your document is a multiple page document, refer to "Viewing Multiple Page Documents".
Formats that Image Tool Can Open
Table 13-1 lists the file formats that Image Tool can open along with recommended file name extensions. These extensions may help you recognize file formats.
Note -
PostScript file formats are for PostScript and Encapsulated PostScript File (EPSF) documents. For simplicity, in the rest of this chapter the term PostScript includes EPSF.
Table 13-1 Image Tool File Formats and Extensions
|
File Format |
File Name Extension |
|---|---|
|
Encapsulated PostScript File |
.ps, .eps, .epsf |
|
PostScript |
.ps |
|
3 Portable Graymap |
.rgb3 |
|
Abekas YUV |
.yuv |
|
Andrew Toolkit |
.atk |
|
Atari Compressed |
.spc |
|
Atari Uncompressed Spectrum |
.spu |
|
Atari Degas 1 |
.pi1 |
|
Atari Degas 3 |
.pi3 |
|
AutoCAD Slide |
.sld |
|
Benet Yee Face File |
.ybm |
|
CMU Window Manager |
.cmu |
|
FITS |
.fits |
|
GEM |
.img |
|
GIF |
.gif, .GIF |
|
Gould Scanner |
.gould |
|
Group 3 Fax |
.g3 |
|
HIPS |
.hips |
|
IFF ILBM |
.ilbm |
|
HP PaintJet |
.pj |
|
JFIF (JPEG) |
.jpg, .jpeg, .JPG, .JPEG |
|
Lisp Machine Bit-Array |
.lispm |
|
MGR |
.mgr |
|
MTV/PRT Ray-Tracer |
.mtv |
|
MacPaint |
.mac |
|
PBM |
.pbm |
|
PC Paintbrush |
.pcx |
|
PGM |
.pgm |
|
PICT |
.pict |
|
PPM |
.ppm |
|
QRT Ray-Tracer |
.qrt |
|
Raw Grayscale |
.rawg |
|
Raw RGB |
.raw |
|
Sun Icon |
.icon |
|
Sun Raster |
.im1 (monochrome) .im8 (8-bit color) .im24 (24-bit color) .im32 (32-bit color) .rs |
|
TIFF |
.tif, .tiff, .TIF, .TIFF |
|
TrueVision Targa |
.tga |
|
Usenix FaceSaver |
.fs |
|
X Bitmap |
.xbm |
|
X11 Window Dump |
.xwd |
|
XPM |
.xpm |
|
Xerox Doodle Brush |
.brush |
|
Xim |
.xim |
Opening Your File in a Specific Format
If Image Tool cannot recognize the file format you want to open, you may need to specify the format, as described in the following section. To do so:
-
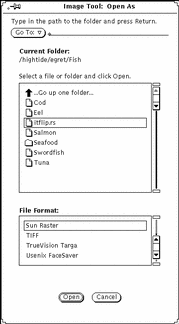
Choose File -> Open As.
The Open As window displays, as shown in Figure 13-3, with the current folder location and document file type.
Figure 13-3 The Open As Window
-
Select a file type from File Format.
Table 13-1 shows the possible file extensions and list of file formats Image Tool can open.
-
Select a file from the scrolling list.
-
Click Open.
Your file or document is opened in the View Window. The palette is automatically displayed when your file is opened. If you do not want to automatically display the palette, refer to "Setting Image Tool Properties".
Getting Information About Your Image
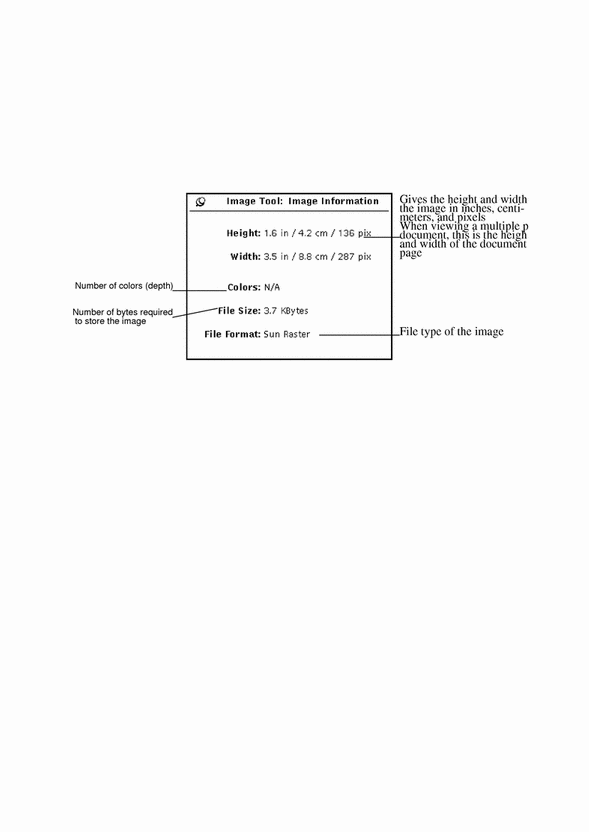
Image Tool provides the following information about the currently opened file: height, width, colors, or size. To view this information:
Select View -> Image Info.
The Image Information window displays as shown in Figure 13-4.
Figure 13-4 Image Information Window
Saving Image Files and Documents
Saving an Image
There are several options for saving files, but normally only one or two choices are available. For complete information on standard file saving methods, refer to Chapter 1, Introduction to the Solaris User Environment.
To save a raster image or multiple page document and keep the current file name, directory, and attributes, choose Save from the File menu.
-
Save As applies to the entire image
-
Save Selection As applies to a region that you defined using the Selector tool.
-
Save Page As Image applies only to a single page of a multiple page document.
-
File Format: EPSF, GIF, JFIF (JPEG), PostScript, Sun Raster, or TIFF
-
Compression:
-
None
-
UNIX --Standard UNIX file compression utility, available for (ESPF), PostScript, Sun Raster, and TIFF formats
-
Encoded run length--Available for Sun Raster
-
LZW--Available for TIFF files
-
JPEG--Available for JFIF files
-
-
Colors: Choose from Black and White, 256, Millions.
To save an image (whole or in part) and change the file name directory, or attributes, choose one of the Save As command items:
If the file format for the opened file is not supported, the Save button is dimmed and unavailable. Figure 13-5, shows the Image Tool Save As window.
Figure 13-5 Image Tool Save As Window
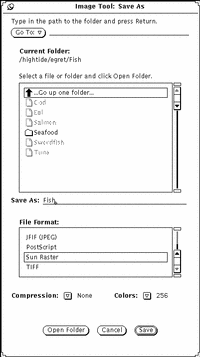
You can change the settings for:
Available compression methods depend upon selected format. Compression saves disk space.
Note -
The number of colors stored in GIF is at most 256. JFIF stores them in true color (millions).
Save As
To save a file or document as one of the available formats:
-
Choose File -> Save As.
-
Type a new name and extension for the file, if necessary.
-
Select a new file format.
Image Tool can save files in the following formats:
-
PostScript
-
EPSF
-
GIF
-
JFIF (JPEG)
-
Sun Raster
-
TIFF
-
-
Select a Compression method, if applicable.
The following compression methods are available:
-
None
-
UNIX --Standard UNIX file compression utility, available for (ESPF), PostScript, Sun Raster, and TIFF formats
-
Encoded run length--Available for Sun Raster
-
LZW--Available for TIFF files
-
JPEG--Available for JFIF files
Available compression methods depend upon selected format. Compression saves disk space.
-
-
Select a color attribute, if applicable.
Available color attributes are: Black and White, 256, Millions.
-
Select Save.
Save Selection As
Save Selection As is available once you have defined an area with the Selector tool on the palette. For information on using the palette, refer to "Using the Image Tool Palette". To save a portion of the image:
-
Open the image.
For information on opening an image, refer to "Opening Image Files and Documents".
-
Select a portion of the image to be saved.
For information on using the selector tool to select a portion of the image, refer to "Selecting An Area to Be Saved".
-
Select File -> Save Selection As.
Saving a selection is the same as using Save as. Refer to "Save As" for complete information.
Save Page As Image
You may want to save a single page from a multiple page document. To do this you need to:
-
Open the multiple page document.
Refer to "Opening Image Files and Documents", for complete information. Save Page as Image is only used for multiple page documents.
-
Navigate to the page to be saved.
For information on selecting a page, refer to "Viewing Multiple Page Documents".
-
Select File -> Save Page As Image.
Saving a single page of a multiple page document is exactly like any other type of save. Refer to "Save As" for complete information.
Printing Images
You can print your image without verifying the print settings or you can check or change settings before printing. Previewing images before printing them saves paper and trips to the printer. Especially if you have scaled an image to a larger size.
Printing with Current Settings
Select File Print One from the current file menu.
Image Tool uses Print Window settings to print one copy.
Previewing Before Printing
-
Choose Print Preview from the File menu.
The Print Preview window displays a reduced image with dotted lines representing page boundaries. The page boundaries are determined by the Page Size setting in the Printer window.
-
Click SELECT on Cancel or Print.
Cancel dismisses the window, and Print displays the Print window.
Printing after Checking or Changing Settings
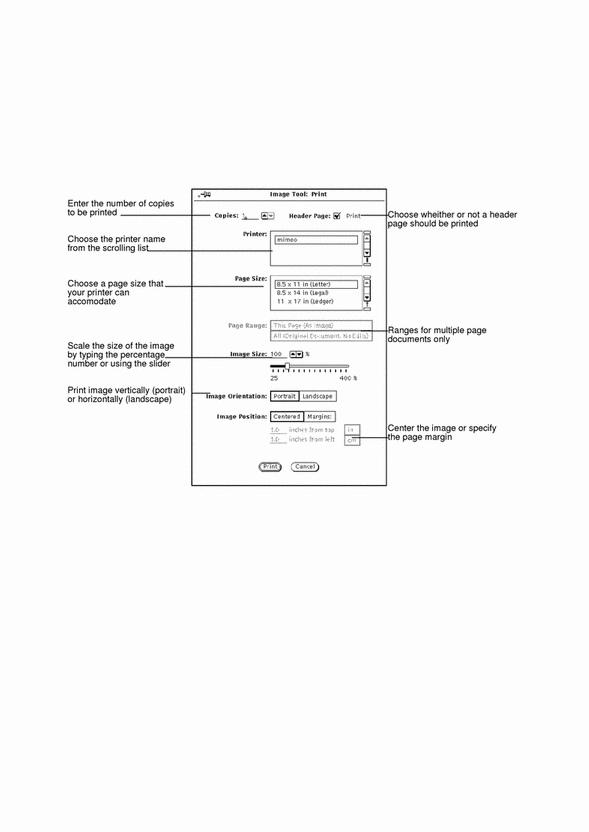
You can verify printer settings and start the printing job from the Print window.
-
Choose Print from the File menu, or click SELECT on Print in the Print Preview window.
The Print window, shown in Figure 13-6, is displayed.
Figure 13-6 Print Window
-
Change settings, if desired.
If you change Page Size, Image Size, Image Orientation, or Image Position, you may want to preview the image before printing.
-
Choose Print to start printing or Cancel to dismiss the window.
A very large raster image may be larger than a single sheet of paper. If so, the entire image is printed on multiple pages.
Note -PostScript pages are printed as bitmapped images (if printed on single pages).
Using the Image Tool Palette
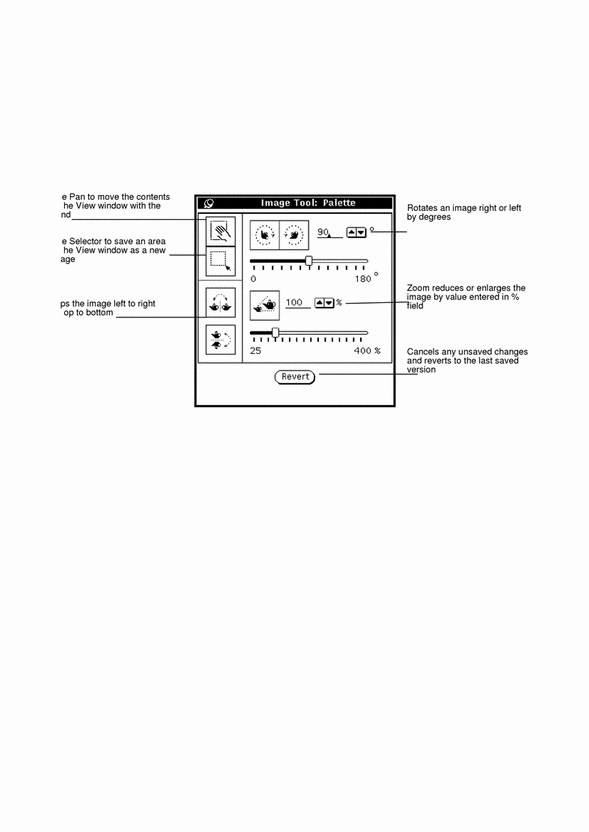
Image Tool's Palette, shown in Figure 13-7, is useful for simple changes to an image.
Figure 13-7 Image Tool Palette
-
Choose Palette from the Edit menu.
-
Modify the image.
You can modify the image by panning; using the selector; or by flipping, rotating or zooming it. Refer to "Panning an Image"; "Selecting An Area to Be Saved"; "Flipping an Image"; ""; or "".
Panning an Image
To move the image within the View window, choose the Pan tool. The pointer changes to a hand until you choose another action. Figure 13-7 shows the pan icon as a hand.
Selecting An Area to Be Saved
To select an area of an image to be saved:
-
Choose the Selector tool.
-
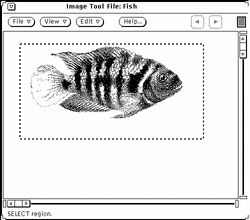
Outline the new view by pressing SELECT in one corner of the new view and dragging to the opposite corner.
-
Release SELECT.
You can save the selected view as a new image. Figure 13-8 shows the selector icon and selection made from the View window. For information on saving your file, refer to "Save As".
Figure 13-8 Selector icon and selected item

Flipping an Image
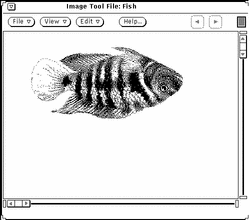
To display a mirror image, use the Flip tools. You can flip horizontally and vertically. Figure 13-9 shows the Flip icon and the result of flipping the image upside down.
Figure 13-9 Flip Icon and Flipped Image
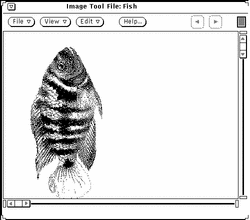
Rotating an Image
To rotate the image with the Rotate tool, first enter the number of degrees to be applied in the text field next to the buttons.
You can type the value, use the abbreviated menu buttons, or use the sliders. Figure 13-10, shows the rotate icon and an image that has been rotated 90 degrees.
Figure 13-10 Rotate Icon and Rotated Image
Zooming an Image
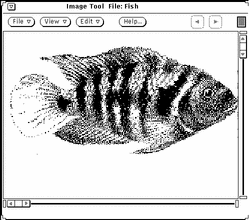
To change the size of the image with the Zoom tool, first enter a value in the text field next to the buttons.
You can type the value, use the abbreviated menu buttons, or use the sliders. Figure 13-11 shows the Zoom icon and an image that has been enlarged by 25%.
Figure 13-11 Zoom Icon and Enlarged Image
To cancel unsatisfactory changes:
-
For the most recent single change (panning, flipping, rotating, or zooming), choose Undo from the Edit menu.
-
For multiple changes, click SELECT on Revert. This restores the last saved version of the image.
Viewing Multiple Page Documents
When you open a multiple page document (such as a PostScript file), Image Tool offers several options to help you navigate the document. For example, once a multiple page document has been opened for viewing, the Page Up and Page Down buttons are enabled and you can use them to move through the document page by page.
Page Overview
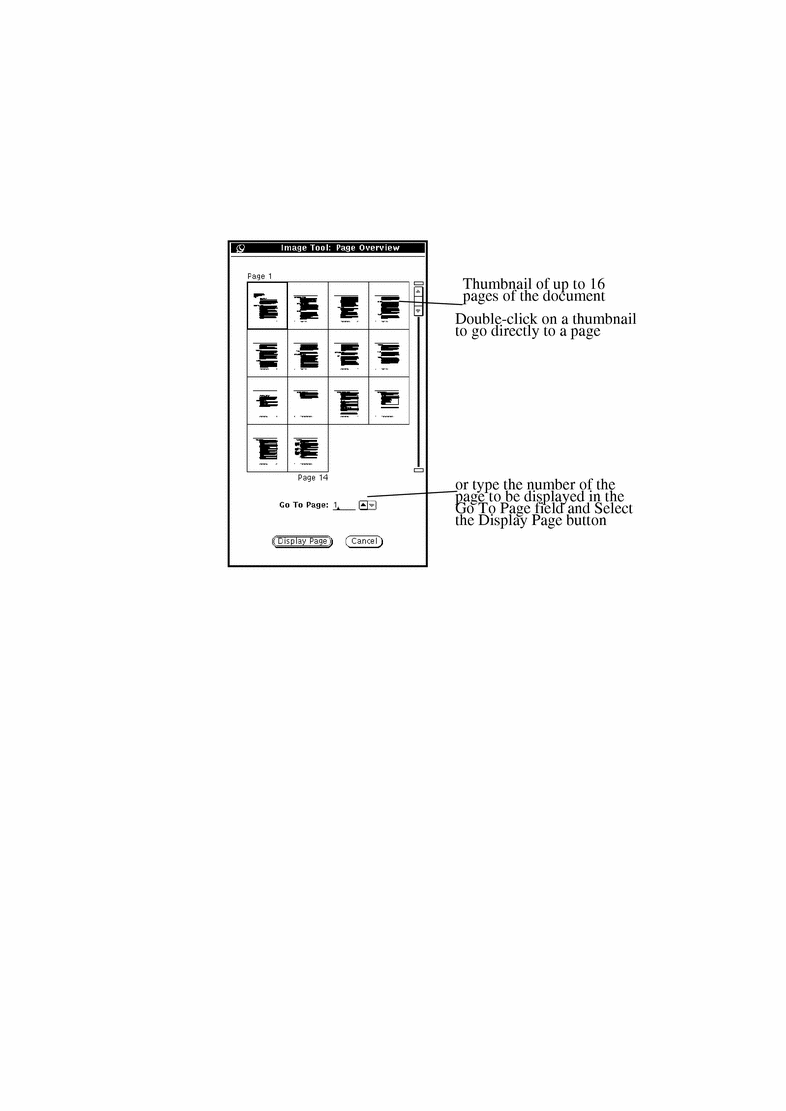
Use Page Overview to display a window with a scrollable list of thumbnail renderings of each page and controls for viewing specific pages. To open:
Select View -> Page Overview.
Figure 13-12 shows the Page Overview window.
Figure 13-12 Page Overview Window
Page Viewing Controls
Choose View -> Page Viewing Controls.
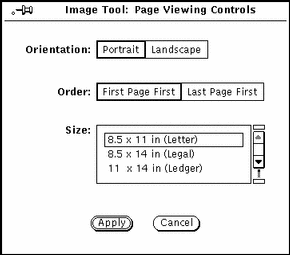
Use Page Viewing Controls to set the viewing orientation to portrait (vertical) or landscape (horizontal); page display order (first page first or last page first); and page size of a multiple page document.
The page size options are:
-
8.5x11(Letter)
-
8.5x14 (Legal)
-
11x14 (Ledger)
-
29.7x42cm (A3)
-
21x29.7cm (A4)
-
17.6x25cm (B5)
Figure 13-13 shows the Page Viewing Controls.
Figure 13-13 Page Viewing Controls
Setting Image Tool Properties
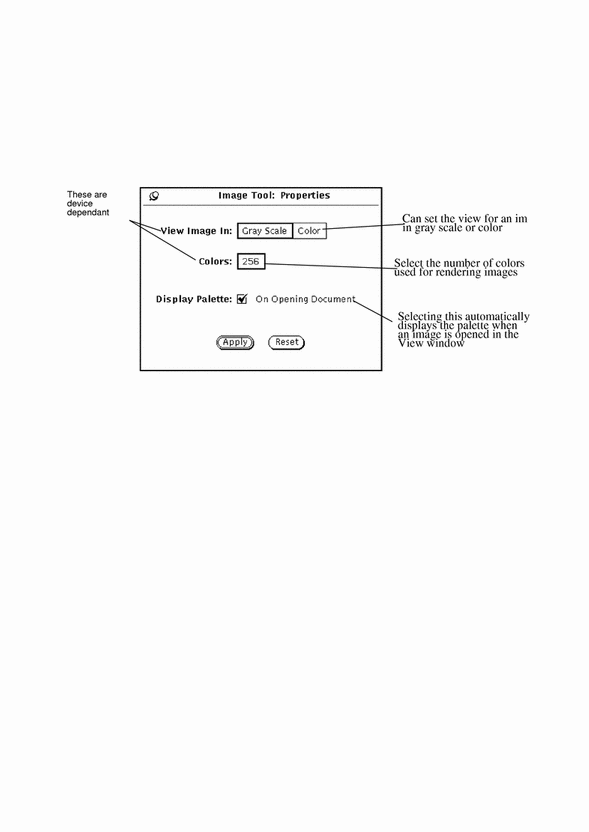
The Properties window lets you choose your preferences for display characteristics. Depending on the hardware capabilities of your display, the properties window may have different choices under View Image In.
-
Choose Properties from the Edit menu.
The Properties window, shown in Figure 13-14, is displayed.
Figure 13-14 Image Tool Properties Window
-
Change the settings, as desired.
The View Image In and Colors settings work together to produce an optimal display of color and color depth, based on your monitor's color capabilities.
-
Choose Apply to implement the new settings or Reset to discard the changes.
These changes take effect the next time Image Tool is started.
Status Messages, Error Messages and Help
The footer of the Image Tool base window displays two kinds of messages:
-
Status messages (on the right) describe multiple pages. For example, page 1 of 5.
-
Error messages (on the left). (Conditions that require decisions on your part are displayed in pop-up notices.)
-
You can get information on how to use Help from Chapter 1, Introduction to the Solaris User Environment. Magnify Help and the Help Button are also available to you.
Dragging and Dropping
You can drag files from the following tools and drop them onto Image Tool's drag and drop target:
-
File Manager
-
Mail Tool
-
Snapshot
If Image Tool is already open, dragging and dropping replaces any images already displayed. You can drag images from Image Tool and drop them onto the following tools:
-
File Manager
-
Mail Tool
-
Print Tool
For information on how to drag and drop, see Chapter 1, Introduction to the Solaris User Environment.
Image Tool Controls and Menus
The Image Tool control area has three menu buttons (File, View, and Edit) and a Help button. The Help button opens the On-Line Help Handbook for Image Tool. The File, View, and Edit menus are described in the following sections.
File Menu
The File menu contains items for opening, saving, and printing images. Image Tool conforms to standard file choosing methods. All items on the File menu, except Save and Print One, display pinnable pop-up windows. The choices you can make depend on the type of file you are working with--multiple page or single page images.
The functions of each item are:
-
Open displays a window from which you choose the file for the image you want to open.
-
Open As displays a window from which you choose the file and file format for the image you want to open.
-
Save displays a window from which you can save the currently displayed image to a file.
-
Save As displays a window from which you choose the type, format, folder, and name of a file for saving the currently displayed image. Use this option when you want to convert an image to a different file format and file type.
-
Save Selection As saves the selected area to a new image file. This option is active when an area of the View window has been selected with the Selector tool from the palette.
-
Save Page As Image displays a window from which you can save the currently displayed page of a multiple page document as a new image file.
-
Print One uses the current settings of the Print window to print a single copy of the currently displayed image or page.
-
Print Preview displays the Print Preview window that shows how the contents of the View window will appear when printed. The Print Preview window uses dotted lines to depict the boundaries of the printed page. You can control which area of the image gets printed by dragging the image within the dotted lines.
-
Print displays the Print window that contains these options for controlling how the contents of the View window are printed:
-
Copies (number of)
-
Header Page (whether one should be printed)
-
Printer (which device)
-
Page Size (Letter, Legal, Ledger, A3, A4, B5)
-
Page Range (for multiple page documents)
-
Image Size (scaling)
-
Image Orientation (Portrait or Landscape)
-
Image Position (centered or specify margins)
-
View Menu
The View menu contains image information, page overview and multiple page options.
The functions of each item are:
-
Image Info displays a window that contains the following information about the currently displayed image or page:
-
Height and Width
-
Number of colors (depth)
-
File size
-
File Format
-
-
Page Overview Available only for multiple page documents, this option displays a window with a scrollable list of thumbnail renderings of each page and controls for viewing specific pages.
-
Page Viewing Controls sets these viewing controls for multiple page documents:
-
Page orientation
-
Page display Order
-
Page size
Note -The page size setting affects only the view, not printing.
-
Edit Menu
The Edit menu contains the following items:
-
Undo undoes the last usage of these tools from the palette--Flip, Rotate, Pan, or Zoom.
-
Palette contains the Pan, Rotate, Selector, Flip, and Zoom.
-
Properties displays the Properties window where you can set--
-
If images are viewed in color or gray scale.
-
The number of colors used for rendering images.
-
If the palette is automatically displayed when an image is opened.
-
Some Standard Operations
The following chart summarizes standard Image Tool operations.
|
To: |
Do this: |
|---|---|
|
Open Image Tool from the workspace |
Choose Workspace Programs Image Tool. |
|
Open Image Tool from its icon |
Double-click SELECT on the Image Tool icon. |
|
Display an image |
Choose Open from the File menu. |
|
Save a raster image |
Choose Save from the File menu. |
|
Close the Image Tool window |
Click SELECT on the window menu button in the upper left corner. |
|
Quit from the Image Tool icon |
Press MENU on the icon, then choose Exit from the menu. |
|
Quit from the Image Tool window |
Press MENU on the window menu button in the upper left corner, then choose Exit from the menu. |
- © 2010, Oracle Corporation and/or its affiliates
