Printing Images
You can print your image without verifying the print settings or you can check or change settings before printing. Previewing images before printing them saves paper and trips to the printer. Especially if you have scaled an image to a larger size.
Printing with Current Settings
Select File Print One from the current file menu.
Image Tool uses Print Window settings to print one copy.
Previewing Before Printing
-
Choose Print Preview from the File menu.
The Print Preview window displays a reduced image with dotted lines representing page boundaries. The page boundaries are determined by the Page Size setting in the Printer window.
-
Click SELECT on Cancel or Print.
Cancel dismisses the window, and Print displays the Print window.
Printing after Checking or Changing Settings
You can verify printer settings and start the printing job from the Print window.
-
Choose Print from the File menu, or click SELECT on Print in the Print Preview window.
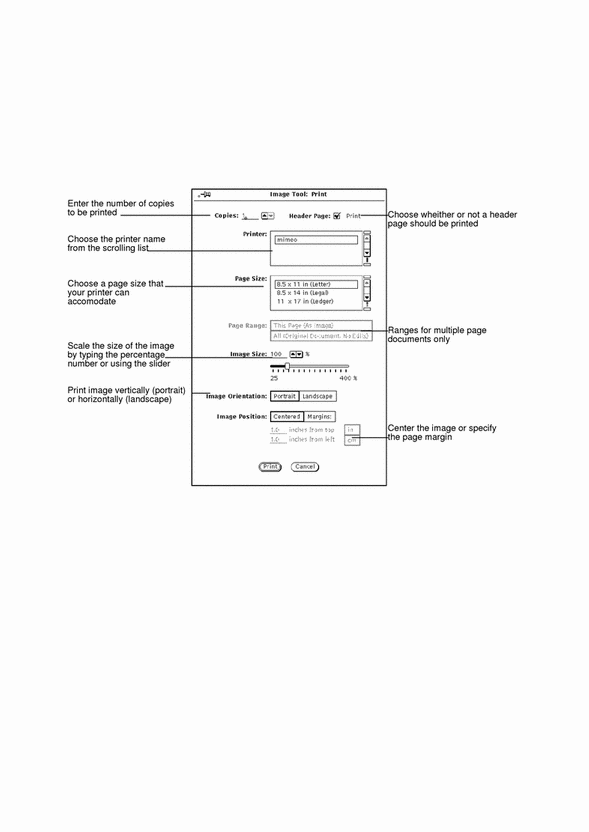
The Print window, shown in Figure 13-6, is displayed.
Figure 13-6 Print Window

-
Change settings, if desired.
If you change Page Size, Image Size, Image Orientation, or Image Position, you may want to preview the image before printing.
-
Choose Print to start printing or Cancel to dismiss the window.
A very large raster image may be larger than a single sheet of paper. If so, the entire image is printed on multiple pages.
Note -PostScript pages are printed as bitmapped images (if printed on single pages).
- © 2010, Oracle Corporation and/or its affiliates
