Chapter 2 File Manager
File Manager provides a graphical display of the UNIX file system, using icons that represent directories (folders), files (documents), and applications.
You can use File Manager to find, copy, move, open, close, delete, undelete, create, and print files. You can start applications from File Manager, and reorganize your file system by moving or copying files between folders. You can also use File Manager to link files and to transfer files to other machines.
In addition, the icons representing individual parts of the file system can be dragged out of the File Manager window onto the workspace or onto other DeskSet application icons or windows.
Note -
Solaris supports SPARC, x86, and PowerPC-based machines, whose keyboards differ. Consequently, some keyboard equivalents of commands found in OpenWindows menus differ, according to keyboard.
For most keyboard equivalents, Solaris supports a Meta key combination that can be used on both platforms. See Chapter 1, Introduction to the Solaris User Environment for a list of command functions and their various keyboard equivalents.
File Manager Icon
The primary icon for File Manager looks like a file folder. The name of the current directory is displayed beneath the folder, as shown in "File Manager Base Windows".
Figure 2-1 File Manager Icon
File Manager Base Windows
The primary File Manager base window displays your file system and allows you to manipulate it. The secondary base window is a Wastebasket that you can use to remove files from your file system. When you start File Manager, the Wastebasket window is normally started and displayed as an icon. The Wastebasket is described in the section "Using the Wastebasket".
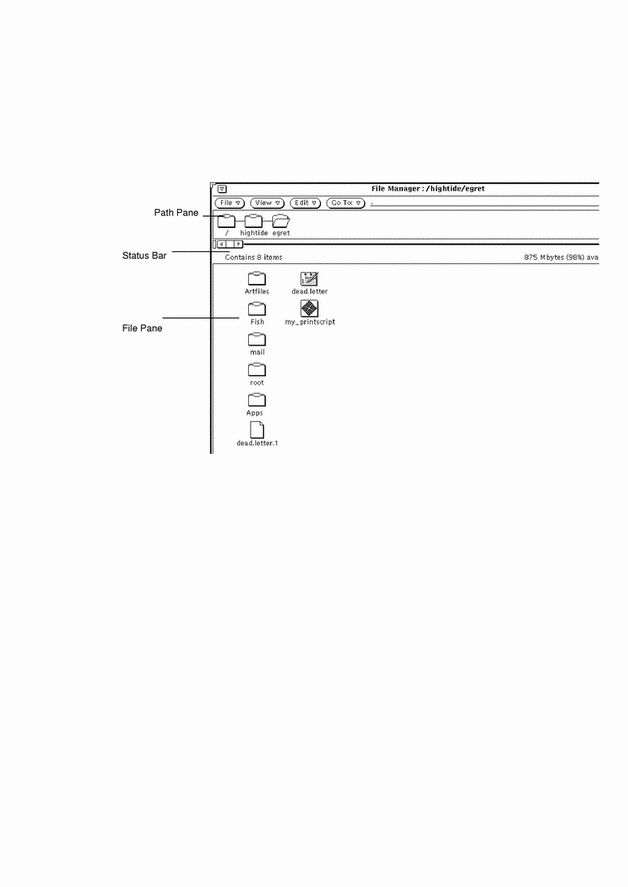
The primary File Manager window, shown in Figure 2-2, provides a set of controls that you can use to manipulate your file system. The window has a path pane that displays the file system hierarchy and a scrollable file pane that displays the contents of the open folder in the path. You can open many windows from within File Manager, and File Manager works the same way within each window.
Figure 2-2 Primary File Manager Window
File Manager File Icons
The files in your file system, by default, are represented by three kinds of icons, which are similar to application icons on the workspace. Directories are displayed as folders. Files such as documents, graphic files, and spreadsheet files are displayed as dog-eared sheets of paper. Executable files (applications) are displayed as an application icon. Figure 2-3 shows these three file type icons.
Figure 2-3 Three Types of File Icons

File Manager checks the Binder database for information bound to each file being operated on. Every file displayed can have its own file type. Each file type can have its own icon, open method, and print method stored in the Binder database. When File Manager displays a folder, it gets the information from the Binder database on how to display and operate on each file.
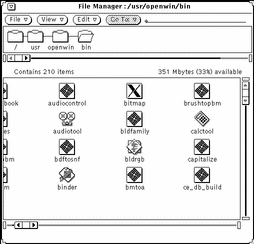
When a file is not bound to a specific icon, its generic icon is displayed. In the example shown in Figure 2-4, the files are bound to different application types.
Figure 2-4 Data File Icons that also Show the Application Type
You can create your own images for files using the Icon Editor, and bind them to the File Manager data file icons using the Binder. See the chapters Chapter 15, Icon Editor and Chapter 16, Binder for more information.
Selecting File Manager Icons
In order to operate on File Manager icons, you first need to select them.
You select a File Manager folder icon in the path pane by moving the pointer onto it and clicking SELECT.
You select a single icon or group of icons in the file pane by clicking SELECT on the first icon and clicking ADJUST on each additional icon that you want to include in a group. Selected icons are highlighted. Exclude an icon by clicking ADJUST on an icon that is already selected.
You can select an adjacent group of icons by pressing SELECT to define one corner of a rectangle surrounding the group of files, dragging the pointer to the opposite corner, and releasing SELECT. You can select an additional group of icons using the same method with the ADJUST mouse button.
Double-Click Accelerators
You can double-click SELECT on any individual icon to open it. Double-clicking SELECT on any folder in the path pane or the file pane opens it and displays its contents in the file pane. Double-clicking SELECT on a data file starts the application for that data file and usually displays its data. Double-clicking SELECT on an application icon starts the application.
Panning Through the Tree and File Panes
A feature provided by File Manager is the ability to pan through file panes. This lets you scroll through the panes without using the scrollbars. Panning is like "gluing" the contents of a pane to the current pointer, so that when you move the pointer, the entire contents of the pane moves with it.
Note -
On x86 and PowerPC machines, Meta is Ctrl-Alt.
You initiate panning by following these steps:
-
Move the pointer to the place where you want to start panning.
-
Press the Meta key on the keyboard, and then press SELECT.
When the pointer changes to the panning pointer (a curved arrow pointing down), release the Meta key.
-
Drag the pointer to a new location within the pane, and release SELECT.
The contents of the pane move along with the pointer. Repeat these steps if necessary to reach the desired location.
Control Area Menus
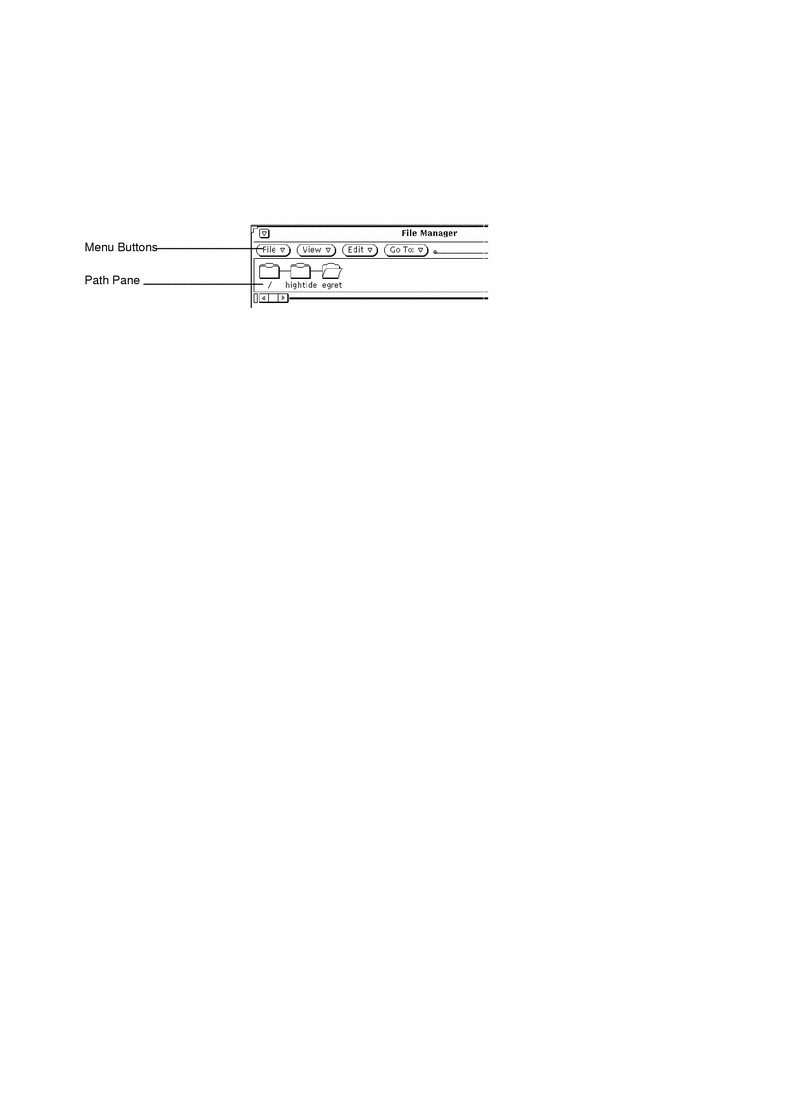
The control area has four menu buttons: File, View, Edit, and Go To; Go To has a text field. This section shows each of these controls and provides a brief introduction to each of the items. Figure 2-5 shows the menu buttons within the File Manager control area.
Figure 2-5 File Manager Control Area Menu Buttons
File Menu
The File menu provides choices that you can use to perform filing functions.
-
Use Open to open selected folders and files. Open is inactive unless you have made a selection in the file pane or path pane.
-
Use Open in Editor to open the file in the Text Editor.
-
Use Create Document to create a new document.
-
Use Duplicate to create another version of the selected item(s).
-
Use Print One to print your selection to your default printer. Print is inactive unless you have made a selection in the file pane.
-
Use Print to print selected files using your own print method and specified printer. You can select the number of copies to print. Print is inactive unless you have made a selection in the file pane.
-
Use Find to display a pop-up window that you can use to find files. See "Using the Find Pop-up Window" for more information.
-
Use Information to find out information about your file. See "File and Folder Information" for more information.
-
Use Remote Copy to open a pop-up window for remote transfers. See "Transferring Files From Your System to Another" for more information.
-
Use Custom Commands to run your own customized commands, or to pop-up a UNIX shell that you use like any other Shell Tool. See "Customizing Your File Manager" for information.
-
Use Check for Floppy to bring up window, if floppy has been inserted.
-
Use Quit File Manager to quit the File Manager. This does preserve the way you had your icons set up in the window.
Note -The following two items are only visible if you are using a floppy disk.
-
Use Format Floppy to format a floppy in your disk drive. For more information, see "Using Floppy and CD Media".
-
Use Rename Floppy to rename the floppy inserted into your disk drive. For more information, see "Renaming a Floppy Disk".
View Menu
From the Base Window, the View button has a menu with choices for different ways to view the file system. These are Open Folder View, Large Icon View, Small Icon View, Icon By Name, Icon By Type, List by Name, List by Type, List by Size, List by Date, and Cleanup Selection. Refer to "Folder View " for information on the Folder View. Otherwise, use these display options to choose how the contents of the file pane are displayed and sorted:
-
Use Large Icon View for viewing icons at regular size. You can move these icons around in the file pane.
-
Use Small Icon View for viewing icons at reduced size. You can move these icons around in the file pane.
-
Use Icon by Name to sort the large icons alphabetically by name.
-
Use Icon by Type to sort the icons in alphabetical groups by file type, with folders first, followed by files, then by applications.
-
As a listing, to show you more information about each individual file.
-
Use List by Name to sort the files alphabetically.
-
Use List by Type to sort the files in alphabetical groups by file type, with folders first, followed by files, then by applications.
-
Use List by Size to sort the files by size, largest to smallest.
-
Use List by Date to sort the files from newest to oldest.
-
-
Use Cleanup Icons for putting all icon(s) in order to the nearest grid point. If icon(s) are selected, use Cleanup Selection for putting selections in order to nearest grid point. Each grid point is determined by the width of the largest name.
Edit Menu
Edit has a menu with options for editing.
-
Use Cut to remove selected icons from a folder and place them on the clipboard. Cut is inactive unless you have made a selection in the File pane.
-
Use Copy to put a copy of selected icons on the clipboard. Copy is inactive unless you have made a selection in the File pane.
-
Use Link to link files together. See "Linking Files".
-
Use Paste to paste the contents of the clipboard at the next available grid point in File Manager. Paste is inactive unless something is on the clipboard.
-
Use Delete/Destroy to remove selected file names from a folder, and place them in the Wastebasket or really delete them, depending on the File Manager Properties setting. See "Using the Wastebasket" for information about the Wastebasket.
-
Use Properties to customize your File Manager. See "Customizing Your File Manager" for information.
Go To Menu and Text Field
The Go To menu has choices (that can be set by you in properties) that allow you to quickly go back to your home directory or to other directories that you have recently accessed. You can also type the path name of a folder you want to go to in the Go To text field. See "Using the Go To Text Field and Menu" for more information.
Folder View
Use Folder View to look at your folder hierarchy. The Folder View opens a separate window that displays only folders and shows how folders are stored in the hierarchy. You can open each of your folders into a separate window by selecting the folder and:
Selecting View->Open Folder View.
Figure 2-6 shows a Folder View.
Figure 2-6 Opening the Folder View
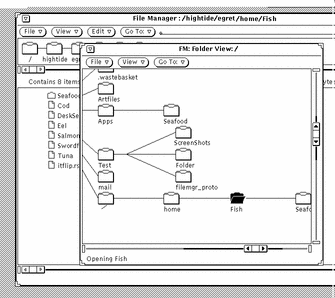
The hierarchical Folder View (tree structure) is another way of showing the UNIX file system. The analogy between the parts of a tree and the parts of the file system is often used when describing the UNIX file system. The Folder View can show all parts of the file system. Alternatively, you can use the Folder View to start at any directory or folder in the file system.
Root is the top directory in the file system. Under the root are various branches. For example, Figure 2-7 shows root and the branches that start with the directories /,home.
Along with the tree analogy, there is a parent/child analogy. The root directory is the parent directory. A subdirectory is also a parent directory when there are one or more subdirectories below it. Each subdirectory is a child of the parent directory that is above it.
The File menu from the Folder View has the following options: Open (Opens the children of the selected folder), Open Folder Window (Brings up the File Manager folder pane), Find, Information, Remote Copy, and Custom Commands.
The View menu from the Folder View has the following options:
-
Use Show Horizontal/Vertical to change the view orientation from horizontal to vertical or visa versa.
-
Use Show All Sub Folders to show all folders below the selected folder.
-
Use Hide Sub Folders to "hide" all sub folders below the selection.
-
Use Start Folder View Here to begin showing the folder view from the selected folder.
-
Use Add Parent the parent of the folder selected folder.
Go To can be used the same way as described in "Go To Menu and Text Field".
Folder View Options
The Folder View contains commands that you can use to "prune" the Folder (or tree) view so that it contains branches of the tree that are useful to you and hides other folders that you may not need to access.
If you frequently move or copy files between folders, you may find that using the Folder View allows you to perform more operations using drag and drop, since more folders can be displayed in the Folder View.
When you open the Folder View window, you can choose the following options:
-
Subfolders are folders that are farther down the tree than the current folder. Figure 2-7 shows a Folder View that contains most of the folders from the root directory downward.
Figure 2-7 Example of a Folder View
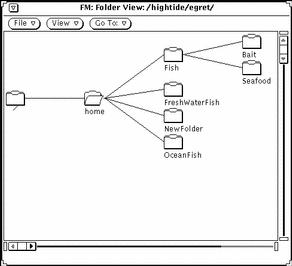
The following examples show a series of progressions, using each of the view modification commands from the Folder View.
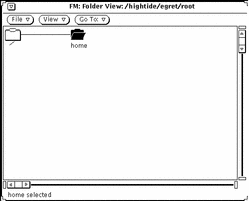
Clicking SELECT on the home folder and choosing Hide Subfolders from the Folder View results in the display shown in Figure 2-8. Compare that display with the one shown in Figure 2-7.
Figure 2-8 Example of Hiding Subfolders
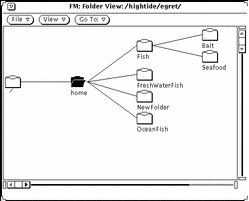
Choosing Show Subfolders from the (Folder View) View menu produces the display shown in Figure 2-9.
Figure 2-9 Example of Showing Subfolders
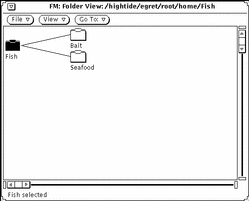
With the fish folder selected, choosing Begin Tree Here from the View menu changes the display as shown in Figure 2-10.
Figure 2-10 Example of Changing the Beginning Point of a Folder View
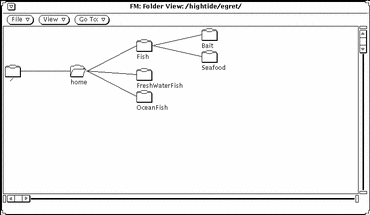
Choosing Add Tree's Parent from the Folder View adds one folder farther up the path, and its subfolders, as shown in Figure 2-11.
Figure 2-11 Example of Adding a Parent Folder
Path Pane
The path pane shows your current location in your file system.
Parts of the Path and Folder View
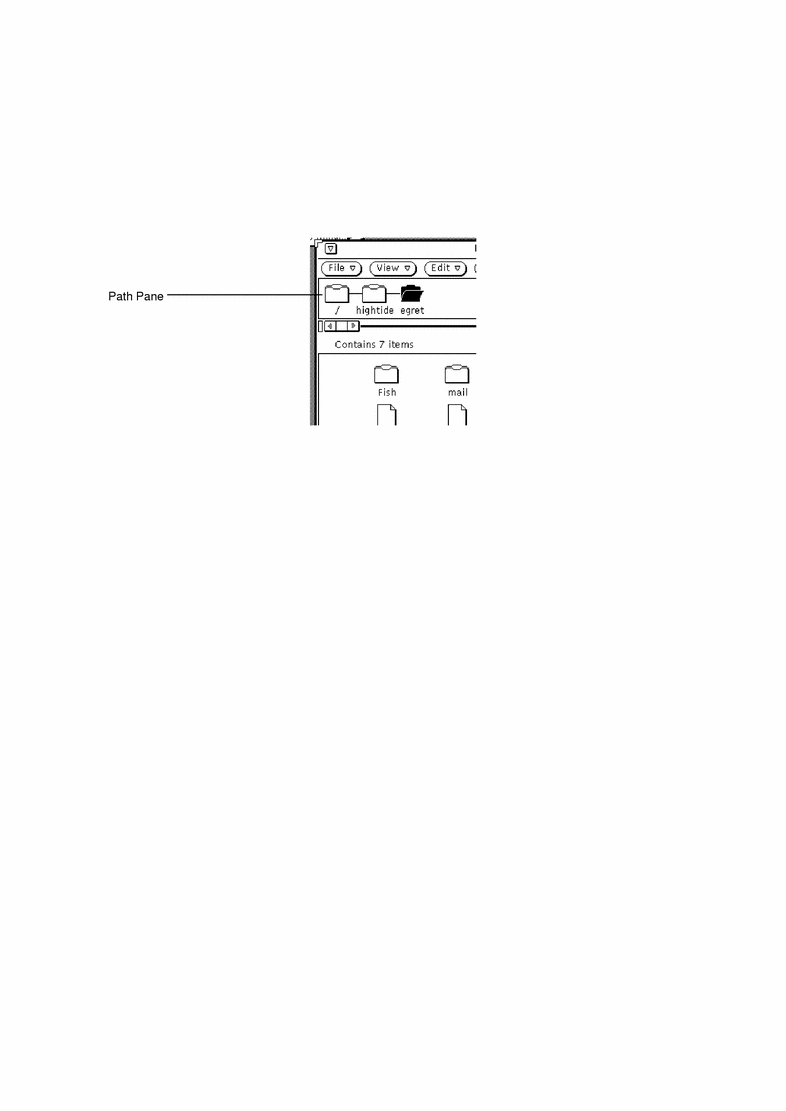
The path displayed in the File Manager window shows only the folders for the directory and subdirectories that lead to the current folder, which is the folder that is open. Any folders below it in the tree are subfolders. An example of a path is given in the window in Figure 2-12, which shows the path for /root/hightide/egret.
Figure 2-12 A home Directory in the Path Pane
Path that is Displayed
When you start File Manager for the first time, it displays the path of the directory from which you started it. The next time you start File Manager, it remembers your last location before quitting, and you see the things the way you left them. If you choose File Manager from the Programs submenu, it displays the path for your home directory. The last folder in the chain is open, and its contents are displayed in the file pane, as shown in Figure 2-12.
Use the Open Folder item on the Path pane pop-up menu to open a selected folder.
Display the Path pane pop-up menu by moving the pointer on the background of the Path pane and pressing MENU.
Once a folder has been selected in the Path Pane, all of the Base window commands are available to you except the following: Duplicate, Print One, Print, Format Disk, Rename Disk.
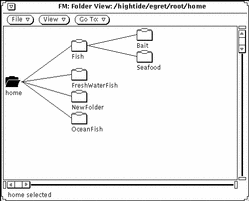
Figure 2-13 Example of a Horizontal Folder View (Tree Structure)
As you move around from folder to folder by double-clicking SELECT to open each one, Folder View expands to show subfolders and rearranges the other branches of the file system tree.
After you open a folder, an open folder icon indicates that the folder has been opened. For example, in Figure 2-13, the folder labelled home has been opened.
You can expand or reduce the number of folders in the Folder View by choosing View items from the Folder View menu: You can toggle between showing Horizontal and Vertical views, Show All Sub Folders, Hide Sub Folders, Start Folder View, and Add (the folder's) Parent. Once you have chosen one of these items from the menu, File Manager remembers it. When you choose Folder View again, the view displayed is the last format that you chose for the Folder View. See "Customizing Your File Manager" for examples of these other kinds of displays.
File Pane
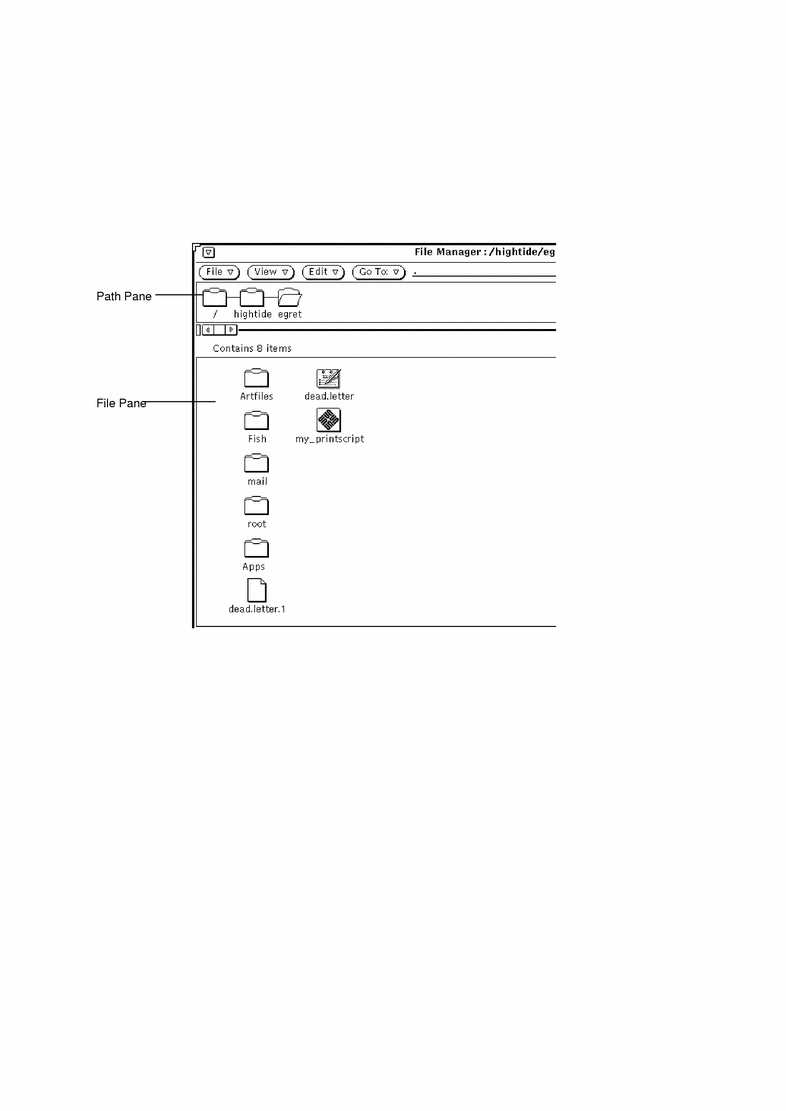
The file pane displays the contents of the open folder in the path pane. When you first start File Manager, the file pane displays icons with names beneath them, as shown in Figure 2-14.
Figure 2-14 Icons in the File Pane
File Pane Pop-up Menu
To use the File Pane pop-up menu:
Press MENU from within the File Pane.
Depending on whether you have a folder or file selected, all or some of the following options are available from this menu: Select All, Cut, Copy, Link, Paste, Delete, Print One, Print, Cleanup (Selection). For information on Cut, Copy, Paste and Delete refer to "File Menu". For information on Link, refer to "Linking Files". For information on Cleanup Selection, refer to "View Menu".
Alternative Display Options
You can change the way icons are displayed in the file pane by choosing options from the View menu and you can change the default displays from the Properties window. See "Current Folder Settings" or "New Folder Defaults" for more information.
Large Icon View
Choosing Large Icon View from the View menu displays a list of standard-size icons with the name of the icon centered below it as shown in Figure 2-14. When application images are specified by the Binder, those images are displayed. You can move these icons around.
Note -
Sorting large icons looses all position information for the large icon view.
Small Icon View
Choosing Small Icon View from the View menu displays a list of small sized icons with a name centered below it. The small icon show you whether each file is a folder, data file, or an executable program file. The small icons are shown in Figure 2-15.
Figure 2-15 File Manager List Display Small
Note -
Small icons do not display custom icon images for files (as displayed in the Icon View modes).
Icon By Name
Choose Icon By Name if you want to view your icons as large icons ordered alphabetically.
Icon By Type
Choose Icon By Type if you have several different types of icons in one folder. The order of icons listed is folder, file (or document), and application or program.
List By Name
Choosing the List By Name option shows a list of icons and file names, as shown in Figure 2-16. You can select and operate on small icons in the same way as for standard-sized icons. These are listed as one entry per line. The default is icon, name, size, and date.
Figure 2-16 Example of a List Display
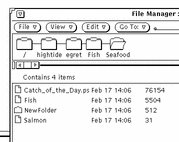
When using the View menu, you can choose to display additional information about each file such as the Date, Size, Owner, Group, Links, and Permissions. When displaying any of these file attributes, the display changes to show one item per line. For complete information on file information (or properties), refer to "File and Folder Information". You choose the information to display by changing the default settings from the Customize View window. See "New Folder Defaults" or "Current Folder Settings" for more information.
List By Size
Choose List By Size if you want to view your files from the largest file (in KB) to the smallest file.
List By Date
Choose List By Date if you want to view your files from the newest (date last modified) to the oldest date.
Opening Files
When you select and open a data file, the appropriate application is started and the data of the opened file is displayed in the application's window. When you select and open an application or executable file, the application is started. Executable shell scripts display a Notice asking you if you want to start the script in a Shell Tool. You can change your properties to have your folders open into the same window or separate windows. For complete information on this refer to "General Defaults".
From the file pane, you can open folders, files, and applications in the following ways:
-
Dragging and dropping selected folders onto the workspace.
-
Dragging and dropping selected files or applications onto the workspace, then using the menu or double-clicking SELECT on the icon or open window.
-
Choose File->Open or double-click SELECT on a data file or application icon.
Note -
When you open a file or an application from File Manager, you cannot close or quit it by dragging it back onto File Manager. You quit any window or icon on the workspace by choosing Quit from the Window menu.
Creating New Files and Folders
You can create new files and folders in the file pane, which puts them in the folder where they are created.
To create a new file or folder, follow the steps below:
-
Check to be sure you are in the folder where you want to create the new file or folder.
If necessary, select another folder and click Open.
-
Choose either Create Document or Create Folder from the File menu.
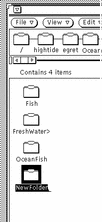
An empty file called NewDocument (for a file) or NewFolder (for a folder) is created in the file pane. Subsequent new documents or folders are numbered in sequence. For example, if you create a file called NewDocument and a file with this name already exists, the new file will be called NewDocument.1. The next new document will be called NewDocument.2, and so forth. The name of the new document or folder is highlighted and underlined when it is first displayed, which means it is ready to be renamed. Figure 2-17 shows a new folder in the file pane.
Figure 2-17 New Folder in the File Pane
Naming a Document or Folder
When the name of a file or folder is highlighted and underlined, the name is an editable text field. You can change the name of any folder or file by clicking SELECT on its name to select it and display an editable text field. You can edit the contents of this text field in the same way you edit any other text field. When you have changed the file name, press Return or click SELECT on the background of the file pane. You can also change the name of a file using the Information popup window. See "File and Folder Information" for more information.
Moving and Copying Files
You can move and copy icons that are displayed in the File pane using cut, copy, paste, choosing Duplicate from the File menu, or using the drag and drop operation.
Using Cut, Copy, Paste
You can move or copy files within File Manager using the Cut/Copy/Paste commands. Cut/Copy/Paste commands are provided on the Edit menu, the File Pane pop-up menu, and as function keys on the keyboard. Some keyboards will have Cut, Copy, and Paste keys; otherwise, you can use the keyboard equivalents described in Chapter 1, Introduction to the Solaris User Environment.
When you cut material, it is not deleted. It is put on a clipboard, where it is stored temporarily. Only one item or group of items is stored on the clipboard at a time.
Note -
If you do another cut without using what is on the clipboard, the previous information is lost.
Moving or Copying Files and Folders Using Cut and Paste
To move or copy folders and files using the clipboard, follow these steps:
-
Select the file or files you want to copy or move.
The icon is selected. If you want to move a group of files or folders, click ADJUST on individual icons to add them to the group. If the icon is already selected, clicking ADJUST deselects it, removing it from the group.
-
Choose Cut or Copy from the Edit menu.
Use Cut, or Copy to copy a file. The file or files are moved or copied to the clipboard.
If your keyboard has Cut and Copy keys, you can use them, or Meta-x (Cut) and Meta-c (Copy). (On x86 and PowerPC systems, Meta is Control-Alt.)
An instruction message is displayed in the footer, as shown in Figure 2-18.
Figure 2-18 Messages when Files are Cut to the Clipboard

-
Open the folder you want to receive the files.
-
Choose Paste from the Edit menu or the File Pane pop-up menu.
If your keyboard has a Paste key, you can use that. You may also use Meta-v. (On x86 and PowerPC systems, Meta is Control-Alt.)
Using Drag and Drop in File Manager
You can use the drag and drop operation to copy and move files from the Folder View, path pane, or file pane to the following destinations:
-
Any icon onto any folder icon in pathpane, file pane, or folder view
-
Onto the background of any open File Manager file pane
-
Onto the Wastebasket icon or window
-
Onto the any folder icon on the workspace
You can use drag and drop between tools such as:
-
Onto the Mail Tool Compose icon or window (attachment pane)
-
Onto the Text Editor icon, text pane, or drop target
-
Onto the icon or drop target of Print Tool, Tape Tool, Icon Editor, Snapshot, Audio Tool, or any other application supporting the drag and drop.
Moving or Copying Files and Folders Using Drag and Drop
To move or copy a file or folder into another folder within File Manager when both the source and destination icons are visible, follow these steps:
-
Select the file or folders that you want to move or copy.
-
To move, press SELECT on a selected file and drag the pointer onto the destination folder. To copy, press the Control key together with SELECT on a selected file, and drag the pointer onto the destination folder.
The tip of the arrow defines the destination of the move operation.
-
Release SELECT.
The file or folder is moved or copied to the new folder.
Dragging and Dropping a Document Icon onto the Workspace
You can drag and drop data file icons from File Manager onto the Workspace. When you drop the icon onto the workspace, it starts the appropriate application, and opens the file.
Dragging and Dropping a Folder onto the Workspace
You can drag and drop individual folders from File Manager onto the Workspace. When you drop the folder onto the workspace, it is opened, and the contents of the folder are displayed in a new window. If you switch frequently between directories, you can use this feature to display the contents of more than one folder at a time.
To drag and drop a folder onto the workspace, follow these steps:
-
Click SELECT on a folder to select it.
-
Press SELECT and drag the folder onto the workspace background.
-
Release SELECT.
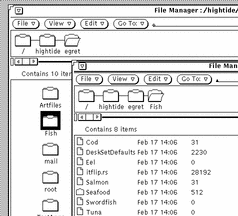
The window is opened, and the contents displayed, as shown in the example in Figure 2-19.
Figure 2-19 Folder Opened into a new File Manager Window
-
Close folder to an icon on the WorkSpace.
Dragging and Dropping Between Tools
You can use drag and drop in the following ways between tools.
Dragging and Dropping a File onto another Application
You can drag and drop a file onto another application outside of File Manager, regardless of whether the application is displayed as an icon or as an open window. If you drop a file with an inappropriate format onto a window or icon, the move or copy is not performed.
When you drop a file onto the drag and drop target or icon of an application, the file is loaded into the application. Follow these steps to load a file into another application:
-
In File Manager, click SELECT on the file icon that you want to load.
-
Drag the file onto the application icon or drag and drop target, and release SELECT.
The file is loaded into the application. Note that when you drag and drop a file to an application outside of File Manager, the file is always copied. The original file remains in File Manager. For example, if you move a file from File Manager to Print Tool, the original file is not deleted after it is printed.
If the application cannot accept the file format, the file is not loaded. When you drop an icon of an incompatible file type onto an open window, or when you drop an icon onto an inappropriate location, an error message is displayed in the footer of the destination window.
Dragging and Dropping Mail onto File Manager
When you receive a mail message, you can drag and drop individual mail attachments onto File Manager, or you can drag and drop the entire mail message onto File Manager. See "Mail Tool Attachments" for information about mail attachments.
Copying Mail Attachments onto File Manager
When you receive a mail message that contains attachments, you can access the attachments by dragging and dropping any or all of them onto File Manager. The attachment files are then available for you to use just like any other File Manager file. You can drag and drop the attachments onto File Manager using the following steps:
-
Open both File Manager and Mail Tool.
-
Open the folder window in File Manager where you want to put the attachment(s).
-
In the Mail Tool application, click SELECT on the attachment that you want to move or copy. Click ADJUST on any additional attachments that you want to include.
-
Press SELECT and drag the pointer.
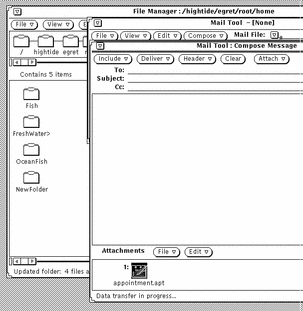
A small glyph of the type of file being moved is displayed, as shown in Figure 2-20.
Figure 2-20 Dragging a Mail Attachment onto File Manager
-
Drag the pointer onto the File Manager file pane and release SELECT.
The attachment appears in File Manager with its original name and data type.
Copying Entire Mail Messages onto File Manager
You can copy an entire mail message to File Manager, including all attachments. The message and attachments are then combined into one file. If you drag and drop a mail message onto File Manager that doesn't have any attachments, the message is saved as a simple text file. To copy an entire mail message to File Manager, follow these steps:
-
Open both File Manager and Mail Tool.
-
Open the folder window in File Manager where you want to put the mail message(s).
-
In the Mail Tool application, click SELECT on the header of the mail message to be copied or moved.
-
Press SELECT and drag the pointer.
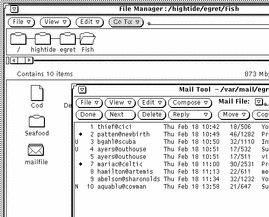
A small mail file icon is displayed, as shown in Figure 2-21. You can release the Control key any time after the envelope is displayed.
Figure 2-21 Dragging a Mail Message onto File Manager
-
Drag the pointer onto the File Manager file pane and release SELECT.
The first time you drag a mail message onto File Manager, the mail message appears in File Manager as a file called mailfile. If that file already exists, the mail message appears as mailfile0. If mailfile and mailfile0 already exist, the file is named mailfile1, and so forth.
You can also drag and drop a mail message onto a mail file icon in File Manager to append the new message to an existing mail file.
Transferring Files From Your System to Another
To transfer files from your system to another system, follow these steps:
-
Display the Remote Copy popup by choosing Remote Copy from the File menu.
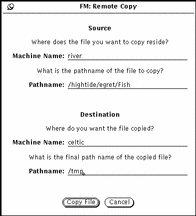
If you have selected files, your host name (workstation or machine name) is displayed in the Source Machine Name text field, and the file names are displayed in the Pathname text field, as shown in Figure 2-22.
Figure 2-22 Remote Copy Pop-up Window
-
Type the destination machine name in the Machine Name text field under Destination.
-
Type the pathname in the Path Name text field under Destination.
-
Click SELECT on Copy File to initiate the transfer.
While the transfer is in process, the Copy button displays the standard busy pattern.
To transfer files from another system to your system, you must know the path and file name of the files you want to transfer. To transfer a file from a remote machine to your machine, follow these steps:
-
Type the name of the remote machine in the Source Machine text field.
-
Type the full path and file name of the file you want to transfer under Source in the Path Name text field.
-
Leave the Destination text fields blank, or type your machine name.
-
Type the path and file name for the file under Destination in the Path Name text field.
-
Click SELECT Copy File to start the transfer.
The Copy button is dimmed until the transfer is complete. If there are problems with the transfer, error messages will appear in the footer of the current File Manager window.
-
Click SELECT on the Copy button to start the transfer.
The Copy button is dimmed until the transfer is complete. If there are problems with the transfer, error messages appear in a pop-up window that explains the problem.
Printing Files
You can print files from File Manager in three ways:
-
Select files in the file pane and drag and drop them onto the Print Tool application. Files are printed using the default print instructions bound to the icon in the Binder database. See Chapter 10, Print Tool for more information about using the Print Tool and Chapter 16, Binder for information about print bindings.
-
Select files in the file pane and choose Print (or Print One) from the File menu or the File Pane pop-up menu. The Print (or Print One) item is inactive unless files are selected. Print One prints files using the print method in the Binder database, if it exists. Otherwise, Print prints files using the default print method from the File Manager Properties window. See "Customizing Your File Manager" for information about tool properties and the chapter Chapter 16, Binder for information about print bindings.
-
Highlight the Print (or Print One) item from the File menu or the File Pane pop-up menu, drag right to display the Print submenu, and choose Print to display the Print Options window. This is useful when you want to print a file using a method other than the default print method, or if you want to print a file to a different printer. Figure 2-23 shows the Print window with an alternate printer specified in the text field. Specify $FILE where you want the file name to be in your print script.
Figure 2-23 Print Popup Window

Finding Files and Folders
File Manager provides three ways to locate folders and files:
-
Go To text field and button
-
Pattern matching with a string typed in the File Pane
-
Find pop-up window
This section describes how to use these methods to find folders and files.
Using the Go To Text Field and Menu
The Go To menu includes a list of the folders that you have accessed since you started File Manager. Your home folder is the default item on this menu. The rest of the items on the menu show (a default of) ten of your most recently accessed folders. You can make the amount of items greater or smaller. You can change back to any of these folders by choosing the path to the folder from the Go To menu. You can also add your own items to the menu. For information on how to make these changes, refer to "Go To Menu Defaults".
When you know the path of the folder you want to open or the path and file name of a file that you want to select, you can type the path or the path and file name in the Go To text field. Then either press Return or SELECT the Go To button.
When a path is typed, the folder specified is opened and its contents are displayed in the file pane. When a path and file name are typed, the specified folder is opened, its contents are displayed in the file pane, and the file is located, scrolled into view, and selected.
Using Pattern Matching to Find Files
You can use wildcard characters to select groups of related files in the currently displayed file pane by typing a pattern-matching sequence in the Go To text field or with the pointer anywhere in the File Pane.
Pattern Matching in the Go To Text Field
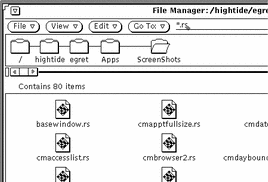
The star symbol (*) can be used to match any string, so typing *.rs in the Go To text field and either pressing Return or clicking SELECT on the Go To button will select all files ending in .rs.Figure 2-24 shows an example of a file pane with all *.rs files.
Figure 2-24 Using Pattern Matching with Go To to Select Related Files
Pattern Matching in the File Pane
You can also use pattern matching to find files by moving the pointer into the File Pane and typing the pattern that you want to match.
The pattern you type is displayed in the footer. As the pattern is typed, all the files starting with the current pattern are selected. For example, when you type c, the pattern is c*, and all the files starting with c are selected. If you then type h, the pattern becomes ch*, and only the files starting with ch are selected. If you then type a, the pattern becomes cha*, and the files starting with cha are selected, and so on. To finish the pattern, press Return. If there are no files that match the pattern, an error message appears in the footer.
Using the Find Pop-up Window
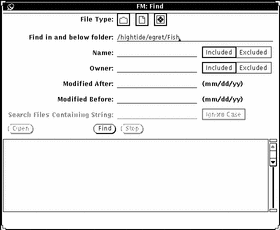
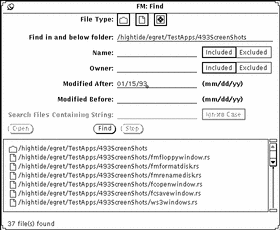
When you do not know or cannot remember the specific location of a folder or file, or when you want to locate a group of files according to specific criteria, use the Find pop-up window. To display the Find window, choose Find from the File menu. The Find pop-up window is displayed, as shown in Figure 2-25.
Figure 2-25 Find Window
Finding Files With the Find Window
To find a specific file or group of files, you can fill in some or all of the text fields, according to the type of search you want to perform.
-
Use the File Type setting to specify whether you want to search only folders, only files, only applications, only executable files or a combination. The mini-icons displayed in the File Type choice item are the same as the mini-icons used in the List by... displays, as shown in Figure 2-15.
-
Use the Find files in and below folders text field to specify where in your file system you want to start the search. The search begins in the folder you specify in this text field, and includes all subfolders in that path.
-
Use the Name text field to specify the file name or pattern you want to match. Use Included or Excluded to either include or exclude the pattern from the search.
-
Use the Owner text field when you want to search for files by owner, or exclude a particular owner from the search.
-
Use the Modified After or Modified Before text field, or both, to specify a time frame for the search. You must specify, as a minimum, the month and day for each of these text fields.
-
Use the Search Files Containing String field when you want to find files with specific contents. For example, to find all files in which the DeskSet product is specifically named, you would type DeskSet in the text field. If you click SELECT to turn on the Ignore Case setting, all files with the word "DeskSet" will be listed in the scrolling list, regardless of how the word is capitalized.
When you have filled in the text fields, click SELECT on the Find button to start the search. Once you start a search, the Stop button is activated. You can stop the search at any time by clicking SELECT on the Stop button.
When the search is completed, all files that match the pattern are displayed in the scrolling list at the bottom of the Find window. If you have more than one field filled out on the Find window, a file must match the information in all of these fields for it be listed. Figure 2-26 shows an example of a file content pattern matching search. File Manager found 37 files containing the specified string. (Seven of the files found are shown in the figure, the rest are scrolled out of view.)
Figure 2-26 Example of a Find
You can select and open one file at a time from the Find window scrolling list. To select a file, move the pointer onto the line and click SELECT. The line is highlighted, and the Open button is activated. To open the highlighted file, click SELECT on the Open button.
Using the Wastebasket
The Wastebasket is a temporary storage area for files that you want to discard and that you probably will delete from your file system. When you start File Manager, the Wastebasket is automatically created and displayed as an icon. You can move the Wastebasket anywhere you want on the workspace.
When the Wastebasket is empty, the icon shows an empty wastebasket. After you have put a file in the Wastebasket, the Wastebasket icon's appearance is changed to remind you that at least one file is there. Figure 2-27 shows the Wastebasket icon when empty and when there are one or more files in it.
Figure 2-27 The Wastebasket Icon, Empty and with One or More Files
You can move folders and files to the Wastebasket by selecting them and dragging and dropping them onto the Wastebasket icon or window, or by choosing Delete from the Edit menu.
Files that you put in the Wastebasket are stored in a .wastebasket folder in your home directory.
You can view the contents of the Wastebasket by opening the Wastebasket icon. A window is displayed with a scrolling pane that shows you the files you have moved to the Wastebasket. Figure 2-28 shows an example of the Wastebasket window.
Figure 2-28 Wastebasket Window
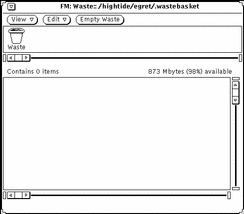
The Wastebasket window has View, Edit, and Empty Waste functions available. To access the Wastebasket pop-up menu, move the pointer anywhere in the Wastebasket window and press MENU. You can use the Wastebasket pop-up menu to do the following:
-
Use Empty Wastebasket to delete all the files in the Wastebasket. This option is inactive if the Wastebasket is already empty.
 Caution -
 You cannot recover any files that you delete/destroy with Empty Waste or Empty Wastebasket on the File pane menu.
-
Use Select All to select and highlight all the files in the Wastebasket. This option is inactive if the Wastebasket is empty.
-
Use Destroy to delete all the selected files in the Wastebasket. This option is inactive if no files in the Wastebasket are selected.
-
Use Undelete to restore the selected files in the Wastebasket. The files are automatically moved back to their original locations. This option is inactive if the Wastebasket is empty.
If you quit File Manager and restart it, the new File Manager will not remember the original locations of files in the Wastebasket. If you choose Undelete in this case, File Manager sends the message Original location for <file> not saved -- please restore manually. See "Moving or Copying Files and Folders Using Cut and Paste" or "Moving or Copying Files and Folders Using Drag and Drop" for information about how to move the file out of the Wastebasket and back into the desired folder.
-
Use Cut to move the selected files from the Wastebasket to the clipboard. This option is inactive if no files in the Wastebasket are selected.
-
Use Copy to copy the selected files from the Wastebasket to the clipboard. This option is inactive if no files in the Wastebasket are selected.
-
Use Paste to move the contents of the clipboard into the Wastebasket.
Creating a New Wastebasket
If you quit the Wastebasket window, you can create a new one by following these steps:
-
Make sure the File Manager Tool General Defaults Properties Edit Menu item is "Delete".
The "Delete" option is the default setting. See "Customizing Your File Manager" for information about setting the File Manager Tool Properties.
-
In File Manager, select a folder or file that you want to put into the Wastebasket.
-
Choose Delete from the Edit menu or the File Pane pop-up menu.
A new Wastebasket is created to contain the files you selected.
Linking Files
A link is a symbolic connection or pointer to a single file that allows you to access it from more than one directory. You can set up a link to a file in a restricted directory, allowing access to the file without providing access to the directory.
The Link option on the Edit menu runs the standard ln operating system command. A symbolic link is created when you link files between directories. When you link files in the same directory, a symbolic link is created. Refer to the man page for ln for a complete description.
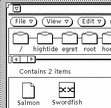
For example, if you have a file named Marlin in a folder called Fish, you can link it to another folder called SwordFish. Once the link is established, you can access Marlin from either folder. Marlin has not been copied into SwordFish; it has been linked with a pointer from one folder to another.
Any editing changes you make to a file with links are reflected in all of the folders, since there is really only one file, not multiple copies of it.
To use a linked file, you can drag and drop its icon from any folder that the file is linked to.
Creating a Link
To link files to folders, follow these steps:
-
Select the file (or files) you want to link.
-
Choose Link from the Edit menu or popup file pane menu.
An instructional message is displayed in the footer, as shown in Figure 2-29, telling you how to proceed.
Figure 2-29 Instruction Message after a Link is Initiated

-
Open the folder you want to link the file to.
-
Choose Paste from the Edit menu or the File Pane pop-up menu, or press the Paste key on the keyboard.
The file icon is displayed in the file pane and a message confirming the link is displayed in the File Manager footer.
Link information is displayed as part of the properties of the file, as shown in the example in Figure 2-30. See "File and Folder Information" for more information about file properties.
Figure 2-30 Links Displayed as Part of the File Type Properties.

Removing a Link
You can remove a link by selecting the file and choosing Delete from the Edit menu or the File Pane menu. Removing a link does not remove the original file.
If you remove the original file without also deleting the link, the icon for the link changes to display a broken chain. In the example shown in Figure 2-31, the original file named aliases has been deleted, but the linked file remains.
Figure 2-31 A Broken Link
File and Folder Information
Each folder, file and application in your file system has the following information (also known as properties) associated with it:
You can display these properties for an individual selected file choosing Information from the File menu. You can change these properties if you own the file and have the correct permissions set.
The File Information window also displays the following about each file:
-
File Size in bytes
-
File Type
-
File Permissions and Information--Owner, Group, World, Owner name, and Group name
These (more advanced) topics can be accessed by pressing the plus button at the lower right corner of the Information window. Once the information is displayed, you can "hide" it by pressing the minus sign at the lower right corner.
Figure 2-32 shows an example of a File Properties window.
Figure 2-32 Example of a File Properties Window
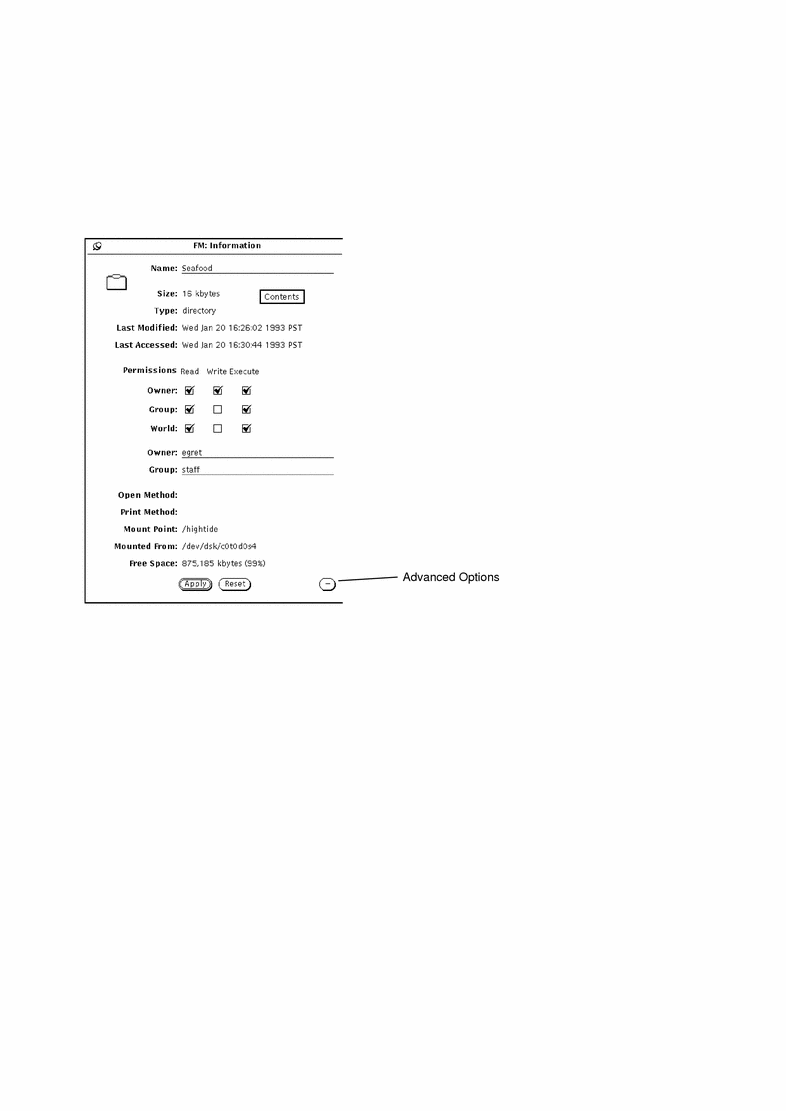
To display the Information window, select a file or a group of files and choose Information from the File menu.
If the Information window is already showing when you select a new file, the File Properties information is updated to reflect the properties of the new file.
If you select more than one file, the Information window shows those properties that the selected files can share. The document names and specific document information are not displayed. You can change the permissions for the group of selected files to be the same by clicking SELECT on the Permissions check boxes and then clicking SELECT on the Apply button.
Changing Properties and Permissions
Every file and directory has a security system organized around permissions. Permissions determine which users can read a file, write to (or change) it, or execute it (applications are executed). You must own the file to change its permissions. Users are categorized as owner, group, and world.
You can change file properties for any file you own (as long as you have permission to make modifications in the folder containing the file). If you do not own the file, the write permissions determine whether you can access a file to change it.
To change file properties, type new information in the text fields of the Information window. Click SELECT on a check box to either add or remove a check.
When you have changed the properties, click SELECT on the Apply button to apply them. The changes take effect immediately.
You can change common properties on more than one file in the same manner.
Customizing Your File Manager
You can customize your File Manager from the Properties menu in the following ways:
-
Customize General Defaults such as open a new folder into a different window, view the Folder View horizontally (or vertically), change the Wastebasket to delete or destroy or change the default document name.
-
Customize New Folder Defaults
-
Customize Current Folder Settings
-
Customize the Go To menu
-
Create your own custom commands and add them to the Custom Commands submenu that you access from the File menu.
-
Customize Advanced settings such as print method, default editor, how you view floppies and so forth.
These methods are described in the sections that follow.
You can access the Properties by choosing Edit Properties.
The different properties categories are shown in Figure 2-33.
Figure 2-33 File Manager Properties Menu
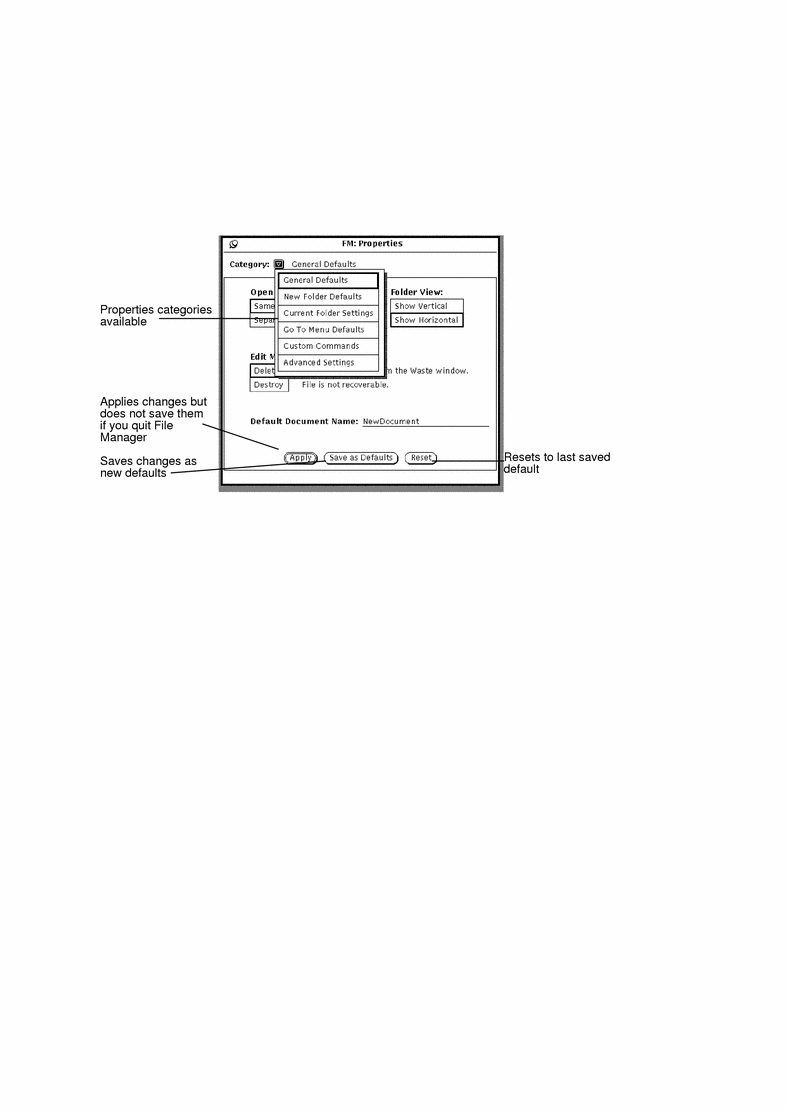
In addition, you can customize your File Manager (and other DeskSet applications) with items such as font type and size that can be set in the Workspace Properties menu. See "Using the Workspace Properties Window" for more information.
General Defaults
To change the General Default Properties:
Choose Properties -> General Defaults from Category.
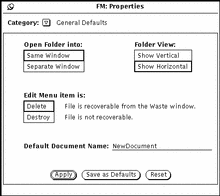
The General Defaults Properties window is shown in Figure 2-34.
Figure 2-34 General Defaults Properties Window
-
Use Open Folder any time you open a folder. You can set the folder to open it into the same window as your existing folders or have the folder open into a new window each time.
-
Use Folder View to lay out your folder structure horizontally or vertically.
-
Use Edit Menu item to change the Delete option (default) on the Edit menu. Delete means delete to Waste window (where files can be recovered, if necessary.) Destroy means files cannot be recovered. Whatever you set for delete or destroy is reflected in the Edit menu. The Delete/Destroy setting allows you to choose whether File Manager deletes files by moving them to the Wastebasket, or destroys them. See "Using the Wastebasket" for more information. If you choose Destroy, files are not moved to the wastebasket and are not recoverable once you delete them. On the other hand, you never need to empty the wastebasket if you choose the Destroy option.
Note -If you choose the Destroy option (and selected Save as Defaults), this state is saved when you quit File Manager. Therefore, the next time you start up the File Manager application, the Wastebasket will not be created because Destroy is on.
-
Use Default Document Name to change the default name of a new document. This is the name you see when you create a new document.
New Folder Defaults
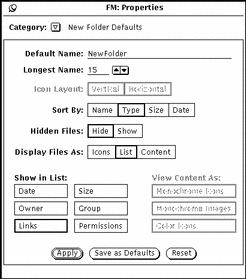
You can change the default for the way new files or folders are displayed in the file pane using the New Folder Defaults, shown in Figure 2-35. To display this window, choose New Folder Defaults from the Properties Category.
Choose Properties ->New Folder Defaults from Category.
The New Folder Defaults Properties window is shown in Figure 2-35.
Figure 2-35 New Folder Defaults Window
Default Name
The current default name (when a new folder is created) is NewFolder. You can change this to anything you like.
Longest Name
The Longest Name field allows you to choose how many characters (based on the average width of the characters) of each file name are displayed in the file pane of File Manager. You can type any number from 0 to 255.
Note -
The number of characters actually displayed for each file name may vary when using variable-width fonts because the width is calculated based on the width of the average character in the font.
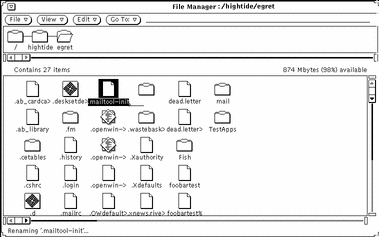
Names that do not fit within the specified length are followed by a "greater than" sign (>) to show that the complete name is not displayed. Figure 2-36 shows an example of the file pane with shorter file names set.
Figure 2-36 File Pane with Shorter File Names Specified
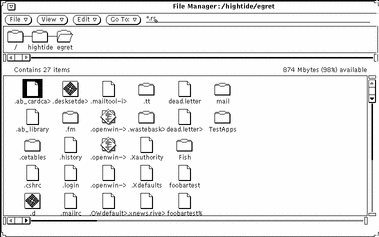
If you want to see the complete file name, you can click SELECT on the name. In this example, the file .ab_cardca> is selected, and the full name is displayed in an editable text field, as shown in the example in Figure 2-37.
Figure 2-37 Displaying a complete file name when short names are specified
Icon Layout
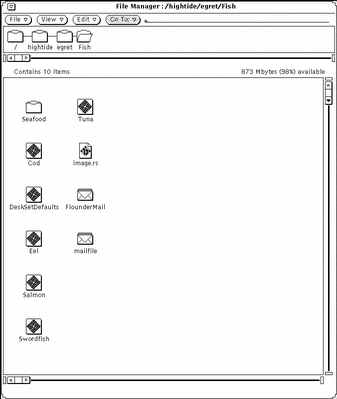
The Icon Layout setting determines whether files in the file pane are listed in rows (horizontally) or columns (vertically). The default is row order. For example, if files are sorted alphabetically by Name in rows, they are listed in from left to right, with the first files on the top row, then the second row, and so on. If files are sorted alphabetically by Name in columns, they are listed from top to bottom, with the first files in the left column, then the second column, etc. Figure 2-38 shows files sorted by Name in rows, and Figure 2-39 shows the same files sorted in columns.
Figure 2-38 Icons Listed in Rows (Horizontally) in the File Pane
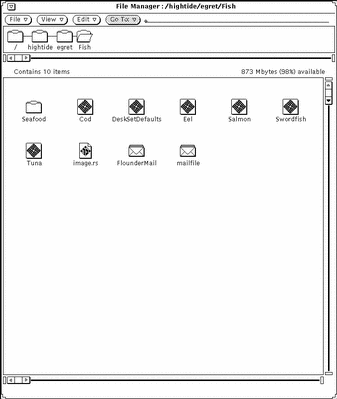
Figure 2-39 Icons Listed in Columns (Vertically) in the File Pane
Sort By Options
The Sort By Options allow you to choose how the files in the file pane are sorted. You can choose any of the following settings:
-
Name, to sort the files alphabetically
-
Type, to sort the files in alphabetical groups by file type, with folders first, followed by files, then by applications
-
Size, to sort the files by size, largest to smallest
-
Date, to sort the files in reverse chronological order (newest to oldest)
Hidden Files
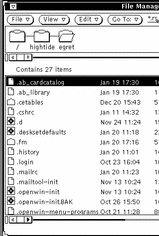
The Hidden Files settings allow you to choose whether or not to display hidden system files (or dot files as they are sometimes called). Hidden files are usually system or configuration files, and the filename is preceded by a dot (.). Figure 2-40 shows an example of a listing with hidden files displayed.
Figure 2-40 File Pane with Hidden Files (dot files) Visible
Display Files As
Display Files as lets you determine the default way to display your files in the file pane. You can choose any of the following settings:
-
Icon, to help you identify each file by type
-
List, to display more files in the pane and to show you more information about each individual file, determined by the List Options. Displaying more files is true only if no list options are set.
-
Content, to display a preview of the contents of icon and raster files. All other files are displayed as icons.
Show in List
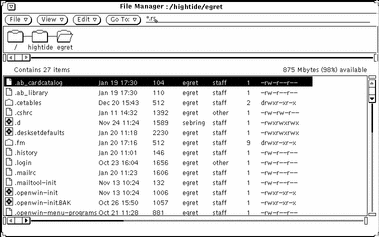
The Properties window option Show in List allow you to choose how much information is displayed when you display the contents of the file pane as a list with mini-icons as shown in Figure 2-41.
The list options in Show in List are nonexclusive settings. You can choose none, some, or all of the options. To set an option, click SELECT to toggle it from off to on, or from on to off. (Chosen options have a thickened border on monochrome monitors.) Figure 2-41 shows an example of a list display when all of the options are chosen.
Figure 2-41 File Pane with all of the List Options Set
View Contents As
View Contents as lets you determine the type of files that you want to display a preview of when the Display Mode is Content.
View By Content
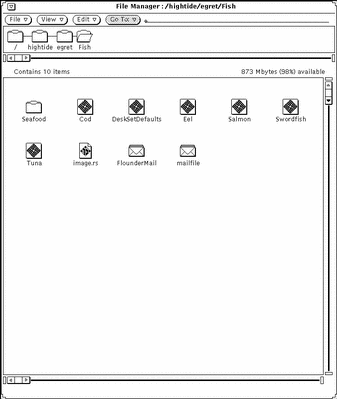
When your file system contains icon and raster files created by applications, such as Icon Editor and Snapshot, you can display an image of the contents of the file in place of the standard data file icon. The images are displayed to scale in a 64-by-64 pixel square.
Choosing Content as your default Display Mode in the New Folder Defaults window displays the contents of black-and-white and color icons, rasters, X bitmap files, or any combination of these. Folders, applications, and other files are displayed as icons. Figure 2-42 is an example of a Contents file display.
Figure 2-42 Contents File Display
Note -
Choosing to display the contents of icon and raster files can delay the reading and displaying of other types of files and folders since File Manager must perform some additional processing to provide the preview.
You can select any or all of the options, as follows:
-
Monochrome Icons, to preview black-and-white Sun icons
-
Monochrome Images, to preview black-and-white Sun raster and X Bitmap images
-
Color Icons, to preview XPM files
Current Folder Settings
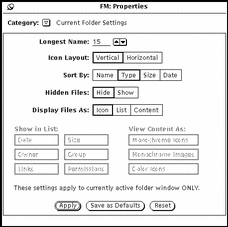
This allows you to change the settings of the current folder. These settings are identical to the property settings that can be set for a new folder except there is no Default Name field. For complete information on these settings, refer to "New Folder Defaults".
Figure 2-43 Current Folder Settings Menu
Note -
The Current Folder Settings window displays the same information for the active (selected) folder window only. You can use this to change the settings for the designated active window.
Go To Menu Defaults
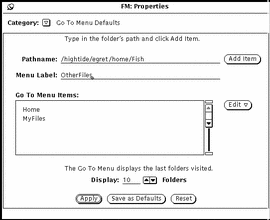
This allows you to change the defaults of the Go To menu. You can set the Go To menu properties to show a trail of the directory paths you last visited, and you can set up special paths to directories that you visit often. The Go To menu has several sections divided by spaces. Typically, you see a default label for home (a label for your home directory pathname), application specific defaults that include Waste and Folder View, then the paths to the directories you last visited.
Figure 2-44 The Go To Menu Defaults
-
Use Pathname and the Add Item button to add another pathname to the default Go To menu. This can be in addition to your home directory pathname. If you add a pathname without a label, then the entire pathname is displayed in the Go To menu.
-
Use Menu Label to create a new name for the specified pathname. You can add it to the Go To Menu Items scrolling list. This is useful if the pathname specified is long.
-
Use the Edit button to cut; copy; paste--an item before, after, on top or on bottom of another item; delete an item in the Go To Menu Items default scrolling list.
-
Use Display: Folders to indicate how many of the last folders visited should display by default in the Go To menu.
Custom Commands
The Custom Commands window allows you to create and store commonly used operating system commands. Once you have added the commands to the menu, you can use them at any time by choosing them from the Custom Commands submenu from the File menu.
Creating Custom Commands
Choose Custom Commands category from the Properties menu, as shown in Figure 2-45. You use this window to add often-used UNIX commands to your Custom Commands menu. You can even create a command that lets you specify different options every time the command is chosen.
Note -
The Custom Command feature assumes that you have some working knowledge of the UNIX operating system. If you are not familiar with UNIX or have problems, you might want to have your system administrator help you create any desired custom commands.
Figure 2-45 Custom Command Pop-up Window
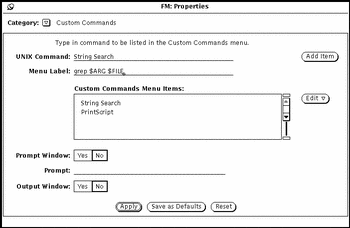
The scrolling list shows your current custom commands. You use this window to add, delete, and change the order of your custom commands.
Follow the steps below to add a new custom command to the Custom Commands Menu Items scroll box. Follow the examples to add a custom command to search for a particular text string in the selected files or folders.
-
Type the actual UNIX command in the UNIX Command text field.
You can add $FILE or $ARG to the command to represent the currently selected file or special arguments (options) that you can specify at the time you choose the command.
In this example, type grep $ARG $FILE in the UNIX command text field.
-
Type the name of the command that you want to appear in the Menu Label text field.
This Menu Label does not have to be the actual UNIX command. You may want the command to be something more descriptive.
In this example, type String Search.
-
Add the item.
-
To prompt for command options, (that is, if you are using $ARG in the UNIX command), choose Yes on the Prompt Window setting, then type the prompt label into the first line of the Prompt text field.
If you use a prompt window, when the custom command is chosen from the Custom Commands menu a window is displayed with the prompt label. You use this pop-up window to type the command options.
In this example, choose Yes on the Prompt Window setting and type Search For: in the Prompt text field. When your custom command is chosen from the Custom Commands window, a window is displayed in which you can specify the text that you want to search for.
-
If your custom command will create any output, choose Yes on the Output Window setting.
This causes an output window to be displayed when the custom command is chosen, where you can see the result of your command.
In this example, you want to choose Yes on the Output Window. Then when you choose the new custom command from the Custom Commands menu, a window will be displayed that lists the places the text string is found.
-
Click SELECT on Apply to add the new command to the Custom Commands scrolling list.
To use the item, select the folders and files where you want to search for text, choose the String Search command from the Custom Commands submenu, and type the text string to search for in the window that is displayed. Press RETURN to quit or SELECT Quit from the output window.
Advanced Settings
You can change the way File Manager behaves and the way it presents certain information by changing controls in the Advanced Settings window. To display the Advanced Settings window, choose Advanced Settings from Category.
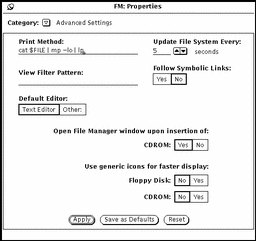
The File Manager Tool Properties window is shown in Figure 2-46.
Figure 2-46 Tool Properties Window
Print Method
The Print Method text field allows you to specify a default UNIX print script for files that are printed from File Manager that do not have a print method defined in the Binder database. The print script shown in Figure 2-46 prints your files in landscape mode on your default printer, using the mp PostScript pretty printer. If you want to change the print script, make sure to type $FILE in the script where the file name should be inserted.
View Filter Pattern
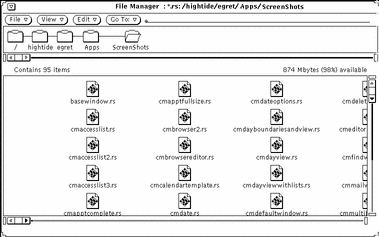
The View Filter Pattern text field allows you to specify that only files of a certain type are displayed in the file pane of File Manager. In the example shown in Figure 2-47, the filter pattern *.rs shows only the raster files in a directory, even though other files are there. Note that the header of the window shows you what filter pattern is set.
Figure 2-47 File Pane with a *.rs Filter Pattern Set
Default Editor
-
Use Default Editor to specify what default editor File Manager uses to display the text of files that are not specifically bound to another application. If you click SELECT on Other, a text field is displayed in which you can type the name of a different text editor application. If you specify a different text editor that does not display its own window, you must specify that a Shell Tool is started before the text editor.
Note -Running command line programs, such as rm or rlogin, without specifying a Shell Tool to run the program in can lead to unpredictable File Manager behavior. Unless a program starts with its own window (such as textedit or mailtool), prepend shelltool to the program in the Default Editor text field, as shown in Figure 2-45.
Update File System
You can set the number of seconds that File Manager checks to see if any items were added or deleted.
Follow Symbolic Links
If Symbolic Lines is set to No (the default), you see filenames just as you typed them. For example, in the Go To field. If Symbolic Links is set to Yes, you see links made across file systems.
Open File Manager Window
Automatically opens the CD window of the CD that has been inserted.
Use Generic Icons
When you insert a Floppy or CD, it can take some time for the icons to display. If it is not important to you what the icons look like, and/or if you want the them to display quickly, you can set Yes and a generic representation of the icon is displayed and is much quicker time.
Customizing Your File Manager Colors
There are two ways to change the File Manager color scheme, as follows:
-
To change the colors in the tree and file panes, use the -fg and -bg command line flags to specify different colors for your foreground (characters) and background. For example, if you want the tree and file panes to have blue characters on a gray background, try starting File Manager in a Command Tool or Shell Tool by typing the following:
filemgr -fg 0 0 255 -bg 127 127 127 &
Each trio of numbers represents red, green, and blue intensities from 0 to 255.
Alternatively, you can specify the actual names of colors instead of the trio of numbers, as follows:
filemgr -fg blue -bg gray50 &
To see the available list of color names, look at the file /usr/openwin/lib/rgb.txt.
-
If you do not like the colors of the icons displayed in File Manager, use the Binder with its Color Chooser to change the colors to your liking. See "Changing a Binding" of the chapter "Binder" for information.
File Manager first looks for entries in the Binder database to determine colors of the icons it displays. If File Manager cannot make contact with the Binder database, it issues a warning message, and then uses the colors set up via X resources, described in the filemgr manual page.
Using Floppy and CD Media
File Manager allows you to use removable media such as Floppy Disks or CD-ROM (Compact disk, read-only memory) on the WorkSpace. You can view your Floppy disks or CDs if you:
-
have a system with at least (1) floppy drive or (1) CD-ROM drive and are running Solaris 2.4
Refer to the documentation that came with your computer for information on how to insert a floppy disk or CD into the drive.
Using a Floppy Disk with File Manager
The following explains what to do with your floppy disk once you have inserted it into your drive. You may encounter these cases when you insert a Floppy disk:
-
The disk is formatted and labeled. In this case you see the window as shown in Figure 2-48. You can begin using the information on your disk.
-
The disk is unformatted. Refer to "Reformatting a Floppy Disk" for information on formatting a disk.
-
The disk is formatted and may contain data. If the data is in Macintosh format or unknown to this system, you may see the a popup as shown in Figure 2-53.
Checking for a Floppy Disk
-
Insert your floppy disk into the disk drive on (or attached to) your computer.
-
Select Check For Floppy from the File Menu.
If you inserted a formatted, labeled disk, you can move on to "Viewing a File from the Contents of a Floppy Disk or CD".
Note -You do not have to check for CDs.
Viewing a File from the Contents of a Floppy Disk or CD
Once the File Manager window is displayed, you can view the contents of your floppy disk or CD.
Figure 2-48 The File Manager Floppy Disk Window
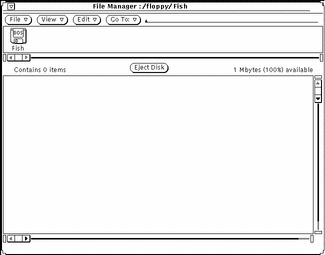
Figure 2-49 The File Manger CD Window
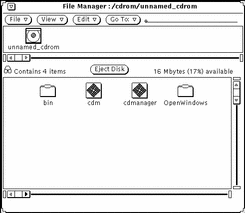
-
If necessary, scroll through the contents of floppy disk or CD until you find the file you want to view.
-
Select the file or folder to be viewed.
-
Choose File->Open.
You can now use File Manager windows and menus. If you close the window to an icon you see the following for floppy or CD as in Figure 2-50.
Figure 2-50 The Floppy Disk and CD icons


Removing a Floppy Disk or CD from the Disk Drive
-
From the floppy or CD window Select the Eject Disk Button.
-
Remove the disk or CD from the drive when it is ejected.
The drive is now free.
Note -On x86 or PowerPC machines, you must physically remove floppies by hand. After selecting the Eject Disk button, you will see a pop-up window telling you that you may manually eject the floppy. Do not remove the floppy without selecting Eject Disk first. If you do, the system will display a pop-up window telling you to reinsert the floppy. Reinsert it, select Eject Disk, and remove the floppy.
Ejecting Unrecognized Data Format CDs
To eject a CD that has an unrecognized data format (such as audio files):
Your disk should now be ejected from the drive.
Reformatting a Floppy Disk
If you are using a diskette for the first time or if you want to format your diskette, perform the following steps.
-
Insert the floppy disk.
-
Select Check For Floppy from the File Menu.
Note -If you inserted a correctly formatted disk, you see the window on the WorkSpace as shown in Figure 2-48.
If the diskette is not formatted, you see the window in Figure 2-51.
-
Choose Format Floppy from the File menu.
Make sure the floppy window is active.
Figure 2-51 The Floppy Format Disk Window
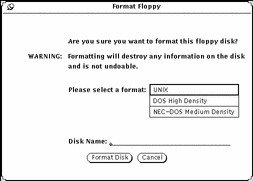
If you choose to Format the disk, this is your last chance to Cancel.
-
Click Format Disk.
When the initialization has been complete, you see the File Manager window on the WorkSpace as shown in Figure 2-48.
Unformatted Floppy
If you inserted an unformatted floppy disk, the following popup displays:
Figure 2-52 Unformatted Floppy Popup
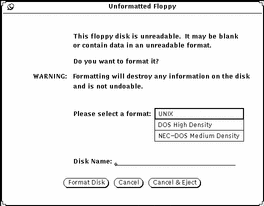
You can choose to:
-
format the disk, refer to "Reformatting a Floppy Disk" for information on reformatting the disk.
or
-
cancel the operation and dismiss the popup.
or
-
cancel the operation and eject the floppy.
Note -Macintosh, Sun TAR and Sun BAR formats are not recognized.
Unlabeled Floppy
If you inserted a floppy disk that is unlabeled, that is there is data on the disk but is not a recognized format, the following message displays:
Figure 2-53 Unlabeled (Unknown Data) Floppy Popup
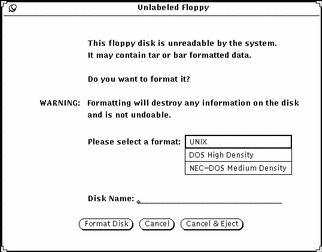
You can choose to:
-
format the disk, refer to "Reformatting a Floppy Disk" for information on reformatting the disk.
or
-
cancel the operation and dismiss the popup.
or
-
cancel the operation and eject the floppy.
Renaming a Floppy Disk
There are times when you would like to change the name of your disk.
-
Insert the disk to be renamed.
-
Select Check For Floppy from the File Menu.
-
Choose Rename Disk from the File menu.
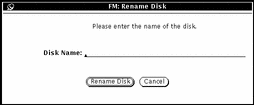
You see the rename disk window.
Figure 2-54 The Floppy Rename Disk Window
-
Type a new name for the disk.
You type over the existing disk name and it disappears when you have finished typing.
-
SELECT the Rename Disk button.
The disk is now ready to be used or ejected.
Dragging and Dropping Files from Floppy Disk or CD to File Manager
-
Open the floppy disk or CD into a window.
-
Select the file or folder icon and drag it from one window to the other.
For information on dragging and dropping, refer to Chapter 1, Introduction to the Solaris User Environment. The file is now copied to File Manager.
Copying Files from Floppy Disk or CD to Floppy Disk
You can copy files from a floppy disk (or CD) to another floppy disk.
- © 2010, Oracle Corporation and/or its affiliates
