Customizing Your File Manager
You can customize your File Manager from the Properties menu in the following ways:
-
Customize General Defaults such as open a new folder into a different window, view the Folder View horizontally (or vertically), change the Wastebasket to delete or destroy or change the default document name.
-
Customize New Folder Defaults
-
Customize Current Folder Settings
-
Customize the Go To menu
-
Create your own custom commands and add them to the Custom Commands submenu that you access from the File menu.
-
Customize Advanced settings such as print method, default editor, how you view floppies and so forth.
These methods are described in the sections that follow.
You can access the Properties by choosing Edit Properties.
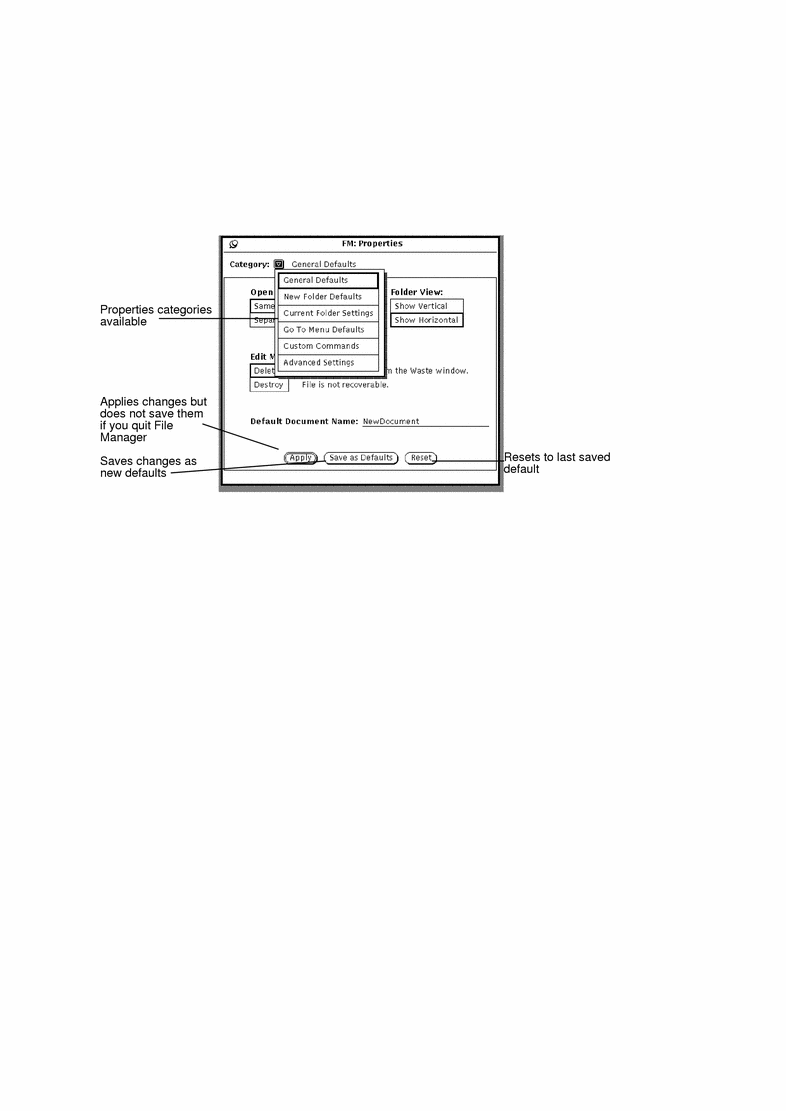
The different properties categories are shown in Figure 2-33.
Figure 2-33 File Manager Properties Menu
In addition, you can customize your File Manager (and other DeskSet applications) with items such as font type and size that can be set in the Workspace Properties menu. See "Using the Workspace Properties Window" for more information.
General Defaults
To change the General Default Properties:
Choose Properties -> General Defaults from Category.
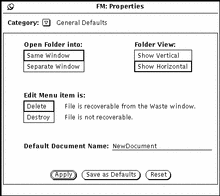
The General Defaults Properties window is shown in Figure 2-34.
Figure 2-34 General Defaults Properties Window
-
Use Open Folder any time you open a folder. You can set the folder to open it into the same window as your existing folders or have the folder open into a new window each time.
-
Use Folder View to lay out your folder structure horizontally or vertically.
-
Use Edit Menu item to change the Delete option (default) on the Edit menu. Delete means delete to Waste window (where files can be recovered, if necessary.) Destroy means files cannot be recovered. Whatever you set for delete or destroy is reflected in the Edit menu. The Delete/Destroy setting allows you to choose whether File Manager deletes files by moving them to the Wastebasket, or destroys them. See "Using the Wastebasket" for more information. If you choose Destroy, files are not moved to the wastebasket and are not recoverable once you delete them. On the other hand, you never need to empty the wastebasket if you choose the Destroy option.
Note -If you choose the Destroy option (and selected Save as Defaults), this state is saved when you quit File Manager. Therefore, the next time you start up the File Manager application, the Wastebasket will not be created because Destroy is on.
-
Use Default Document Name to change the default name of a new document. This is the name you see when you create a new document.
New Folder Defaults
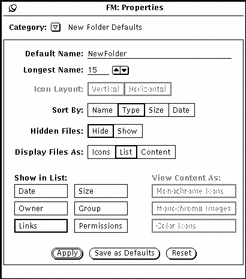
You can change the default for the way new files or folders are displayed in the file pane using the New Folder Defaults, shown in Figure 2-35. To display this window, choose New Folder Defaults from the Properties Category.
Choose Properties ->New Folder Defaults from Category.
The New Folder Defaults Properties window is shown in Figure 2-35.
Figure 2-35 New Folder Defaults Window
Default Name
The current default name (when a new folder is created) is NewFolder. You can change this to anything you like.
Longest Name
The Longest Name field allows you to choose how many characters (based on the average width of the characters) of each file name are displayed in the file pane of File Manager. You can type any number from 0 to 255.
Note -
The number of characters actually displayed for each file name may vary when using variable-width fonts because the width is calculated based on the width of the average character in the font.
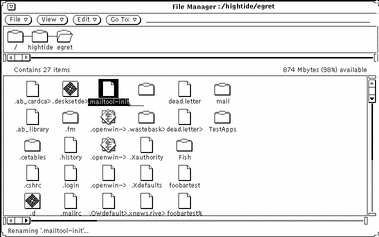
Names that do not fit within the specified length are followed by a "greater than" sign (>) to show that the complete name is not displayed. Figure 2-36 shows an example of the file pane with shorter file names set.
Figure 2-36 File Pane with Shorter File Names Specified
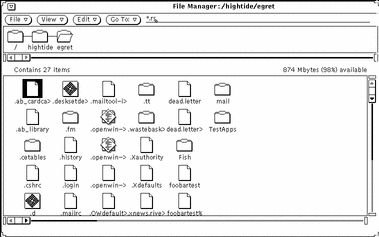
If you want to see the complete file name, you can click SELECT on the name. In this example, the file .ab_cardca> is selected, and the full name is displayed in an editable text field, as shown in the example in Figure 2-37.
Figure 2-37 Displaying a complete file name when short names are specified
Icon Layout
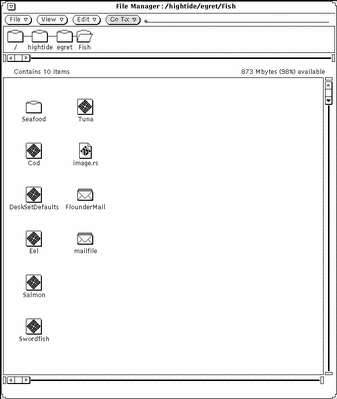
The Icon Layout setting determines whether files in the file pane are listed in rows (horizontally) or columns (vertically). The default is row order. For example, if files are sorted alphabetically by Name in rows, they are listed in from left to right, with the first files on the top row, then the second row, and so on. If files are sorted alphabetically by Name in columns, they are listed from top to bottom, with the first files in the left column, then the second column, etc. Figure 2-38 shows files sorted by Name in rows, and Figure 2-39 shows the same files sorted in columns.
Figure 2-38 Icons Listed in Rows (Horizontally) in the File Pane
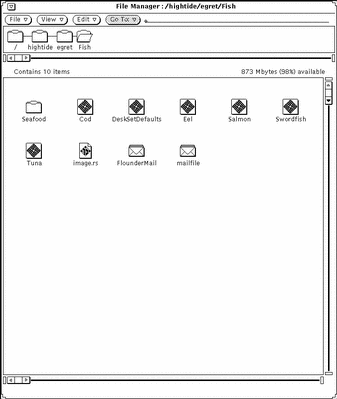
Figure 2-39 Icons Listed in Columns (Vertically) in the File Pane
Sort By Options
The Sort By Options allow you to choose how the files in the file pane are sorted. You can choose any of the following settings:
-
Name, to sort the files alphabetically
-
Type, to sort the files in alphabetical groups by file type, with folders first, followed by files, then by applications
-
Size, to sort the files by size, largest to smallest
-
Date, to sort the files in reverse chronological order (newest to oldest)
Hidden Files
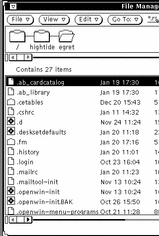
The Hidden Files settings allow you to choose whether or not to display hidden system files (or dot files as they are sometimes called). Hidden files are usually system or configuration files, and the filename is preceded by a dot (.). Figure 2-40 shows an example of a listing with hidden files displayed.
Figure 2-40 File Pane with Hidden Files (dot files) Visible
Display Files As
Display Files as lets you determine the default way to display your files in the file pane. You can choose any of the following settings:
-
Icon, to help you identify each file by type
-
List, to display more files in the pane and to show you more information about each individual file, determined by the List Options. Displaying more files is true only if no list options are set.
-
Content, to display a preview of the contents of icon and raster files. All other files are displayed as icons.
Show in List
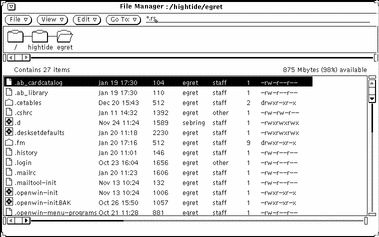
The Properties window option Show in List allow you to choose how much information is displayed when you display the contents of the file pane as a list with mini-icons as shown in Figure 2-41.
The list options in Show in List are nonexclusive settings. You can choose none, some, or all of the options. To set an option, click SELECT to toggle it from off to on, or from on to off. (Chosen options have a thickened border on monochrome monitors.) Figure 2-41 shows an example of a list display when all of the options are chosen.
Figure 2-41 File Pane with all of the List Options Set
View Contents As
View Contents as lets you determine the type of files that you want to display a preview of when the Display Mode is Content.
View By Content
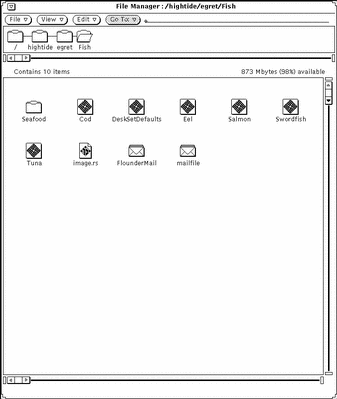
When your file system contains icon and raster files created by applications, such as Icon Editor and Snapshot, you can display an image of the contents of the file in place of the standard data file icon. The images are displayed to scale in a 64-by-64 pixel square.
Choosing Content as your default Display Mode in the New Folder Defaults window displays the contents of black-and-white and color icons, rasters, X bitmap files, or any combination of these. Folders, applications, and other files are displayed as icons. Figure 2-42 is an example of a Contents file display.
Figure 2-42 Contents File Display
Note -
Choosing to display the contents of icon and raster files can delay the reading and displaying of other types of files and folders since File Manager must perform some additional processing to provide the preview.
You can select any or all of the options, as follows:
-
Monochrome Icons, to preview black-and-white Sun icons
-
Monochrome Images, to preview black-and-white Sun raster and X Bitmap images
-
Color Icons, to preview XPM files
Current Folder Settings
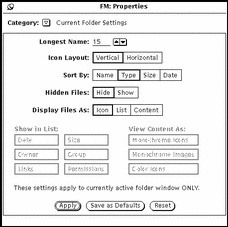
This allows you to change the settings of the current folder. These settings are identical to the property settings that can be set for a new folder except there is no Default Name field. For complete information on these settings, refer to "New Folder Defaults".
Figure 2-43 Current Folder Settings Menu
Note -
The Current Folder Settings window displays the same information for the active (selected) folder window only. You can use this to change the settings for the designated active window.
Go To Menu Defaults
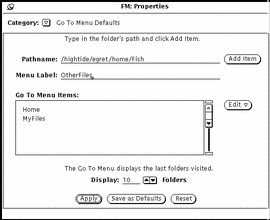
This allows you to change the defaults of the Go To menu. You can set the Go To menu properties to show a trail of the directory paths you last visited, and you can set up special paths to directories that you visit often. The Go To menu has several sections divided by spaces. Typically, you see a default label for home (a label for your home directory pathname), application specific defaults that include Waste and Folder View, then the paths to the directories you last visited.
Figure 2-44 The Go To Menu Defaults
-
Use Pathname and the Add Item button to add another pathname to the default Go To menu. This can be in addition to your home directory pathname. If you add a pathname without a label, then the entire pathname is displayed in the Go To menu.
-
Use Menu Label to create a new name for the specified pathname. You can add it to the Go To Menu Items scrolling list. This is useful if the pathname specified is long.
-
Use the Edit button to cut; copy; paste--an item before, after, on top or on bottom of another item; delete an item in the Go To Menu Items default scrolling list.
-
Use Display: Folders to indicate how many of the last folders visited should display by default in the Go To menu.
Custom Commands
The Custom Commands window allows you to create and store commonly used operating system commands. Once you have added the commands to the menu, you can use them at any time by choosing them from the Custom Commands submenu from the File menu.
Creating Custom Commands
Choose Custom Commands category from the Properties menu, as shown in Figure 2-45. You use this window to add often-used UNIX commands to your Custom Commands menu. You can even create a command that lets you specify different options every time the command is chosen.
Note -
The Custom Command feature assumes that you have some working knowledge of the UNIX operating system. If you are not familiar with UNIX or have problems, you might want to have your system administrator help you create any desired custom commands.
Figure 2-45 Custom Command Pop-up Window
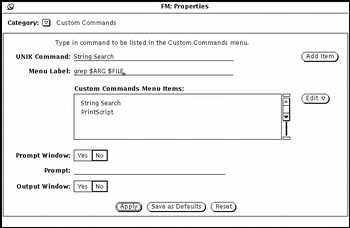
The scrolling list shows your current custom commands. You use this window to add, delete, and change the order of your custom commands.
Follow the steps below to add a new custom command to the Custom Commands Menu Items scroll box. Follow the examples to add a custom command to search for a particular text string in the selected files or folders.
-
Type the actual UNIX command in the UNIX Command text field.
You can add $FILE or $ARG to the command to represent the currently selected file or special arguments (options) that you can specify at the time you choose the command.
In this example, type grep $ARG $FILE in the UNIX command text field.
-
Type the name of the command that you want to appear in the Menu Label text field.
This Menu Label does not have to be the actual UNIX command. You may want the command to be something more descriptive.
In this example, type String Search.
-
Add the item.
-
To prompt for command options, (that is, if you are using $ARG in the UNIX command), choose Yes on the Prompt Window setting, then type the prompt label into the first line of the Prompt text field.
If you use a prompt window, when the custom command is chosen from the Custom Commands menu a window is displayed with the prompt label. You use this pop-up window to type the command options.
In this example, choose Yes on the Prompt Window setting and type Search For: in the Prompt text field. When your custom command is chosen from the Custom Commands window, a window is displayed in which you can specify the text that you want to search for.
-
If your custom command will create any output, choose Yes on the Output Window setting.
This causes an output window to be displayed when the custom command is chosen, where you can see the result of your command.
In this example, you want to choose Yes on the Output Window. Then when you choose the new custom command from the Custom Commands menu, a window will be displayed that lists the places the text string is found.
-
Click SELECT on Apply to add the new command to the Custom Commands scrolling list.
To use the item, select the folders and files where you want to search for text, choose the String Search command from the Custom Commands submenu, and type the text string to search for in the window that is displayed. Press RETURN to quit or SELECT Quit from the output window.
Advanced Settings
You can change the way File Manager behaves and the way it presents certain information by changing controls in the Advanced Settings window. To display the Advanced Settings window, choose Advanced Settings from Category.
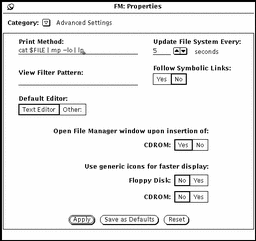
The File Manager Tool Properties window is shown in Figure 2-46.
Figure 2-46 Tool Properties Window
Print Method
The Print Method text field allows you to specify a default UNIX print script for files that are printed from File Manager that do not have a print method defined in the Binder database. The print script shown in Figure 2-46 prints your files in landscape mode on your default printer, using the mp PostScript pretty printer. If you want to change the print script, make sure to type $FILE in the script where the file name should be inserted.
View Filter Pattern
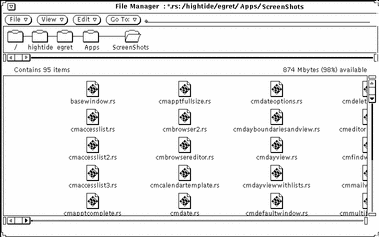
The View Filter Pattern text field allows you to specify that only files of a certain type are displayed in the file pane of File Manager. In the example shown in Figure 2-47, the filter pattern *.rs shows only the raster files in a directory, even though other files are there. Note that the header of the window shows you what filter pattern is set.
Figure 2-47 File Pane with a *.rs Filter Pattern Set
Default Editor
-
Use Default Editor to specify what default editor File Manager uses to display the text of files that are not specifically bound to another application. If you click SELECT on Other, a text field is displayed in which you can type the name of a different text editor application. If you specify a different text editor that does not display its own window, you must specify that a Shell Tool is started before the text editor.
Note -Running command line programs, such as rm or rlogin, without specifying a Shell Tool to run the program in can lead to unpredictable File Manager behavior. Unless a program starts with its own window (such as textedit or mailtool), prepend shelltool to the program in the Default Editor text field, as shown in Figure 2-45.
Update File System
You can set the number of seconds that File Manager checks to see if any items were added or deleted.
Follow Symbolic Links
If Symbolic Lines is set to No (the default), you see filenames just as you typed them. For example, in the Go To field. If Symbolic Links is set to Yes, you see links made across file systems.
Open File Manager Window
Automatically opens the CD window of the CD that has been inserted.
Use Generic Icons
When you insert a Floppy or CD, it can take some time for the icons to display. If it is not important to you what the icons look like, and/or if you want the them to display quickly, you can set Yes and a generic representation of the icon is displayed and is much quicker time.
- © 2010, Oracle Corporation and/or its affiliates
