Creating a New Binding
The following steps explain how to create a new binding. The example binds the cat icon described in Chapter 15, Icon Editor to the cat program file in your /bin directory.
-
If an icon does not exist for the new binding, use the Icon Editor to create a 32 by 32 (XView format) pixel icon.
See Chapter 15, Icon Editor for instructions.
The icon for the binding is the icon displayed by the File Manager, Mail Tool, and other applications in the DeskSet environment
If you want to color only part of the icon when it is displayed in the File Manager or other DeskSet applications, use the Icon Editor to create a 32 by 32 (XView format) pixel icon mask, which defines the area of the icon to be colored. See "Mask File" for information about icon masks.
-
Click SELECT on the New button at the bottom of the base window.
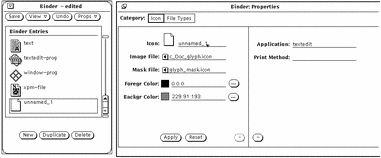
A new entry is automatically created called unnamed_1, and the Binder Properties window is displayed showing the Icon category, as shown in Figure 16-13. If an entry called unnamed_1 already exists, the new entry is called unnamed_2, and so forth.
Figure 16-13 A New Binder Entry

-
Replace the name in the Icon text field of the Properties window with the name you want for the new Binder entry.
In this example, type cat_prog in the Icon text field.
-
Type the path and file name of a 32 by 32 (XView format) pixel icon in the Image File text field.
In this example, type the path and name of the cat icon created in Step 1.
-
If you want to specify a color mask for the icon, type the path and file name of the icon mask in the Mask File text field.
An icon mask defines the area of the icon to be colored when the icon is displayed in the File Manager or other DeskSet applications. See the section "Mask File" for more information.
If you don't specify an icon mask file, the entire icon image will be colored with the background color.
-
Specify the foreground and background colors for the icon by typing RGB (red/green/blue) values in the text fields, or by using the Color Chooser.
The foreground color is the color the icon is drawn with when it is displayed by the File Manager or other DeskSet applications. See the section "Foregr (Foreground) Color" for more information.
The background color is the color the icon is filled with when it is displayed by the File Manager or other DeskSet applications. If you have specified an icon mask file, the background color is only filled in the mask area. See the section "Backgr (Background) Color" for more information.
You use the Color Chooser to specify colors by clicking SELECT on the Foreground Color or Background Color menu buttons, located to the right of the Foregr and Backgr text fields. See "Using the Color Chooser Palette with Binder " for information about using the Color Chooser.
-
If desired, type an Application or Print Method, or both, in the text fields of the expanded Properties window.
If your Properties window is not expanded, click SELECT on the plus sign (+) button at the bottom right corner of the Properties window to display the Application and Print Method text fields.
The Application defines the application that is invoked whenever any file bound to this set of properties is opened in File Manager, Mail Tool, or other applications in the DeskSet environment. The default application is textedit.
The Print Method defines how a file bound to this set of properties is printed in the DeskSet environment. If you do not specify a Print Method, the print method of the application the file is being printed from is used.
-
Choose File Types on the Properties window Category choice item to display the File Type properties.
The File Type properties determine the set of files that are bound to the Icon properties that you just specified.
-
Type the new File Type entry name in the Pattern text field and press Return.
In this example, type cat in the Pattern text field.
If you are going to recognize files by Pattern, the Pattern text field must contain the pattern to be matched, such as cat in this example. If you are going to recognize files by Content, the Pattern text field can be anything that distinguishes this type of file.
-
Move the pointer to the Identify choice item on the expanded properties window, and click SELECT on "by Name" or "by Content" to specify how you want to recognize files.
In this example, click SELECT on "by Name" to match the file named cat.
If you select "by Content," the last four Type Information fields become active. You then need to specify the Tag Offset, Tag Type, and Tag Value to be used to recognize files by content. You can also specify a Tag Mask, if desired. See the section "Identify by Content" for more information about the Content fields.
-
If you want to specify more files to be bound to the Icon properties, repeat steps 9 and 10.
-
Click SELECT on the Apply button to apply the Icon and File Type properties to your new Binder entry.
-
Click SELECT on the Save button at the top of the Binder base window to save the new Binder entry in your personal database.
If you are running the Binder as root with the special options to update the system or network entries, the new entry is added to the appropriate database. See the section "Binder Databases" for information about the three different Binder databases.
Note -The DeskSet applications will not recognize the new binding until you have saved it by clicking SELECT on the Save button. You must also restart the application.
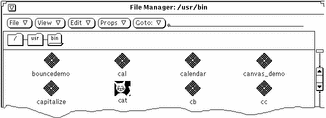
Figure 16-14 shows the new bound image after quitting File Manager and starting it again.
Figure 16-14 The New Image in the File Manager

- © 2010, Oracle Corporation and/or its affiliates
