Header Window Properties
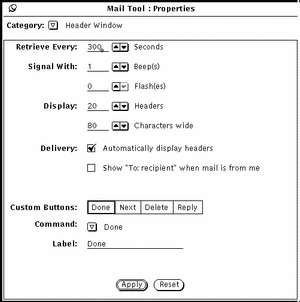
The Header Window properties are shown in Figure 4-31 and described in the following sections. After you change any of the Header Window properties, click SELECT on the Apply button to apply them to the Mail Tool application.
Figure 4-31 Header Window Properties

Mail Arrival Properties
Use the Retrieve Every field to determine how often new mail is retrieved. The default value is 300 seconds, or 5 minutes. You can retrieve mail at any time between this interval by choosing Load In-Box or Save Changes from the File Menu.
Use the Signal With fields to determine how Mail Tool signals new incoming mail. The Beep setting causes Mail Tool to beep the specified number of times. The Flash setting causes the icon to flash or the Header window to flash, depending on whether the Mail Tool is closed to an icon or open.
Mail Tool Window Size
Use the Display Headers field to determine how many headers are displayed in your primary Mail Tool Header window. You can increase the setting to display more headers at one time, or decrease the setting to display fewer headers to make the Header window smaller.
Use the Display Characters field to determine the width of all Mail Tool panels and windows.
After you make changes to the Display fields, you need to quit the Mail Tool application and restart it in order to see the change.
Delivery Properties
If you want Mail Tool to automatically display the headers for incoming mail messages, check the Automatically Display Headers option. If you do not choose this option, Mail Tool does not display headers for incoming messages unless you specifically request them by choosing Load In-Box or Save Changes from the File menu.
If the Show "To: recipient" ... option is checked, the Mail Tool header of a message sent by you will display the recipient of the message instead of your mail address.
Mail Tool Custom Buttons
The first four buttons on the second row of the Mail Tool Header window are custom buttons. You can change the value of these buttons to be any of the items from the File, View, Edit, or Compose menus. If there are items on these menus that you use very frequently, you can change your custom buttons to activate those commands.
-
The Custom Buttons choices indicate the current value of the four custom buttons. You select one of these choices to change the value of that custom button.
-
The Command setting shows you the command of the currently selected button, that is, what the button does.
-
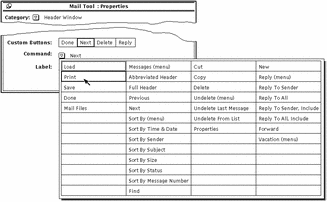
The Command menu button provides a menu of all of the available commands from the File, View, Edit, and Compose menus.
-
The Label text field determines what the custom button says. Usually this is the same as the command, but it doesn't have to be. Sometimes the command is too long to fit in the button, so the Label might be an abbreviation of the actual command.
To change the value of a custom button, follow the steps below.
-
Select the Custom Buttons choice that you want to change.
The first choice represents the first button on the second row of the Header window, the second choice represents the second button, and so on.
-
Choose the desired command from the Command menu shown in Figure 4-32.
The first column in the Command menu displays all the choices available from the Mail Tool File menu, the second column displays the choices from the View menu, the third displays the choices from the Edit menu, and the last column displays the choices from the Compose menu.
Figure 4-32 Header Window Properties Command menu

-
If you want to select a new label to go with the selected command, type a new label.
Try to keep the label as small as possible in order to keep the custom button to a reasonable size.
-
Click SELECT on Apply to change the custom button in the primary Mail Tool Header window.
The custom button on the Mail Tool Header window is changed to the new label and command. Figure 4-33shows the Header window with the second custom button changed to Print.
Figure 4-33 A New Custom Button (Print) on the Header Window

- © 2010, Oracle Corporation and/or its affiliates
