Chapter 2 System Power
Your SPARCstation Voyager has a new timesaving feature for turning the power off and on. The new feature, Suspend-Resume, is provided with your system.
Without Suspend-Resume, you must exit your applications, halt your operating system, and turn off the power. When you turn the power on again, the system must go through the normal boot sequence, taking at least a few minutes, before you can restart your applications and bring up your files.
With the SPARCstation Voyager, when you suspend, you save all the activities current on your workstation and turn the power off in one command. When you resume, the power comes on and the system displays your work at exactly the point where you left it, in a very short time.
Suspend-Resume works with Power Manager to suspend your system automatically. For information on how to set Power Manager for your individual needs, refer to Using Power Management in the Solaris 7 User Collection on the Solaris 7 Documenation CD.
SPARCstation Voyager consumes no power during suspension. You can leave the system suspended for an indefinite length of time without losing data.
Note -
If you are turning your system on for the first time, be sure to read "Preparing the System for Use".
This chapter tells you:
-
When and how to use suspend and resume to turn the power off
-
When and how to halt the operating system and turn the power off
-
How to turn the power back on
-
Troubleshooting
Suspending Your System
Usually Suspend is the best way to shut the power off. The Suspend-Resume feature is perfect for when you want to:
-
Transport the system
-
Change the power source to a battery or power supply
-
Unplug the system unit power cord
-
Shut the system off to conserve energy
If you need to shut the power off for other reasons, see "Halting the Operating System".
What to Consider Before Suspending
A few considerations apply to suspending the system. You must wait for the following operations to complete before you initiate suspend:
-
Audio activity
-
Floppy disk activity
-
Print jobs
-
Tape activity
As always, saving everything before you suspend is a good practice.
How to Suspend
Suspend and a subsequent resume typically require less than a minute.
Note -
When you resume, the Lockscreen utility is in effect for security. You need to type your password to gain access to the system.
You can perform suspend from several methods.
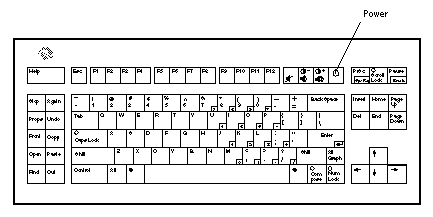
Figure 2-1 Power Key Location: Sun Compact 1 Keyboard

Suspend Method 1: Keyboard
-
Press the power key on the keyboard.
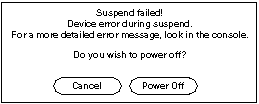
The pop-up confirmation window appears. See Figure 2-2.
Figure 2-2 Suspend Confirmation

-
Select Suspend.
Selecting Suspend will cause your computer to save your session to disk so that when you resume, the system displays your work as you left it.
-
Turn off the power to all external units.
External units may include external drive units, printers, or other serial or parallel devices. See the manual supplied with the external device for instructions.
Suspend Method 2: Keyboard
-
Press shift and the power key on the keyboard.
See Figure 2-1 for the location of the power key. A sequence begins (suspend) in which the system state is saved to disk before the power goes off. When you press the power key again (resume), the resulting display will be as you left it when you turned the power off.
-
Turn off the power to all external units.
External units may include external drive units, printers, or other serial or parallel devices. See the manual supplied with the external device for instructions.
Workspace Utilities Suspend
You can suspend your system using the Workspace Utilities menu.
-
Place your cursor in the workspace and hold down the menu button.
The Workspace menu will appear.
-
Select Utilities with the menu button.
-
Select the Suspend menu option.
The Suspend confirmation window will pop up. See Figure 2-2.
-
Select Suspend.
The system state is saved to disk. It will resume as you left it when you press the power key again.
-
Turn off the power to all external units.
External units may include external drive units, printers, or other serial or parallel devices. See the manual supplied with the external device for instructions.
Shell Command Suspend
You can use a shell command to suspend. The window system does not have to be running for the shell command suspend to work.
The Suspend confirmation window will appear. See Figure 2-2.If the window system is not running, the command will execute without the confirmation window.
-
Select Suspend.
The computer will save your activities to disk. When you press the power key again, the display will appear just as you left it.
-
Turn off the power to all external units.
External units may include external drive units, printers, or other serial or parallel devices. See the manual supplied with the external device for instructions.
Halting the Operating System
You must halt the operating system in an orderly manner. Do not turn off the system by disconnecting the AC plug or pulling the battery out. Doing so can cause damage to your operating system. Any data you have not saved will be lost.
Sometimes you must halt the operating system and turn the system off.
You must halt the operating system and turn off the power to:
-
Change the system configuration
-
Remove or install a part, such as a memory card, inside the system unit
-
Remove or install an external drive unit or monitor
-
Install a PCMCIA card in a slot previously occupied by a PCMCIA card of a different type
-
Install, reinstall, or upgrade the operating system
-
When your system is hung (frozen), you will not be able to halt the operating system; you must turn the power off
Changing the System Configuration
When you change the system configuration, for example, to add or remove an internal part such as a memory card or an external part such as a CD ROM or replace a PCMCIA card with one of a different type, you must halt the operating system and turn the power off. A configuration change requires you to reboot the system after adding or removing items. You will need to use the boot -r command to reconfigure the system.
Shutting the System Down
To halt the system, you must first become superuser.
-
tempest% su
The system will ask you for a password.
-
Type your superuser password.
A screen will appear with a # sign.
-
# init 0
screen messages
ok
After the ok prompt appears, you can turn the system off. Press Shift and the power key to turn the system off.
Rebooting After a Configuration Change
After you add a device to your SPARCstation Voyager, you must reboot in a particular way. After the system comes up, type boot -r to reconfigure the system.
How To Turn the Power Back On
Note -
If you are powering on your system for the first time, follow the instructions in "How to Turn the Power On".
-
Turn on the power for any external devices.
-
Press the power key on the keyboard.
If you used any of the Suspend methods to turn the system off, your system will Resume with the Lockscreen utility. After you type your password, the system will Resume at the point that you left it.
If you halted the system, it will boot.
Troubleshooting
This section describes the following:
-
What to do if power-on does not succeed
-
What to do if the power key does not suspend the system
-
How to recover from a hung system
-
What to do if suspend does not succeed
What To Do If Power-On Does Not Succeed
If you do not see the banner screen within 10 to 15 seconds after you turn on the power:
-
Check the power LED at the front of the system to see if it is lit.
-
Make sure the AC power cord is securely attached to both the power supply and the AC wall outlet.
-
Be sure the AC wall outlet has power.
-
Check to see that the keyboard cables are firmly connected.
-
Try pressing the power key again.
You should hear a beep as the machine comes on.
-
If the machine does not come on, try pressing the power switch on the rear panel.
See Figure 2-3.
Figure 2-3 Power Switch Location

If the power still does not come on, call your Sun sales office or a service provider.
If the Power Key Does Not Suspend the System
Use a shell window to check that the key processing daemon is present.
% ps -eaf | grep speckeysd
If the resulting output does not list /usr/openwin/bin/speckeysd, you should start it.
% /usr/openwin/bin/speckeysd
Recovering From a Hung System
If your system does not respond to the mouse or keyboard, perform the following steps:
-
If your system is on a network, wait a few minutes before taking any action.
A slow response may be due to network problems or delays. Check with your network administrator. If the response is not due to the network, go to the next step.
-
Press Stop-a.
Hold both keys down at the same time. Pressing Stop-a (or Break) puts the system into the monitor command mode (indicated by the ok prompt).
Note -If you use a Wyse WY-50, DEC VT100, or compatible terminal as the console with your SPARCstation Voyager system unit, press Break instead of Stop-a.
-
Type sync.
Your file system will be saved.
ok sync
-
When Stop-a (or Break) is not effective, turn the power off using the power switch on the back panel of the system.
See Figure 2-3. The system power will turn off without the Suspend sequence. When you turn the system on again, the boot sequence will begin. Your work will not be saved.
What To Do If Suspend Does Not Succeed
If Suspend does not succeed, an alert window will pop up and more information about the failure will be displayed in the console window.
Figure 2-4 Suspend Failed Example

If Suspend Does Not Succeed Do the Following
-
Select Cancel.
If you have not already saved your work, do so now.
-
Look in the Console window for more information.
You may be able to take corrective action.
-
Try Suspend again.
-
If Suspend succeeds, the system will save your activities and the system will power off.
-
If Suspend does not succeed, the alert will pop up again.
 Caution -
 Save your work if you have not already done so.
-
-
Select Power Off.
Your work will not be saved. When you power on again, the system will reboot.
If Power Off Fails Do the Following
Figure 2-5 Power Off Failure Window

-
Select Continue.
-
Save your work if you haven't already done so.
-
Turn the power off after halting the system.
See "Changing the System Configuration" and Steps 2 through 4 of "Recovering From a Hung System".
- © 2010, Oracle Corporation and/or its affiliates
