Chapter 3 Using Power Management Software on SPARCstation Voyager Systems
This chapter explains how to use the dtpower program to activate or turn off power management features, and to specify when you want the screen, hard disk, or the SPARCstation Voyager system to shut down automatically to reduce energy use.
This tool can be used with the OpenWindows(TM) and Common Desktop Environment (CDE) desktops.
Note -
If you are not using a SPARCstation Voyager, dtpower will operate in different ways. Refer to Using Power Management (rather than this book) for an explanation of using Power Management features on sun4m and sun4u desktop machines.
The dtpower program is integrated into the Power Management system for this nomadic computer. For example, if a SPARCstation Voyager is operating on battery power, the system will automatically suspend when it is about to exhaust the battery charge, regardless of what you have specified with the dtpower command.
A command line interface is also provided for a system administrator to change the system default settings. For information on using the pmconfig program and the power.conf file, refer to Using Power Management.
To start using dtpower, go to the next section ("Starting dtpower"") in this chapter.
Starting dtpower
Note -
In CDE, the Power Management icon appears on the default desktop.
Start dtpower by using one of the following methods.
To start dtpower Fom the Command Line
-
example% su
Password: root_password
You must become superuser before you can modify any settings in the Power Management software.
-
example% /usr/openwin/bin/dtpower &
To start dtpower From the OpenWindows Menus
-
Select Power Manager from the Workspace menu under the Programs option if you are using the default OpenWindows menu.
For more information on the Workspace menu, refer to the Solaris User's Guide.
The dtpower Icon
If you have already run the dtpower program, its icon may be displayed in one of the following ways:
-
This dtpower icon appears when the SPARCstation Voyager is connected to a wall outlet (that is, operating on AC).
-
One of these two dtpower icons appears when the SPARCstation Voyager is operating from a battery. The first indicates how many minutes of operation remain before recharging is needed. The second indicates that the battery is charging.
Figure 3-1 The dtpower Icon

Figure 3-2 dtpower Icons Indicating that the Battery is Charging

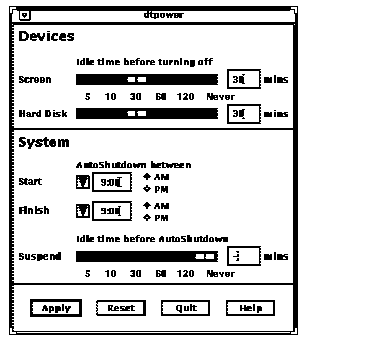
When you start up dtpower (or double-click on the dtpower icon), the main window is displayed, as shown in Figure 3-3.
Figure 3-3 dtpower Main Window for the SPARCstation Voyager

In this window you can see the current settings for Power Management features. You also can change the settings, as described in the procedures in this chapter. Figure 3-3 indicates the default settings for Power Management on a SPARCstation Voyager.
The buttons at the bottom of this window have the following effects:
-
Apply puts into effect all the settings currently displayed in the window.
-
Reset changes all the settings back to the state they were when Apply was previously selected (or to the machine's default values if this is the first time dtpower has been run). Reset, however, will not return to earlier values if you have already selected Apply.
-
Quit dismisses the dtpower window; no icon remains on the screen. Any settings that were not put into effect with the Apply button will be lost.
-
Help displays information about using the dtpower window.
To reduce this main window to an icon again, select Close from the window bar.
The Devices Panel
You can use the Devices panel of the dtpower window to specify whether you want the screen or hard disk to turn off after a specified number of minutes of idle time for each device.
To Set an Idle Time for Your Screen
-
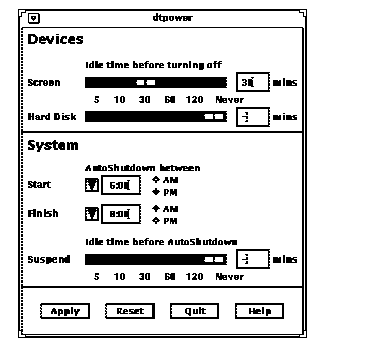
Drag the Screen slider of the Devices panel (Figure 3-4) to set the length of idle time in minutes before your screen will automatically power off.
You can deactivate automatic control of power for your screen by dragging the screen slider to the far right position, which is labeled "Never."
Also, you can set the time by typing the number of minutes directly into the box to the right of the slider.
-
Click Apply at the bottom of the window.
In Figure 3-4, the previous setting ("Never") has been changed to 30 minutes. Your screen will now automatically power off after 30 minutes of inactivity (that is, no keystrokes or mouse activity).
Figure 3-4 Setting a Screen Idle Time for a SPARCstation Voyager

If you have not selected Apply yet, you can return to the previous settings by selecting Reset at the bottom of the window.
To Set an Idle Time for Your Hard Disk
-
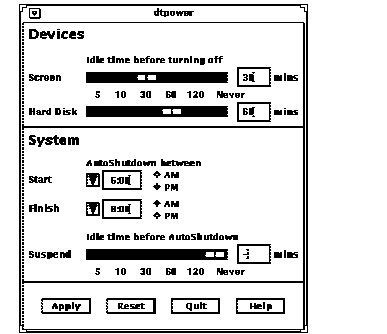
Drag the Hard Disk slider of the Devices panel (Figure 3-5) to set the length of idle time in minutes before your hard disk will automatically power off.
You can deactivate automatic control of power for your hard disk by dragging the hard disk slider to the far right position, which is labeled "Never."
Also, you can set the time by typing the number of minutes directly into the box to the right of the slider.
-
Click Apply at the bottom of the window.
In Figure 3-5, the previous setting ("Never") has been changed to 60 minutes. This hard disk will automatically power off after 60 minutes of inactivity (that is, no keystrokes or mouse activity).
Figure 3-5 Setting a Hard Disk Idle Time for a SPARCstation Voyager

If you have not selected Apply yet, you can return to the previous settings by selecting Reset at the bottom of the window.
The System Panel
On the System panel you can specify the conditions when your system will shut down automatically while idle.
Note -
Be sure you have read all cautions on using Power Management software in Using Power Management and in release notes before changing the AutoShutdown settings.
AutoShutdown uses the Suspend feature to automatically power off your system. When the system powers up again, it will resume in the same state as when it was suspended.
Using the System panel of the dtpower window, you can activate or deactivate the AutoShutdown feature, and specify the following times:
-
The number of minutes of idle time before AutoShutdown attempts to suspend the system
-
The Start and Finish times of the period each day when AutoShutdown can occur (When the Start and Finish times are identical, AutoShutdown can occur at any time.)
To Set an Idle Time for AutoShutdown of the System
-
Start dtpower as superuser (see "Starting dtpower").
-
Drag the Suspend slider to the number of minutes of idle time you want before the system will power down automatically.
If you want to completely deactivate the AutoShutdown feature, select the Never setting at the far right of the slider.
Also, you can type the number of minutes directly in the numerical box to the right of the slider.
-
Select the Start time of the period each day when you want AutoShutdown of the system to be able to take place.
You can select the time (in 15-minute increments) through a menu that drops down from the button closest to the Start label.
Also, you can type the Start time directly into the numerical box.
-
Click AM or PM for the Start time.
-
Select the Finish time of the period each day when you want AutoShutdown of the system to be able to take place.
You can select the time (in 15-minute increments) through a menu that drops down from the button closest to the Finish label. The last setting on this menu is All Day, which means AutoShutdown can occur at any time of day.
Also, you can type the Finish time directly into the numerical box. You can specify "All Day" this way by entering a Finish time that is identical to the Start time.
-
Click AM or PM for the Finish time.
-
Click the Apply when the settings you want are all displayed.
If you want to reject the displayed settings, select Reset and the currently active settings (that is, whatever settings were last put into effect by selecting Apply) will be displayed in the window.
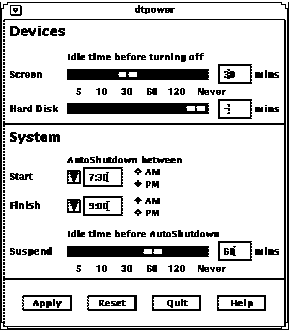
In Figure 3-6, the System panel is set for AutoShutdown of the system after 60 minutes of idle time between 7:30 pm and 9:00 am
Figure 3-6 Setting the AutoShutdown Timing for a SPARCstation Voyager

Exiting dtpower
Make sure you have clicked Apply if you want to activate any new settings you have made in this window.
To Exit dtpower
- © 2010, Oracle Corporation and/or its affiliates
