| Skip Navigation Links | |
| Exit Print View | |

|
Oracle Solaris Cluster 3.3 With SCSI JBOD Storage Device Manual |
| Skip Navigation Links | |
| Exit Print View | |

|
Oracle Solaris Cluster 3.3 With SCSI JBOD Storage Device Manual |
1. Installing a SCSI JBOD Storage Device
2. Maintaining a SCSI JBOD Storage Device
Sun StorEdge 3120 Cabling Diagrams
Installing a Sun StorEdge 3120 Storage Array
Sun StorEdge 3310 and 3320 SCSI Cabling Diagrams
Installing a Sun StorEdge 3310 or 3320 Storage Array
Adding a Sun StorEdge 3310 or 3320 Storage Array
SPARC: Sun StorEdge D1000 Cabling Diagrams
SPARC: Installing a Sun StorEdge D1000 Storage Array
SPARC: Adding a Sun StorEdge D1000 Storage Array
SPARC: Replacing a Sun StorEdge D1000 Storage Array
SPARC: Removing a Sun StorEdge D1000 Storage Array
SPARC: Sun StorEdge Multipack Cabling Diagrams
SPARC: Installing a Sun StorEdge Multipack Storage Array
SPARC: Adding a Sun StorEdge Multipack Storage Array
SPARC: Replacing a Sun StorEdge Multipack Storage Array
SPARC: Removing a Sun StorEdge Multipack Storage Array
SPARC: Sun StorEdge Netra D130/S1 Cabling Diagrams
SPARC: Installing a Sun StorEdge Netra D130/S1 Storage Array
SPARC: Adding a Sun StorEdge Netra D130/S1 Storage Array
SPARC: Replacing a Sun StorEdge Netra D130/S1 Storage Array
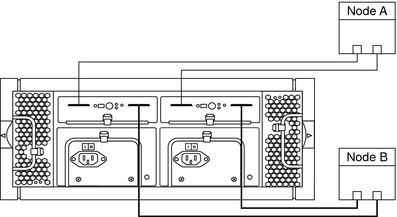
You can install a single storage array by using a split-bus configuration. You can install two storage arrays by using a single-bus configuration.
Figure 3-24 SPARC: Installing a Sun StorEdge D2 Split-Bus Configuration: An Example

To use a single storage array in a Oracle Solaris Cluster environment, you must use the split-bus configuration.
As Figure 3-24 shows, the split-bus configuration requires that the storage array contain two Environmental Service Modules (ESM). Each ESM is connected to two nodes. Each ESM controls half the disks in the storage array and the data is mirrored by using a volume manager.
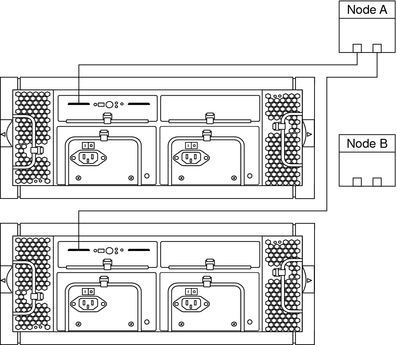
Figure 3-25 SPARC: Installing a Sun StorEdge D2 Single-Bus Configuration: An Example

As Figure 3-25 shows, the single-bus configuration requires two storage arrays that each contain a single Environmental Service Module (ESM). The ESM controls all disks on the storage array in which it is installed and the volume manager implements mirroring between the two storage arrays. Each ESM must be connected to two nodes.
Ensure that the entire bus length that is connected to the storage array is less than 12 m. The bus length includes the cables from the ESM to the host adapter. See the documentation that shipped with your hardware for internal bus length.
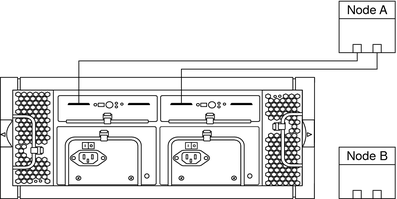
For split-bus configurations, see Figure 3-26 and Figure 3-28.
For single-bus configurations, see Figure 3-27 and Figure 3-29.
Figure 3-26 SPARC: Adding a Sun StorEdge D2 Split-Bus Configuration: Part 1

Figure 3-27 SPARC: Adding a Sun StorEdge D2 Single-Bus Configuration: Part 1

Figure 3-28 SPARC: Adding a Sun StorEdge D2 Split-Bus Configuration: Part 2

Figure 3-29 SPARC: Adding a Sun StorEdge D2 Single-Bus Configuration: Part 2
