| Skip Navigation Links | |
| Exit Print View | |

|
Oracle Solaris Cluster 3.3 With SCSI JBOD Storage Device Manual |
| Skip Navigation Links | |
| Exit Print View | |

|
Oracle Solaris Cluster 3.3 With SCSI JBOD Storage Device Manual |
1. Installing a SCSI JBOD Storage Device
2. Maintaining a SCSI JBOD Storage Device
Sun StorEdge 3120 Cabling Diagrams
Installing a Sun StorEdge 3120 Storage Array
Sun StorEdge 3310 and 3320 SCSI Cabling Diagrams
SPARC: Sun StorEdge D1000 Cabling Diagrams
SPARC: Installing a Sun StorEdge D1000 Storage Array
SPARC: Adding a Sun StorEdge D1000 Storage Array
SPARC: Replacing a Sun StorEdge D1000 Storage Array
SPARC: Removing a Sun StorEdge D1000 Storage Array
SPARC: Sun StorEdge Multipack Cabling Diagrams
SPARC: Installing a Sun StorEdge Multipack Storage Array
SPARC: Adding a Sun StorEdge Multipack Storage Array
SPARC: Replacing a Sun StorEdge Multipack Storage Array
SPARC: Removing a Sun StorEdge Multipack Storage Array
SPARC: Sun StorEdge Netra D130/S1 Cabling Diagrams
SPARC: Installing a Sun StorEdge Netra D130/S1 Storage Array
SPARC: Adding a Sun StorEdge Netra D130/S1 Storage Array
SPARC: Replacing a Sun StorEdge Netra D130/S1 Storage Array
SPARC: Removing a Sun StorEdge Netra D130/S1 Storage Array
SPARC: Sun StorEdge D2 Cabling Diagrams
SPARC: Installing a Sun StorEdge D2 Storage Array
Ensure that the cable does not exceed bus-length limitations. For more information about bus-length limitations, see the documentation that shipped with your hardware.
For the procedure about how to cable the storage arrays, see the Sun StorEdge 3000 Family Installation, Operation, and Service Manual. For a URL to this storage documentation, see Related Documentation.
Figure 3-3 Cabling a Dual-Bus, Multi-Initiator Sun StorEdge 3310 or 3320 Storage Array

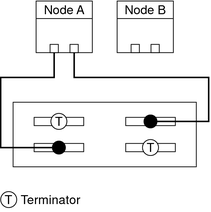
If the storage array is in dual-bus, multi-initiator mode, see Figure 3-4 for a diagram about how to cable and terminate the storage arrays.
 | Caution - Do not power on the storage array until the storage array is cabled to the first node. |
Ensure that the cable does not exceed bus-length limitations. For more information about bus-length limitations, see the documentation that shipped with your hardware.
For the procedure about how to cable the storage arrays, see the Sun StorEdge 3000 Family Installation, Operation, and Service Manual. For a URL to this storage documentation, see Related Documentation.
Figure 3-4 Cabling a Dual-Bus, Multi-Initiator Sun StorEdge 3310 or 3320 Storage Array: Part 1

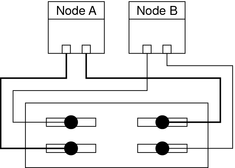
If the storage array is in dual-bus, multi-initiator mode, remove the terminators and connect the storage array to the second node. See Figure 3-5 for a diagram about how to cable the storage array to both nodes.
For the procedure about how to cable the storage arrays, see the Sun StorEdge 3000 Family Installation, Operation, and Service Manual. For a URL to this storage documentation, see Related Documentation.
Ensure that the cable does not exceed bus-length limitations. For more information about bus-length limitations, see the documentation that shipped with your hardware.
Figure 3-5 Cabling a Dual-Bus, Multi-Initiator Sun StorEdge 3310 or 3320 Storage Array: Part 2
