Chapter 10 Administering DHCP (Task)
This chapter describes tasks you might find useful when you administer the Solaris DHCP service. The chapter includes tasks for the server, BOOTP relay agent, and client. Each task includes a procedure to help you perform the task in DHCP Manager and a procedure for the equivalent task with DHCP command-line utilities. DHCP command-line utilities are more fully documented in man pages.
You should have already completed the initial configuration of your DHCP service and initial network before you use this chapter. Chapter 9, Configuring DHCP Service (Task) discusses DHCP configuration.
The chapter contains the following information:
DHCP Manager
DHCP Manager is a graphical interface you can use to perform administration tasks on the DHCP service.
The DHCP Manager Window
The DHCP Manager window's appearance differs, depending on whether the server on which it is running was configured as a DHCP server or a BOOTP relay agent.
When the server is configured as a DHCP server, DHCP Manager uses a tab-based window, in which you select a tab for the type of information you want to work with. DHCP Manager features the following tabs:
-
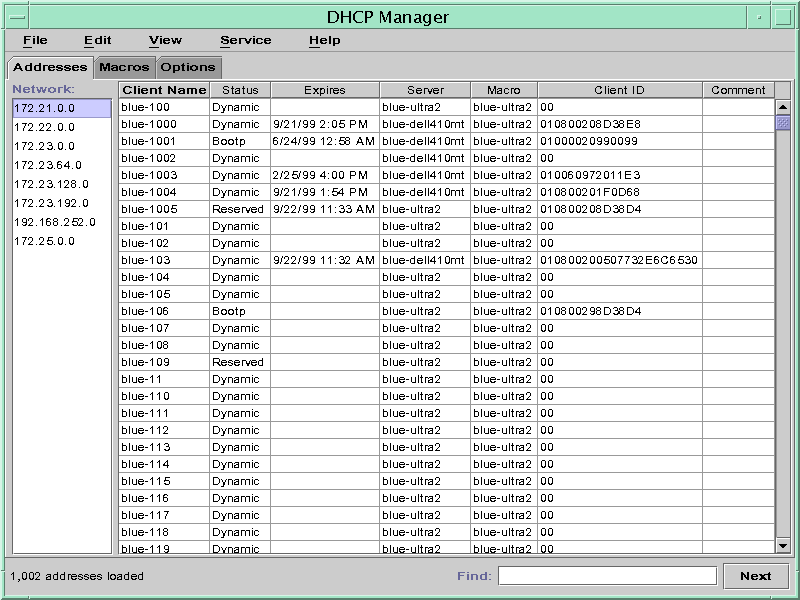
Addresses – Lists all networks and IP addresses placed under DHCP management. From the Addresses tab, you can add or delete networks and add or delete IP addresses individually or in blocks. You can also modify the properties of individual networks or IP addresses or make the same property modifications for a block of addresses simultaneously. When you start DHCP Manager, it opens on the Addresses tab.
-
Macros – Lists all macros available in the DHCP configuration database (dhcptab) and the options contained within them. From the Macros tab, you can create or delete macros, and modify them by adding options and providing values for the options.
-
Options – Lists all options that have been defined for this DHCP server. Options listed on this tab are not the standard ones defined in the DHCP protocol. The options are extensions to the standard options, and have a class of Extended, Vendor, or Site. Standard options cannot be changed in any way so they are not listed here.
The following figure shows the DHCP Manager window as it appears when you start it on a DHCP server.
Figure 10–1 DHCP Manager on a DHCP Server System
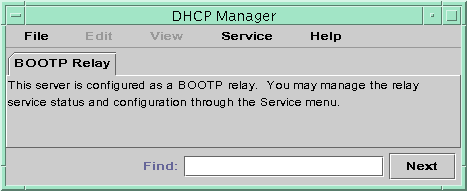
When the server is configured as a BOOTP relay agent, the DHCP Manager window does not show these tabs because the BOOTP relay agent does not need any of this information. You can only modify the BOOTP relay agent's properties and stop/start the DHCP daemon with DHCP Manager. The following figure shows the DHCP Manager window as it appears when you start it on a system configured as a BOOTP relay agent.
Figure 10–2 DHCP Manager on a BOOTP Relay Agent System
DHCP Manager Menus
-
File – Exit DHCP Manager
-
Edit – Perform management tasks upon networks, addresses, macros, and options
-
View – Change the look of the tab currently selected
-
Service – Manage the DHCP daemon and data store.
-
Help – Open your web browser and display help for DHCP Manager
When DHCP Manager runs on a BOOTP relay agent, the Edit and View menus are disabled.
All DHCP service management activities are accomplished through the Edit and Service menus. You use the commands in the Edit menu to create, delete, and modify networks, addresses, macros, and options, depending on which tab is selected. When the Addresses tab is selected, the Edit menu also lists wizards, which are sets of dialogs that make it easy to create networks and multiple IP addresses. The Service menu lists commands that enable you to manage the DHCP daemon. You can start/stop, enable/disable, modify the server configuration, and unconfigure the server. The Service menu also lists commands that enable you to convert the data store and export and import data on the server.
Starting and Stopping DHCP Manager
You must run DHCP Manager on a DHCP server system as superuser, but you can display it remotely on another UNIX system using the X Window remote display feature.
How to Start and Stop DHCP Manager
-
If you are logged in to the DHCP server system remotely, you can display DHCP Manager on your local system as follows.
-
Type the following command:
# /usr/sadm/admin/bin/dhcpmgr &
The DHCP Manager window opens, displaying the Addresses tab if the server is configured as a DHCP server, or no tabs if the server is configured as a BOOTP relay agent.
-
To stop the DHCP Manager, choose Exit from the File menu.
Setting Up User Access to DHCP Commands
To allow users other than root to execute dhcpconfig, dhtadm, and pntadm commands without first becoming superuser, you must set up role-based access control (RBAC) for those commands. RBAC enables you to more precisely define which users can perform which tasks on the system. See rbac(5), exec_attr(4), and user_attr(4) man pages for more information.
The following procedure explains how to assign a user the DHCP Management profile, which enables the user to execute the DHCP commands.
How to Grant Users Access to DHCP Commands
-
Become superuser on the DHCP server system.
-
Edit the file /etc/user_attr to add an entry of the following form for each user you want to be able to manage the DHCP service:
username::::type=normal;profiles=DHCP Management
For example, for user ram, add the following entry:
ram::::type=normal;profiles=DHCP Management
Starting and Stopping the DHCP Service
The starting and stopping of the DHCP service encompasses several degrees of action you can take to affect the operation of the DHCP daemon. You must understand what it means to start/stop, enable/disable, and configure/unconfigure the DHCP service in order to select the correct procedure to obtain the result you want. The terms are explained below.
-
Start, stop, and restart commands affect the daemon only at the current session. For example, if you stop the DHCP service, the daemon terminates but restarts when you reboot the system. DHCP data tables are not affected when you stop the service.
-
Enable and disable commands affect the daemon for current and future sessions. If you disable the DHCP service, the currently running daemon terminates and does not start when you reboot the server. You must enable the DHCP daemon for the automatic start at system boot to occur. DHCP data tables are not affected. You can disable and enable the DHCP service only from DHCP Manager.
-
Unconfigure command shuts down the daemon, prevents the daemon from starting on system reboot, and enables you to remove the DHCP data tables. Unconfiguration is described in Chapter 9, Configuring DHCP Service (Task).
Note –
If a server has multiple network interfaces and you do not want to provide DHCP services on all the networks, see Specifying Network Interfaces to Monitor for DHCP Service.
This section provides the procedures to help you start and stop the DHCP service, and enable and disable it.
How to Start and Stop the DHCP Service (DHCP Manager)
-
Start DHCP Manager.
See How to Start and Stop DHCP Manager for the procedure.
-
Select one of the following operations:
How to Start and Stop the DHCP Service (Command Line)
-
Choose one of the following operations:
-
To start the DHCP service, type the following command:
# /etc/init.d/dhcp start
The DHCP daemon starts, using the configuration parameters set in /etc/inet/dhcpsvc.conf.
-
To stop the DHCP service, type the following command:
# /etc/init.d/dhcp stop
The DHCP daemon stops until it is manually started again, or the system reboots.
-
How to Enable and Disable the DHCP Service (DHCP Manager)
Modifying DHCP Service Options (Task Map)
You can change values for some additional features of the DHCP service, some of which were not offered during the initial configuration with DHCP Manager. If you configured your server with dhcpconfig, the server is using default values for these options. You can use the Modify Service Options dialog box in DHCP Manager or specify options on the in.dhcpd command to change service options.
The following task map shows the tasks related to service options and the procedures to use:
|
Task |
Description |
Instructions |
|---|---|---|
|
Change logging options |
Enable or disable verbose logging, enable or disable logging of DHCP transactions, and select a syslog facility to use for logging DHCP transactions. |
How to Generate Verbose DHCP Log Messages (DHCP Manager) How to Generate Verbose DHCP Log Messages (Command Line) How to Enable and Disable DHCP Transaction Logging (DHCP Manager) How to Enable and Disable DHCP Transaction Logging for Current Session (Command Line) |
|
Change DNS update options |
Enable or disable server's adding DNS entries for clients that supply a host name, and determine the maximum time the server should spend attempting to update DNS. | |
|
Enable or disable duplicate IP address detection |
Enable or disable the DHCP server's determination that an IP address is not already in use before offering it to a client. |
How to Customize DHCP Server Performance Options (DHCP Manager) How to Customize DHCP Server Performance Options (Command Line) |
|
Change options for DHCP server's reading of configuration information |
Enable or disable automatic reading of dhcptab at specified intervals, or change the interval between reads. |
How to Customize DHCP Server Performance Options (DHCP Manager) How to Customize DHCP Server Performance Options (Command Line) |
|
Change the number of relay agent hops |
Increase or decrease the number of networks a request can travel through before being dropped by the DHCP daemon. |
How to Customize DHCP Server Performance Options (DHCP Manager) How to Customize DHCP Server Performance Options (Command Line) |
|
Change the length of time an IP address offer is cached |
Increase or decrease the number of seconds that the DHCP service reserves an offered IP address before offering to a new client. |
How to Customize DHCP Server Performance Options (DHCP Manager) How to Customize DHCP Server Performance Options (Command Line) |
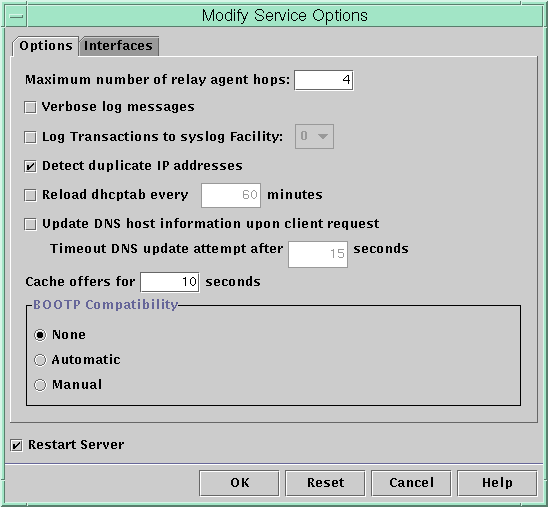
The following figure shows DHCP Manager's Modify Service Options dialog box.
Figure 10–3 Modify Service Options Dialog Box
Changing DHCP Logging Options
The DHCP service can log DHCP service messages and DHCP transactions to syslog. See thesyslogd(1M) andsyslog.conf(4) man pages for more information about syslog.
DHCP service messages logged to syslog include:
-
Error messages, which notify the administrator of conditions that prevent the DHCP service from fulfilling a request by a client or by the administrator.
-
Warnings and notices, which notify the administrator of conditions that are abnormal, but do not prevent the DHCP service from fulfilling a request.
You can increase the amount of information reported by using the verbose option for the DHCP daemon. Verbose message output can help you troubleshoot DHCP problems. See How to Generate Verbose DHCP Log Messages (DHCP Manager).
Another useful troubleshooting technique is transaction logging. Transactions provide information about every interchange between a DHCP server or BOOTP relay and clients. DHCP transactions include:
-
ASSIGN – IP address assignment
-
ACK – Server acknowledges that client accepts the offered IP address, and sends configuration parameters
-
EXTEND – Lease extension
-
RELEASE – IP address release
-
DECLINE – Client is declining address assignment
-
INFORM – Client is requesting network configuration parameters but not an IP address
-
NAK – Server does not acknowledge a client's request to use a previously used IP address
-
ICMP_ECHO – Server detects potential IP address is already in use by another host.
BOOTP relay transactions include:
-
RELAY-CLNT – Message being relayed from the DHCP client to a DHCP server
-
RELAY–SRVR – Message being relayed from the DHCP server to the DHCP client
Transaction logging is disabled by default. When enabled, transaction logging uses the local0 syslog facility by default. DHCP transaction messages are generated with a syslog severity level of notice, so by default, transactions are logged to the file where other notices are logged. However, because they use a local facility, the transaction messages can be logged separately from other notices if you edit the syslog.conf file to specify a separate log file.
You can disable or enable transaction logging, and specify a different syslog facility, from 0 through 7, as explained in How to Enable and Disable DHCP Transaction Logging (DHCP Manager). If you edit the server system's syslog.conf file, you can also instruct syslogd to store the DHCP transaction messages in a separate file, as explained in How to Log DHCP Transactions to a Separate syslog File.
How to Generate Verbose DHCP Log Messages (DHCP Manager)
-
Choose Modify from the Service menu.
-
Select Verbose Log Messages.
-
Select Restart Server if it is not already selected.
-
Click OK.
The daemon runs in verbose mode for this session and each subsequent session until you reset this option. Verbose mode can reduce daemon efficiency because of the time taken to display messages.
How to Generate Verbose DHCP Log Messages (Command Line)
-
Become superuser on the DHCP server system.
-
Type the following commands to stop the DHCP daemon and restart it in verbose mode:
# /etc/init.d/dhcp stop
# /usr/lib/inet/in.dhcpd -v options
where options are any other options you normally use to start the daemon.
The daemon runs in verbose mode for this session only.
Verbose mode can reduce daemon efficiency because of the time taken to display messages.
How to Enable and Disable DHCP Transaction Logging (DHCP Manager)
This procedure enables/disables transaction logging for all subsequent DHCP server sessions.
-
Choose Modify from the Service menu.
-
Select Log Transactions to Syslog Facility.
To disable transaction logging, deselect this option.
-
(Optional) Select a local facility from 0 to 7 to use for logging transactions.
By default, DHCP transactions are logged to the location where system notices are logged, which depends on how syslogd is configured. If you want the DHCP transactions to be logged to a file separate from other system notices, see How to Log DHCP Transactions to a Separate syslog File.
Message files can quickly become very large when transaction logging is enabled.
-
Select Restart Server if it is not already selected.
-
Click OK.
The daemon will log transactions to the selected syslog facility for this session and each subsequent session until you disable it in this dialog box.
How to Enable and Disable DHCP Transaction Logging for Current Session (Command Line)
-
Become superuser on the DHCP server system.
-
Type the following commands to enable logging for the current session:
# /etc/init.d/dhcp stop
# /usr/lib/inet/in.dhcpd -l syslog-local-facility
where syslog-local-facility is a number from 0 through 7. If you omit this option, 0 is used by default. See How to Enable and Disable DHCP Transaction Logging (DHCP Manager).
Note –To disable transaction logging, omit the -l option when starting in.dhcpd.
By default, DHCP transactions are logged to the location where system notices are logged, which depends on how syslogd is configured. If you want the DHCP transactions to be logged to a file separate from other system notices, see How to Log DHCP Transactions to a Separate syslog File.
Message files can quickly become very large when transaction logging is enabled.
How to Log DHCP Transactions to a Separate syslog File
-
Become superuser on the DHCP server system.
-
Edit the /etc/syslog.conf file on the server system and add a line of the following format:
localn.notice path-to-logfile
where n is the syslog facility number you specified for transaction logging, and path-to-logfile is the complete path to the file to use for logging transactions.
For example, you might add the following line:
local0.notice /var/log/dhcpsrvc
See the syslog.conf(4) man page for more information about the syslog.conf file.
Enabling Dynamic DNS Updates by DHCP Server
If a host name is mapped to the IP address leased to a DHCP client and the DHCP server has been configured to supply host names, the DHCP server will inform the client of the name it has been assigned. Alternatively, the DHCP server may be configured so that DHCP clients may supply their own host names and the DHCP server will attempt DNS updates on their behalf.
DNS provides basic name-to-address and address-to-name services for the Internet. Once a DNS update is made, other systems may refer to the DHCP client system by name.
You can enable the DHCP service to update the DNS service with the host names of DHCP clients that supply their own host names. When a system's name is registered with DNS, the system is visible outside its domain. In order for the DNS update feature to work, the DNS server, DHCP server, and DHCP client must all be set up correctly, and the requested name must not be in use by another system in the domain.
The DHCP server's DNS update feature works if all the following are true:
-
DNS server supports RFC 2136.
-
DNS software that is BIND-based, whether on the DHCP server system or the DNS server system, must be v8.2.2, patch level 5 or newer.
-
DNS server is configured to accept dynamic DNS updates from the DHCP server.
-
DHCP server is configured to make dynamic DNS updates.
-
DNS support is configured for the DHCP client's network on the DHCP server.
-
DHCP client is configured to supply a requested host name in its DHCP request message.
-
Requested host name corresponds to a DHCP-owned address or has no corresponding address.
How to Enable Dynamic DNS Updating for DHCP Clients
Note –
Be aware that dynamic DNS updates are by nature a security risk.
By default, the Solaris DNS daemon (in.named) does not allow dynamic updates. Authorization for dynamic DNS updates is granted if the requesting host's IP address is assigned to the allow-update keyword in the appropriate zones of the named.conf configuration file on the DNS server system. No other security is provided. You must carefully weigh the convenience of this facility for users against the security risk created when you enable dynamic DNS updates.
-
At the DNS server, edit the /etc/named.conf file as root.
-
Find the zone section for the appropriate domain and add the DHCP server's IP addresses to the allow-update keyword.
For example, if the DHCP server resides at addresses 10.0.0.1 and 10.0.0.2, a named.conf file for the dhcp.domain.com zone would be modified as follows:
zone "dhcp.domain.com" in {
             type master;
             file "db.dhcp";
             allow-update { 10.0.0.1; 10.0.0.2; };
};

zone "10.IN-ADDR.ARPA" in {
             type master;
             file "db.10";
             allow-update { 10.0.0.1; 10.0.0.2; };
};
Note that allow-update for both zones must be enabled to allow the DHCP server to update both A and PTR records on the DNS server.
-
On the DHCP server, start DHCP Manager.
-
Choose Modify from the Service menu.
The Modify Service Options dialog box opens.
-
Select Update DNS Host Information Upon Client Request.
-
Specify the number of seconds to wait for a response from the DNS server before timing out, then click OK.
The default value should be adequate. If you have timeout problems, you can increase the value later.
-
Click the Macros tab and ensure that the correct DNS domain is specified.
The DNSdmain option must be passed with the correct domain name to any client that expects dynamic DNS update support. By default, DNSdmain is specified in the server macro, which is used as the configuration macro bound to each IP address.
-
Set up the DHCP client to specify its host name when requesting DHCP service.
If you use the Solaris DHCP client, see How to Enable a Solaris Client to Request Specific Host Name. If your client is not a Solaris DHCP client, see the documentation for your DHCP client for information about how to do this.
How to Enable a Solaris Client to Request Specific Host Name
-
On the client system, edit the /etc/default/dhcpagent file as root.
-
Find the keyword REQUEST_HOSTNAME in the /etc/default/dhcpagent file and modify it as follows:
REQUEST_HOSTNAME=yes
If there is a comment sign (#) in front of the keyword, remove the #. If the keyword is not present, insert it.
-
Edit the /etc/hostname.interface file on the client system and add the following line:
inet hostname
where hostname is the name you want the client to use.
-
As root, type the following commands to have the client perform a full DHCP negotiation upon rebooting:
# pkill dhcpagent
# rm /etc/dhcp/interface.dhc
# reboot
The DHCP server makes sure that the host name is not in use by another system on the network before the server assigns it to the client. Depending how it is configured, the DHCP server may update name services with the client's host name.
Customizing DHCP Service Performance Options
You can change options that affect the performance of the DHCP service. These options are described in the following table.
Table 10–1 Options Affecting DHCP Server Performance
The following procedures describe how to change these options.
How to Customize DHCP Server Performance Options (DHCP Manager)
-
To change the number of BOOTP relay agents a request can pass through, specify a different Maximum Number of Relay Agent Hops.
-
To have the DHCP server verify that an IP address is not in use before it offers the address to a client, select Detect Duplicate IP Addresses.
-
To have the DHCP server read dhcptab at specified intervals, select Reload dhcptab Every n Minutes, and type the number of minutes for the interval.
-
To change the length of time the server holds an IP address open after it makes an offer, type the number of seconds in the field Cache Offers for n Seconds.
-
Select Restart Server if it is not already selected.
-
Click OK.
How to Customize DHCP Server Performance Options (Command Line)
If you change options with this procedure, the changed options affect only the current server session. If the DHCP server system reboots, the DHCP server starts with the settings specified during server configuration. If you want settings to apply to all future sessions, you must make changes using DHCP Manager.
-
Become superuser on the DHCP server system.
-
Type the following command:
# /etc/init.d/dhcp stop
# /usr/lib/inet/in.dhcpd options
where options are any of the following:
-h relay-hops
Specifies the maximum number of relay agent hops that can occur before the daemon drops the DHCP/BOOTP datagram.
-n
Disables automatic duplicate IP address detection. This is not recommended.
-t dhcptab_rescan_interval
Specifies the interval in minutes that the DHCP server should use to schedule the automatic rereading of the dhcptab information.
-o seconds
Specifies the number of seconds the DHCP server should cache the offers it has extended to discovering DHCP clients. The default setting is 10 seconds.
For example, the following command sets the hop count to 2, disables duplicate IP address detection, sets the rescan interval to 30 minutes, and sets the offer time to 20 seconds.
# /usr/lib/inet/in.dhcp -h 2 -n -t 30 -o 20
Adding, Modifying, and Removing DHCP Networks (Task Map)
When you configure a DHCP server, you must also configure at least one network in order to use the DHCP service. You can add more networks at any time.
The following task map lists tasks you may need to perform when working with DHCP networks and the procedures used to carry them out.
|
Task |
Description |
Instructions |
|---|---|---|
|
Enable or disable DHCP service on server network interfaces |
The default behavior is to monitor all network interfaces for DHCP requests, but you can change this. |
How to Specify Network Interfaces for DHCP Monitoring (DHCP Manager) |
|
Add a new network to the DHCP service |
Place a network under DHCP management, for the purpose of managing IP addresses on the network. | |
|
Change parameters of a DHCP-managed network |
Modify the information that is passed to clients of a particular network. |
How to Modify Configuration of a DHCP Network (DHCP Manager) |
|
Delete a network from the DHCP service |
Remove a network so that IP addresses on the network are no longer managed by DHCP. |
Specifying Network Interfaces to Monitor for DHCP Service
By default, both dhcpconfig and DHCP Manager's Configuration Wizard configure the DHCP server to monitor all the server system's network interfaces. If you add a new network interface to the server system, the DHCP server automatically monitors the new interface when you boot the system. You can then add any networks that will be monitored through the network interface.
However, DHCP Manager also allows you to specify which network interfaces the DHCP service should monitor and which it should ignore. You might want to ignore an interface if you do not want to offer DHCP service on that network.
If you specify that any interface should be ignored, and then install a new interface, the DHCP server ignores the new interface unless you add it to the server's list of monitored interfaces. You can specify interfaces with DHCP Manager.
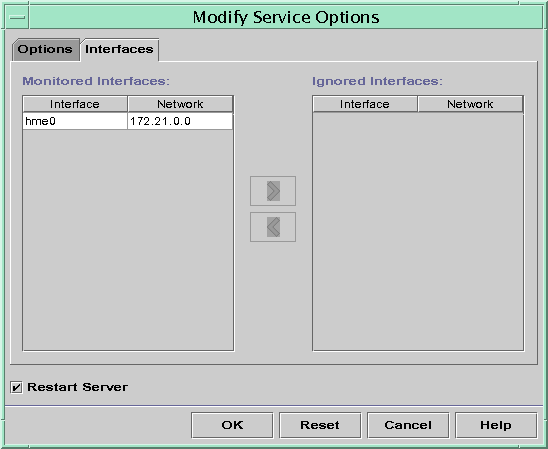
This section includes a procedure that enables you to specify which network interfaces DHCP should monitor, and which to ignore. The procedure uses the Interfaces tab of the DHCP Manager's Modify Service Options dialog box, which is shown in the following figure.
Figure 10–4 Interfaces Tab of Modify Service Options Dialog Box
How to Specify Network Interfaces for DHCP Monitoring (DHCP Manager)
-
Choose Modify from the Service menu.
The Modify Service Options dialog box is displayed.
-
Select the Interfaces tab.
-
Select the appropriate network interface and click the arrow buttons to move the interface to the Monitored Interfaces list or the Ignored Interfaces list.
For example, to ignore an interface, select it in the Monitored Interfaces list and click the right arrow button to move the interface in the Ignored Interfaces list.
-
Make sure Restart Server is selected and click OK.
Adding DHCP Networks
When you use DHCP Manager to configure the server, the first network (usually the local one on the server system's primary interface) is also configured at the same time. If you want to configure additional networks, use the DHCP Network Wizard in DHCP Manager.
If you use dhcpconfig -D to configure the server, you must manually configure all networks that will be served by the DHCP service. See How to Add a DHCP Network (dhcpconfig) for more information.
The following figure shows the initial dialog box for the DHCP Network Wizard in DHCP Manager.
Figure 10–5 DHCP Manager's Network Wizard
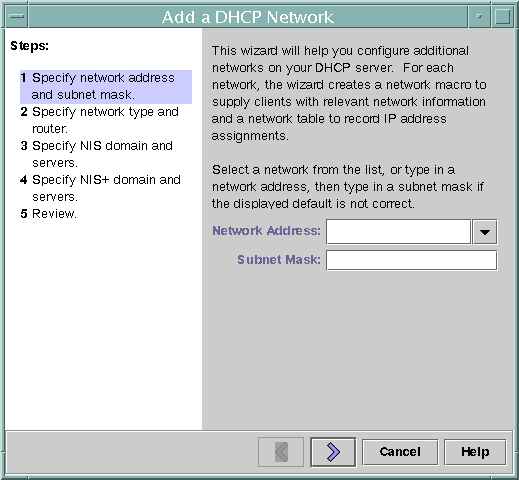
When you configure a new network, DHCP Manager creates the following components:
-
Network table in the data store. The new network is shown in the network list on the Addresses tab of DHCP Manager.
-
Network macro that contains information needed by clients that reside on this network. The network macro's name matches the IP address of the network. The network macro is added to the dhcptab in the data store.
How to Add a DHCP Network (DHCP Manager)
-
Click the Addresses tab in DHCP Manager.
Any networks already configured for DHCP service are listed.
-
Choose Network Wizard from the Edit menu.
-
Select options or type requested information based on the decisions you made during the planning phase.
Planning is described in Planning for Remote Network Configuration.
If you have difficulty with the wizard, click Help in the wizard window to open your web browser and display help for the DHCP Network Wizard.
-
Click Finish to complete the network configuration when you have finished entering the requested information.
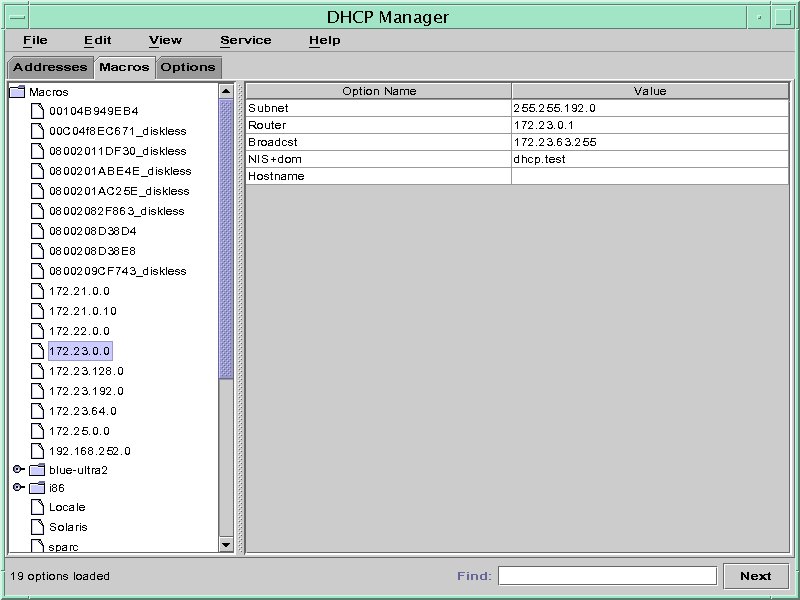
The Network Wizard creates a network macro whose name matches the IP address of the network. If you click the Macros tab in the DHCP Manager window and select the network macro, you can confirm that the information you provided in the wizard has been inserted as values for options contained in the macro.
The Network Wizard creates an empty network table, which is listed in the left pane of the window. You must add addresses for the network before the network's IP addresses can be managed under DHCP. See Adding Addresses to the DHCP Service for more information.
How to Add a DHCP Network (dhcpconfig)
-
Become superuser or a user assigned to the DHCP Management profile .
-
Type the following command on the DHCP server system:
# /usr/sbin/dhcpconfig -N network_address
where network_address is the IP address of the network you want to add to the DHCP service. See the dhcpconfig man page for suboptions you can use with the -N option.
If you do not use suboptions, dhcpconfig uses network files to obtain information it needs about the network.
-
Add IP addresses for the network so clients on the network can obtain addresses.
Modifying DHCP Network Configuration
After you add a network to the DHCP service, you can modify the configuration information you originally supplied by modifying the network macro used to pass information to the clients on the network.
The following figure shows the Macros tab of the DHCP Manager.
Figure 10–6 DHCP Manager's Macros Tab
How to Modify Configuration of a DHCP Network (DHCP Manager)
-
Select the Macros tab.
All macros defined for this DHCP server are listed in the left pane.
-
Select the network macro whose name matches the network whose configuration you want to change.
The network macro name is the network IP address.
-
Choose Properties from the Edit menu.
The Macro Properties dialog box displays a table of the options included in the macro.
-
Select the option you want to modify.
The option name and value are displayed in text fields near the top of the dialog box.
-
Type the new value for the option and click Modify.
You can also add options here by clicking Select in the dialog box. See Modifying DHCP Macros for more general information about modifying macros.
-
Select Notify DHCP Server of Change and click OK.
The change is made to the dhcptab and the DHCP server is signaled to reread the dhcptab and put the changes into effect.
How to Modify Configuration of a DHCP Network (dhtadm)
-
Determine which macro includes information for all clients of the network.
The network macro's name matches the network IP address.
If you don't know which macro includes this information, you can display the dhcptab database to list all macros by using the command dhtadm -P.
-
Type a command of the following format to change the value of the option you want to change:
# dhtadm -M -m macro-name -e 'symbol=value'
For example, to change the 10.25.62.0 macro's lease time to 57600 seconds and NIS domain to sem.example.com, type the following commands:
# dhtadm -M -m 10.25.62.0 -e 'LeaseTim=57600'
# dhtadm -M -m 10.25.62.0 -e 'NISdmain=sem.example.com'
-
Type the following command as root to make the DHCP daemon reread dhcptab:
# pkill -HUP in.dhcpd
Removing DHCP Networks
DHCP Manager enables you to remove multiple networks at once. You have the option to automatically remove the hosts table entries associated with the DHCP-managed IP addresses on those networks as well. The following figure shows DHCP Manager's Delete Networks dialog box.
Figure 10–7 Delete Networks Dialog Box
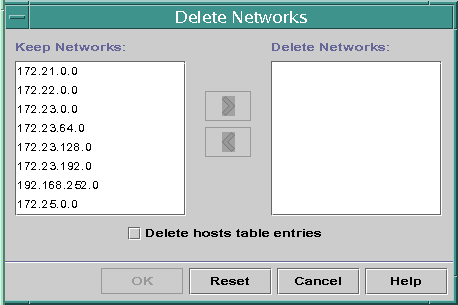
The pntadm command requires you to delete each IP address entry from a network before you delete that network. You can delete only one network at a time.
How to Remove a DHCP Network (DHCP Manager)
-
Select the Addresses tab.
-
Choose Delete Networks from the Edit menu.
The Delete Networks dialog box opens.
-
In the Keep Networks list, select the networks you want to delete.
Press the Control key while you click with the mouse to select multiple networks, or press the Shift key while you click to select a range of networks.
-
Click the right arrow button to move the selected networks to the Delete Networks list.
-
If you want to remove the host table entries for the DHCP–managed addresses on this network, select Delete Host Table Entries.
Note that this does not delete the host registrations at the DNS server for these addresses. It affects only the local name service.
-
Click OK.
How to Remove a DHCP Network (pntadm)
Note that this procedure deletes the addresses on the network before removing the network. This ensures that the host names are removed from the hosts file or database.
-
On the server system, become superuser or a user assigned to the DHCP Management profile.
-
Type a command following this format to remove an IP address and its host name from the name service:
# pntadm -D -y IP-address
For example, to remove address 10.25.52.1, type the following command:
# pntadm -D -y 10.25.52.1
The -y option specifies to delete the host name.
-
Repeat the pntadm -D -y command for each address in the network.
You might want to create a script to do this if you are deleting many addresses.
-
After all addresses are deleted, type the following command to delete the network from the DHCP service.
# pntadm -R network-IP-address
For example, to remove network 10.25.52.0, type the following command:
# pntadm -R 10.25.52.0
See the pntadm man page for more information about using pntadm.
Supporting BOOTP Clients with DHCP Service (Task Map)
To support BOOTP clients on your DHCP server, you must set up your DHCP server to be BOOTP compatible. You can register BOOTP clients in the DHCP server's network table or reserve a number of IP addresses for allocation to BOOTP clients, depending how you set up BOOTP compatibility.
Note –
BOOTP addresses are permanently assigned, whether or not you explicitly assign them a permanent lease.
The following task map lists tasks you may need to perform to support BOOTP clients and the procedures used to carry them out.
|
Task |
Description |
Instructions |
|---|---|---|
|
Set up automatic BOOTP support |
Provide IP address for any BOOTP client on a DHCP-managed network, or on a network connected by a relay agent to a DHCP-managed network. This requires you to reserve a pool of addresses for exclusive use by BOOTP clients. This option may be more useful if the server must support a large number of BOOTP clients. | |
|
Set up manual BOOTP support |
Provide IP address for only those BOOTP clients that have been manually registered with the DHCP service. This requires you to bind a client's ID to a particular IP address that has been marked for BOOTP clients. This option is useful for a small number of BOOTP clients, or in the event that you want to restrict the BOOTP clients that can use the server. |
How to Set Up Support of Registered BOOTP Clients (DHCP Manager) |
How to Set Up Support of Any BOOTP Client (DHCP Manager)
-
Select Modify from the Service menu.
The Modify Service Options dialog box opens.
-
In the BOOTP Compatibility section of the dialog box, select Automatic.
-
Select Restart Server, if it is not already selected.
-
Click OK.
-
Select the Addresses tab in DHCP Manager.
-
Select addresses that you want to reserve for BOOTP clients.
Select a range of addresses by clicking the first address, pressing the Shift key, and clicking the last address.
Select multiple non-concurrent addresses by pressing the Control key while clicking each address.
-
Select Properties from the Edit menu.
The Modify Multiple Addresses dialog box opens.
-
In the BOOTP section, select Assign All Addresses Only to BOOTP Clients.
All other options should be set to Keep Current Settings.
-
Click OK.
Any BOOTP client can now obtain an address from this DHCP server.
How to Set Up Support of Registered BOOTP Clients (DHCP Manager)
-
Select Modify from the Service menu.
The Modify Service Options dialog box opens.
-
In the BOOTP Compatibility section of the dialog box, select Manual.
-
Select Restart Server if it is not already selected.
-
Click OK.
-
Select the Addresses tab in DHCP Manager.
-
Select an address you want to assign to a particular BOOTP client.
-
Choose Properties from the Edit menu.
The Address Properties dialog box opens.
-
Select the Lease tab.
-
In the Client ID field, type the client's identifier.
For a BOOTP client that runs the Solaris operating environment on an Ethernet network, the client ID is a string derived from the client's hexadecimal Ethernet address, preceded by the Address Resolution Protocol (ARP) type for Ethernet (01). For example, a BOOTP client having the Ethernet address 8:0:20:94:12:1e would use the client ID 0108002094121E.
Tip –As superuser on a Solaris client system, type the following command to obtain the Ethernet address for the interface:
ifconfig -a
-
Select Reserved to reserve the IP address for this client.
-
Select Assign Only to BOOTP Clients.
-
Click OK.
In the Addresses tab, BOOTP is displayed in the Status field, and the client ID you entered is listed in the Client ID field.
Working With IP Addresses in the DHCP Service (Task Map)
You can use DHCP Manager or the pntadm command to add IP addresses, modify their properties, and remove them from the DHCP service. Before you work with IP addresses, you should refer to Table 10–2 to become familiar with IP address properties. The table provides information for users of DHCP Manager and pntadm.
Note –
This section does not include procedures for using the pntadm command. However Table 10–2 includes examples of using pntadm to specify IP address properties while adding and modifying IP addresses. Also refer to the pntadm man page for more information about pntadm.
The following task map lists tasks you must perform to add, modify, remove IP addresses and the procedures used to carry them out.
|
Task |
Description |
Instructions |
|---|---|---|
|
Add single or multiple IP addresses to DHCP service. |
Add IP addresses on networks that are already managed by the DHCP service by using DHCP Manager. |
How to Add a Single IP Address (DHCP Manager) How to Duplicate an Existing IP Address (DHCP Manager) |
|
Change properties of an IP address. |
Change any of the IP address properties described in Table 10–2. | |
|
Remove IP addresses from DHCP service. |
Prevent the use of specified IP addresses by DHCP. |
How to Mark Addresses Unusable (DHCP Manager) How to Mark Addresses Unusable (pntadm) |
|
Assign consistent address to a DHCP client. |
Set up a client to receive the same IP address each time it requests its configuration. |
How to Assign a Consistent IP Address to a DHCP Client (DHCP Manager) How to Assign a Consistent IP Address to a DHCP Client (pntadm) |
The following table lists and describes the properties of IP addresses.
Table 10–2 IP Address Properties|
Property |
Description |
How to Specify in pntadm Command |
|---|---|---|
|
Network address |
Address of the network that contains the IP address you are working with. The network address is displayed in the Networks list on the Addresses tab in DHCP Manager.
|
The network address must be the last argument on the pntadm command line used to create, modify, or delete an IP address. For example, to add an IP address to network 10.21.0.0 pntadm -A ip-address options 10.21.0.0 |
|
IP address |
Address you are working with, whether you are creating, modifying, or deleting it. The IP address is displayed in the first column of the DHCP Manager's Addresses tab. |
The IP address must accompany the -A, -M, and -D options to the pntadm command. For example, to modify IP address 10.21.5.12 pntadm -M 10.21.5.12 options 10.21.0.0 |
|
Client name |
Host name mapped to the IP address in the hosts table. This name may be automatically generated by DHCP Manager when addresses are created. If you create a single address, you can supply the name. |
Specify the client name with the -h option. For example, to specify client name carrot12 for 10.21.5.12: pntadm -M 10.21.5.12 -h carrot12 10.21.0.0 |
|
Owning server |
DHCP server that manages the IP address and is responsible for responding to the DHCP client's request for IP address allocation. |
Specify the owning server name with the -s option. For example to specify server blue2 to own 10.21.5.12: pntadm -M 10.21.5.12 -s blue2 10.21.0.0 |
|
Configuration macro |
Macro the DHCP server uses to obtain network configuration options from the dhcptab. Several macros are created automatically when you configure a server and add networks. See About Macros for more information about macros. When DHCP Manager creates addresses, it creates a server macro and assigns that macro as the configuration macro for each address. |
Specify the macro name with the -m option. For example, to assign the server macro blue2 to address 10.21.5.12 pntadm -M 10.21.5.12 -m blue2 10.21.0.0 |
|
Client ID |
Text string that is unique within the DHCP service. If the client ID is listed as 00, the address is not allocated to any client. If you specify a client ID when modifying the properties of an IP address, you manually bind the address to that client for its exclusive use. The client ID is determined by the vendor of the DHCP client. If your client is not a Solaris DHCP client, consult your DHCP client documentation for more information. |
Specify the client ID with the -i option. For example, to assign client ID 08002094121E to address 10.21.5.12 pntadm -M 10.21.5.12 -i 0108002094121E 10.21.0.0 |
|
|
For Solaris DHCP clients, the client ID is derived from the client's hexadecimal hardware address, preceded by the ARP code for the type of network, such as 01 for Ethernet. The ARP codes are assigned by the Internet Assigned Numbers Authority (IANA) in the ARP Parameters section of the Assigned Numbers standard at http://www.iana.com/numbers.html For example, a Solaris client with the hexadecimal Ethernet address 8:0:20:94:12:1e would use the client ID 0108002094121E. The client ID is listed in DHCP Manager and pntadm when a client is currently using an address. Tip: As superuser on the Solaris client system, type the following command to obtain the Ethernet address for the interface: ifconfig -a |
|
|
Reserved |
The setting that specifies the address is reserved exclusively for the client indicated by the client ID, and the DHCP server cannot reclaim the address. If you choose this option, you manually assign the address to the client. |
Specify that the address is reserved, or manual, with the -f option. For example, to specify that IP address 10.21.5.12 is reserved for a client: pntadm -M 10.21.5.12 -f MANUAL 10.21.0.0 |
|
Lease type/policy |
The setting that determines how DHCP manages the use of the IP address by clients. A lease may be dynamic or permanent. See Dynamic and Permanent Lease Type for a complete explanation. |
Specify that the address would be permanently assigned with the -f option. Addresses are dynamically leased by default. For example, to specify that IP address 10.21.5.12 has a permanent lease: pntadm -M 10.21.5.12 -f PERMANENT 10.21.0.0 |
|
Lease expiration time |
Date and time when the lease expires, applicable only when a dynamic lease is specified. The date is specified in mm/dd/yyyy format. |
Specify an absolute lease expiration time with -e. For example, to specify an expiration time of January 1, 2002: pntadm -M 10.21.5.12 -e 01/01/2002 10.21.0.0 |
|
BOOTP setting |
The setting that marks the address as reserved for BOOTP clients. See Supporting BOOTP Clients with DHCP Service (Task Map) for more information about supporting BOOTP clients. |
Reserve an address for BOOTP clients with -f. For example, to reserve IP address 10.21.5.12 for BOOTP clients: pntadm -M 10.21.5.12 -f BOOTP 10.21.0.0 |
|
Unusable setting |
The setting that marks the address so it cannot be assigned to any client. |
Mark an address unusable with -f. For example, to mark IP address 10.21.5.12 unusable: pntadm -M 10.21.5.12 -f UNUSABLE 10.21.0.0 |
Adding Addresses to the DHCP Service
Before you add addresses, you must add the network that owns them to the DHCP service. See Adding DHCP Networks for information about adding networks.
You can add addresses with DHCP Manager or pntadm.
On networks that are already managed by the DHCP service, you can add addresses in several ways with DHCP Manager:
-
Add a single IP address – Place one new IP address under DHCP management.
-
Duplicate an existing IP address – Copy the properties of an existing IP address managed by DHCP, and supply a new IP address and client name.
-
Add a range of multiple IP addresses – Use the Address Wizard to place a series of IP addresses under DHCP management.
The following figure shows the Create Address dialog box. The Duplicate Address dialog box is identical to the Create Address dialog box, except that the text fields display the values for an existing address.
Figure 10–8 Create Address Dialog Box
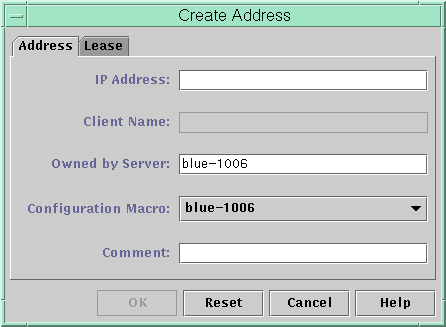
The following figure shows the first dialog of the Address Wizard, used to add a range of IP addresses.
Figure 10–9 Address Wizard
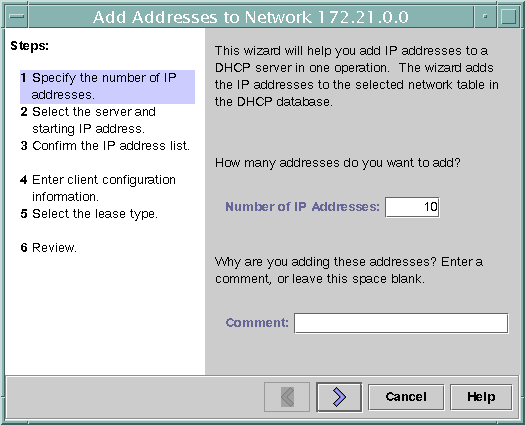
How to Add a Single IP Address (DHCP Manager)
-
Select the Addresses tab.
-
Select the network where the new IP address is to be added.
-
Choose Create from the Edit menu.
The Create Address dialog box opens.
-
Select or type values for the address settings on the Address and Lease tabs.
See Table 10–2 for information about the settings.
-
Click OK.
How to Duplicate an Existing IP Address (DHCP Manager)
-
Select the Addresses tab.
-
Select the network where the new IP address is located.
-
Select the address whose properties you want to duplicate.
-
Choose Duplicate from the Edit menu.
-
Change the IP address and client name for the address.
Most other options should remain the same, but you can change them if necessary.
-
Click OK.
How to Add Multiple Addresses (DHCP Manager)
-
Select the Addresses tab.
-
Select the network where the new IP addresses are to be added.
-
Choose Address Wizard from the Edit menu.
The Address Wizard prompts you to provide values for the IP address properties. See Table 10–2 for more information about the properties. Making Decisions for IP Address Management (Task Map) includes more extensive information.
-
Click the right arrow button as you finish entering information in each screen, and click Finish on the last screen.
The Addresses tab is updated with the new addresses.
How to Add Addresses (pntadm)
-
Become superuser or a user assigned to the DHCP Management profile.
-
Type a command of the following format:
# pntadm -A ip-address options network-address
Refer to the pntadm man page for a list of options you can use with pntadm -A. In addition, Table 10–2 shows some sample pntadm commands that specify options.
Note –You can write a script to add multiple addresses with pntadm. See Example 12–1 for an example.
Modifying IP Addresses in the DHCP Service
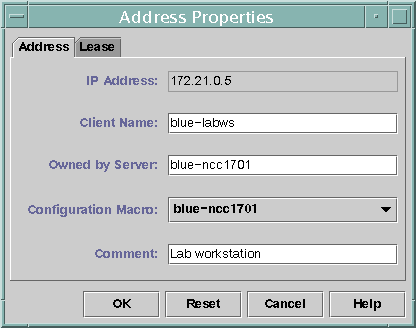
After you add IP addresses to the DHCP service, you can modify any of the properties described in Table 10–2 by using DHCP Manager or the pntadm -M command. See the pntadm man page for more information about pntadm -M.
The following figure shows the Address Properties dialog box that you use to modify IP address properties.
Figure 10–10 Address Properties Dialog Box
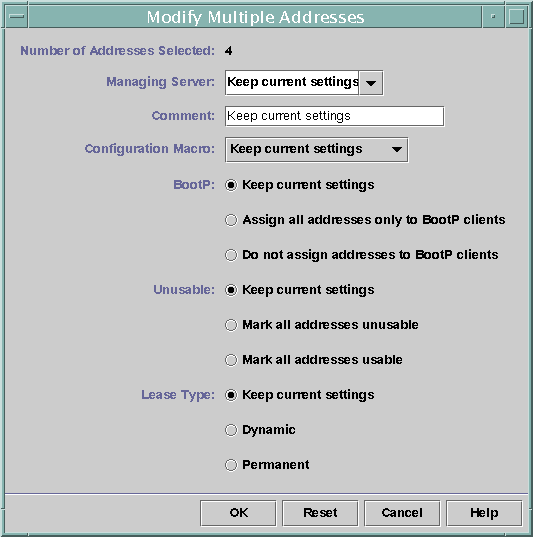
The following figure shows the Modify Multiple Addresses dialog box that you use to modify multiple IP addresses.
Figure 10–11 Modify Multiple Addresses Dialog Box
How to Modify IP Address Properties (DHCP Manager)
-
Select the Addresses tab.
-
Select the IP address's network.
-
Select one or more IP addresses you want to modify.
If you want to modify more than one address, press the Control key while you click with the mouse to select multiple addresses. You can also press the Shift key while you click to select a block of addresses.
-
Choose Properties from the Edit menu.
The Modify Addresses dialog box or the Modify Multiple Address dialog box opens.
-
Change the appropriate properties.
Click the Help button or refer to Table 10–2 for information about the properties.
-
Click OK.
How to Modify IP Address Properties (pntadm)
-
Become superuser or a user assigned to the DHCP Management profile.
-
Enter a command of the following format:
# pntadm -M ip-address options network-address
Many options can be used with the pntadm command, which are documented in the pntadm man page.
Table 10–2 shows some sample pntadm commands that specify options.
Removing Addresses From DHCP Service
At times you might want the DHCP service to stop managing a particular address or group of addresses. The method you use to remove an address from DHCP depends on whether you want the change to be temporary or permanent.
-
To temporarily prevent the use of addresses, you can mark them unusable in the Address Properties dialog box as described in Marking IP Addresses Unusable by the DHCP Service.
-
To permanently prevent the use of addresses by DHCP clients, delete the addresses from the DHCP network tables, as described in Deleting IP Addresses from DHCP Service.
Marking IP Addresses Unusable by the DHCP Service
You can use the pntadm -M command with the -f UNUSABLE option to mark addresses unusable.
In DHCP Manager, you use the Address Properties dialog box, shown in Figure 10–10, to mark individual addresses, and the Modify Multiple Addresses dialog box, show in Figure 10–11, to mark multiple addresses, as described in the following procedure.
How to Mark Addresses Unusable (DHCP Manager)
-
Select the Addresses tab.
-
Select the IP address's network.
-
Select one or more IP addresses you want to mark unusable.
If you want to mark more than one address unusable, press the Control key while you click with the mouse to select multiple addresses. You can also press the Shift key while you click to select a block of addresses.
-
Choose Properties from the Edit menu.
The Modify Addresses dialog box or the Modify Multiple Address dialog box opens.
-
If you are modifying one address, select the Lease tab.
-
Select Address is Unusable.
If you are editing multiple addresses, select Mark All Addresses Unusable.
-
Click OK.
How to Mark Addresses Unusable (pntadm)
-
Become superuser or a user assigned to the DHCP Management profile.
-
Enter a command of the following format:
# pntadm -M ip-address -f UNUSABLE network-address
For example, to mark address 10.64.3.3 as unusable, type:
pntadm -M 10.64.3.3 -f UNUSABLE 10.64.3.0
Deleting IP Addresses from DHCP Service
You should delete IP addresses from the DHCP service database if you no longer want the address to be managed by DHCP. You can use the pntadm -D command or DHCP Manager's Delete Address dialog box.
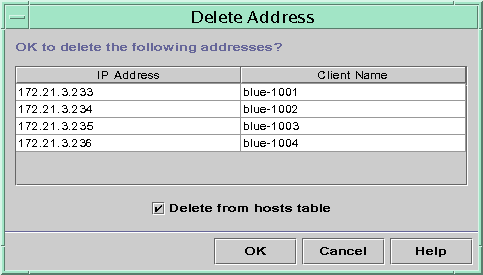
The following figure shows the Delete Address dialog box.
Figure 10–12 Delete Address Dialog Box
How to Delete IP Addresses from DHCP Service (DHCP Manager)
-
Select the Addresses tab.
-
Select the IP address's network.
-
Select one or more IP addresses you want to delete.
If you want to delete more than one address, press the Control key while you click with the mouse to select multiple addresses. You can also press the Shift key while you click to select a block of addresses.
-
Choose Delete from the Edit menu.
The Delete Address dialog box lists the address you selected so you can confirm the deletion.
-
If you want to delete the host names from the hosts table, select Delete From Hosts Table.
If the host names were generated by DHCP Manager, you might want to delete the names from the hosts table.
-
Click OK.
How to Delete IP Addresses from DHCP Service (pntadm)
-
Become superuser or a user assigned to the DHCP Management profile.
-
Type a command of the following format:
# pntadm -D ip-address
If you include the -y option, the host name is deleted from the name service in which it is maintained.
Setting Up DHCP Clients for a Consistent IP Address
The Solaris DHCP service attempts to provide the same IP address to a client that has previously obtained an address through DHCP. However, it is not always possible when a dynamic lease is used.
Routers, NIS/NIS+, DNS servers, and other hosts critical to the network should not use DHCP because they should not rely on the network to obtain their IP addresses. Clients such as print or file servers should have consistent IP addresses as well, but can be set up to receive their network configurations through DHCP.
You can set up a client to receive the same IP address each time it requests its configuration if you reserve, or manually assign, the client's ID to the address you want it to use. You can set up the reserved address to use a dynamic lease to make it easy to track the use of the address, or a permanent lease if you do not need to track address use. However, you might not want to use permanent leases because once a client obtains a permanent lease, it does not contact the server again and cannot obtain updated configuration information unless it releases the IP address and restarts the DHCP lease negotiation. A diskless client is an example of a client that should use a reserved address with a dynamic lease.
You can use the pntadm -M command or DHCP Manager's Address Properties dialog box.
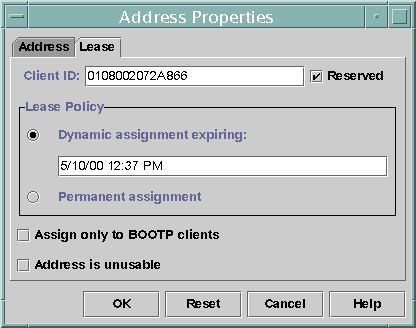
The following figure shows the Lease tab of the Address Properties dialog box used to modify the lease.
Figure 10–13 Address Properties Lease Tab
How to Assign a Consistent IP Address to a DHCP Client (DHCP Manager)
-
Determine the client ID for the client you want to have a permanent IP address.
See the entry for client ID in Table 10–2 for information about how to determine the client ID.
-
Select the Addresses tab in DHCP Manager.
-
Select the appropriate network.
-
Double-click the IP address you want to the client to use.
The Address Properties window opens.
-
Select the Lease tab.
-
In the Client ID field, type the client ID you determined from the client's hardware address.
See the Client ID entry in Table 10–2 for more information.
-
Select the Reserved option to prevent the IP address from being reclaimed by the server.
-
In the Lease Policy area of the window, select Dynamic or Permanent assignment.
Select Dynamic if you want the client to negotiate to renew leases, and thus be able to track when the address is used. Because you selected Reserved, the address cannot be reclaimed even when it uses a dynamic lease. You do not need to enter an expiration date for this lease. The DHCP server calculates the expiration date based on the lease time.
If you select Permanent, you cannot track the use of the IP address unless you enable transaction logging.
How to Assign a Consistent IP Address to a DHCP Client (pntadm)
-
Become superuser or a user assigned to the DHCP Management profile.
-
Type a command of the following format:
# pntadm -M ip-address -i client-id -f MANUAL+BOOTP network-address
Refer to the Client ID entry in Table 10–2 for more information about how to determine client identifiers.
Working With DHCP Macros (Task Map)
DHCP macros are containers of DHCP options. The Solaris DHCP service uses macros to gather together options that should be passed to clients. DHCP Manager and dhcpconfig create a number of macros automatically when you configure the server. See About Macros for background information about macros, and Chapter 9, Configuring DHCP Service (Task) for information about macros created by default.
You might find that when changes occur on your network, you need to make changes to the configuration information passed to clients. To do this, you need to work with DHCP macros. You can view, create, modify, duplicate, and delete DHCP macros.
When you work with macros, you must know about DHCP standard options, which are described in the dhcp_inittab man page.
The following task map lists tasks to help you view, create, modify, and delete DHCP macros.
|
Task |
Description |
Instructions |
|---|---|---|
|
View DHCP macros. |
Display a list of all the macros defined on the DHCP server. | |
|
Create DHCP macros. |
Create new macros to support DHCP clients. | |
|
Modify values passed in macros to DHCP clients. |
Change macros by modifying existing options, adding options to macros, removing options from macros. |
How to Change Values for Options in a DHCP Macro (DHCP Manager) How to Change Values for Options in a DHCP Macro (dhtadm) How to Add Options to a DHCP Macro (DHCP Manager) How to Add Options to a DHCP Macro (dhtadm) |
|
Delete DHCP macros. |
Remove DHCP macros that are no longer used. |
The following figure shows the Macros tab in the DHCP Manager window.
Figure 10–14 DHCP Manager's Macros Tab

How to View Macros Defined on a DHCP Server (DHCP Manager)
-
Select the Macros tab.
The Macros area on the left side of the window displays, in alphabetical order, all macros defined on the server. Macros preceded by a folder icon include references to other macros, while macros preceded by a document icon do not reference other macros.
-
To open a macro folder, click the open/close widget to the left of the folder icon.
The macros included in the selected macro are listed.
-
To view the contents of a macro, click the macro name and look at the area on the right side of the window.
Options and their assigned values are displayed.
How to View Macros Defined on a DHCP Server (dhtadm)
-
Become superuser or a user assigned to the DHCP Management profile.
-
Type the following command:
# dhtadm -P
This command prints to standard output the formatted contents of the dhcptab, including all macros and symbols defined on the server.
Modifying DHCP Macros
You might need to modify macros when some aspect of your network changes and one or more clients need to know about the change. For example, you might add a router or a NIS server, create a new subnet, or decide to change the lease policy.
When you modify a macro, you must know the name of the DHCP option that corresponds to the parameter you want to change, add, or delete. The standard DHCP options are listed in the DHCP Manager help and in the dhcp_inittab man page.
You can use the dhtadm -M -m command or DHCP Manager to modify macros. See the dhtadm man page for more information about dhtadm.
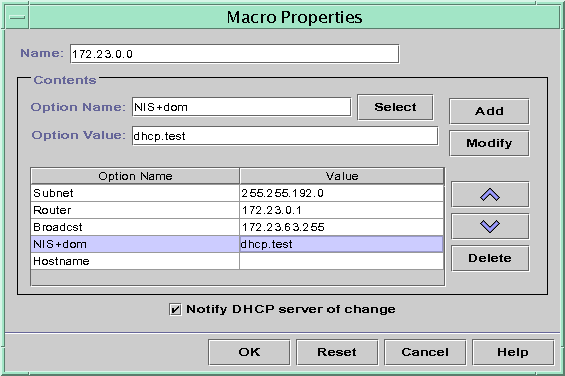
The following figure shows DHCP Manager's Macro Properties dialog box.
Figure 10–15 Macro Properties Dialog Box
How to Change Values for Options in a DHCP Macro (DHCP Manager)
-
Select the Macros tab.
-
Select the macro you want to change.
-
Choose Properties from the Edit menu.
The Macro Properties dialog box opens.
-
In the table of Options, select the option you want to change.
The option's name and value are displayed in the Option Name and Option Value fields.
-
In the Option Value field, select the old value and type the new value for the option.
-
Click Modify.
The new value is displayed in the options table.
-
Select Notify DHCP Server of Change.
This selection tells the DHCP server to reread the dhcptab to put the change into effect immediately after you click OK.
-
Click OK.
How to Change Values for Options in a DHCP Macro (dhtadm)
-
Become superuser or a user assigned to the DHCP Management profile.
-
Type a command of the following format:
# dhtadm -M -m macroname -e 'option=value:option=value'
For example, to change the lease time and the Universal Time Offset in macro bluenote, type the following command:
# dhtadm -M -m bluenote -e 'LeaseTim=43200:UTCOffst=28800'
How to Add Options to a DHCP Macro (DHCP Manager)
-
Select the Macros tab.
-
Select the macro you want to change.
-
Choose Properties from the Edit menu.
The Macro Properties dialog box opens.
-
In the Option Name field, specify the name of an option by using one of the following methods:
-
Click the Select button next to the Option Name field and select the option you want to add to the macro.
The Select Option dialog box displays an alphabetized list of names of Standard category options and descriptions. If you want to add an option that is not in the Standard category, use the Category list to select the category you want.
See About Macros for more information about macro categories.
-
Type Include if you want to include a reference to an existing macro in the new macro.
-
-
Type the value for the option in the Option Value field.
If you typed Include as the option name, you must specify the name of an existing macro in the Option Value field.
-
Click Add.
The option is added to the bottom of the list of options displayed for this macro. If you want to change the option's position in the list, select the option and click the arrow keys next to the list to move the option up or down.
-
Select Notify DHCP Server of Change.
This selection tells the DHCP server to reread the dhcptab to put the change into effect immediately after you click OK.
-
Click OK.
How to Add Options to a DHCP Macro (dhtadm)
-
Become superuser or a user assigned to the DHCP Management profile.
-
Type a command of the following format:
# dhtadm -M -m macroname -e 'option=value'
For example, to add the ability to negotiate leases, in macro bluenote, type the following command:
# dhtadm -M -m bluenote -e 'LeaseNeg=_NULL_VALUE'
Note that if an option does not require a value, you must use _NULL_VALUE as the value for the option.
How to Delete Options from a DHCP Macro (DHCP Manager)
-
Select the Macros tab.
-
Select the macro you want to change.
-
Choose Properties from the Edit menu.
The Macro Properties dialog box opens.
-
Select the option you want to remove from the macro.
-
Click Delete.
The option is removed from the list of options for this macro.
-
Select Notify DHCP Server of Change.
This selection tells the DHCP server to reread the dhcptab to put the change into effect immediately after you click OK.
-
Click OK.
How to Delete Options from a DHCP Macro (dhtadm)
-
Become superuser or a user assigned to the DHCP Management profile.
-
Type a command of the following format:
# dhtadm -M -m macroname -e 'option='
For example, to remove the ability to negotiate leases in macro bluenote, type the following command:
# dhtadm -M -m bluenote -e 'LeaseNeg='
If an option is specified with no value, it is removed from the macro.
Creating DHCP Macros
You may want to add new macros to your DHCP service to support clients with specific needs. You can use the dhtadm -A -m command or DHCP Manager's Create Macro dialog box to add macros. See the dhtadm man page for more information about the dhtadm command.
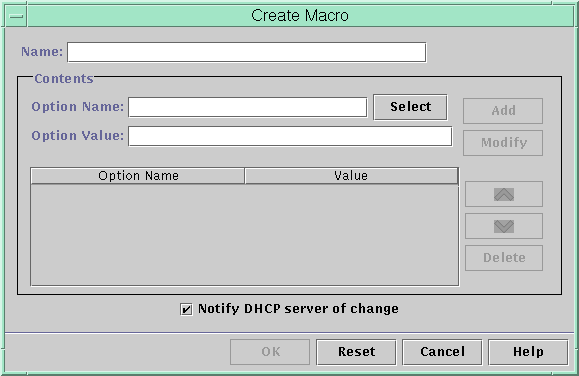
The following figure shows DHCP Manager's Create Macro dialog box.
Figure 10–16 Create Macro Dialog Box
How to Create a DHCP Macro (DHCP Manager)
-
Select the Macros tab.
-
Choose Create from the Edit menu.
The Create Macro dialog box opens.
-
Type a unique name for the macro.
The name can be up to 128 alphanumeric characters. If you use a name that matches a vendor class identifier, network address, or client ID, the macro will be processed automatically for appropriate clients. If you use a different name, the macro can only be processed if it is assigned to a specific IP address or included in another macro that is processed. See Macro Processing by the DHCP Server for more detailed information.
-
Click the Select button next to the Option Name field.
The Select Option dialog box displays an alphabetized list of names of Standard category options and their descriptions.
-
If you want to add an option that is not in the Standard category, use the Category list to select the category you want.
See About Options for more information about option categories.
-
Select the option you want to add to the macro and click OK.
The Macro Properties dialog box displays the selected option in the Option Name field.
-
Type the value for the option in the Option Value field.
-
Click Add.
The option is added to the bottom of the list of options displayed for this macro. If you want to change the option's position in the list, select the option and click the arrow keys next to the list to move the option up or down.
-
Repeat Step 6 through Step 8 for each option you want to add to the macro.
-
Select Notify DHCP Server of Change when you are finished adding options.
This selection tells the DHCP server to reread the dhcptab to put the change into effect immediately after you click OK.
-
Click OK.
How to Create a DHCP Macro (dhtadm)
-
Become superuser or a user assigned to the DHCP Management profile.
-
Type a command of the following format:
# dhtadm -A -m macroname -d ':option=value:option=value:option=value:'
There is no limit to the number of option/value pairs included in the argument to -d. The argument must begin and end with colons, with colons separating each option/value pair.
For example, to create macro bluenote, type the following command:
# dhtadm -A -m bluenote -d \
':Router=10.63.6.121:LeaseNeg=_NULL_VALUE:'DNSserv=10.63.28.12:'
Note that if an option does not require a value, you must use _NULL_VALUE as the value for the option.
Deleting DHCP Macros
You might want to delete a macro from the DHCP service. For example, if you delete a network from the DHCP service, you can also delete the associated network macro.
You can use the dhtadm -D -m command or DHCP Manager to delete macros.
How to Delete a DHCP Macro (DHCP Manager)
-
Select the Macros tab.
-
Select the macro you want to delete.
The Delete Macro dialog box prompts you to confirm that you want to delete the specified macro.
-
Select Notify DHCP Server of Change.
-
Click OK.
How to Delete a DHCP Macro (dhtadm)
-
Become superuser or a user assigned to the DHCP Management profile.
-
Type a command of the following format:
# dhtadm -D -m macroname
For example, to delete macro bluenote, type the following command:
# dhtadm -D -m bluenote
Working With DHCP Options (Task Map)
Options are keywords for network configuration parameters that the DHCP server can pass to clients. In the Solaris DHCP service, the only options that you can create, delete, or modify are those that are not specified as standard options in the Solaris DHCP service. For this reason, when you first set up your DHCP service, the Options tab in DHCP Manager is empty until you create options for your site.
If you create options on the DHCP server, you must also add information about the options on the DHCP client. For the Solaris DHCP client, you must edit the /etc/dhcp/inittab file to add entries for the new options. See the dhcp_inittab man page for more information about this file.
If you have DHCP clients that are not Solaris clients, refer to the documentation for those clients for information about adding new options or symbols. See About Options for more information about options in Solaris DHCP.
You can use either DHCP Manager or the dhtadm command to create, modify, or delete options.
Note –
Options are called symbols in the DHCP literature. The dhtadm command and man page also refer to options as symbols.
The following task map lists tasks you must perform to create, modify, and delete DHCP options and the procedures needed to carry them out.
|
Task |
Description |
Instructions |
|---|---|---|
|
Create DHCP options. |
Add new options for information not covered by a standard DHCP option. |
How to Create DHCP Options (DHCP Manager) |
|
Modify DHCP options. |
Change properties of DHCP options you have created. | |
|
Delete DHCP options. |
Remove DHCP options you have created. |
Before you create options, you should be familiar with the option properties listed in the following table.
Table 10–3 DHCP Option Properties|
Option Properties |
Description |
|---|---|
|
Category |
The category of an option must be one of the following: Vendor – Options specific to a client's vendor platform, either hardware or software. Site – Options specific to your site. Extend – Newer options that have been added to the DHCP protocol, but not yet implemented as standard options in Solaris DHCP. |
|
Code |
The code is a unique number you assign to an option. The same code cannot be used for any other option within its option category. The code must be appropriate for the option category: Vendor – Code values of 1–254 for each vendor class Site – Code values of 128–254 Extend – Code values of 77-127 |
|
Data type |
The data type specifies what kind of data can be assigned as a value for the option. Valid data types are: ASCII – Text string value. BOOLEAN – No value is associated with the Boolean data type. The presence of the option indicates a condition is true, while the absence of the option indicates false. For example, the Hostname option (which is a Standard option and cannot be modified) is a Boolean. If it is included in a macro, it tells the DHCP server that it should consult name services to see if there is a host name associated with the assigned address. IP – One or more IP addresses, in dotted decimal format (xxx.xxx.xxx.xxx). OCTET – Uninterpreted hexadecimal ASCII representation of binary data. For example, a client ID uses the octet data type. UNUMBER8, UNUMBER16, UNUMBER32, UNUMBER64, SNUMBER8, SNUMBER16, SNUMBER32, or SNUMBER64 – Numeric value. An initial U or S indicates whether the number is unsigned or signed, and the digits at the end indicates the amount of bits in the number. |
|
Granularity |
Specifies how many “instances” of the data type are needed to represent a complete option value. For example, a data type of IP and a granularity of 2 would mean that the option value must contain two IP addresses. |
|
Maximum |
The maximum number of values that can be specified for the option. Building on the previous example, a maximum of 2, with a granularity of 2 and a data type of IP Address would mean that the option value could contain a maximum of two pairs of IP addresses. |
|
Vendor client classes |
This option is available only when the option category is Vendor. It identifies the client class(es) with which the Vendor option is associated. The Class is an ASCII string that represents the client machine type and/or operating system, for example, SUNW.Ultra5_10. This type of option makes it possible to define configuration parameters that are passed to all clients of the same class, and only clients of that class. You can specify multiple client classes. Only those DHCP clients with a client class value that matches one you specify will receive the options scoped by that class. The client class is determined by the vendor of the DHCP client. For DHCP clients that are not Solaris clients, refer to the vendor documentation for the DHCP client for the client class. For Solaris clients, the Vendor client class can be obtained by typing uname -i on the client. To specify the Vendor client class, substitute periods for any commas in the string returned by the uname command. For example, if the string SUNW,Ultra5_10 is returned by the uname -i command, you should specify the Vendor client class as SUNW.Ultra5_10. |
Creating DHCP Options
If you need to pass client information for which there is not already an existing option in the DHCP protocol, you can create an option. See the dhcp_inittab man page for a list of all the options that are defined in Solaris DHCP before you create your own.
You can use the dhtadm -A -s command or DHCP Manager's Create Option dialog box to create new options.
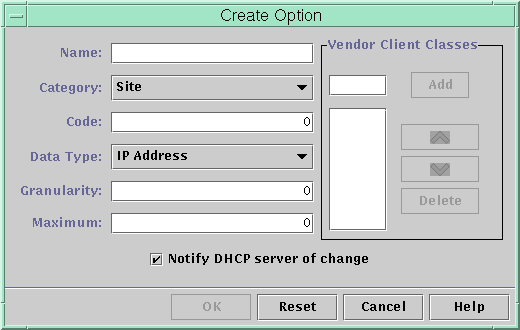
The following figure shows DHCP Manager's Create Option dialog box.
Figure 10–17 Create Option Dialog Box
How to Create DHCP Options (DHCP Manager)
-
Select the Options tab.
-
Choose Create from the Edit menu.
The Create Options dialog box opens.
-
Type a short descriptive name for the new option.
The name may contain up to 128 alphanumeric characters including spaces.
-
Type or select values for each setting in the dialog box.
Refer to Table 10–3 for information about each setting.
-
Select Notify DHCP Server of Change if you are finished creating options.
-
Click OK.
You can now add the option to macros and assign a value to the option to pass to clients.
How to Create DHCP Options (dhtadm)
-
Become superuser or a user assigned to the DHCP Management profile.
-
Type a command using the following format:
# dhtadm -A -s option-name-d 'category,code,data-type,granularity,maximum'
where
option-name
is an alphanumeric string of 128 characters or less.
category
is Site, Extend, or Vendor=list-of-classes, and list-of-classes is a space-separated list of vendor client classes to which the option applies. See Table 10–3 for information about how to determine the vendor client class.
code
is a numeric value appropriate to the option category, as explained in Table 10–3.
data-type
is a keyword that indicates the type of data passed with the option, as explained in Table 10–3.
granularity
is a nonnegative number, as explained in Table 10–3.
maximum
is a nonnegative number, as explained in as explained in Table 10–3.
The following two commands are examples:
# dhtadm -A -s NewOpt -d 'Site,130,UNUMBER8,1,1'
# dhtadm -A -s NewServ -d 'Vendor=SUNW.Ultra-1 \
SUNW.SPARCstation10,200,IP,1,1'
Modifying DHCP Options
If you have created options for your DHCP service, you can change the properties for an option by using either DHCP Manager or the dhtadm command.
You can use the dhtadm -M -s command or DHCP Manager's Option Properties dialog box to modify options.
Note that you should modify the Solaris DHCP client's option information to reflect the same modification you make to the DHCP service. See Modifying the Solaris DHCP Client's Option Information.
The following figure shows DHCP Manager's Option Properties dialog box.
Figure 10–18 Option Properties Dialog Box
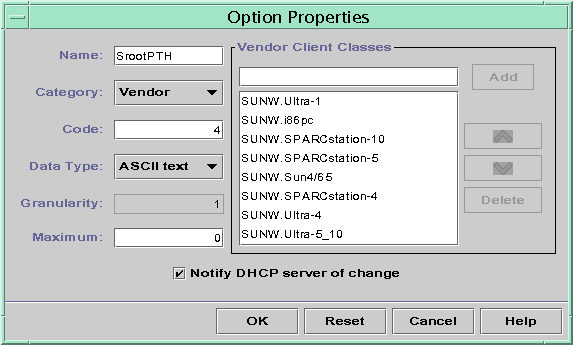
How to Modify DHCP Option Properties (DHCP Manager)
-
Select the Options tab.
-
Select the option whose properties you want to change.
-
Choose Properties from the Edit menu.
The Option Properties dialog box opens.
-
Edit the properties as needed.
See Table 10–3 for information about the properties.
-
Select Notify Server of Change when you are finished with options.
-
Click OK.
How to Modify DHCP Option Properties (dhtadm)
-
Become superuser or a user assigned to the DHCP Management profile.
-
Type a command using the following format:
# dhtadm -M -s option-name-d 'category,code,data-type,granularity,maximum'
where
option-name
is the option name whose definition you want to change.
category
is Site, Extend, or Vendor=list-of-classes, and list-of-classes is a space-separated list of vendor client classes to which the option applies. For example, SUNW.Ultra5_10 SUNW.Ultra-1 SUNWi86pc.
code
is a numeric value appropriate to the option category, as explained in Table 10–3.
data-type
is a keyword that indicates the type of data passed with the option, as explained in Table 10–3.
granularity
is a nonnegative number, as explained in Table 10–3.
maximum
is a nonnegative number, as explained in as explained in Table 10–3.
Note that you must specify all of the DHCP option properties with the -d switch, not just the properties you want to change.
The following two commands are examples:
# dhtadm -M -s NewOpt -d 'Site,135,UNUMBER8,1,1'
# dhtadm -M -s NewServ -d 'Vendor=SUNW.Ultra-1 \
SUNW.i86pc,200,IP,1,1'
Deleting DHCP Options
You cannot delete standard DHCP options, but if you have defined options for your DHCP service, you can delete them by using DHCP Manager or the dhtadm command.
How to Delete DHCP Options (DHCP Manager)
-
Select the Options tab.
-
Choose Delete from the Edit menu.
The Delete Options dialog box opens.
-
Confirm the deletion by clicking OK.
How to Delete DHCP Options (dhtadm)
-
Become superuser or a user assigned to the DHCP Management profile.
-
Type a command using the following format:
# dhtadm -D -s option-name
Modifying the Solaris DHCP Client's Option Information
If you add a new DHCP option to your DHCP server, you must add a complementary entry to each DHCP client's option information. If you have a DHCP client that is not a Solaris DHCP client, refer to that client's documentation for information about adding options or symbols.
On a Solaris DHCP client, you must edit the /etc/dhcp/inittab file and add an entry for each option that you add to the DHCP server. If you later modify the option on the server, you must also modify the entry in the client's /etc/dhcp/inittab file.
Refer to the dhcp_inittab man page for detailed information about the syntax of the /etc/dhcp/inittab file.
Note –
If you added DHCP options to the dhcptags file in a previous release of Solaris DHCP, you must add the options to the /etc/dhcp/inittab file. See DHCP Option Information for more information.
Supporting Solaris Network Installation with the DHCP Service (Task Map)
You can use DHCP to install the Solaris operating environment on certain client systems on your network. Only Sun Enterprise Ultra systems and Intel systems that meet the hardware requirements for running the Solaris operating environment can use this feature.
For information about supporting diskless clients, see Supporting Remote Boot and Diskless Boot Clients (Task Map).
The following task map shows the high-level tasks that must be performed to enable clients to obtain installation parameters using DHCP.
|
Task |
Description |
Instructions |
|---|---|---|
|
Set up an install server. |
Set up a Solaris server to support clients that must install the Solaris operating environment from the network. |
“Preparing to Install Solaris Software From the Network (Overview)” in Solaris 9 Installation Guide |
|
Set up client systems for Solaris installation over the network using DHCP. |
Use add_install_client -d to add DHCP network installation support for a class of client (such as those of a certain machine type) or a particular client ID. |
Using Solaris DVD: “Adding Systems to Be Installed From the Network” in Solaris 9 Installation Guide Using Solaris CD: “Adding Systems to Be Installed From the Network” in Solaris 9 Installation Guide |
|
Create DHCP options for installation parameters and macros that include the options. |
Use DHCP Manager or dhtadm to create new Vendor options and macros which the DHCP server can use to pass installation information to the clients. |
Creating DHCP Options and Macros for Solaris Installation Parameters |
Creating DHCP Options and Macros for Solaris Installation Parameters
When you add clients with the add_install_client -d script on the install server, the script reports DHCP configuration information to standard output. This information can be used when you create the options and macros needed to pass network installation information to clients.
To support clients that require Solaris installation from the network, you must create Vendor category options to pass information that is needed to correctly install the Solaris operating environment. The following table shows the options you must create and the properties needed to create them.
Table 10–4 Values for Creating Vendor Category Options for Solaris Clients|
Name |
Code |
Data Type |
Granularity |
Maximum |
Vendor Client Classes * |
Description |
|---|---|---|---|---|---|---|
|
SrootOpt |
1 |
ASCII text |
1 |
0 |
SUNW.Ultra–1, SUNW.Ultra-30, SUNW.i86pc |
NFS mount options for the client's root file system |
|
SrootIP4 |
2 |
IP address |
1 |
1 |
SUNW.Ultra-1, SUNW.Ultra-30, SUNW.i86pc |
IP address of root server |
|
SrootNM |
3 |
ASCII text |
1 |
0 |
SUNW.Ultra-1, SUNW.Ultra-30, SUNW.i86pc |
Host name of root server |
|
SrootPTH |
4 |
ASCII text |
1 |
0 |
SUNW.Ultra-1, SUNW.Ultra-30, SUNW.i86pc |
Path to the client's root directory on the root server |
|
SswapIP4 |
5 |
IP address |
1 |
0 |
SUNW.Ultra-1, SUNW.Ultra-30, SUNW.i86pc |
IP address of swap server |
|
SswapPTH |
6 |
ASCII text |
1 |
0 |
SUNW.Ultra-1, SUNW.Ultra-30, SUNW.i86pc |
Path to the client's swap file on the swap server |
|
SbootFIL |
7 |
ASCII text |
1 |
0 |
SUNW.Ultra-1, SUNW.Ultra-30, SUNW.i86pc |
Path to the client's boot file |
|
Stz |
8 |
ASCII text |
1 |
0 |
SUNW.Ultra-1, SUNW.Ultra-30, SUNW.i86pc |
Time zone for client |
|
SbootRS |
9 |
NUMBER |
2 |
1 |
SUNW.Ultra-1, SUNW.Ultra-30, SUNW.i86pc |
NFS read size used by standalone boot program when it loads the kernel |
|
SinstIP4 |
10 |
IP address |
1 |
1 |
SUNW.Ultra-1, SUNW.Ultra-30, SUNW.i86pc |
IP address of Jumpstart Install server |
|
SinstNM |
11 |
ASCII text |
1 |
0 |
SUNW.Ultra-1, SUNW.Ultra-30, SUNW.i86pc |
Host name of install server |
|
SinstPTH |
12 |
ASCII text |
1 |
0 |
SUNW.Ultra-1, SUNW.Ultra-30, SUNW.i86pc |
Path to installation image on install server |
|
SsysidCF |
13 |
ASCII text |
1 |
0 |
SUNW.Ultra-1, SUNW.Ultra-30, SUNW.i86pc |
Path to sysidcfg file, in the format server:/path |
|
SjumpsCF |
14 |
ASCII text |
1 |
0 |
SUNW.Ultra-1, SUNW.Ultra-30, SUNW.i86pc |
Path to JumpStart configuration file in the format server:/path |
|
Sterm |
15 |
ASCII text |
1 |
0 |
SUNW.Ultra-1, SUNW.Ultra-30, SUNW.i86pc |
Terminal type |
|
* The vendor client classes determine what classes of client can use the option. Vendor client classes listed here are suggestions only. You should specify client classes that indicate the actual clients in your network that need to install from the network. See Table 10–3 for information about how to determine a client's vendor client class. |
||||||
When you have created the options, you can create macros that include those options. The following table lists suggested macros you can create to support Solaris installation for clients.
Table 10–5 Suggested Macros to Support Network Installation Clients|
Macro Name |
Contains These Options and Macros |
|---|---|
|
Solaris |
SrootIP4, SrootNM, SinstIP4, SinstNM, Sterm |
|
sparc |
SrootPTH, SinstPTH |
|
sun4u |
Solaris and sparc macros |
|
i86pc |
Solaris macro, SrootPTH, SinstPTH, SbootFIL |
|
SUNW.i86pc * |
i86pc macro |
|
SUNW.Ultra-1 * |
sun4u macro, SbootFIL |
|
SUNW.Ultra-30 * |
sun4u macro, SbootFIL macro |
|
xxx.xxx.xxx.xxx (network address macros) |
BootSrvA option could be added to existing network address macros. The value of BootSrvA should indicate the tftboot server. |
|
* These macro names match the Vendor client classes of the clients that will install from the network. These names are examples of clients you might have on your network. See Table 10–3 for information about determining a client's vendor client class. |
|
You can create these options and macros by using the dhtadm command or DHCP Manager. If you use dhtadm, it is better to create the options and macros by writing a script that uses the dhtadm command repeatedly.
The following section, Writing a Script That Uses dhtadm to Create Options and Macros, shows a sample script that uses the dhtadm command. If you prefer to use DHCP Manager, see Using DHCP Manager to Create Install Options and Macros.
Writing a Script That Uses dhtadm to Create Options and Macros
You can create a Korn shell script by adapting the example in Example 10–1 to create all the options listed in Table 10–4 and some useful macros. Be sure to change all IP addresses and values contained in quotes to the correct IP addresses, server names, and paths for your network. You should also edit the Vendor= key to indicate the class of clients you have. Use the information reported by add_install_client -d to obtain the data needed to adapt the script.
Example 10–1 Sample Script to Support Network Installation
# Load the Solaris vendor specific options. We'll start out supporting # the Ultra-1, Ultra-30, and i86 platforms. Changing -A to -M would replace # the current values, rather than add them. dhtadm -A -s SrootOpt -d 'Vendor=SUNW.Ultra-1 SUNW.Ultra-30 SUNW.i86pc,1,ASCII,1,0' dhtadm -A -s SrootIP4 -d 'Vendor=SUNW.Ultra-1 SUNW.Ultra-30 SUNW.i86pc,2,IP,1,1' dhtadm -A -s SrootNM -d 'Vendor=SUNW.Ultra-1 SUNW.Ultra-30 SUNW.i86pc,3,ASCII,1,0' dhtadm -A -s SrootPTH -d 'Vendor=SUNW.Ultra-1 SUNW.Ultra-30 SUNW.i86pc,4,ASCII,1,0' dhtadm -A -s SswapIP4 -d 'Vendor=SUNW.Ultra-1 SUNW.Ultra-30 SUNW.i86pc,5,IP,1,0' dhtadm -A -s SswapPTH -d 'Vendor=SUNW.Ultra-1 SUNW.Ultra-30 SUNW.i86pc,6,ASCII,1,0' dhtadm -A -s SbootFIL -d 'Vendor=SUNW.Ultra-1 SUNW.Ultra-30 SUNW.i86pc,7,ASCII,1,0' dhtadm -A -s Stz -d 'Vendor=SUNW.Ultra-1 SUNW.Ultra-30 SUNW.i86pc,8,ASCII,1,0' dhtadm -A -s SbootRS -d 'Vendor=SUNW.Ultra-1 SUNW.Ultra-30 SUNW.i86pc,9,NUMBER,2,1' dhtadm -A -s SinstIP4 -d 'Vendor=SUNW.Ultra-1 SUNW.Ultra-30 SUNW.i86pc,10,IP,1,1' dhtadm -A -s SinstNM -d 'Vendor=SUNW.Ultra-1 SUNW.Ultra-30 SUNW.i86pc,11,ASCII,1,0' dhtadm -A -s SinstPTH -d 'Vendor=SUNW.Ultra-1 SUNW.Ultra-30 SUNW.i86pc,12,ASCII,1,0' dhtadm -A -s SsysidCF -d 'Vendor=SUNW.Ultra-1 SUNW.Ultra-30 SUNW.i86pc,13,ASCII,1,0' dhtadm -A -s SjumpsCF -d 'Vendor=SUNW.Ultra-1 SUNW.Ultra-30 SUNW.i86pc,14,ASCII,1,0' dhtadm -A -s Sterm -d 'Vendor=SUNW.Ultra-1 SUNW.Ultra-30 SUNW.i86pc,15,ASCII,1,0' # Load some useful Macro definitions # Define all Solaris-generic options under this macro named Solaris. dhtadm -A -m Solaris -d ':SrootIP4=10.21.0.2:SrootNM="blue2":SinstIP4=10.21.0.2:\ SinstNM="red5":Sterm="xterm":' # Define all sparc-platform specific options under this macro named sparc. dhtadm -A -m sparc -d ':SrootPTH="/export/sparc/root":SinstPTH="/export/sparc/install":' # Define all sun4u architecture-specific options under this macro named sun4u. (Includes # Solaris and sparc macros.) dhtadm -A -m sun4u -d ':Include=Solaris:Include=sparc:' # Solaris on IA32-platform-specific parameters are under this macro named i86pc. dhtadm -A -m i86pc -d \ ':Include=Solaris:SrootPTH="/export/i86pc/root":SinstPTH="/export/i86pc/install"\ :SbootFIL="/platform/i86pc/kernel/unix":' # Solaris on IA32 machines are identified by the "SUNW.i86pc" class. All # clients identifying themselves as members of this class will see these # parameters in the macro called SUNW.i86pc, which includes the i86pc macro. dhtadm -A -m SUNW.i86pc -d ':Include=i86pc:' # Ultra-1 platforms identify themselves as part of the "SUNW.Ultra-1" class. # By default, we boot these machines in 32bit mode. All clients identifying # themselves as members of this class will see these parameters. dhtadm -A -m SUNW.Ultra-1 -d ':SbootFIL="/platform/sun4u/kernel/unix":Include=sun4u:' # Ultra-30 platforms identify themselves as part of the "SUNW.Ultra-30" class. # By default, we will boot these machines in 64bit mode. All clients # identifying themselves as members of this class will see these parameters. dhtadm -A -m SUNW.Ultra-30 -d ':SbootFIL="/platform/sun4u/kernel/sparcv9/unix":\ Include=sun4u:' # Add our boot server IP to each of the network macros for our topology served by our # DHCP server. Our boot server happens to be the same machine running our DHCP server. dhtadm -M -m 10.20.64.64 -e BootSrvA=10.21.0.2 dhtadm -M -m 10.20.64.0 -e BootSrvA=10.21.0.2 dhtadm -M -m 10.20.64.128 -e BootSrvA=10.21.0.2 dhtadm -M -m 10.21.0.0 -e BootSrvA=10.21.0.2 dhtadm -M -m 10.22.0.0 -e BootSrvA=10.21.0.2 # Make sure we return host names to our clients. dhtadm -M -m DHCP-servername -e Hostname=_NULL_VALUE_ # The client with this MAC address is a diskless client. Override the root settings # which at the network scope setup for Install with our client's root directory. dhtadm -A -m 0800201AC25E -d \ ':SrootIP4=10.23.128.2:SrootNM="orange-svr-2":SrootPTH="/export/root/10.23.128.12":' |
As superuser, execute dhtadm in batch mode and specify the name of the script to add the options and macros to your dhcptab. For example, if your script is named netinstalloptions, type the command:
dhtadm -B netinstalloptions
When you have done this, clients that have vendor client classes that are listed in the Vendor= string can use DHCP to obtain the parameters they need for Solaris installation over the network.
Using DHCP Manager to Create Install Options and Macros
You can create the options listed in Table 10–4 and the macros listed in Table 10–5 with DHCP Manager.
See Figure 10–17 and Figure 10–16 for illustrations of the dialog boxes you use to create options and macros.
How to Create Options to Support Solaris Installation (DHCP Manager)
-
Select the Options tab in DHCP Manager.
-
Choose Create from the Edit menu.
The Create Option dialog box opens.
-
Type the option name for the first option and type values appropriate for that option.
Use Table 10–4 to look up the option names and values for options you must create. Notice that the vendor client classes are only suggested values. You should create classes to indicate the actual client types that need to obtain Solaris installation parameters from the DHCP service. See Table 10–3 for information about how to determine a client's vendor client class.
-
Click OK when you have entered all the values.
-
In the Options tab, select the option you just created.
-
Select Duplicate from the Edit menu.
The Duplicate Option dialog box opens.
-
Type the name of another option and modify other values appropriately.
The values for code, data type, granularity, and maximum are most likely to need modification. See Table 10–4 for the values.
-
Repeat Step 5 through Step 7 until you have created all the options.
You can now create macros to pass the options to network installation clients, as explained in the following procedure.
Note –You do not need to add these options to a Solaris client's /etc/dhcp/inittab file because they are already included in that file.
How to Create Macros to Support Solaris Installation (DHCP Manager)
-
Select the Macros tab in DHCP Manager.
-
Choose Create from the Edit menu.
The Create Macro dialog box opens.
-
Type the name of a macro.
See Table 10–5 for macro names you might use.
-
Click the Select button.
The Select Option dialog box opens.
-
Select Vendor in the Category list.
The Vendor options you created are listed.
-
Select an option you want to add to the macro and click OK.
-
Type a value for the option.
See Table 10–4 for the option's data type and refer to the information reported by add_install_client -d.
-
Repeat Step 6 through Step 7 for each option you want to include.
To include another macro, type Include as the option name and type the macro name as the option value.
-
Click OK when the macro is complete.
Supporting Remote Boot and Diskless Boot Clients (Task Map)
The Solaris DHCP service can support Solaris client systems that mount their operating system files remotely from another machine, called the OS server. Such clients are often called diskless clients. They can be thought of as persistent remote boot clients in that each time they boot, they must obtain the name and IP address of the server that hosts their operating system files, and then boot remotely from those files.
Each diskless client has its own root partition on the OS server, which is shared to the client host name. This means that the DHCP server must always return the same IP address to the client, and that address must remain mapped to the same host name in the name service (such as DNS). To accomplish this, each diskless client must be assigned a consistent IP address.
In addition to the IP address and host name, the DHCP server can supply a diskless client with all the information needed to locate its operating system files on the OS server. However, you must create options and macros that can be used to pass the information in a DHCP message packet.
The following task map lists the tasks required to support diskless clients or any other persistent remote boot clients, and includes links to procedures to help you carry them out.
|
Task |
Description |
Instructions |
|---|---|---|
|
Set up OS services on a Solaris server. |
Use the smosservice command to create operating system files for clients. |
“Managing Diskless Client Support (Tasks)” in System Administration Guide: Basic Administration Also see the smosservice man page. |
|
Set up DHCP Service to support network boot clients |
Use DHCP Manager or dhtadm to create new Vendor options and macros which the DHCP server can use to pass booting information to the clients. Note that if you already created the options for network install clients, you need only create macros for the Vendor client types of the diskless clients. |
Supporting Solaris Network Installation with the DHCP Service (Task Map) |
|
Assign reserved IP addresses to the diskless clients. |
Use DHCP Manager or pntadm to mark addresses reserved (or manual) for diskless clients. | |
|
Set up diskless clients for OS service |
Use the smdiskless command to add operating system support on the OS server for each client. Specify the IP addresses you reserved for each client. |
“Managing Diskless Client Support (Tasks)” in System Administration Guide: Basic Administration Also see the smdiskless man page |
|
Assign reserved IP addresses to the diskless clients. |
Use DHCP Manager or pntadm to mark addresses reserved (or manual) for diskless clients. | |
|
Set up diskless clients for OS service |
Use the smdiskless command to add operating system support on the OS server for each client. Specify the IP addresses you reserved for each client. |
“Managing Diskless Client Support (Tasks)” in System Administration Guide: Basic Administration Also see the smdiskless man page |
Setting Up DHCP Clients as NIS+ Clients
You can use the NIS+ name service on Solaris systems that are DHCP clients, but to do so requires you to partially circumvent one of the security-enhancing features of NIS+ - the creation of DES credentials. When you set up a NIS+ client that is not using DHCP, you add unique DES credentials for the new NIS+ client system to the cred table on the NIS+ server. There are several ways to accomplish this, such as using the nisclient script or the nisaddcred command.
For DHCP clients, you cannot use these methods because they depend on a static host name to create and store the credentials. If you want to use NIS+ and DHCP, you must create identical credentials to be used for all the host names of DHCP clients. In this way, no matter what IP address (and associated host name) a DHCP client receives, it can use the same DES credentials.
Note –
Before you do this, remember that NIS+ was designed with security in mind, and this procedure weakens that security because it allows random DHCP clients to receive NIS+ credentials.
The following procedure shows you how to create identical credentials for all DHCP host names. This procedure is only valid if you know the host names that DHCP clients will use, such as when the host names are generated by the DHCP server.
How to Set Up Solaris DHCP Clients as NIS+ Clients
A DHCP client workstation that is to be a NIS+ client must use credentials copied from another NIS+ client workstation in the NIS+ domain. This procedure only produces credentials for the workstation, which apply only to the superuser logged in to the workstation. Other users logged in to the DHCP client workstation must have their own unique credentials in the NIS+ server, created according to the procedure in the System Administration Guide: Naming and Directory Services (FNS and NIS+).
-
Type the following command on the NIS+ server to write the cred table entry for the NIS+ client to a temporary file.
# nisgrep nisplus-client-name cred.org_dir > /tmp/file
-
View the contents of the temporary file so you can copy the credentials and use them to create credentials for DHCP clients.
You must copy the public key and private key, which are long strings of numbers and letters separated by colons.
-
Type the following commands to add credentials for a DHCP client. Copy the public and private key information from the temporary file.
# nistbladm -a cname=" dhcp-client-name@nisplus-domain" auth_type=DES \
auth_name="unix.dhcp-client-name@nisplus-domain" \
public_data=copied-public-data \
private_data=copied-private-data
-
Type the following commands on each DHCP client system to remote copy NIS+ client files to the DHCP client system.
# rcp nisplus-client-name:/var/nis/NIS_COLD_START /var/nis
# rcp nisplus-client-name:/etc/.rootkey /etc
# rcp nisplus-client-name:/etc/defaultdomain /etc
If you get a “permission denied” message, the systems may not be set up to allow remote copying. You can copy the files as a regular user to an intermediate location and then copy them to the proper location as root on the DHCP client systems.
-
Type the following command on the DHCP client system to use the correct name service switch file for NIS+:
# cp /etc/nsswitch.nisplus /etc/nsswitch.conf
-
Reboot the DHCP client system.
The DHCP client system should now be able to use NIS+ services.
Example – Setting up a Solaris DHCP Client as an NIS+ Client
The following example assumes that you have one workstation, nisei, which is a NIS+ client in the NIS+ domain dev.example.net, and one DHCP client, dhow, that you want to be a NIS+ client.
(first log in as root on the NIS+ server) # nisgrep nisei cred.org_dir > /tmp/nisei-cred # cat /tmp/nisei-cred nisei.dev.example.net.:DES:unix.nisei@dev.example.net:46199279911a84045b8e0 c76822179138173a20edbd8eab4:90f2e2bb6ffe7e3547346dda624ec4c7f0fe1d5f37e21cff63830 c05bc1c724b # nistbladm -a cname="dhow@dev.example.net." \ auth_type=DES auth_name="unix.dhow@dev.example.net" \ public_data=46199279911a84045b8e0c76822179138173a20edbd8eab4 \ private_data=90f2e2bb6ffe7e3547346dda624ec4c7f0fe1d5f37e21cff63830\ c05bc1c724b # rlogin dhow (log in as root on dhow) # rcp nisei:/var/nis/NIS_COLD_START /var/nis # rcp nisei:/etc/.rootkey /etc # rcp nisei:/etc/defaultdomain /etc # cp /etc/nsswitch.nisplus /etc/nsswitch.conf # reboot |
The DHCP client system dhow should now be able to use NIS+ services.
Adding Credentials With a Script
If you want to set up a large number of DHCP clients as NIS+ clients, you can write a script to quickly add the entries to the cred table. The following sample shows how this might be done.
Example 10–2 Sample Script for Adding Credentials for DHCP Clients
#! /usr/bin/ksh
#
# Copyright (c) by Sun Microsystems, Inc. All rights reserved.
#
# Sample script for cloning a credential. Hosts file is already populated
# with entries of the form dhcp-[0-9][0-9][0-9]. The entry we're cloning
# is dhcp-001.
#
#
PUBLIC_DATA=6e72878d8dc095a8b5aea951733d6ea91b4ec59e136bd3b3
PRIVATE_DATA=3a86729b685e2b2320cd7e26d4f1519ee070a60620a93e48a8682c5031058df4
HOST="dhcp-"
DOMAIN="mydomain.example.com"

for
i in 002 003 004 005 006 007 008 009 010 011 012 013 014 015 016 017 018 019
do
     print - ${HOST}${i}
     #nistbladm -r [cname="${HOST}${i}.${DOMAIN}."]cred.org_dir
     nistbladm -a cname="${HOST}${i}.${DOMAIN}." \
         auth_type=DES auth_name="unix.${HOST}${i}@${DOMAIN}" \
         public_data=${PUBLIC_DATA} private_data=${PRIVATE_DTA} cred.org_Dir
done

exit 0
|
Converting to a New Data Store
Solaris DHCP provides a utility to convert the DHCP configuration data from one data store to another. You may need to convert to a new data store if, for example, your number of DHCP clients increases to the point that you need higher performance or higher capacity from the DHCP service, or if you want to share the DHCP server duties among multiple servers. See Choosing the Data Store for a comparison of the relative benefits and drawbacks of each type of data store.
Note –
If you upgraded from a Solaris release older than the Solaris 8 7/01 release on the DHCP server system, the first time you run any Solaris DHCP management tool after Solaris installation, you are prompted to convert your DHCP data tables to the new data store. The conversion is required because the format of the data stored in both files and NIS+ changed in the Solaris 8 7/01 release. If you do not convert to the new data store, the DHCP server continues to read the old data tables to extend leases for existing clients. You cannot register new DHCP clients or use management tools with the old data tables.
The conversion utility is also useful for sites converting from a Sun-provided data store to a third-party data store. The conversion utility looks up entries in the existing data store and adds new entries that contain the same data to the new data store. Data store access is implemented in separate modules for each data store, which enables the conversion utility to convert DHCP data from any data store format to any other data store format, provided each data store has a module. See Solaris DHCP Service Developer's Guide for more information about how to write a module to support a third-party data store.
The data store conversion can be accomplished with DHCP Manager through the Data Store Conversion wizard, or with the dhcpconfig -C command.
The initial dialog box of the Data Store Conversion wizard is shown in the following figure.
Figure 10–19 Data Store Conversion Wizard Dialog Box
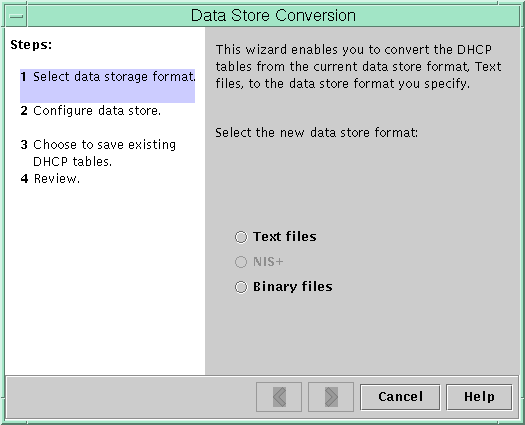
Before the conversion begins, you must specify whether to save the old data store's tables (dhcptab and network tables) . The conversion utility then stops the DHCP server, converts the data store, and restarts the server when the conversion has completed successfully. If you did not specify to save the old tables, the utility deletes them after it determines the conversion is successful. The process of converting can be time-consuming, so the conversion runs in the background with a meter to inform you of its progress.
How to Convert the DHCP Data Store (DHCP Manager)
-
Choose Convert Data Store from the Service menu.
The Data Store Conversion wizard opens.
-
Answer the wizard's prompts.
If you have trouble providing the requested information, click Help to view detailed information about each dialog box.
How to Convert the DHCP Data Store (dhcpconfig -C)
-
Become superuser or a user assigned to the DHCP Management profile.
-
Type a command of the following format:
# /usr/sbin/dhcpconfig -C -r resource -p path
where resource is the data store (such as SUNWbinfiles) and path is the path to the data (such as /var/dhcp).
Note that if you want to keep the original data (in the old data store) after the conversion, specify the -k option.
Moving Configuration Data Between DHCP Servers (Task Map)
The DHCP Manager and dhcpconfig utilities enable you to move some or all the DHCP configuration data from one Solaris DHCP server to another. You can move entire networks and all the addresses, macros, and options associated with it, or select specific IP addresses, macros, and options to move. You can also copy useful macros or options without removing them from the first server when you specify to keep the data on the server.
You might want to move data if you are going to do any of the following tasks:
-
Add a server to share DHCP duties
-
Replace the DHCP server's system
-
Change the path for the data store (while still using the same data store)
The following task map identifies the procedures you must perform when you move DHCP configuration data.
|
Task |
Description |
Instructions |
|---|---|---|
|
1. Export the data from the first server |
Select the data you want to move to another server and create a file of exported data. | |
|
2. Import the data to the second server |
Copy exported data to another DHCP server's data store. | |
|
3. Modify the imported data for the new server environment |
Change server-specific configuration data to match the new server's information. |
In DHCP Manager, you use the Export Data wizard and Import Data wizard to move the data from one server to the other, and modify macros in the Macros tab. The following figures show the initial dialog boxes for the wizards.
Figure 10–20 Export Data Wizard Dialog Box
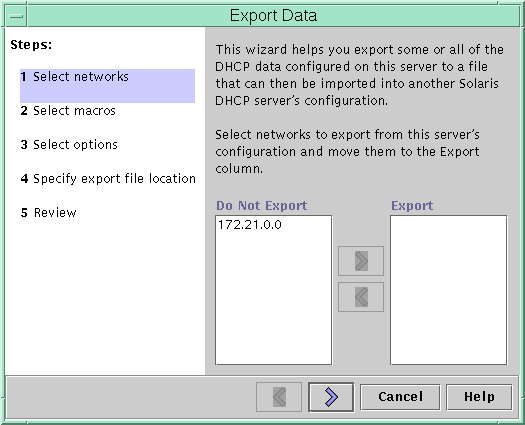
Figure 10–21 Import Data Wizard Dialog Box
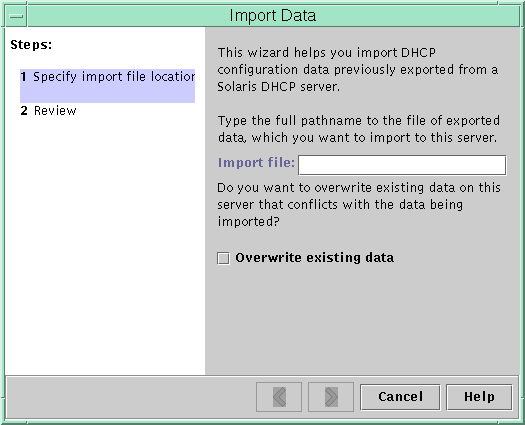
How to Export Data From a DHCP Server (DHCP Manager)
-
Become superuser on the server from which you want to move or copy data.
-
Choose Export Data on the Service menu.
The Export Data wizard opens as shown in Figure 10–20.
-
Answer the wizard's prompts.
If you have difficulty, click Help for detailed information about the prompts.
-
Move the export file to a file system that is accessible to the DHCP server to which you want to move the data.
Import the data as described in How to Import Data On a DHCP Server (DHCP Manager).
How to Import Data On a DHCP Server (DHCP Manager)
-
Become superuser on the server to which you want to move data that you previously exported from a DHCP server.
-
In DHCP Manager, choose Import Data from the Service menu.
The Import Data Wizard opens, as shown in Figure 10–21.
-
Answer the wizard's prompts.
If you have difficulty, click Help for detailed information about the prompts.
How to Modify Imported DHCP Data (DHCP Manager)
-
Become superuser on the server to which you imported data.
-
Examine imported data for network–specific information that needs modification.
For example, if you moved networks, you must open the Addresses tab and change the owning server of addresses in the imported networks. You might also need to open the Macros tab to specify the correct domain names for NIS, NIS+ or DNS in the macros that specify them.
-
Open the Addresses tab and select a network that you imported.
-
To select all the addresses, click the first address, press and hold the Shift key, and click the last address.
-
From the Edit menu, choose Properties.
The Modify Multiple Addresses dialog box opens.
-
At the Managing Server prompt, select the new server's name.
-
At the Configuration Macro prompt, select the macro that should be used for all clients on this network.
-
Click OK.
-
Open the Macros tab.
-
Use the Find facility at the bottom of the window to locate the options that are likely to need modified values.
DNSdmain, DNSserv, NISservs, NIS+serv, and NISdmain are examples of options that might need modification on the new server.
-
When you locate an option that needs to be changed, select the macro name and choose Properties from the Edit menu and change its value.
How to Export Data From a DHCP Server (dhcpconfig -X)
-
Become superuser on the server from which you want to move or copy data.
-
Type a command of the following format:
# /usr/sbin/dhcpconfig -X filename -a network-addresses -m macros -o options
where filename is the full path name you want to use to store the compressed exported data. You can use the keyword ALL with the command options to export all the networks, macros, or options. For example:
# /usr/sbin/dhcpconfig -X dhcp1065_data -a ALL -m ALL -o ALL
Alternatively, you can specify particular network addresses, macros, and configuration options in comma-separated lists. For example:
# /usr/sbin/dhcpconfig -X dhcp1065_data -a 10.63.0.0,10.62.0.0 \
-m 10.63.0.0,10.62.0.0,SUNW.Ultra-5_10 -o Sterm
See the dhcpconfig man page for more information about the dhcpconfig command.
-
Move the file that contains the exported data to a location that is accessible to the server to which you want to move the data.
Import the data as described in How to Import Data on a DHCP Server (dhcpconfig -I).
How to Import Data on a DHCP Server (dhcpconfig -I)
-
Become superuser on the server to which you want to import the data.
-
Type a command of the following format:
# /usr/sbin/dhcpconfig -I filename
where filename is the name of the file that contains the data exported from the first server.
Be sure to modify the imported data as described in How to Modify Imported DHCP Data (pntadm, dhtadm)
How to Modify Imported DHCP Data (pntadm, dhtadm)
-
Become superuser on the server to which you imported data.
-
Examine the network tables for data that needs to be modified.
If you moved networks, use pntadm -P network_address to print out the network tables for the networks you moved.
-
Use the pntadm command to modify IP address information.
You might need to change the owning server and the configuration macro used for imported addresses. For example, to change the owning server (10.60.3.4) and macro (dhcpsrv-1060) for address 10.63.0.2, you would use the following command:
pntadm -M 10.63.0.2 -s 10.60.3.4 -m dhcpsrv-1060 10.60.0.0
If you have a large number of addresses, you should create a script file that contains commands to modify each address, and then execute the script with the pntadm -B command, which runs pntadm in batch mode. See the pntadm man page.
-
Examine the dhcptab macros for options with values that need modification.
Use dhtadm -P to print the entire dhcptab, and use grep or some other tool to search for particular options or values that you might want to change.
-
Use the dhtadm -M command to modify options in macros if necessary.
For example, you might need to modify some macros to specify the correct domain names and servers for NIS, NIS+ or DNS. For example, the following command changes the values of DNSdmain and DNSserv in the macro mymacro:
dhtadm -M -m mymacro -e 'DNSserv=dnssrv2:DNSdmain=example.net'
- © 2010, Oracle Corporation and/or its affiliates
