| C H A P T E R 3 |
|
Troubleshooting |
This chapter includes installation and activation error messages, troubleshooting tips, and instructions for removing SRS Net Connect 3.1.
Check the following section to resolve installation errors before you contact the SRS Net Connect Support group.
If you did not click Create Company when you created your root administrator account, you will not be able to download the activation kit. The following instructions assume you have already created an account as a root administrator, but did not create a company.
Perform the following steps to create a company:
1. At the SRS Net Connect Home page, click Company List.
3. Complete the required fields.
5. Select the company and click Make Active.
6. Click SRS Net Connect Home and click Download Activation Kit.
If SRS Net Connect 3.1 is already installed on the monitored system, the Web Start Wizard cannot install 3.1 again. The following message appears: SRS Net Connect 3.1 is already installed on this system. You must uninstall before you can install it again.
This situation exists if one of the following actions occurred:
If you run the activation script and a Required patches (or higher revisions) are NOT installed message appears, you must install the required Solaris patch. Log into http://www.sunsolve.sun.com, and download and install the patch according to the instructions. Reboot your monitored system and run the activation script again.
You can uninstall SRS Net Connect 3.1 software that was installed with the wizard by using the Solaris Product Registry. The Error: System Registry not available message indicates that you are not logged into the monitored system as a root user. Log into the system as a root user and type prodreg to launch the Solaris Product Registry. See Uninstalling Net Connect for instructions.
Perform the following steps if your SRS Net Connect 3.1 installation fails:
1. Review the error messages onscreen during the installation and check the syslog file by typing:
2. Determine if your system is configured to use remote logging. See the SunSM Remote Services Net Connect 3.1 Quick Installation Guide.
3. Remove the SRS Net Connect 3.1 package by following the instructions in Uninstalling Net Connect and reinstall.
4. If you use the SunSpectrumSM service, you can get technical support according to the terms of your contract. You can call your Customer Care Center or click Support and Online Support Center. Response times depend on your level of service.
If you do not use the SunSpectrum service, click Support and read the documentation. If you still have questions, click Support and Email Support Form, and complete the required fields. At Problem Description, include the following information:
Click Submit. You will receive a response the next business day. Email support is English only.
There are two ways to remove SRS Net Connect 3.1. The removal method you choose depends on how Net Connect was installed; installation can be done with the Solaris Web Start Wizard or the Net Connect installation script.
If the Solaris Web Start Wizard was used to install SRS Net Connect 3.1, perform the following steps to remove Net Connect:
1. Log into the monitored system as the root user.
2. Type the following to launch the Solaris Product Registry:
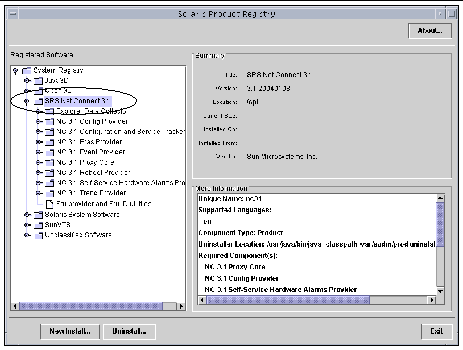
3. In the Registered Software section, click SRS Net Connect 3.1 to highlight it, as shown in FIGURE 3-1.

5. At the Welcome screen, click Next.
6. At the Select Type of Uninstall screen, click Full and click Next.
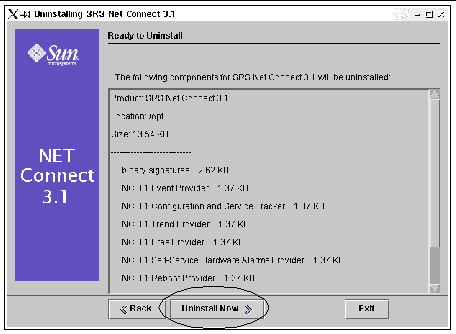
7. At the Ready to Uninstall screen, click Uninstall Now, as shown in FIGURE 3-2.

8. At the Uninstallation Summary screen, click Exit.
9. At the Uninstall Complete box, click OK.
If you installed SRS Net Connect 3.1 by running the installation script, perform the following steps to remove Net Connect:
1. Log into the monitored system as the root user.
2. If you installed SRS Net Connect using the default directories, change to the following directory:
3. Type the following to run the uninstall script from the directory where you installed Net Connect:
# ./UninstallNetConnect.003.001.000.sh
The version number in the uninstall script should reflect the version of Net Connect you installed.
4. If you installed CST, remove this package by typing:
Go to https://srsnetconnect.sun.com to retrieve the SunSM Remote Services Net Connect 3.1 Customer Planning Guide.
Go to https://srsnetconnect.sun.com and log into SRS Net Connect 3.1 to retrieve the following documents:
Go to http://www.sun.com/service/support/cst to view the Configuration and Service Tracker, version 3.5 Customer Installation and Operations Guide.
Go to http://www.sun.com/storage/software/autodiagnostic/ for more information on Storage Automated Diagnostic Environment.
Copyright © 2004, Sun Microsystems, Inc. All rights reserved.