| C H A P T E R 2 |
|
Activation |
After you install SRS Net Connect 3.1, you must register for a Net Connect account to obtain the activation kit. The activation kit contains your customized customer certificate and activation script. If you already have an activation kit, you do not need to obtain another kit.
If you have already registered as an SRS Net Connect 3.1 user, you can use that username and password to get the activation kit. If you have not registered, perform the following steps:
1. If you have not registered as a Net Connect user, go to https://srsnetconnect.sun.com to access SRS Net Connect 3.1.
2. At the Welcome page, click Sign Up to create a new root administrator user account. A Net Connect root administrator controls the company profile, views reports, and creates, modifies, and deletes users, user groups, and system groups. More than one person can be a root administrator.
3. Read the agreement, click the check box, and click Accept.
4. At the Sign Up - Account Creation page, complete the required fields to add yourself as a root administrator and click Submit.
5. At the Sign Up Create Company page, click Create Company. To download the installation bundle and use SRS Net Connect 3.1, you must add your company.
6. At the New Company page, complete the required fields. The Company Name field must be less than 80 characters. The Short Name must be less than 20 characters; it cannot be edited later since this is how the company information is stored in the database.
7. A default system group is created using your company short name, and as you install SRS Net Connect 3.1 on new monitored systems, the systems are added to this system group. You can change this later by clicking System Grouping. The last field, Update Mode, defines how software updates are delivered to your monitored system. Select one of the following:
For both Auto and Review settings, you can get email notification about failed software updates by selecting the Net Connect Event Provider on the Notifications page in the SRS Net Connect 3.1 application. See the SunSM Remote Services Net Connect 3.1 Customer Operations Guide for instructions on email notification.
8. Click Save to display the Download SRS Net Connect page.
9. Click Welcome and then click SRS Net Connect Home to display the SRS Net Connect Home page.
You must have an SRS Net Connect username and password to get the activation kit. Perform the following steps to get the activation kit:
1. Log into the SRS Net Connect 3.1 application.
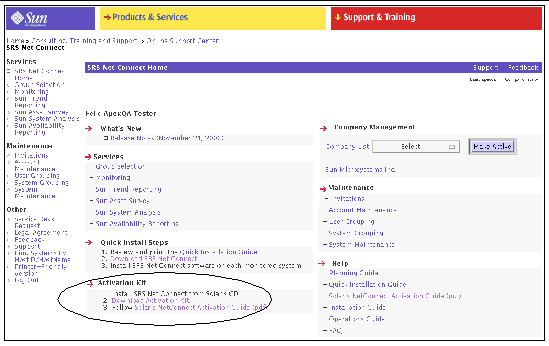
2. On the SRS Net Connect Home page, click Follow Solaris Net Connect Activation Guide and print it.
3. Click Download Activation Kit, as shown in FIGURE 2-1.

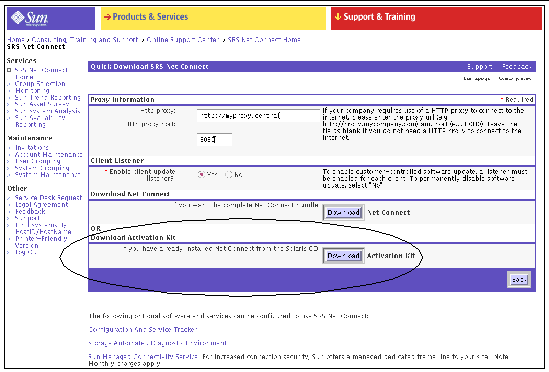
4. If your company uses an HTTP proxy to connect to the Internet, type the URL or IP address of the HTTP proxy. At HTTP Proxy Port, type the port number it uses. Leave these fields blank if you have a direct connection to the Internet and do not use an HTTP proxy.
5. To allow software updates to be automatically installed on the monitored system, click Yes at Enable Client Update Listener. To disable software update installation, click No. The updates include new software versions and messages. If you click Yes at Client Listener, you should also set the Update Mode field in the New Company page to Auto or Review to automatically send a Non-Critical alert about an update.
6. At the Download Activation Kit section, click Download to save the compressed 53 KByte activation_kit-sparc.tar.Z file to your monitored system. FIGURE 2-2 shows the Quick Download SRS Net Connect page.

7. At the Save As dialog box, specify a directory on the monitored system where you want to perform the installation and click OK. If you put the installation file in the /tmp directory, the files are deleted if your system reboots, so the /var directory is a more permanent location. A configuration file and a security certificate are automatically generated for you and included in your activation kit. The configuration file is saved in the /etc/opt/SUNWsrspx/ directory when the software is installed on the monitored systems. See the SunSM Remote Services Net Connect 3.1 Customer Installation Guide for details on the default configuration values included in the activation kit.
After you download the activation kit tar file, you must extract it and run the activation script on each monitored system. The activation script contains the following items:
The activation script performs the following actions:
1. The bin directory - Contains a program called text to support globalization in the activation script
2. The funcs directory - Assists the activation script with shell functions
3. The locale directory - Contains globalization support strings
These directories are not used after the activation is successful, and you can delete them if you wish.
If you have a previous version of the Net Connect 3.x event provider installed, the activation script detects the file archive directory and copies the SRSQueueStore directory to the DISK_STORE_BASE directory. A new file called DISK_STORE_BASE/SRSQueueStore/install/RESTART is created and the /etc/inittab file is updated.
Run the activation script by performing the following steps on each monitored system:
1. Open a terminal window and log into the monitored system as the root user.
2. Copy the activation_kit-sparc.tar.Z file you downloaded in Downloading the Activation Kit to each monitored system that will run SRS Net Connect 3.1.
3. Change to the directory where you copied the activation kit tar file. This should be a directory that is owned and readable by the root user.
4. Uncompress and extract the activation kit tar file by typing:
# zcat activation_kit-sparc.tar.Z | tar xvf -
5. Run the activation script from the directory where you uncompressed and extracted it by typing:
The activation script verifies the following:
6. If you running the script for the first time, you must provide a user account when the following text appears:
SRS Net Connect 3 executes programs as the user specified in answer to the following questions. The user and their group must already exist on the system and it is highly recommended that this user account be a locked account that denies interactive login.
Type the account identifier. Note: the account must already exist. [?,q].
Type the user name and press Return. If you have a previous version of Net Connect installed, the activation script automatically detects the user name and group you used to install Net Connect.
7. After you type the user name, choose a group name when the following text appears:
Type the group name to be used with this account identifier. Note: This group must already exist and the account identifier specified above must be a member of this group.
Available groups: staffType the group name: [?,q]
If the user account has only one group associated with it, this step is skipped. Type the group name and press Return.
8. SRS Net Connect requires space to build and store messages. You must specify a directory for queue space when the following text appears:
SRS Net Connect 3 requires space to build and store messages that are sent in response to system management monitoring events. The default file system location for this queue space is: /var
This directory currently has the following characteristics:
Filesystem kbytes used avail capacity Mounted on
/dev/dsk/c0t0d0s5 492422 184319 258861 42% /var
Type the name of the file system where queue space should be allocated [/var]
Press Return to accept the default /var directory, or type a different directory (for example, /var/SUNWsrspx).
9. You must also specify the size for the DISK_STORE_SIZE value when the following text appears:
Amount of space(MB) to allocate for the SRS Net Connect queue store.
Type the maximum size that the proxy may use: [20]
Press Return to accept the default size of 20 MBytes.
10. If you run the proxy through a SOCKS server, you must provide the path to the SOCKS server when the following text appears:
The SRS Net Connect proxy may be run via a SOCK daemon process.
If you want the proxy to use the SOCKS proxy, type the fully-qualified path to the 'runsocks' or equivalent program. This adds the run-time library for the SOCKS libraries to the LD_LIBRARY_PATH. If you do not want to run via the SOCKS daemon, enter 'none' at the prompt.
Enter the path to the runsocks program or 'none': [none]
Type the path to the SOCKS server or press Return to accept the default value of none.
11. You can enable automatic software upgrades, so new software is automatically installed on your monitored system. The updates include new software versions and messages. The following text appears:
SRS Net Connect can automatically install software updates that are received
by the proxy.
Would you like to enable automatic updates? [y,n,?,q] y
Press Return to automatically install software updates or type N.
The activation script checks the user's ability to interact with cron. The SRS Net Connect 3 activation complete message indicates a successful SRS Net Connect activation. Log into SRS Net Connect 3.1 to view your monitored systems. See the SunSM Remote Services Net Connect 3.1 Customer Operations Guide for instructions on creating system groups and user groups.
After you run the activation script, the monitored system and its providers run within three minutes. Wait at least 30 minutes before retrieving system reports from SRS Net Connect 3.1. Delta reports require at least two sets of data to compare.
Perform the following steps after you finish the installation:
1. Log into the monitored system as the root user.
2. Verify which SRS Net Connect 3.1 providers are installed by typing:
For example, the following text indicates that you have successfully installed the configuration provider (SUWsrscp), Sun RAS System Analysis (SUNWsrsep), and the reboot provider (SUNWsrsrp):
1 9 * * 5 /opt/SUNWsrscp/bin/config_pvr_runner config_pvr 003.001.001 IM-NC_ENG- config_pvr /tmp/config_pvr 756000 text/plain
1 9 04 * * /opt/SUNWsrsep/bin/eras_pvr_runner eras_pvr 003.001.001 IM-NC_ENG-eras_pvr /tmp/eras_pvr 3348000 application/x-gtar
0-59 * * * * /opt/SUNWsrsrp/bin/gmt_time > /var/opt/SUNWsrsrp/latest
3. Verify that the SRS Net Connect 3.1 providers and proxy are running by typing:
The following providers and proxy processes should be running continuously:
4. Verify that the monitored system can communicate with the SRS Net Connect Data Center. Change to the /opt/SUNWsrspx/bin/ directory and type:
The -p indicates ping mode, and verifies that it can route to the Data Center.
5. Validate that the hardware alarm provider is working by typing:
# logger -p user.error Fan Removed - test
This causes an error message to be logged in the /var/adm/messages file, which is detected by the hardware alarm provider. The hardware alarms provider sends a Fan Warning alarm.
6. Check the syslog file for warnings. The log is located in the /var/adm/messages file.
7. Log into SRS Net Connect 3.1 to verify that the alarm appears.
Copyright © 2004, Sun Microsystems, Inc. All rights reserved.