| C H A P T E R 1 |
|
Installation |
This guide is designed for users who install and configure SRS Net Connect 3.1 through the SolarisTM 9 Operating System (OS) 4/04 CD. SRS Net Connect 3.1 will be loaded onto new Sun systems during the manufacturing process. If you have a Sun system that was not loaded with Net Connect during manufacturing, you can load it through the Solaris 9 OS 4/04 Extra Value CD.
SRS Net Connect is a no-cost, self-monitoring Web-based application that uses programs (also called providers) to gather data and monitor your systems. SRS Net Connect helps you maximize system availability and reliability. You can add or remove other fee-based services, such as SunSM System Analysis, to meet your management needs.
SRS Net Connect 3.1 supports up to 500 monitored systems per group and 2000 monitored systems per company.
This guide includes the following typographic conventions:
You must have a standard browser to view the SRS Net Connect 3.1 application. SRS Net Connect does not support browsers that use 56-bit encryption. For the Solaris Operating System (Solaris OS), standard browsers include Netscape 4.79 or higher and Mozilla 1.2.1.
Each monitored system must meet the following minimum requirements:
Average CPU utilization is less than .5 percent of the CPU on a single processor desktop system. Average RAM consumption (minus common shared libraries, such as libc and libnsl) is 5.8 Mbytes.
If you install the optional Storage Automated Diagnostic Environment 2.3, the system on which Storage Automated Diagnostic Environment package is installed must meet the following minimum requirements:
Average CPU utilization is less than .5 percent of the CPU as measured with a 248 MHz single CPU system. Storage Automated Diagnostic Environment uses approximately 14 MBytes of the 128 MBytes of required RAM.
Use the Solaris 9 4/04 Extra Value CD to install the SRS Net Connect software and then run an activation script to configure and activate Net Connect.
Installing SRS Net Connect 3.1 through the Solaris 9 4/04 Extra Value CD involves three steps:
1. Use the CD to install SRS Net Connect 3.1 on each monitored system. The SRS Net Connect 3.1 software contains the following components:
2. Register and download your customized activation kit from the SRS Net Connect 3.1 web site.
3. Run the activation script on each monitored system.
After you install the Net Connect software from the CD, you must obtain an activation kit from the SRS Net Connect web site and run the activation script. The activation script guides you through the configuration and activation of the SRS Net Connect 3.1 software.
See the SunSM Remote Services Net Connect 3.1 Customer Planning Guide for more information on the SRS Net Connect architecture, monitored system, and providers.
Before you install SRS Net Connect 3.1 on the monitored system, complete the steps in the Installation Checklist in TABLE 1-1.
|
Verify that your monitored system meets the requirements listed in System Requirements. |
|
|
If you have a version of Storage Automated Diagnostic Environment installed that is earlier than version 2.3, remove it before installing Storage Automated Diagnostic Environment 2.3 and SRS Net Connect 3.1. Your existing Storage Automated Diagnostic Environment settings will be saved. Follow the steps in the SunSM Remote Services Net Connect 3.1 Customer Installation Guide. |
|
|
If you have installed a version of CST that is earlier than 3.5, follow the special instructions in "Preparing for the CST Installation" in the SunSM Remote Services Net Connect 3.1 Customer Installation Guide. |
|
|
Determine if you will use an existing user account or create a new user account on the monitored system. The user name must belong to the user group. The user name and group that you enter are used to run all processes that do not require root access. For example, the monitored system proxy will run under the user name and group (since it does not need root privileges), while the trend and event providers must run as the root user. If you do not have a user name and group, the installation script will not run successfully. |
|
|
Verify that the user you specify during installation has a home directory. |
|
|
Verify that the user account has a shell associated with it, and that the user can interact with the crontab entries. The installation script checks for the existence of the user and group, verifies that the user account has a shell associated with it, and that the user can interact with the crontab entries. |
|
|
Verify that the user account you specify during installation does not allow login. You should also verify that the user account is not locked. A locked account contains *LK* as part of its password. Type the following for more information on the shadow file: man shadow. You can substitute NP (no password) for LK in the /etc/shadow file. Under Solaris 9 OS, the cron process will not work with a locked account. |
If SRS Net Connect has never been installed on your monitored system, follow the instructions in Installing Net Connect 3.1 for the First Time. If you are upgrading an existing version of Net Connect, follow the instructions in Upgrading to Net Connect 3.1.
SRS Net Connect 3.1 uses the following default directories:
Perform the following steps to install SRS Net Connect 3.1 on a monitored system that did not have Net Connect installed at the factory:
1. Insert the Solaris 9 4/04 Extra Value CD in the monitored system's CD-ROM drive.
2. The Solaris Web Start WizardTM displays the License screen. Click the Accept check box and click Next.
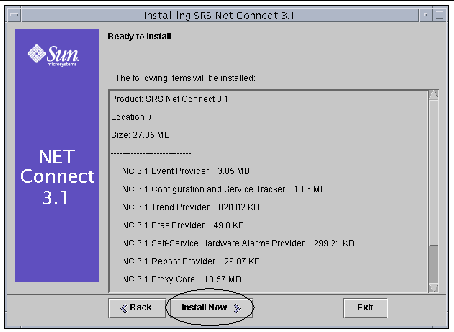
3. At the Ready to Install screen, review the providers that will be installed and click Install Now. If your system is FRU-enabled, the FRU provider is also installed. See FIGURE 1-1.

4. The Installing screen appears. Do not click Stop unless you want to terminate the installation. The following packages are installed:
5. At the Additional Information screen, review the information and click Next.
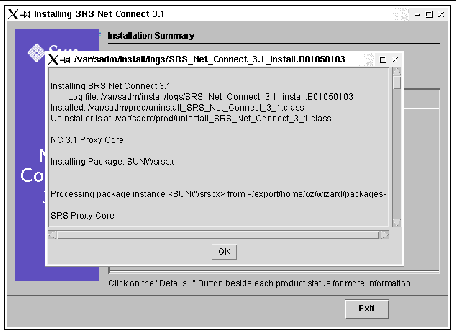
6. At the Installation Summary screen, you can click Details as shown in FIGURE 1-2 to see specific directory names and provider versions. Click OK to exit the Details screen and then click Exit.

7. After you install the SRS Net Connect software, the next step is to go to SRS Net Connect 3.1 to get your customized activation kit at the https://srsnetconnect.sun.com site. See Chapter 2 for instructions.
Perform the following steps to upgrade existing versions of SRS Net Connect to Net Connect 3.1:
1. Insert the Solaris 9 4/04 Extra Value CD in the monitored system's CD-ROM drive.
2. At the License screen, click the Accept check box and click Next.
|
Note - If you have already installed Net Connect 3.1 with the Solaris Web Start Wizard, you must click Exit and use the prodreg command to remove Net Connect. Follow the instructions in Uninstalling Net Connect. |
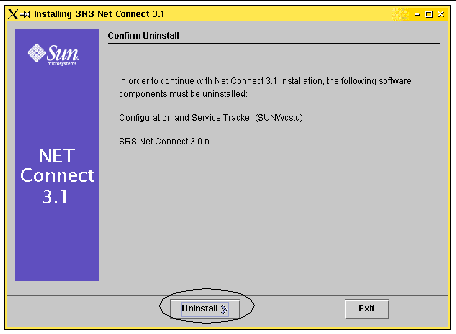
3. If an older Net Connect component (such as a version of SunTM Explorer prior to 4.2, or a version of CST prior to 3.5) is detected, click Uninstall when FIGURE 1-3 appears.

Configuration files are copied to a file archive directory.
The SUNWnc01 package is removed from the monitored system.
The SRSQueueStore directory and its contents are also copied to the archive directory. The location of the SRSQueueStore is controlled by the DISK_STORE_BASE value in the srsproxyconfig.cfg file. The following packages on the monitored system are removed:
Not all the providers listed above are installed on every monitored system.
If you have CST 3.5 or earlier installed and the CST middleware server is not running, you must uninstall CST. The CST package is removed, but the CST data is saved. If you have already installed CST 3.5, the wizard reinstalls CST 3.5.
If you choose to remove a previous version of CST with the wizard and have the wizard reinstall CST 3.5, CST is not automatically started. You must run the activation script as described in Chapter 2 before CST will begin collecting data again.
Run the activation script or perform the following steps to manually start CST 3.5 to begin collecting data:
a. Remove the file that blocks CST from starting by typing:
# rm /etc/opt/SUNWsrspx/cst_nostart
b. Start CST before a reboot by typing:
You can also wait for CST to start after the next reboot, but CST data will not be collected until CST starts. See the SunSM Remote Services Net Connect 3.1 Customer Installation Guide for additional CST upgrade instructions.
4. At the Ready to Install screen, click Install Now.
5. The Installing screen appears. Do not click Stop unless you want to terminate the installation. The following packages are installed:
6. At the Additional Information screen, click Next.
7. At the Installation Summary screen, you can click Details to see specific directory names and provider versions. Click OK to exit the Details screen and then click Exit.
8. After you install the SRS Net Connect software, the next step is to log into SRS Net Connect 3.1 to get your customized activation kit. See Chapter 2 for instructions.
Copyright © 2004, Sun Microsystems, Inc. All rights reserved.