Chapter 5 Working With Menus
This chapter describes how to use menus in the GNOME Desktop.
Introduction to Menus
You can access all desktop environment functions through menus. The Menu Panel contains menus, so you can use a combination of menus and panels to perform your tasks. You can perform various actions on your menus, such as copy menu items to panels.
You can access the following menus in your desktop environment:
-
Applications menu: You can access many of your applications, commands, and configuration options from the Applications menu. You can also access the desktop environment preference tools from the Applications menu.
-
Actions menu: You can access various commands that enable you to perform desktop environment tasks from the Actions menu. For example, you can start the
Search Toolapplication, or log out of the desktop environment. -
GNOME Menu: You can also access the items in the Applications and Actions menus from the GNOME Menu. You can have many GNOME Menu buttons in your panels.
You can also right-click on the desktop to open the Desktop menu. The Desktop menu enables you to perform desktop-related tasks.
All of these menus provide you with multiple ways to perform your tasks, and enable you to work in the way that you prefer.
Menu Features
Menus can contain the following items:
-
Submenus
-
Launchers or menu items
An arrow to the right of an item in a menu indicates that the item is a submenu. When you point to the submenu, the submenu opens. You can choose items from the submenu.
When you choose a launcher, the launcher starts an application or runs a command. You can also right-click on a launcher to open a popup menu. The popup menu enables you to add the item to a panel, and perform other tasks. For more information on the popup menu, see the next section.
You can change the theme for your session to change how all your menus look. To change the theme, choose Applications -> Desktop Preferences -> Theme.
Menu Item Popup Menu
Items in menus have an associated popup menu that enables you to perform tasks related to the item. When you right-click on an item in a menu, the popup menu for the item opens. The popup menu also contains a submenu that allows you to perform menu-related tasks.
You can use the menu item popup menu to perform the following tasks:
-
Add menu items as launchers to panels.
-
Remove items from menus.
-
Open the Run Program dialog with the menu item command in the dialog.
-
Add menus to panels. You can add a menu as a menu object or as a drawer object.
-
Add new items to menus.
-
Change the properties of submenus and menu items.
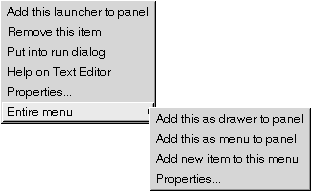
Figure 5–1 shows the popup menu.
Figure 5–1 Menu Item Popup Menu

Table 5–1 describes menu item popup menus.
Table 5–1 Menu Item Popup Menus|
Item |
Description |
|---|---|
|
Add this launcher to panel |
Adds the launcher to the panel from which you open the menu. |
|
Remove this item |
Removes the launcher from the menu. |
|
Put into run dialog |
Displays the Run Program dialog with the command from the Command field of the launcher in the command field on the Run Program dialog. |
|
Help on application-name |
Opens the online help for the application. |
|
Properties |
Displays a dialog that enables you to edit the properties of the launcher. |
|
Entire menu -> Add this as drawer to panel |
Adds the submenu as a drawer to the panel from which you open the menu. |
|
Entire menu -> Add this as menu to panel |
Adds the submenu as a menu object to the panel from which you open the menu. |
|
Entire menu -> Add new item to this menu |
Enables you to add an item to the submenu. |
|
Entire menu -> Properties |
Displays a dialog that enables you to edit the properties of the submenu. |
Applications Menu
The Applications menu contains a hierarchy of submenus, from which you can start the standard GNOME applications and preference tools. The Applications menu contains the Desktop Preferences menu. You can use the Desktop Preferences menu to start the preference tools. The Applications menu also includes the file manager and the help browser.
The Applications menu resides in the following places:
-
Menu Panel
-
Start Here location in
Nautilus -
GNOME Menu
Actions Menu
The Actions menu contains various commands that enable you to perform desktop environment tasks. Table 5–2 describes the commands in the Actions menu.
Table 5–2 Actions Menu Commands|
Menu Item |
Function |
|---|---|
|
Run Program |
Opens the Run Program dialog. Use the Run Program dialog to run commands. For more information, see Using the Run Program Dialog. |
|
Search for Files |
Starts the |
|
Screenshot |
Takes a screenshot of the full screen, and opens the Screenshot dialog. Use the Screenshot dialog to save the screenshot. |
|
Lock Screen |
Locks your screen. |
|
Log Out |
Logs you out of the current session. |
The Actions menu resides in the following places:
-
Menu Panel.
-
GNOME Menu. The items in the Actions menu are at the top level of the GNOME Menu.
Using the Run Program Dialog
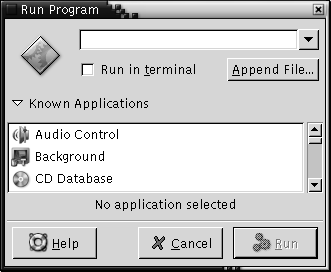
The Run Program dialog gives you access to the command line. When you run a command in the Run Program dialog, you cannot receive output from the command.
To run a command from the command line perform the following steps:
-
Display the Run Program dialog. You can display the Run Program dialog in any of the following ways:
-
From the Menu Panel
Choose Actions -> Run Program.
-
From the GNOME Menu
Open the GNOME Menu, then choose Run Program.
-
Use shortcut keys
The default shortcut keys to display the Run Program dialog are Alt + F2. You can change the shortcut keys that display the Run Program dialog in the
Keyboard Shortcutspreference tool. To change the shortcut keys, choose Applications -> Desktop Preferences -> Keyboard Shortcuts. -
From a menu item popup menu
Right-click on an item in a menu, then choose Put into run dialog from the popup menu. The Run Program dialog opens with the command from the menu in the command field.
The Run Program dialog is displayed.

-
-
Enter the command that you want to run in the blank field. Alternatively, to choose a command that you ran previously, click the down arrow button beside the command field, then choose the command to run.
Alternatively, click on the Known Applications button to display a list of available applications.
You can also use the Append File button to choose a file to append to the command line. For example, you can enter
emacsas the command, then choose a file to edit.Select the Run in terminal option to run the application or command in a terminal window. Choose this option for an application or command that does not create a window in which to run.
-
Click on the Run button on the Run Program dialog.
To Take a Screenshot
You can take a screenshot in any of the following ways:
-
Use the Actions menu
To take a screenshot of the entire screen, choose Actions -> Screenshot. A Screenshot dialog is displayed. To save the screenshot, select the Save screenshot to file option. Enter the path and filename for the screenshot in the drop-down combination box. Alternatively, to save the screenshot to another directory, click Browse. When you select a directory, click OK.
You can also save the screenshot to the desktop. To save the screenshot to the desktop, select the Save screenshot to desktop option.
-
Use shortcut keys
To take a screenshot, use the following shortcut keys:
Default Shortcut Keys
Function
Print Screen
Takes a screenshot of the entire screen, and displays the Screenshot dialog. Use the Screenshot dialog to save the screenshot.
Alt + Print Screen
Takes a screenshot of the window that has focus, and displays the Screenshot dialog. Use the Screenshot dialog to save the screenshot.
You can use the
Keyboard Shortcutspreference tool to modify the default shortcut keys. -
Use a command
You can use the gnome-panel-screenshot command to take a screenshot. The gnome-panel-screenshot command takes a screenshot of the entire screen, and displays the Screenshot dialog. Use the Screenshot dialog to save the screenshot.
You can also use options on the gnome-panel-screenshot command as follows:
Option
Function
--window
Takes a screenshot of the window that has focus, and displays the Screenshot dialog. Use the Screenshot dialog to save the screenshot.
--delay=seconds
Takes a screenshot after the specified number of seconds, and displays the Screenshot dialog. Use the Screenshot dialog to save the screenshot.
--help
Displays the options for the command.
GNOME Menu

You can access almost all of the standard applications, commands, and configuration options from the GNOME Menu.
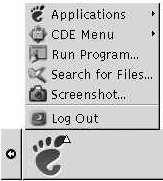
The GNOME Menu provides the following top-level menus and special menu items:
-
Applications: Contains all applications and preference tools. This menu also includes the file manager and the help browser.
-
Actions: Contains commands that enable you to perform desktop environment tasks, for example the Lock Screen and Log Out commands. The items in the Actions menu are at the top level of the GNOME Menu.
You can add GNOME Menu buttons to your panels. By default, the GNOME Menu is represented on panels by a stylized footprint icon, as follows:
To Open the GNOME Menu
You can open the GNOME Menu in the following ways:
-
From a panel with a GNOME Menu
Click on the GNOME Menu.
-
Use shortcut keys
You can use shortcut keys to open the GNOME Menu. When you use shortcut keys to open the GNOME Menu, the GNOME Menu appears at the mouse pointer.
The default shortcut keys to open the GNOME Menu are Alt + F1. To change the shortcut keys that open the GNOME Menu, choose Applications -> Desktop Preferences -> Keyboard Shortcuts.
To Add a GNOME Menu to a Panel
You can add as many GNOME Menu buttons as you want to your panels. To add a GNOME Menu to a panel, right-click on any vacant space on the panel. Choose Add to Panel -> GNOME Menu.
Customizing Your Menus
You can modify the contents of the following menus:
-
Applications menu
-
Desktop Preferences menu
You use the following desktop environment components to customize menus:
-
Menus on panels
-
Nautilusfile manager
When you use panels to customize your menus, you use the menu item popup menu. For more information, see Menu Item Popup Menu.
When you use Nautilus to customize your menus,
you must access the Applications menu or the Desktop Preferences menu from within Nautilus.
To access the Applications menu or the Desktop
Preferences menu, open a Nautilus window.
Choose Go -> Start Here. Double-click on the Applications object
or on the Desktop Preferences object. For more information
on Nautilus, see Nautilus File Manager.
To Add a Menu
To add a menu, perform the following steps:
-
In a
Nautiluswindow, access the location where you want to add the menu. For example, to add a menu to the Applications menu, choose Go -> Start Here, then double-click on the Applications object. -
Choose File -> New Folder. An untitled folder is added to the view pane. The name of the folder is selected.
-
Type a name for the folder, then press Return.
The next time that you log out then log in again, the menu is in the assigned location.
To Add a Launcher to a Menu
To add a launcher to a menu, perform the following steps:
-
Right-click on any item in the menu to which you want to add the launcher.
-
Choose Entire menu -> Add new item to this menu. A Create Launcher dialog is displayed.
-
Enter the properties of the launcher in the Create Launcher dialog. For more information on the elements in the Create Launcher dialog, see Working With Panels.
-
Click OK.
To Add a Launcher to an Empty Menu
To add a launcher to an empty menu, perform the following steps:
-
Open a
Nautiluswindow, then choose Go -> Start Here. Alternatively, double-click on the Start Here object on the desktop. The Start Here location is displayed. -
In the
Nautiluswindow, double-click on the object that represents the menu to which you want to add the launcher. -
Choose File -> New Launcher. A Create Launcher dialog is displayed.
-
Enter the properties of the launcher in the Create Launcher dialog. For more information on the elements in the Create Launcher dialog, see Working With Panels.
-
Click OK.
To Copy a Launcher to a Menu
To copy an existing launcher to a menu, perform the following steps:
-
In a
Nautiluswindow, access the location from which you want to copy the launcher. For example, to copy a launcher from the Applications menu, choose Go -> Start Here, then double-click on the Applications object. -
Select the launcher that you want to copy, then choose Edit -> Copy File.
-
In a
Nautiluswindow, access the location to which you want to copy the launcher. -
Choose Edit -> Paste Files. The launcher is added to the new location.
Alternatively, you can drag the launcher from one location to another.
The next time that you log out then log in again, the launcher is in the new menu location.
To Edit the Properties of a Menu
To edit the properties of a menu, perform the following steps:
-
Right-click on any item in the menu that you want to edit.
-
Choose Entire menu -> Properties. A Launcher Properties dialog is displayed.
-
Modify the properties of the menu in the Launcher Properties dialog. For more information on the elements in the Launcher Properties dialog, see Working With Panels.
-
Click OK.
To Edit a Menu Item
To edit a menu item, perform the following steps:
-
Right-click on the item that you want to edit.
-
Choose Properties. A Launcher Properties dialog is displayed.
-
Modify the properties of the launcher in the Launcher Properties dialog. For more information on the elements in the Launcher Properties dialog, see Working With Panels.
-
Click OK.
To Delete an Item from a Menu
To delete an item from a menu, use the menu item popup menu. To delete an item from a menu, perform the following steps:
-
Right-click on the item that you want to delete.
-
Choose Remove this item.
- © 2010, Oracle Corporation and/or its affiliates
