| Sun ONE Studio 5, Standard Edition Getting Started Guide |
| Sun ONE Studio 5, Standard Edition Getting Started Guide |
| C H A P T E R 6 |
|
Using Sun ONE Application Server With the IDE |
Once you have successfully installed the IDE, you can complete the configuration of Sun ONE Application Server as your default application server. This chapter describes the basic configuration steps necessary to validate your installation and deploy the example described in Chapter 7. This chapter does not describe all available configuration options. See the Sun ONE Application Server 7 Getting Started Guide and the Sun ONE Application Server 7 Administrator's Guide for more information. You can find the Sun ONE Application Server 7, Standard Edition documentation at http://docs.sun.com/db/coll/s1_asse_en.
This chapter covers the following topics:
The Sun ONE Application Server introduces a feature named administrative domains that enables you to define multiple, completely separate application server runtime configurations that reuse the same installation image. Each administrative domain is represented by an administrative server which in turn controls one or more application server instances. The configuration of an administrative domain can reside anywhere on the machine.
Although it is likely that developers using their own workstations use a single administrative domain for day-to-day development, both shared development servers and operational environments can greatly benefit from using multiple administrative domains. On shared development servers, creation of an administrative domain for each developer provides a compartmentalized area or "sandbox" for each developer on a shared server machine. In operational environments, administrative domains enable system administrators to define separate secure runtime configurations without requiring multiple installations of the product.
Depending on the engineering practices in your development environment, you have several options for creating or configuring administrative server domains that can be used by individual developers.
TABLE 6-1 describes the procedures in this chapter to help you complete the configuration of Sun ONE Application Server 7.
This installation of Sun ONE Studio and Sun ONE Application Server 7, creates a preconfigured default administrative domain. This domain is added to the IDE's server registry. By server design, this administrative domain and its associated administrative server belong to the superuser.
If the users of the IDE normally have superuser or administrator privileges, they can start the server using the installed default settings. For example, Microsoft Windows development environments where the developers do their daily work with user logins that have administrative privileges should use the default administrative domain and server as described in To Start the Default Administrative Server.
Additional procedures (not described in this book) for using the default administrative domain when the standard IDE user does not have superuser or administrative privileges are:
|
Caution - Changing permissions on the domain directories can create security problems if not handled properly. See the Sun ONE Application Server 7 documentation for more information. |
This procedure is for a user with superuser or administrative privileges who is starting the IDE for the first time. If this is not the first time you are starting the IDE, see To Confirm the Default Application Server.
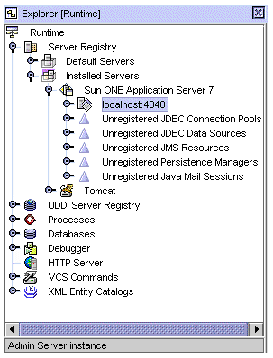
1. In the Explorer in the main IDE window, select the Runtime tab.
The Runtime tab of the Explorer displays the Server Registry node. The Server Registry node contains subnodes for all of the installed web servers and application servers. There is also a node showing which servers are the default servers.
2. Select the Server Registry node.
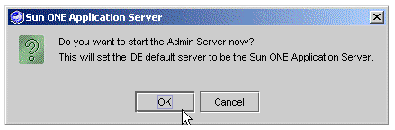
A query window pops up, asking whether you want to start the admin server. This refers to the admin server for the default domain, which can only be run by a user with superuser or administrator privileges.
The IDE starts the default admin server and configures Sun ONE Application Server as the IDE's default application server. This process can take a minute or so to complete.
4. Expand the Server Registry node and expand the Installed Servers node.
5. Expand the Sun ONE Application Server 7 node.
The node localhost:4848 is your Admin Server instance.
6. Expand the localhost:4848 node to see the application server instance server1.
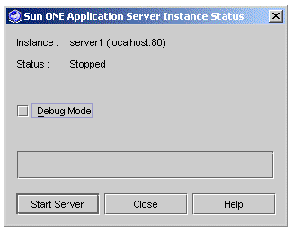
7. To start your application server instance, right-click server1 and choose Status from the contextual menu.
The Sun ONE Application Server Instance Status dialog box displays.
The application server instances starts.
In Solaris and Linux development environments, users do not usually run the IDE as a user with superuser privileges. If you are planning to use the bundled Sun ONE Application Server, it is necessary to provide IDE users with access to an administrative domain that they can start and stop. This enables them to create and manipulate application server instances within that domain as required by their development work. There are multiple ways to accomplish this using the default admin server domain as mentioned in the section Using the Default Administrative Domain. The procedure described here creates a separate domain for each IDE user. Once this is done, each user has the maximum flexiblity for controlling the use of their admin domain and minimal intervention is required by the system administrator.
In this procedure, the superuser creates a separate Sun ONE Application Server administrative domain for each standard user. The standard user completes the configuration within the IDE by adding (in the Sun ONE Application Server 7 documentation, this is also referred to as "registering") the administrative domain to the IDE's server registry. This enables the standard user to control the administrative server for this domain and to manipulate instances of the application server as needed for development.
The procedures documented in this section use the Sun ONE Application Server asadmin utility, a command-line interface. For more information about the asadmin utility, see the Sun ONE Application Server 7 Administrator's Guide at http://docs.sun.com/source/816-7156-10.
The superuser performs this procedure to create a domain for another user.
2. Change to the directory where the asadmin utility executable is located.
# cd /opt/studio5_se/appserver7/bin |
This example shows the default installation directory for a Solaris installation. If you specified a different installation directory when you installed this product, replace /opt/studio5_se with the path name to your installation directory.
3. In the asadmin utility create the domain with the create-domain command.
# ./asadmin create-domain --sysuser standarduser --adminport portnumber --adminuser useradmin --adminpassword userpassword userdomain |
The options and associated arguments for this command are described in the following table. The domain name is specified without an associated option.
The following message displays.
Created Domain userdomain successfully. |
4. Exit from superuser privileges.
5. Provide your standard user with the values that you used in Step 3 for the port number, admin user name, admin user password, and the domain name.
The standard user uses these values to complete the configuration of the application server from within the IDE. These values are used in Step 5 in the section, To Add the User's Domain to the IDE.
The standard user should perform this procedure.
|
Note - This procedure is done with the same login and permissions used for running the IDE for normal day-to-day development activities. |
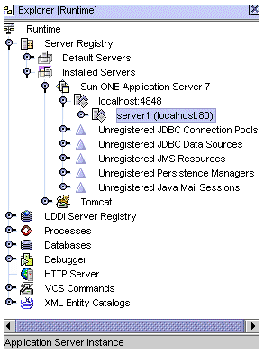
2. In the IDE Explorer, select the Runtime tab.
3. Select the Server Registry node.
A query window displays asking "Do you want to start the Admin Server now?" This refers to the default domain, domain1, which can only be run by a superuser or administrator.
If you click OK, this action creates and starts an admin server that you can not use.
This dismisses the query window and now we can add your user Admin Server. This was created by your system administrator or other superuser as described in To Create a Domain for Another User.
5. Add (also called Register in application server documentation) your admin server by following these steps:
a. Expand the Server Registry node and expand the Installed Servers node.
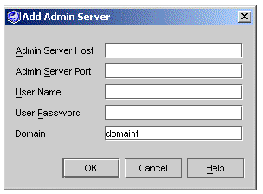
b. Right-click the Sun ONE Application Server 7 node and choose Add Admin Server from the contextual menu.
The Add Admin Server dialog box is displayed.
c. Type the values in the text fields.
Contact the superuser or administrator who installed the IDE and created your user admin domain to get these values:
|
userpassword, user password used in the create-domain command |
|
The following error message might display:
Could not connect to Admin Server. If Admin Server is local it will be started. |
e. Click OK to dismiss this error message.
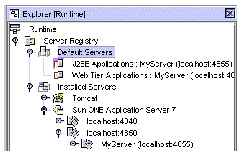
The local admin server is started and your new admin server is added to the IDE. A new admin server node is generated in the Explorer representing your domain and admin server. You are now ready to create your application server instance.
6. To create the application server instance, follow these steps:
a. In the Explorer, right-click the new admin server node, identified by the portnumber you entered, and choose Create a Server Instance from the contextual menu.
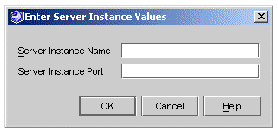
The Enter Server Instance Values dialog box is displayed.
b. Type in a name and an available port number.
For example, MyServer and 4855.
A new application server instance is created in the IDE. You can see it by expanding your admin server instance.
7. To set the new server as the default application server and web server, right-click the new application server instance and choose Set As Default.
8. Expand the Default Servers node to verify.
The default servers for J2EE application and web tier applications show the new server as the default.
As long as your admin server is running, you can start, stop and deploy your applications using your application server instances. When the admin server stops running, the IDE loses its connection to the application server. If your admin server is stopped for any reason, for example if your system is rebooted, it is necessary to start the admin server for your domain and to set the default application server again.
This chapter describes using Sun ONE Application Server 7 from the IDE. The application server documentation describes other facilities for starting and stopping the application server and using the asadmin command-line interface, the Administrative Console, Windows Services, and other facilities. Refer to the Sun ONE Application Server 7 Getting Started Guide for more details.
If you have started Sun ONE Application Server before, this is how you confirm that it is still the default server:
1. In the IDE Explorer, select the Runtime tab.
2. Expand the Server Registry node and expand its Default Servers subnode.
If the J2EE Applications node's label is server-instance(server-hostname:server-portnumber), then Sun ONE Application Server is the default application server. If it is not, continue with the next step.
3. Find your server instance under the Installed Servers node, right-click the server instance, and choose Set As Default.
Your server is set as the default server for J2EE applications and Web Tier applications.
1. Right-click the application server node and choose Status from the contextual menu.
|
Note - If this node is not displayed, your admin server might not be running. Be sure your admin server is running and then try again. |
The Sun ONE Application Server Instance Status dialog box is displayed.
If the dialog box has a Stop Server button, the server is already running.
| Sun ONE Studio 5, Standard Edition Getting Started Guide | 817-2318-10 |
Copyright © 2003, Sun Microsystems, Inc. All rights reserved.