| Sun ONE Studio 5 Web Application Tutorial |
| Sun ONE Studio 5 Web Application Tutorial |
| A P P E N D I X C |
|
Creating the Tutorial with an Oracle Database |
This appendix describes the steps you must perform to create and run the CDShopCart tutorial with an Oracle database. The topics covered are:
|
Note - There are several references in this book to the CDShopCart application files. These files include a completed version of the tutorial application, a readme file describing how to run the completed application, and SQL script files for creating the required database tables. These files are compressed into a zip file you can download from the Sun ONE Studio 5 Developer Resources portal at http://forte.sun.com/ffj/documentation/tutorialsandexamples.html |
Configuring the Sun ONE Studio 5software to connect to the Oracle database requires the following actions:
Enabling a JDBC driver means putting the driver library in the Sun ONE Studio 5 and Sun ONE Application Server 7 class paths. To do this, you need the Oracle Type 4 JDBC driver library (the classes12.zip file). You can download this driver from the Oracle portal.
To enable the Oracle Type 4 JDBC driver:
1. Copy the Oracle Type 4 driver library to the s1studio-install-directory/lib/ext directory.
For example, copy the classes12.zip file to c:\Sun\studio5_se\lib\ext. Solaris and Linux users will have a different target directory.
|
Note - You must have root or administrator privileges to write to the Sun ONE Studio 5 home directories. |
3. In the Runtime pane of the Explorer, select your application server instance.
It is labeled app-server-name (app-server-host:app-server-port). For example, the default server is server1 (localhost:4848), or a standard user's server could be MyServer (localhost:4855).
4. Display the properties of the application server instance.
The property window is usually below the Explorer window. Selecting the node displays the properties in the window. Alternatively, right-click the server instance node and choose Properties.
5. Open the property editor for the Classpath Suffix property.
Click on the value field of this property, then on the ellipsis button that appears. The Classpath Suffix editor window is displayed.
6. Click the Add JAR/ZIP button.
Use the Add JAR File file finder to locate your classes12.zip file.
7. Select the classes12.zip file and click OK.
8. Click OK to close the property editor window. J
To perform various actions in the tutorial, you must connect the IDE to the Oracle database. You can either connect before creating the components or during the creation process. Here is how you connect to the database beforehand:
1. Make sure the Oracle server is running.
2. In the Runtime pane of the Explorer, expand the Databases node and its Drivers subnode.
A node labeled Oracle thin is displayed.
If this node has a red strike across it, you have not enabled the Oracle JDBC driver properly. Follow the procedures in Enabling the Oracle Type 4 JDBC Driver.
3. Right-click this node and choose Connect Using.
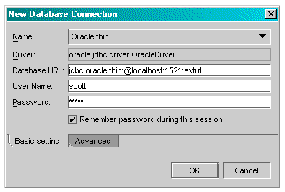
The New Database Connection dialog box is displayed.
4. Make sure Oracle thin is selected in the name field.
5. Fill in the property values for URL, User, and Password.
For example, the following values are correct for a locally installed Oracle database with a SID of "extut," and the default Oracle login of "scott" for User and "tiger" for Password: (1521 is the standard Oracle port number.)
6. Enable the Remember password during this session option.
The New Database Connection dialog box looks like this:
The new Oracle thin driver node is displayed, labeled jdbc:oracle:thin:@hostname:1521:sid [Username on Password].
The CDShopCart tutorial uses one database table, which you must create in an Oracle Server database. The instructions that follow describe how to use the provided SQL script to create the table. Microsoft Windows users can copy and paste the SQL script provided in Appendix B to create this table. Solaris and Linux users can use a script file, CDCatalog_ora.sql, which is available within CDShopCart application files.
To install the tutorial table in an Oracle database on Microsoft Windows systems:
1. Open the Oracle Console by choosing Start  Programs Oracle (your version) Application Development SQL Plus.
2. Log in to SQL Plus using your user name and password.
3. When the SQL prompt appears, copy the script from Appendix B and paste it next to the prompt.
To install the tutorial table on Solaris or Linux environments:
1. Unzip the CDShopCart.zip file from the Developer Resources portal.
For example, unzip it to the /MyZipFiles directory.
$ cd your-unzip-dir/CDShopCart/db $ sqlplus db-userid/db-password@db-servicename @CDCatalog_ora.sql |
$ cd /MyZipFiles/CDShopCart/db $ sqlplus scott/tiger@MyDB @CDCatalog_ora.sql |
The DROP statement will generate errors, but they are harmless.
Before performing this procedure, connect the IDE to the database, as in Connecting the IDE to the Oracle Server.
To test that you have created the CD table in the database that you have connected to the IDE:
1. In the Runtime tab of the Explorer, expand the Databases node, the Oracle connection node, and its Tables node.
If you don't see the CD table, right-click the Tables node and choose Refresh from the contextual menu.
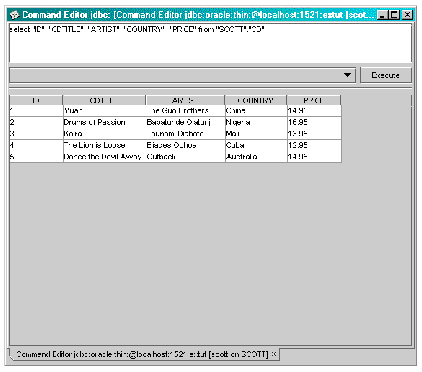
2. Right-click the CD table and choose View Data from the contextual menu.
The Command Editor is displayed, showing the table's data.
There is only one change you have to make to to create the application using an Oracle database:
In the section, , in Step 2, use the setDataSource statement f or Oracle instead of PointBase. Fill in the variables with the correct values for your connection. For example, for an Oracle database on a local system, with a database named "MyOracleDB," a userid of "scott." and password of "tiger"::
| Sun ONE Studio 5 Web Application Tutorial | 817-2320-10 |
Copyright © 2003, Sun Microsystems, Inc. All rights reserved.