| C H A P T E R 3 |
|
Creating a Web Service Client |
The Sun ONE Studio 4, Enterprise Edition for Java IDE gives you several ways to create a web service client without writing client code. This chapter describes the IDE tools and procedures that you can use to do each of the following tasks:
If you are creating your own web service and clients in the IDE, you can set the default test client for the service. For further information, see .
This section assumes that you start with an existing web service developed in the IDE.
You can automatically generate a simple client and client SOAP proxy that is adequate for testing your web service during development. You can then edit the client or replace it entirely by a more sophisticated client that can be used for business purposes.
You can create a client starting at a package node, a web service node, or the IDE's main window menu.
To start at a web service node:
1. Open the New Web Service Client wizard from the Explorer by right-clicking the web service node (the one with the blue sphere icon  ) and choosing New Client.
The New Client dialog box is displayed, as illustrated in FIGURE 3-1.
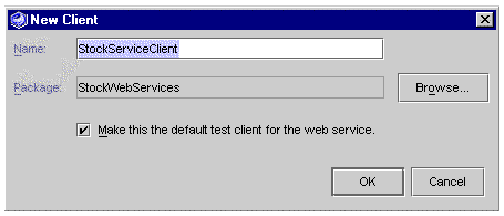
2. Ensure that the Package field specifies the desired location in which to create the web service client.
Click Browse to find and select a package of your choice.
3. In the Name field, type a name for the new web service client.
If you enter the name of a web service client that already exists in the package designated in the wizard, the IDE displays a highlighted message: A web service client with this name already exists in package.
Your new web service client is displayed in the Explorer. A client node ( ) appears under the designated package.
To start at a Java package node:
1. Right-click a Java package node and choose New  Web Services
  Web Service Client.
Alternatively, Choose File  New Template
  Web Services
  Web Services
  Web Service Client from the IDE's main window.
In this case the IDE displays the Web Service Client dialog box, as illustrated in FIGURE 3-2.
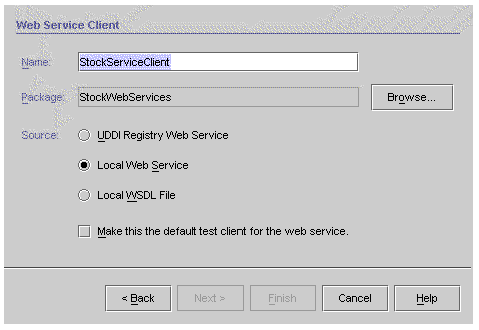
2. Set the desired name and package.
3. Select Local Web Service for Source.
4. Click Next to open a browse window, select the desired web service in the browse window, and click Finish.
Your new web service client is displayed in the Explorer. A client node ( ) appears under the designated package.
The IDE can generate a client that uses the JAX-RPC runtime (the default) the kSOAP runtime, or the Apache SOAP runtime. kSOAP is a SOAP API suitable for the Java 2 Microedition. Apache SOAP clients are supported for compatibility with the previous release of the IDE.
2. Right-click the client node and choose Properties. The Soap Runtime property has the default value JAX-RPC.
3. Click the property value. The choices JAXRPC, Apache SOAP, and kSoap are displayed, as shown in FIGURE 3-3. Choose kSoap.
When you generate the client, a kSOAP proxy is created.

|
Note - The rest of this chapter assumes a JAX-RPC client, unless otherwise specified. |
To generate the client's SOAP proxy and test user interface (HTML and JSP pages), right-click the web service client node in the Explorer, and choose Generate Client Proxy.
During the generation process, the IDE analyzes the web service's WSDL and issues validation warning and error messages if there are problems such as invalid data types (for example, a user object that is not a valid JavaBean component). Validation is particularly important when you are creating a client from someone else's web service, such as a web service accessed through a UDDI registry. IDE validation is based on the JAX-RPC reference implementation.
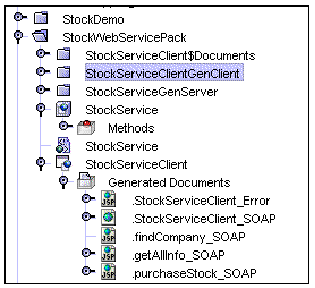
The IDE puts the generated objects in the same package as the client. A Generated Documents node contains HTML and JSP pages that invoke the SOAP proxy classes.
If the client's SOAP Runtime property is kSoap or Apache SOAP, the IDE generates a single proxy class and puts it in a node named xxxProxy, where xxx is the client name. If the client's SOAP Runtime property is JAXRPC, the IDE generates many proxy classes and puts them in a node named xxxGenClient, where xxx is the client name.
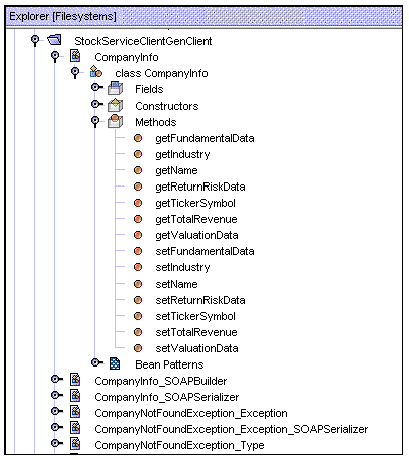
The Explorer hierarchy for a JAX-RPC client is illustrated in FIGURE 3-4.
 [ D ]
[ D ]The following client documents are generated:
The names of the welcome page and error page appear as properties of the client node in the IDE.
To view the HTML or JSP code, right-click the node of the desired document and choose Open. Code samples for a welcome page and a JSP page are illustrated in FIGURE 3-5 and FIGURE 3-6.

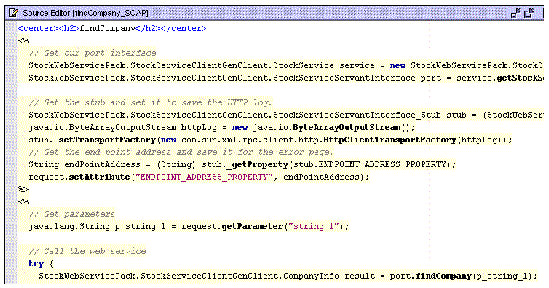
FIGURE 3-7 shows an Explorer view of some of the proxy classes generated for a JAX-RPC client. To view the Java source code, right-click a class or method node and choose OPEN.
The IDE lets you edit the proxy source, but if you regenerate the client in the IDE, your proxy source changes are not preserved.
You can use the generated proxy with a Java Swing client or more sophisticated HTML and JSP pages.
Clients that use the kSOAP runtime execute on small J2ME devices such as cell phones and PDAs, whose user interfaces are typically constrained by the display limitations. Developers often use Java AWT, WML, and other presentation technologies to create the user interfaces.
If you set a client's SOAP Runtime property to kSoap, the IDE does not create a Generated Documents node and does not generate HTML or JSP pages.
If the client's SOAP Runtime property is JAX-RPC or Apache SOAP, you might want to suppress the generated documents under certain circumstances. For example, if you already have a front-end business client, you might want the IDE to generate only the client SOAP proxy, and to display your own client components. To do this:
2. Right-click the client node and choose Properties. The Generate Presentation property has the default value True.
3. Change the Generate Presentation property value to False.
When you generate the client, only the client SOAP proxy is created.
4. (Optional) Right-click the client node and choose Add References to  Documents.
You can add references to documents created outside the IDE, such as HTML and JSP pages created in a web design tool, if you mount the directory containing the documents so they are visible in the IDE Explorer.
The IDE displays the Add Reference to Documents browser. Navigate to a folder that contains your own HTML and JSP pages and click OK in the browser to add the references to your client. The IDE creates a Documents folder containing the references. The Documents folder appears in the Explorer under the client node, on the same hierarchy level as the client's Generated Documents folder.
You can also right-click the client node and add references to Libraries and Classes. The IDE includes them in your test application's WAR file. The libraries and classes can be used to build a Swing test client.
To assemble the client application, right-click the client node in the Explorer and choose Assemble. The IDE creates a WAR file and displays a node in the Explorer with the WAR icon ( ) and a name of the form clientName_Client.
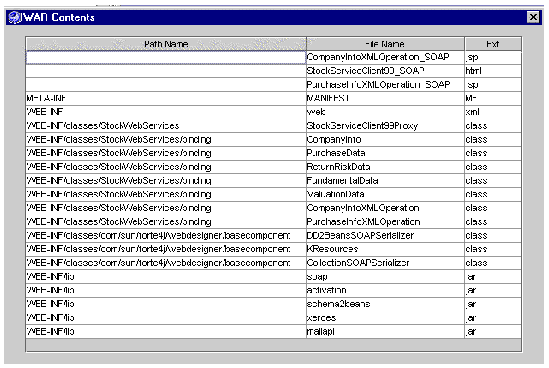
To view the contents of the WAR file, right-click its node in the Explorer and choose View WAR Content. The display is illustrated in FIGURE 3-8.
If you change your web service and regenerate its runtime classes, you can cause the IDE to automatically regenerate the client. To do this, right-click the client in the Explorer and choose Refetch WSDL. This causes the client proxy and documents to be regenerated. (The Refetch WSDL command name refers to an internal WSDL that is based on the service and associated with the client. This WSDL is not displayed in the Explorer.)
You can then reassemble the client. Alternatively, the client will be automatically reassembled the next time you execute it.
The web service referenced by your client must be currently deployed.
If you are using a Sun ONE Application Server 7 server, deploy and then execute.
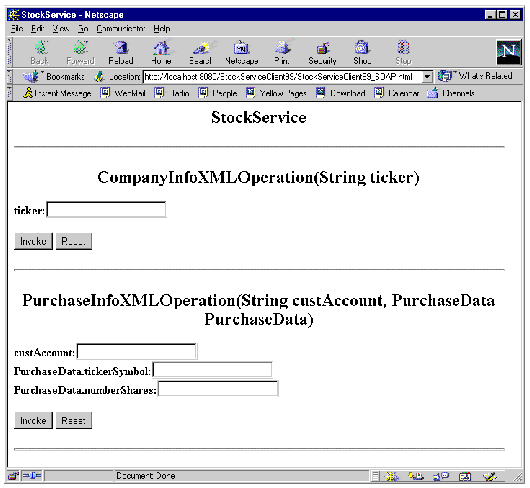
If you are using the built-in Apache Tomcat web server it is not necessary to deploy as a separate step. When you choose Execute, the IDE automatically starts the web server, deploys the client application, and displays the client's welcome page in your default web browser. The result is illustrated in FIGURE 3-9.
Alternatively, you can make the client the default test client, as explained in . Then you can start the client by right-clicking the J2EE application of your web service and choosing Execute.
 [ D ]
[ D ]
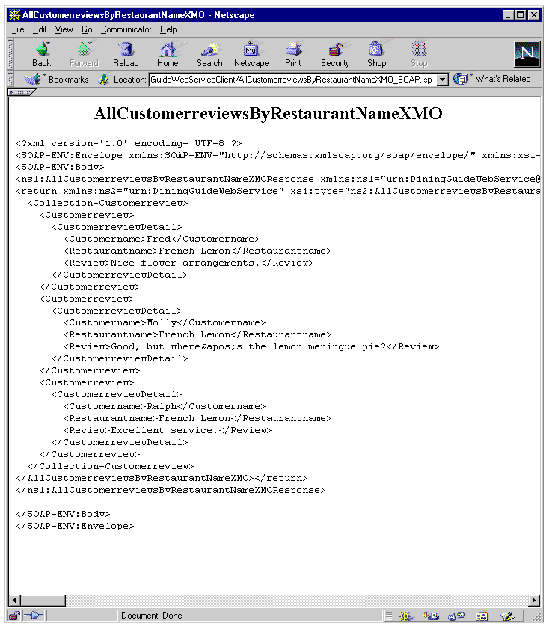
FIGURE 3-10 illustrates a display from the generated test client of a restaurant review application.
 [ D ]
[ D ]
WSDL provides a portable representation of the external interfaces of a web service. See for the procedure to create a WSDL description of your web service. See WSDL and for other information about WSDL and UDDI registries.
WSDL can be useful even if you are not using a UDDI registry. Several people on a project might be developing different kinds of clients, perhaps in different locations or on different schedules. They can be given copies of the WSDL to generate clients. A WSDL file is an XML document and can be put on a shared network drive, sent as an email attachment, or passed around on a disk. The developers must also have network access to a runtime instance of the web service to test their clients.
The following procedure assumes that you have a WSDL file, that the file name extension is .wsdl, and that the directory containing the file is mounted in the IDE. The .wsdl file appears as a node in the Explorer with a green sphere icon ( ). If someone gives you a WSDL file that does not satisfy this naming convention, you can rename it or make a copy with a file-name extension of .wsdl.
To generate a client from WSDL:
1. Choose File  New Template
  Web Services
  Web Services
  Web Service Client from the IDE's main window.
The IDE displays the Web Service Client dialog box, as illustrated in FIGURE 3-2.
2. Set the desired name and package, and select Local WSDL File for Source.
3. Click Next to open a browse window.
4. Select the WSDL node in the browse window.
The IDE creates a client node.
6. Right-click the client node in the Explorer and choose Generate Client Proxy.
The IDE creates the client SOAP proxy with its own node. The IDE also creates a set of HTML and JSP pages in the Generated Documents node under the client node.
7. The remaining steps, including assembly, deployment, and execution, are the same as in Creating a Client From a Local Web Service.
To generate only the client SOAP proxy, without the Generated Documents node:
1. Right-click the WSDL node in the Explorer, and choose Generate Client Proxy.
The IDE creates the client SOAP proxy with its own node.
2. Create your own client component that makes calls to the client SOAP proxy.
This might be the best approach if you already have fully developed clients that you can easily customize to use the client SOAP proxy, or if you want to use a type of client that is different from the HTML and JSP pages generated by the IDE, such as a Java Swing client.
Some of the business needs and scenarios that might lead you to create a client from a UDDI registry are described in Chapter 1.
The work flow consists of these tasks:
Task 1 requires advance planning and is part of the process of designing your application. It is not enough to consider the characteristics of the web service. You also have to think about the business that is providing the service, what kind of support the business offers, and how much your use of the service will cost. The analysis is simplified if you are using a private registry and the service provider is a part of your own project or enterprise, or perhaps a business partner collaborating on your project.
This section describes how to use the IDE to select a registry, search the registry for a service, and generate a client that can access a runtime instance of the service.
1. Right-click a Java package node and choose New  Web Services
  Web Service Client.
Alternatively, Choose File  New Template
  Web Services
  Web Services
  Web Service Client from the IDE's main window.
The IDE displays the Web Service Client dialog box, as illustrated in FIGURE 3-11.
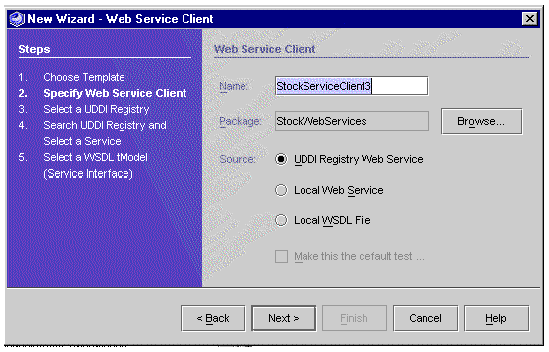
2. Set the desired name and package, and select the UDDI Registry Web Service radio button for Source.
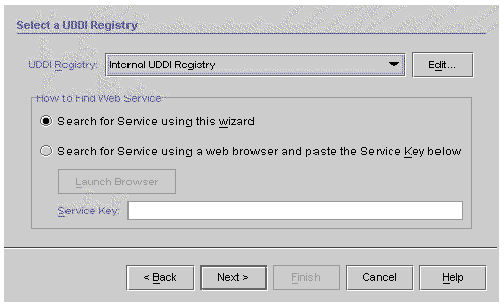
3. Click Next to display the Select a UDDI Registry dialog box, as illustrated in FIGURE 3-12.
The dialog box displays a list of UDDI registries. Select the desired registry or click Edit to edit registry information or change the default registry (see ).
|
Note - The initial default registry in the IDE is the internal UDDI registry that is bundled with the IDE. For further information about this registry, see . |
Most UDDI registries provide browser-based tools for registry searches and for adding, editing, and deleting registry entries. The Browser Tools URL for a registry is one of the properties that you can edit in the IDE (see ).
To search a selected registry with its own browser tools:
a. Select the "Search for service using a web browser" radio button.
The Launch Browser button becomes active.
If you already have the web service's registry key from a previous search, paste the value into the Service Key field and click Next. The IDE displays the final wizard step in which you can click Finish to create the client, bypassing intermediate UDDI registry search steps.
The IDE opens your default web browser at the Browser Tools URL web page.
c. Use the browser tools to locate the web service that you want to access with your client.
d. Copy the web service registry key and paste it into the Service Key field in the Select a UDDI Registry dialog box.
The IDE displays the final wizard step in which you can click Finish to create the client, bypassing intermediate UDDI registry search steps.
The remainder of this procedure assumes that you do your search through the IDE wizard. This is the default radio button under "How to Find Web Service."
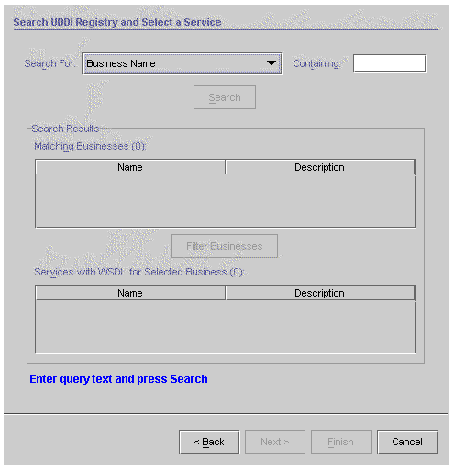
4. Select a registry from the UDDI Registry list and click Next to display the UDDI Registry Search dialog box, as illustrated in FIGURE 3-13.
 [ D ]
[ D ]
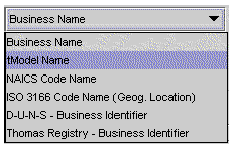
You can search for businesses whose names contain a string that you specify. You can also base your search on a type other than business name. The list of search types is shown in FIGURE 3-14.
 [ D ]
[ D ]
You can search on tModel name, NAICS code name, or ISO 3166 code name.
You can also search for a D-U-N-S business identifier or Thomas Registry business identifier, in which case the search is for a value "Equal To" rather than "Containing." You might know the identifier from a previous search. If you are using a private UDDI registry, someone in your project or enterprise might give you the identifier.
|
Note - If the search type requires an exact value, the label in the UDDI Registry Search dialog box (FIGURE 3-13) changes from Containing to Equal To. |
For NAICS or ISO 3166 code name searches, you can enter either a name or a code in the Containing field. For example:
A search on tModel Name returns all businesses that contain services that are based on the tModels matching the search string.
A search on NAICS Code Name or ISO 3166 Code Name returns all businesses that have categories matching the search string.
The remainder of this procedure assumes that you search on business name.
5. Specify a string in the Containing field and click Search.
The Matching Businesses table displays all businesses in the registry whose names contain your search string, as illustrated in FIGURE 3-15. Each business is listed with its name and an optional description. The number of matching businesses is also displayed.
You can select a business from the table and proceed to Step 7 of this procedure.
Depending on your search string and the size of the registry, your search might return a large number of businesses. This is most likely to occur with public registries, which are expected eventually to grow to tens of thousands or even millions of entries. If the list returned by your search is too large, you can enter a more carefully chosen search string or you can use the registry browser tools to perform a more advanced search.
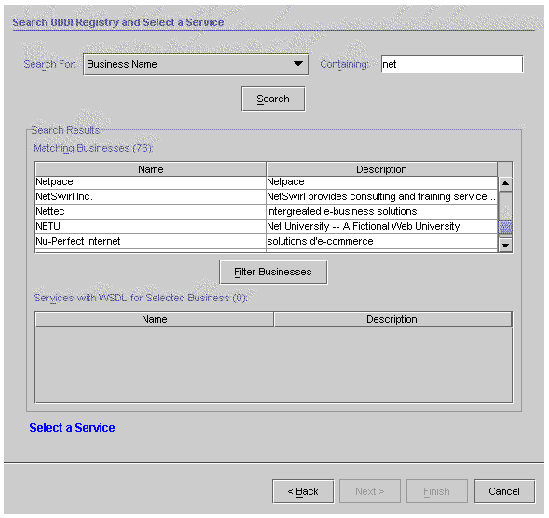
6. Click Filter Businesses to further refine your search.
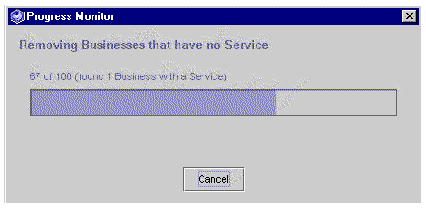
There might be services in the registry that have no WSDL tModel entries. Since you can't create clients for those services, the IDE enables you to filter them out of the Matching Businesses table. When you click Filter Businesses, the IDE searches the UDDI registry for services associated with the businesses in your result set. The IDE checks the services for tModels that have an OverviewDoc with an OverviewURL field that begins with "http://" and ends with either "wsdl" or "asmx". Businesses that fail this test are filtered out of the Matching Businesses table.
The IDE displays a progress monitor window with a Cancel button, as illustrated in FIGURE 3-16. The filtering process can take some time. If it takes too long, you can click Cancel and start over with a more refined search string.
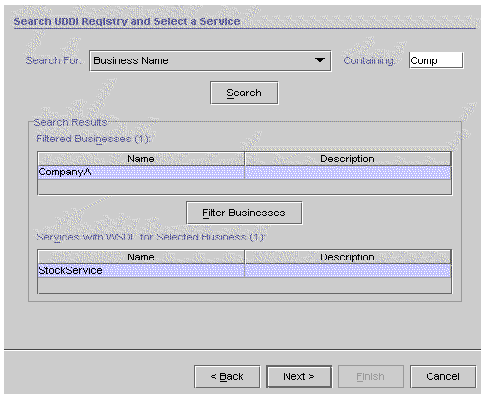
7. Select a business from the Search Results list.
The IDE displays services associated with the selected business, as illustrated in FIGURE 3-17, and activates the Next button. Only services with WSDL tModel entries are displayed.
8. Select a service and click Next to display the Service Interface dialog box, as illustrated in FIGURE 3-18.
The dialog box shows detail information about the service and the tModels and WSDL that it references.
For the service, you see the name, network endpoint, and key. The network endpoint is the URL that a client can use to access the runtime service instance.
For each WSDL tModel, you see name and overview URL. The overview URL is the locator for the WSDL that the IDE uses to create your client.
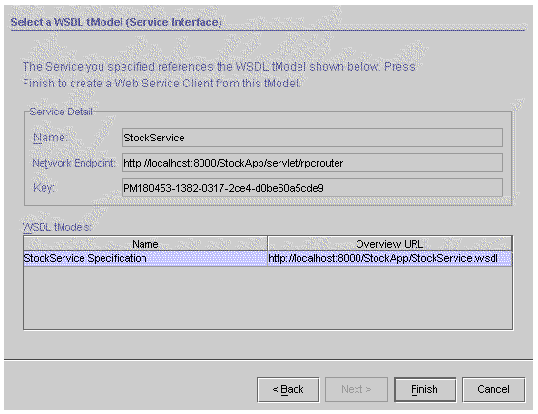
9. Select a WSDL tModel and click Finish to complete the client creation procedure.
The IDE creates your web service client. It appears in the Explorer under the designated package as a new client node.
10. The remaining steps, including assembly, deployment, and execution, are the same as in Creating a Client From a Local Web Service.
For your client to access a service instance at runtime, the client proxy must have the endpoint URL of the service. The IDE can set a default URL in the proxy, or the URL can be passed to the proxy at runtime in its serviceURL parameter, which overrides the default.
The client JSP pages generated by the IDE do not pass the URL at runtime, but assume that the client proxy has a default value for serviceURL. The default URL comes from the WSDL that is used to generate the client proxy.
As explained earlier in this chapter, you can generate a client from your own web service, from a WSDL file displayed in the IDE, or from a service that you find in a UDDI registry. In all of these cases, the IDE creates a hidden file containing WSDL that describes the web service, and the IDE creates the client based on the WSDL. The hidden file, which has a file name extension of .wsdx, cannot be displayed or modified in the IDE. However, you can find the hidden file in the same directory as the client, make a copy of the file with a file name extension of .wsdl, and pass it around so that other developers can generate clients in their instances of the IDE.
|
Note - If you edit the WSDL in the hidden file outside the IDE, your changes will be lost the next time you generate the client. |
The default URL in the hidden WSDL file is derived as follows:
Copyright © 2002, Sun Microsystems, Inc. All rights reserved.