| Building Web Services |
| Building Web Services |
| A P P E N D I X B |
|
Instantiating Objects and Resolving References |
When developing an XML operation, you specify which methods the XML operation calls. To call these methods at runtime, the web service requires certain objects. For each method call, it locates or instantiates:
To perform this task, the web service maintains a reference to each of these target objects and a definition of how to instantiate an object of the appropriate class should the target object not exist. As you add method calls to an XML operation, default object references and target object definitions are automatically added to the web service. These defaults are usually appropriate and do not need editing.
However, you can manually specify the target of an object reference, and you can edit and create new target object definitions to suit your requirements. You might need to manually resolve object references to enterprise beans that were created outside of the IDE.
This section provides instructions that explain how to:
To specify the target of an object reference:
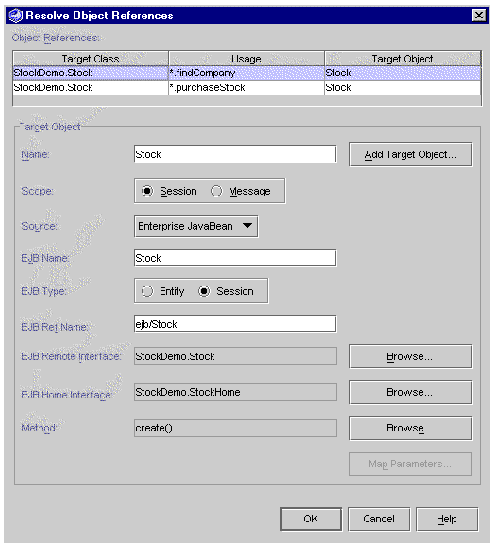
1. Open the Resolve Object References dialog box.
In the Explorer, right-click your web service and choose Resolve Object References. The Resolve Object References dialog box (see FIGURE B-1) is displayed.
 [ D ]
[ D ]
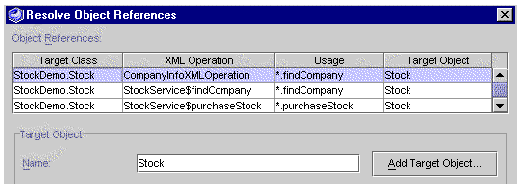
If your web service has references to XML operations, the table in the dialog box has an additional column displaying XML operation names, as illustrated in FIGURE B-2.
2. Locate the object reference you want to edit.
Object references are listed at the top of the dialog box in table format. Each row represents one reference. The following table describes the columns.
3. Select an object to resolve your reference.
In the row representing the object reference you are editing, click in the Target Object column and select an object from the list that drops down. This list displays all available objects of the required class, which includes target objects already defined in this dialog box.
If none of the target objects already defined is appropriate for your object reference, you can define a new target object.
To define a new target object:
1. Open the Resolve Object References dialog box.
In the Explorer, right-click your web service and choose Resolve Object References. The Resolve Object References dialog box is displayed (see FIGURE B-1).
2. Select the reference for which you want to define a new target object.
The dialog box displays the definition for the current target object.
The New Target Object dialog box is displayed.
4. Type a name for the target object in the Target Object Name field.
The dialog box automatically resolves your reference to the newly defined target object. Your new target object uses the same definition as the previous one. Only the name by which it is referenced is changed. For instructions on editing the definition, see Editing a Target Object Definition.
The target object definition specifies how the web service:
A web service can have multiple references that resolve to the same target object. For example, the same session bean might be used in many XML operations in the web service. In such a scenario, editing the target object definition affects each of these references because they all resolve to the same object. If this behavior is inappropriate for your application, you might need to create a new target object definition for one or more of your references. For instructions on creating a new definition, see Defining a New Target Object.
To edit a target object definition:
1. Open the Resolve Object References dialog box.
In the Explorer, right-click your web service and choose Resolve Object References. The Resolve Object References dialog box is displayed (see FIGURE B-1).
2. Edit the Name field, if necessary.
This field specifies the name by which the target object can be referenced. The target object's value is also displayed in the Target Object column in the list of object references at the top of the dialog box. This field is required.
3. Edit the Scope field, if necessary.
This required field defines the scope within which the target object can be referenced. Options are:
|
Note - Your choice of scope has no effect on the runtime characteristics of a web service that you create in the current release of the Sun ONE Studio 4, Enterprise Edition for Java IDE. |
4. Edit the Source field, if necessary.
This field specifies the type of mechanism by which the target object is obtained or instantiated. Options are:
5. Edit the remaining fields, if necessary.
The Source field affects which other fields in the dialog box are displayed and enabled for input. Edit the remaining fields in the dialog box by referring to the descriptions in whichever of the following tables is appropriate for your target object's source.
If the source is an enterprise bean, refer to TABLE B-1.
If the sources is a constructor, refer to TABLE B-2.
If the sources is a static method, refer to TABLE B-3.
6. Map method parameters to sources, if necessary.
If the Map Parameters button is enabled, follow these steps to provide values for parameters of the method specified in the Method, Constructor, or Static Method field.
The Map Parameters dialog box is displayed.
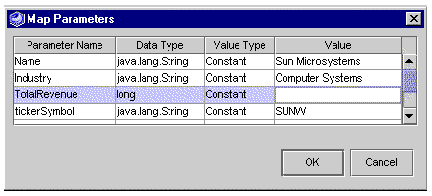
b. Locate the row that represents the parameter you want to map.
Each row represents one method parameter. If your method takes multiple parameters, use the Parameter Name column to identify the parameters. This column gives the names of the parameters if the method is provided as source code. If the method is provided in a JAR file, the Parameter Name column indicates the order in which the method requires the parameters by displaying names such as param1, param2, and so on.
c. Specify a value type for your parameter.
Click in the Value Type column and select an option from the list. The following table describes the options.
d. Specify a value for your parameter in the Value field.
The following table explains how to specify a value depending on your parameter's value type.
| Building Web Services | 816-7862-10 |
Copyright © 2002, Sun Microsystems, Inc. All rights reserved.