| Building J2EE Applications |
| Building J2EE Applications |
| C H A P T E R 9 |
|
Deploying and Executing J2EE Modules and Applications |
The IDE's deployment and execution feature supports the interactive development of enterprise applications. Assuming that an appropriate web server or application server has been installed, you (or a team) can develop and assemble a web application or a J2EE application, deploy it, execute it for testing purposes, modify the source code or component properties, redeploy and retest, and so on. Notice that reassembly is not required unless your testing uncovers a problem with the assembly.
For production deployment, the execution feature is not an alternative to the deployment tools supplied with the server. When you finish testing an application, you can generate a WAR or EAR file that can be deployed with the server's deployment tools.
This chapter covers deploying assembled web and J2EE applications from within the IDE and then executing them through a web browser for testing purposes. The IDE also has facilities for test execution at the component level. These facilities are covered in Building Web Components, Building Enterprise JavaBeans Components, and Building Web Services.
In order to deploy a web or J2EE application to a server you need to interact with the server. To simplify this process for you, Sun ONE Studio 4 represents web and application servers as nodes in the Explorer window.
Like other Explorer window nodes, these server nodes have property sheets and contextual menu commands, which help you manage your interactions with the servers from inside the IDE. This section identifies and explains the server nodes. (For an account of the mechanism that makes it possible to display these nodes, see Appendix A.)
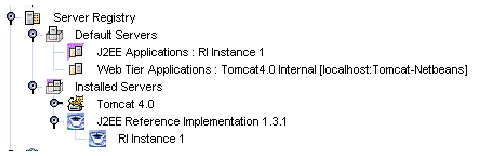
At the top level is the Server Registry node. This node groups the other server- related nodes. It has no commands or properties of its own. FIGURE 9-1 shows the Server Registry with its default subnodes.
 [ D ]
[ D ]This node exists to group other nodes. It has no commands or properties of its own. FIGURE 9-1 shows the Installed Servers node with its default subnodes.
These are the subnodes of the Installed Servers node. Each of these nodes represents a web or application server product that is recognized by the IDE. (These nodes actually represent the presence of a IDE plugin module that is capable of interacting with the specified server product. For more information on server plugins, see Appendix A.) FIGURE 9-1 shows the IDE after default installation, with Installed Server nodes for the Tomcat web server and the J2EE RI application server.
When a server product is installed and a corresponding server product node appears in the Explorer window, the IDE is able to recognize instances of the server and deploy applications to it. Each of these nodes has a contextual menu and a property sheet, although the capabilities of each node are determined by the server product and the plugin module.
Procedures vary with server product, but, in general, to use a server you configure one of these nodes to recognize a specific installation of the server product. For example:
For more information on setting up server products with the IDE, see the Sun ONE Studio 4, Enterprise Edition for Java Getting Started Guide.
Below the server product nodes are nodes that represent instances of the server products. When you deploy, you deploy to a specific server instance, so you must have a server instance node for the server product you are using before you can deploy.
You can use server instance nodes to stop and start the server instances they represent. The procedure for doing this varies with the server product you are using.
These nodes represent the server instances currently designated as the default server instances. When a server instance is the default server instance, applications are deployed to this instance unless you specify otherwise. (Application nodes have an Application Server property. The default value of this property is Default Server. You can change this value to the name of any server instance node.)
To make a server instance the default server, right-click the server instance node and then choose Make Default from the contextual menu. In FIGURE 9-1 shows the default server for J2EE applications is RI Instance 1.
The modules and applications you work with have property sheets, which you use to describe the services your modules and applications need from the application server. In addition to the Properties tab, which shows the properties defined by the J2EE specifications, these property sheets have server-specific tabs, which show properties that prompt you for information needed by a server product.
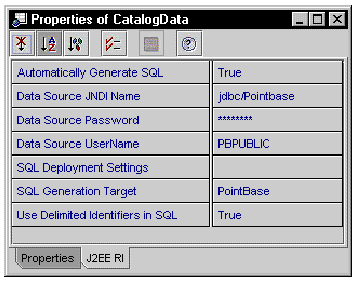
For example, FIGURE 9-2 shows an EJB module property sheet with the J2EE RI tab selected. The module contains some CMP entity beans, and most of the properties on this tab are used to supply information needed by the J2EE RI implementation of container-managed persisitence.
This section presents guidelines for deploying and executing a J2EE application from within the IDE:
To deploy and execute an application:
1. Begin with an assembled J2EE application. Review the application for completeness of assembly.
2. Choose an application server instance.
The application node has an Application Server property. The initial setting of the property is Default Application Server. If you proceed with this setting, the IDE will deploy you application to the server instance that is currently specified, in the Server Registry, as the default server for J2EE applications.
You can also open the property editor for this property and choose a server instance by name. The property editor is a browser, which lets you review all server instances in the server registry and select one.
3. Deploy and execute the application by right-clicking the application node and choosing the Execute command.
This will begin the deploy process. Monitor the process on the output window. When deployment is complete, the IDE will execute the application in the application server's environment. What you see depends on the application. For example, if the application contains a web module, execution will start a web browser and open the application's welcome page.
4. You can also deploy and execute in separate steps. Right-click the application and choose the Deploy command. When deployment is complete, execute the application yourself.
For example, if the application contains a web module, you can start a web browser and open the application's welcome page.
| Building J2EE Applications | 816-7863-10 |
Copyright © 2002, Sun Microsystems, Inc. All rights reserved.