| Building J2EE Applications |
| Building J2EE Applications |
| C H A P T E R 4 |
|
Scenario: Web Module and EJB Module |
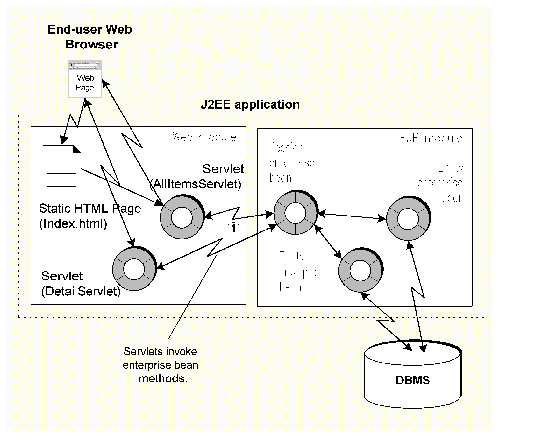
FIGURE 4-1 shows a web module and an EJB module assembled into a J2EE application. The interaction between the modules is Java RMI; servlets in the web module make remote method calls to the EJB module. The other interactions that appear in the figure--the HTTP requests and responses between the user's browser and the application, and the database queries that the application executes--were programmed into the modules.
 [ D ]
[ D ]This scenario looks at a J2EE application that participates in all the interactions shown in FIGURE 4-1. The programming required for the HTTP interactions with users is inside the web module, and it is covered in . The programming required for the interaction with the database is inside the EJB module, and it is covered in Chapter 3. This scenario is about assembling the two modules into a J2EE application.
The one interaction that depends on the presence of both modules is the remote method call between the modules. The logic needed for this interaction is already in the modules. The web module contains JNDI lookup code and an EJB reference declaration (see ), and the EJB module contains remote interfaces that support remote method calls (see Creating Remote Interfaces for the Session Enterprise Bean).
The few tasks covered in this chapter assemble the two modules into a J2EE application. After that, you can deploy the application as a unit and execute it. For a description of the end user actions that lead to the remote method calls, see .
TABLE 4-1 summarizes the programming required to create the J2EE application described in this scenario.
|
See Chapter 3. |
|
|
Create the Catalog application. This creates a J2EE application node in the Sun ONE Studio 4 Explorer. Add the two modules to the application. Specify the web context for the web module. Make sure the web module's EJB references are correctly linked to enterprise beans in the EJB module. |
The sections that follow use simple examples to demonstrate most of these programming tasks.
After creating the modules that go into the Catalog application, you need to create and configure a J2EE application that includes both modules. In the Sun ONE Studio 4 IDE, you do this by creating an application node and using the application node's property sheets to configure the application. You set the application's properties to describe its runtime behavior and to request specific runtime services from the J2EE environment.
The application's properties include both standard properties defined by the J2EE specifications and sever-specific properties for different application server products.
There are two ways to create a J2EE application in the IDE. Both procedures create an application node in the location you specify. The J2EE application node represents a description of the contents of the application. It identifies the source files for all the components you add to the module, but it does not copy the source files to the directory where you put the application node. Keep this in mind when you decide where to put your J2EE application node.
If you keep all of the source code for the module in a single filesystem, you could put your EJB module node at the top level of that filesystem. If the source code for the module is in different filesystems, perhaps in filesystem that are owned by different developers, you might create a set of directories containing only modules and J2EE applications that is separate from the filesystems containing the source code. Such a filesystem can help you see the structure of your application, which will be different than the directory structure of the source code.
To create a J2EE application from a module node:
1. Right-click an EJB module node (or a web module-s WEB-INF node), and then choose New J2EE Application from the contextual menu.
This opens a dialog in which you name the application and choose a place in the filesystem for it. Choose a filesystem, directory, or package node and click Finish.
2. A node representing your new module is created underneath the filesystem, directory, or node you selected, and the module you right-clicked to begin the procedure is automatically included in the new application.
You can add more modules to the application. See Adding Modules to the J2EE Application.
To create an EJB module from a filesystem, package, or directory node:
1. Right-click on a Explorer window node and then choose the following sequence of commands from the contextual menu: New  J2EE J2EE Application.
This opens a dialog on which you name the application. Click OK.
2. A node representing your new application is created underneath the filesystem, package, or directory you selected.
Both of these procedures represent your new module by a node in the directory you chose. Information describing the module, information that will eventually be used to generate a deployment descriptor for the module, is stored in this directory. The source code for the components in the module is not copied into this directory.
Once you have created an application you can add modules to it. To add a module to an application:
1. Right-click the application node and choose "Add Module ..." from the contextual menu.
This opens a dialog in which you can browse all your mounted filesystems for modules.
2. Select a module and click OK. This adds a node representing the module underneath the application node.
Continue using this command until you have added all the modules that belong in the application.
3. When you add a module to a J2EE application, the IDE notes any dependencies of the enterprise bean on other kinds of resources (Java classes, files, and so on) and automatically includes these in the module.
Notice that the source code for the modules you add to the applications is not copied into the directory that holds the application node.
When you deploy a J2EE application to a J2EE application server, URLs are assigned to web module resources by appending names to a URL path. For the J2EE Reference Implementation, the URL path has this general form:
http://hostnmame:port/web_context/URL_pattern |
The elements of this path are determined by the following:
In other words, the URL patterns assigned on the web module's property sheet are relative to the context that you assign with this procedure. To set the web context:
1. Right-click the included web module node (this is the web module node under the J2EE application node), and choose Properties from the contextual menu.
2. Click the Web Context property and type in the string you want to use.
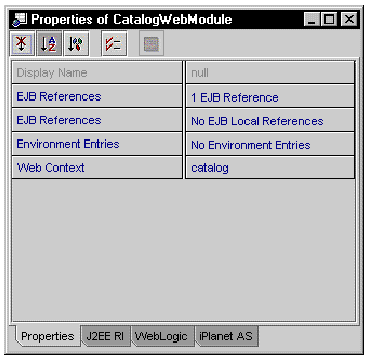
FIGURE 4-2 shows the property sheet for the catalog web module. The web context is set to catalog.
With this value, URLs for web resources in the application will have this general form:
http://hostnmame:port/catalog/URL_pattern |
If you don't supply a web context, it defaults to blank, and URLs for web resources in the application would have this general form:
http://hostnmame:port/URL_pattern |
The Java RMI interaction between the modules requires a linked EJB reference. The web module contains both pieces of an EJB reference, the JNDI lookup code and the reference declaration. To successfully perform the remote method call, the reference must be linked to an enterprise bean that is in the application.
The scenario in covered programming the reference. It explained that in some conditions you might decide to link the reference on the web module's property sheet before you create the application, and in other conditions you would choose the leave the reference unlinked on the web module's property sheet, to be linked later, when the web module is assembled into an application.
This section explains how to work with the application node's enterprise bean reference property. It explains how to check the status of references declared in an application, and, when necessary, how to link them.
To work with the references in an application:
1. Open the application's EJB References Property Editor.
Right-click the application node, and then choose the following sequence from the contextual menu: Properties EJB References ellipsis (...) button.
2. Check the status of the EJB references.
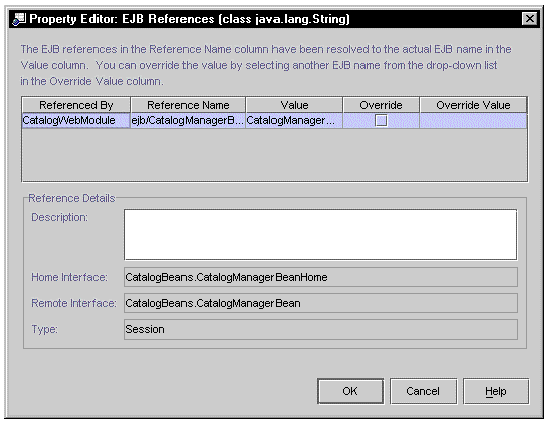
This editor shows you all of the references that have been declared in the modules that make up the application. References are identified by module and reference name (the name used in the JNDI lookup statement).
FIGURE 4-3 shows this property editor for the application in this scenario. There is one EJB reference, in the CatalogWebModule. The reference is named ejb/CatalogManagerBean, and it is resolved by an enterprise bean in the EJB module, named CatalogBeans.CatalogManagerBean.
 [ D ]
[ D ]
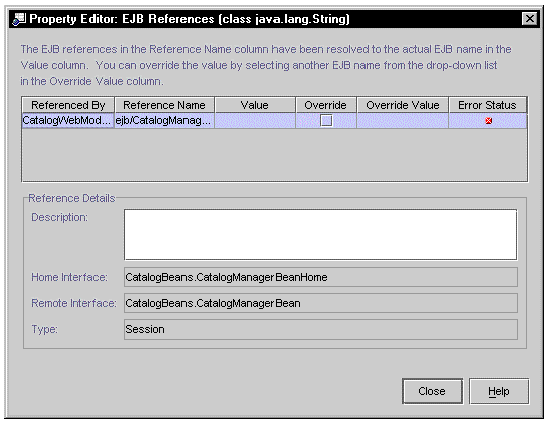
If a reference has not been linked, its Value field will be empty, and an Error Status field will indicate a problem with the references. FIGURE 4-4 shows the same reference, but in this case it was not linked on the web module property sheet.
 [ D ]
[ D ]
3. Link any unresolved references.
To do this, click the Override Value field. It will display a list of enterprise beans in the application that implement the interfaces specified in the reference. Select one of these enterprise beans. When the application executes, the method calls coded in the web module will call the enterprise bean you select here.
This section covers some assembly tasks that were not used in the scenario. You might find them useful in your J2EE applications.
If the application contains any environment entries, you might want to revise the values that were set for them on the module property sheet. You can do this on the application's Environment Entries Property Editor. (To open this editor, right-click on the application node, and then choose the following sequence from the contextual menu: Properties Environment Entries ellipsis (...) button.)
This editor shows you all of the environment entries that have been declared in the modules that make up the application. Environment entries are identified by name (the name used in the JNDI lookup statement) and module.
FIGURE 4-5 shows this property editor for the modules in this scenario. There is one environment entry, that was created on the web module's property sheet. (See .) The reference is named The environment entry is named NumberOfRecordsCached and it has a default value of 100, set on the web module's property sheet.
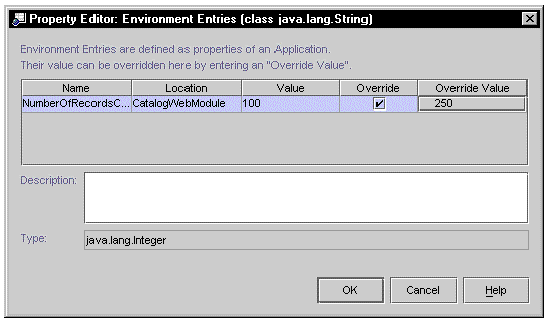 [ D ]
[ D ]
If you are working with the web module source files in your development environment you can change this value on the module's property sheet. If there is any chance that the web module will be used in more than one application, however, you are better off customizing this value on the application's property sheet. If the next person to use the web component changes the value on the module property sheet, it will change the value in your application when you redeploy.
To override the value set on the module property sheet, click the checkbox in the Override column and then supply the override value in the Override Value field.
In general, you should control the contents of a deployment descriptor by working with module and application property sheets. By setting properties, you control the contents of the deployment descriptor. The IDE does allow you to view the actual XML deployment descriptors for modules and applicatons.
You can view deployment descriptors for J2EE applications, included web modules and included EJB modules. To view a deployment descriptor, right-click on the node and then choose View Deployment Descriptor from the contextual menu. The IDE opens the deployment descriptor in the source editor, in read-only mode.
You can edit EJB module deployment descriptors. To do this, right-click an EJB module node and choose Edit Deployment Descriptor from the contextual menu.
| Building J2EE Applications | 816-7863-10 |
Copyright © 2002, Sun Microsystems, Inc. All rights reserved.