| Building J2EE Applications |
| Building J2EE Applications |
| C H A P T E R 3 |
|
Scenario: An EJB Module |
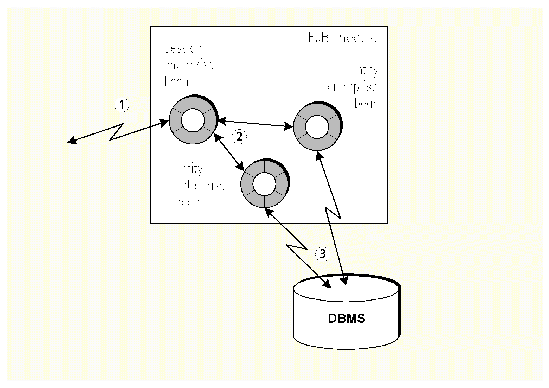
FIGURE 3-1 shows an EJB module that is typical in form--a session bean and several entity beans--and engages in interactions that are typical for an EJB module. EJB modules provide server-side services within a J2EE application, so they must be able to interact with other modules in the application (this interaction is represented in the figure by arrow labeled #1). Most EJB modules contain more than one EJB component, and the enterprise beans interact with each other (represented in the figure by arrow #2). Most EJB modules also interact with external resources, such as relational database management systems (represented in the figure by arrow #3).
 [ D ]
[ D ]This scenario looks at an EJB module that participates in the three types of interaction shown in FIGURE 3-1. The module is part of a J2EE application that supports a retail web site. Within the web site application, this EJB module supplies the data for the online catalog. This is a typical role for an EJB module in a J2EE application.
Another module in the application functions as a client of the catalog EJB module. This client module, typically a web module, requests the data, formats it, and displays it to online shoppers. The catalog data EJB module's responsibility is getting the requested data from the database and passing it to the client module. The catalog data EJB module must be able to process requests for data and return the correct data. More specifically, providing the catalog data requires these interactions:
1. The client module asks the catalog data EJB module for some catalog data. In this simple example, the client can ask either for a list of all the items in the catalog, or for detailed information about one item.
2. The catalog data EJB module processes the request by generating a database query that will get the requested data.
3. The catalog data EJB module executes the query and returns the data to the client module. The client then formats the data and displays it to the user.
These interactions between the client module and the catalog EJB module have some characteristics that determine both the J2EE technologies you choose to implement them and the internal structure of the catalog data module. First, the interaction between client modules and the catalog module is synchronous: online shoppers will ask to see the catalog and wait for the application to display it. To provide a synchronous interaction, you choose to implement this interaction with Java RMI. This means that client modules will request catalog data by invoking methods of the catalog data module.
Second, the interactions between client modules and the catalog EJB module are session-oriented. An online shopper can look at a display of the whole catalog and then request detail for a single item. With multiple end users looking at the catalog simultaneously, your EJB module needs to map requests to user sessions and return the correct data to each session. For this reason, you decide that clients need to interact with a stateful session bean enterprise bean in the catalog module. The session bean will manage the processing of each request submitted by a client module. (For details of using session beans to model sessions, see Building Enterprise JavaBeans Components.)
For the database operations, J2EE provides a type of enterprise bean known as entity enterprise beans. Entity beans model database tables, and they have methods that execute queries and work with the data stored in the tables they model. The catalog data is stored in two tables, so the catalog data module will have two entity enterprise beans, each modeling one of these tables. Connections, query language, and other aspects of the database operations are handled by these entity beans.
After considering these requirements, you design a module like the one illustrated in FIGURE 3-1. Client modules interact only with the session enterprise bean. The session bean manages the incoming requests and calls methods of the entity enterprise beans to obtain the requested data.
TABLE 3-1 summarizes the programming required to create the EJB module illustrated in FIGURE 3-1.
|
Create a session bean (CatalogManagerBean) with remote interfaces (remote interfaces are appropriate handling remote method invocations from other modules). Add business methods that return catalog data to the caller. One of these business methods returns all items in the catalog, the other returns detail for any item selected by the client. Create two entity enterprise beans (itemBean and itemDetailBean) to represent the two database tables that contain the catalog data. Create local interfaces for these entity enterprise beans (this is appropriate for method invocations within the module). Add a method to the itemBean that returns all items in the catalog. Requests for detail on a specific item will use the itemDetailBean's findByPrimayKey method. The session bean calls these methods to obtain the catalog data. Create detail classes (one for the Item table, one for the ItemDetail table). The catalog data module will return these instances of these classes to the caller. Create the catalog data EJB module, which creates an EJB module node in the IDE's Explorer. Add the three enterprise beans to the module. After creating the EJB module, specify the datasource for the catalog data, as a property of the module. |
|
|
To see how you add an EJB module to a J2EE application see Chapter 4. |
The sections that follow show you how to perform many of these programming tasks. Interfaces and method signatures are used to show the inputs to the catalog data module and the outputs from it. The procedures show how to connect these inputs and outputs to other components, other modules, and the catalog database. Instructions for creating the enterprise beans, adding business methods, and implementing the business methods with Java code are not included. If you need to learn about these tasks, see the online help or Building Enterprise JavaBeans Components.
The design for the catalog data module is that client modules get catalog data by calling methods of the stateful session bean, using Java RMI. To make this interaction possible, the session enterprise bean must have remote interfaces. You generate the remote interfaces when you create the session bean with the Session Bean Wizard. (For more information on the Session Bean Wizard see the online help.) CODE EXAMPLE 3-1 shows the completed home and remote interfaces for the stateful session bean.
Client modules can do two things with this interface. When clients wants to see the entire catalog, they calls the getAllItems() method; when they wants detail they call the getOneItemDetail() method. (Most real-world shopping applications provide more functionality that this. But the additional functionality would appear as more methods in these interfaces.)
The implementations of these methods (shown in CODE EXAMPLE 3-4), which are encapsulated by the catalog module, calls methods of the entity beans. The entity beans connect to the database and return the requested data as entity bean instances.
Because clients of the catalog data module do not update the database, the EJB module does not need to return the data in the form of entity bean instances. (Returning entity bean instances would allow the client to update fields of the instances. The container tracks changes to entity bean instances and it would automatically generates database updates.) Instead, to reduce the network bandwidth consumed by passing remote references to entity bean instances, the catalog data module returns instances of ordinary Java classes. These classes, known as detail classes, have the same fields as the entity beans. Data from entity bean instances is copied to detail class instances and the detail class instances are returned to the client. For more information on using detail classes with entity enterprise beans, see Building Enterprise JavaBeans Components.
To see how a client uses these remote interfaces to interact with the catalog data module, see .
To obtain the data that clients request, the CatalogManagerBean is going to call methods of the entity beans. Since these calls are within the module, there is no need for the entity beans to have resource-consuming remote interfaces. Instead, you can use local interfaces. Local interfaces are much faster and more efficient than remote interfaces, and you should use them whenever a remote interaction isn't necessary.
Generate the local interfaces when you create the entity beans with the Entity Bean Wizard. (For more information on the Session Bean Wizard see the online help.) CODE EXAMPLE 3-2 shows the completed local interfaces for one of the entity beans. The interfaces for the other entity bean are similar.
The CatalogManagerBean session bean can call findAll() to obtain a list of all the items in the catalog.
Client modules requests data by calling one of the CatalogManagerBean's business methods. (These are the methods declared in the CatalogManagerBean interface. See CODE EXAMPLE 3-1.) The implementations of these business methods manage the processing of the request for catalog data. They include calls to methods of the entity beans. To call entity bean methods, the session bean needs local EJB references to the local interfaces you created for the entity bean. Like most J2EE references, you need to program two separate parts to the reference.
CODE EXAMPLE 3-3 is the implementation of the session bean's getAllItems() method. Client modules call this method when they want to obtain data that lists all of the items in the online catalog. The method implementation shows you how the CatalogManagerBean manages the request. There are three steps:
1. The session bean uses JNDI lookup to obtain a local reference to the entity bean.
2. The session bean calls the entity bean's findAll() method.
3. The session bean copies the catalog data from entity bean instances to detail class instances, adds the detail class instances to a vector and returns the vector to the client.
Comments in the code identify these steps.
The lookup specifies "ItemBean", but this is actually the name of the reference, not the name of the referenced enterprise bean. The enterprise bean's name is often used as the reference name, to make it easier to remember which enterprise bean is meant. The enterprise bean is specified in the next step.
To complete the JNDI lookup code, you need to set up a reference declaration as a CatalogManagerBean property. The reference declaration maps the reference name (used in the lookup statement) to an actual enterprise bean. To set up a reference declaration:
1. Right click the calling bean's node (in this case the CatalogManagerBean), choose Properties from the contextual menu, then choose the following sequence: the References tab, and the EJB Local References property, the ellipsis (...) button, and the Add button.
The Add button opens a dialog that lets you add a new reference declaration.
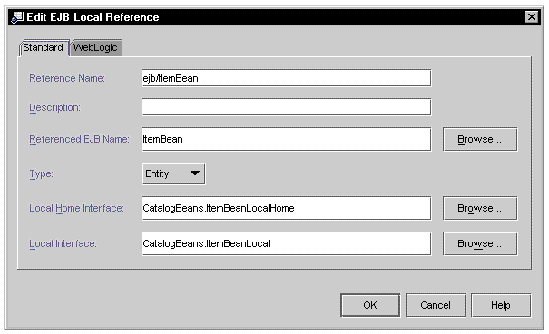
2. To add a reference declaration you must supply a reference name that matches the name used in the lookup statement and map it to the name of the enterprise bean.
The typical way to do this is to type in the Reference Name, matching exactly the string used in the JNDI lookup statement, and then click the Browse button. This opens a dialog that lets you select the matching enterprise bean FIGURE 3-2. shows the Add EJB References Dialog for the CatalogManagerBean, with these fields filled in for a local reference to the ItemBean.
 [ D ]
[ D ]After creating the enterprise beans that will make up the CatalogData module, you need to create and configure the EJB module. In the Sun ONE Studio 4 IDE, you configure the module on its property sheets by setting the module's properties to describe the module's runtime behavior and request specific runtime services from the J2EE environment.
The module's properties include server-specific properties for different implementations of the J2EE runtime environment (different application server products).
There are two ways to create an EJB module in the IDE. Both procedures create an EJB module node in the location you specify. The EJB module node represents a description of the contents of the module. It identifies the source files for all the components you add to the module, but it does not copy them to the directory where you put the EJB module node. Keep this in mind when you decide where to put your EJB module.
If you keep all of the source code for the module in a single filesystem, you could put your EJB module node at the top level of that filesystem. If the source code for the module is in different filesystems, even in filesystem that are owned by different developers, you might create a set of directories containing only modules and J2EE applications, which is separate from the filesystems containing the source code.
To create an EJB module from an enterprise bean node:
1. Right-click an enterprise bean node, and choose New EJB Module from the contextual menu.
This opens a dialog in which you name the module and choose a place in the filesystem for it. You choose a filesystem, directory, or package.
2. A node representing your new module is created underneath the filesystem, directory, or node you selected, and the enterprise bean you right-clicked on to begin the procedure is automatically included in the new module.
You can add more enterprise beans to the module. See Adding Enterprise Beans and Other Resources to the Module.
To create an EJB module from a filesystem, package, or directory node:
1. Right-click on a Explorer window node and then choose the following sequence of commands from the contextual menu: New  J2EE EJB Module.
This opens a dialog on which you name the module. Click OK.
2. A node representing your new module is created underneath the filesystem, package, or directory you selected.
Both of these procedures represent your new module by a node in the directory you chose. Information describing the module, information that will eventually be used to generate a deployment descriptor for the module, is stored in this directory. The source code for the components in the module is not copied into this directory.
Once you have created a module you can add enterprise beans to it. To add an enterprise bean to an EJB module:
1. Right-click the module node and choose "Add EJB..." from the contextual menu.
This opens a dialog in which you can browse all your mounted filesystems for enterprise beans.
2. Select an enterprise bean and click OK. This adds a node representing the enterprise bean underneath the module node.
You can continue using this command until you have added all the enterprise beans that belong in the module.
3. When you add an enterprise bean to a module, the IDE manages any dependencies of the enterprise bean on other kinds of resources (Java classes, files, and so on). It automatically includes these in the module when you compile or deploy the module.
For the few exceptions to this, see Identifying Extra Files.
Notice that the source code for enterprise beans you add to the module is not copied into the directory that holds the module node.
In this scenario, the CatalogData module must access a database to get the catalog data. You need to specify the datasource as part of configuring, or assembling, the module. Keep in mind that there are two times when you specify a datasource for an entity bean. First, at development time, you can open a live connection to a database, select a table, and tell the Entity Bean Wizard to create an entity bean that models the table you selected. (You can also use a database schema instead of a live connection.) This is covered in Building Enterprise JavaBeans Components.
Second, before you deploy the entity bean, you need to specify the database that will be used at runtime. This section covers this second case. To specify a datasource for use at runtime, you use the EJB module's property sheet to configure a resource reference for the datasource.
The way you set up the resource reference depends on the type of entity bean you are working with:
For container-managed entity beans, you simply specify the datasource, by JNDI name, on the module's property sheet. The IDE creates the resource reference for you automatically.
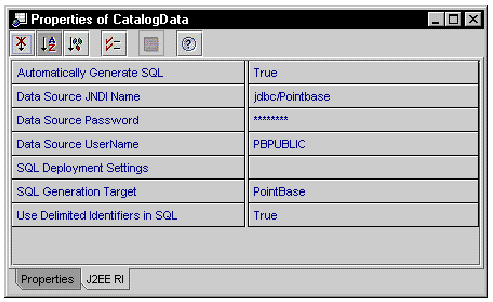
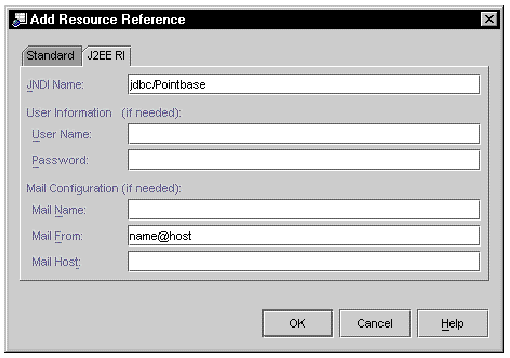
Data sources are assigned JNDI names when data sources are defined to a specific application server. You need to supply the JNDI name that is valid for the J2EE runtime environment (application server product) you are using, on the server-specific tab for that particular runtime environment. FIGURE 3-3 shows the CatalogData module's J2EE RI tab. The Data Source JNDI name property contains the JNDI name for the default Pointbase database.
 [ D ]
[ D ]
Both the J2EE RI server and the PointBase database server were installed with Sun ONE Studio 4. In addition, the Pointbase database was defined to the J2EE RI server as "jdbc/Pointbase," so supplying this name in the Data Source JNDI Name property points to a specific database instance.
If you are using a different database product with the J2EE RI server, you need to use J2EE RI administration tools to define the datasource to the J2EE RI server. After you do this, the datasource will have a recognizable JNDI name.
If you are going to deploy in a managed test environment or a production environment, system administration will probably be responsible for defining data sources to the application server. In this case you simply need to obtain the datasource's JNDI name.
If you are using an application server other than the J2EE RI, the application server must be configured with a datasource definition. The procedures for this depend on the application server product. Once again, in a managed test environment or a production environment, this will probably be done by system administration.
If your EJB module contains entity beans that use bean-managed persistence, instead of container-managed persistence, you've already written JDBC and JTA to extract data from the database. This is covered in Building Enterprise JavaBeans Components. In addition, you must also explicitly code the resource reference that you use to connect to a specific datasource. Like the local EJB references you coded for CatalogManagerBean, this reference has two parts:
A datasource you specify with a explicit lookup must be a named resource, just as it is when the resource reference is automatically generated for a container-managed bean.
CODE EXAMPLE 3-4 shows code you use in a BMP entity enterprise bean to look up a datasource.:
To set up a reference declaration, use the entity bean's property sheet:
1. Right-click on the enterprise bean's logical node, and then choose the following sequence of commands from the contextual menu: Properties References tab Resource References ellipsis (...) button.
This opens the resource reference property editor.
2. Click the Add button to open a dialog that lets you add a new resource reference.
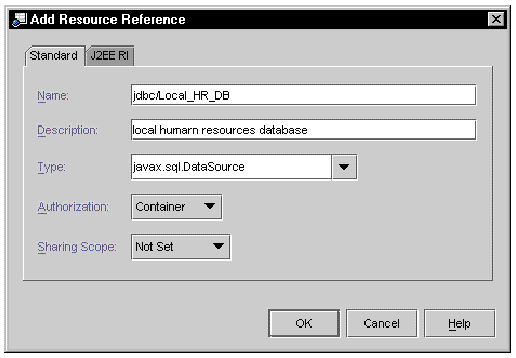
A reference must contain a reference name (the name used in the JNDI lookup statement), a resource type and an authorization type. FIGURE 3-4 shows the Resource Reference Property Add dialog with these fields filled with values that match CODE EXAMPLE 3-4.
 [ D ]
[ D ]
Notice that unlike EJB references, resource references are not linked to other J2EE components at assembly or deployment time. Instead the named resource is defined separately in the application server's environment. Enterprise beans use the JNDI lookup to obtain references to these resources at runtime.This reference will connect to that database instance.
3. Click on the Add dialog's server specific tab to identify the resource.
FIGURE 3-5 shows the Add dialog's J2EE RI tab. The JNDI Name field has a value of jdbc/Pointbase. This value links the resource reference named jdbc/Local_HR_DB to that specific database.
 [ D ]
[ D ]In most cases the IDE recognizes the dependencies of the enterprise beans in the EJB module and includes all needed files in the EJB JAR files it generates at deployment time. There are a few types of dependencies, however that the IDE does not recognize.
In these and similar cases, the IDE does not recognize the dependency and does not include the help file or class file in the archive file it creates. You need identify these files so that they are available at run time.
1. Right-click the module node. From the contextual menu, choose the following sequence: Properties Extra Files ellipsis (...) button.
This opens the Extra Files property editor.
2. Select any extra file that should be deployed or archived as part of this module.
The Extra Files property editor lets you browse all mounted filesystems. Click the extra files and click the Add button to add them to the list of extra files.
In some cases you want to prevent the IDE from acting on some of the file dependencies it recognizes. In particular, when a component in you module has a dependency on a commonly used JAR file that you know will be present in the runtime environment, you can prevent the IDE from adding an unnecessary copy of the commonly used JAR file to archive files created for you module.
To exclude duplicate jar file:
1. Right-click the module node. From the contextual menu, choose the following sequence: Properties Library Jars to Exclude ellipsis (...) button.
This opens the Library Jars to Exclude property editor. It displays a list of mounted JAR files.
2. Select JAR file that should be excluded, and click the Add button to move them to the list of library JARs to excluded.
Specifying a runtime datasource for the CatalogData module is one task that you perform as part of assembling and configuring an EJB module. Depending on the module, there may be other assembly tasks. You need to determine what assembly tasks are required. Questions that you might ask about the module include:
| Building J2EE Applications | 816-7863-10 |
Copyright © 2002, Sun Microsystems, Inc. All rights reserved.