Building Enterprise JavaBeans Components Components
|
| Building Enterprise JavaBeans Components
|
| C H A P T E R 8 |
|
Preparing Enterprise Beans for Deployment |
The foregoing chapters have focused on creating individual enterprise beans. However, before a finished bean can be assembled into an application and deployed in a production environment, three tasks remain to be done:
1. Furnish certain information about the bean's external dependencies and operating requirements. This information becomes part of the bean's deployment descriptor, which is discussed in the next section.
2. Form an EJB module around a group of beans that need to work cooperatively in an application. Also, if necessary, add an EJB JAR file around the EJB module.
3. Test your beans and module, using the automated testing feature of the Sun ONE Studio IDE.
Ordinarily, enterprise beans are assembled into an EJB module, one or more EJB modules are assembled into an application, and the application is deployed to an application server. However, an individual EJB module can also be deployed.
Another document in this series, Building J2EE Applications, discusses in detail the design and assembly of applications and their deployment to servers.
The deployment information you furnish in an enterprise bean's property sheets becomes part of the bean's deployment descriptor. This is an XML-based text file that captures information about the bean's structure, its relationships to other beans, and its other external dependencies. The deployment descriptor contains all the instructions an application server needs when the bean's application is deployed. Any change in this descriptor can change the bean's behavior in the application.
You automatically start a deployment descriptor for an enterprise bean when you use the EJB Builder wizard to create the bean, as described in the foregoing chapters. The wizard generates the bean's basic descriptor.
When you place enterprise beans in an EJB module (as explained in Creating an EJB Module), the IDE automatically generates a deployment descriptor for the module as well. This descriptor file captures:
By changing the EJB module's descriptor, you can change the application's behavior without touching the source code of the component beans.
The contents of a deployment descriptor are accessible through the property sheets of the corresponding bean or module. If necessary, you can also edit an EJB module's descriptor directly. The following three sections describe how you can see and affect the deployment descriptor.
To see the XML-based file that constitute the deployment descriptor of an enterprise bean:
 In the Explorer window, select a bean's logical node, right-click, and choose View Deployment Descriptor. (Or, select an EJB module's logical node, right-click, and choose Deployment Descriptor
  View.)
The Source Editor displays the file as read-only.
Ordinarily, you should edit a bean's or EJB module's deployment descriptor only through property sheets on the bean or EJB module (as described in the next section). When you edit this file using Properties, all you have to do is specify file names and values (and possibly table and column names, if you're working on an entity bean). You don't have to write any XML. You make your selections using a dialog box, and the IDE automatically synchronizes the changes across the appropriate classes of your enterprise bean.
However, if you need to, you can edit the deployment descriptor directly, and after editing you can revert to the generated descriptor.
If you need to make a direct edit in the deployment descriptor file of an EJB module, you can do it as follows:
Right-click the EJB module's node and choose Deployment Descriptor Final Edit.
After directly editing an EJB module's deployment descriptor, you can still use the property sheets to make changes that don't affect the deployment descriptor. For example, you can still go to the J2EE RI tabbed pane of the property sheet and specify or change the Data Source JNDI Name, Data Source Password, or Data Source User Name fields. (Be careful not to edit those fields in both the property sheets and the deployment descriptor.) However, fields that represent items in the deployment descriptor are closed to edits in the property sheets.
If you have used the Final Edit feature, but now want to go back to the last generated version of the deployment descriptor and continue from there to make changes in the property sheets, do as follows:
Right-click the EJB module's node and choose Deployment Descriptor Revert to Generated.
|
Note - If you choose Revert to Generated, any edits you made directly in the deployment descriptor file will be lost. |
To use property sheets to add to, edit, or complete an enterprise bean's or an EJB module's descriptor, do as follows:
Select the bean's or EJB module's logical node, right-click, and choose Properties.
In the case of an enterprise bean, the Properties dialog box appears, showing at least three tabbed panes:
2 Platform, Enterprise Edition)
You also see a tabbed pane for any other application server's plugin module that has been installed with the IDE.
In the case of an EJB module, there are two default tabbed panes: Properties (which includes reference fields) and J2EE RI.
The three default tabbed panes for enterprise beans are described next.
Before you create an EJB module around enterprise beans, specify the individual beans' properties. These properties are discussed pane by pane in the following sections: Using the Properties Tabbed Pane, Using the References Tabbed Pane, and Using the J2EE RI Tabbed Pane.
Since you're familiar with your bean's code, you'll probably recognize most of the fields in the Properties tabbed pane. Also notice the following:
If you want your bean to use another existing class, you can override one of the classes shown in these Properties fields.
If you want to change the name of a class but retain the same class content, you must either make the change in the property editor for that class (not the property editor for the logical bean node) or directly edit the class code in the Source Editor.
Some property types in this tabbed pane are unique to specific bean types, and these properties are discussed next.
In the Properties pane for any entity bean, you also see the following fields:
In the Properties pane for a CMP entity bean, you also see the following fields:
In the Properties pane for a session bean, you also see the following fields:
In the Properties pane for a message-driven bean, you also see the following fields:
To prepare your enterprise bean for assembly and deployment, you complete this tabbed pane's fields, which represent many of the enterprise bean's external dependencies. Some of the information can be stated at the bean level and then overridden at the module or application level.
One example of a References tabbed pane is shown next.
 [ D ]
[ D ]
Each field in this pane is described next, with instructions for completing the field.
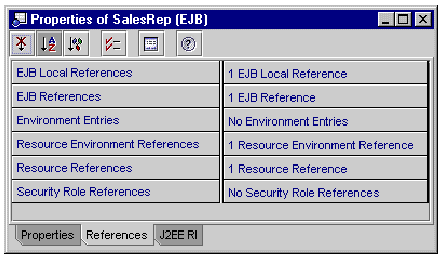
This field and the following one contain information about any other enterprise beans whose methods your bean calls. You use the EJB Local References field to specify references to beans that reside within the same JVM. An EJB local reference accesses the local interface of a bean running in the same JVM, although the two beans might be in different EJB modules. (For contrast, see Specifying EJB References.)
You can specify the name of the implementing enterprise bean at development time, and, if necessary, that setting can be overridden when your bean is assembled into an EJB module.
In the bean's code, you use the JNDI interface to look up the home interface of another bean. Before enclosing the bean in an EJB module, you also link the beans by specifying those same references in the bean's property sheet. The person who assembles the application looks at the EJB References field to see which other beans your bean must have access to in order to work as designed. The references specified here at the bean level can be used or overridden at the module level, as needed in the target environment.
Before multiple beans are enclosed in an EJB module, the references should be coded in the bean class and the EJB references should be specified in the property sheet.
To specify EJB local references in the property sheet, do as follows:
1. Click the EJB Local References field, then the ellipsis (...) button.
The EJB Local References property editor appears.
The Add EJB Local Reference dialog box appears.
The following fields are mandatory.
The description field is optional. That information might be helpful to the person who assembles your EJB module into an application.
In the EJB References field, you specify links to any enterprise beans that reside outside your bean's JVM but whose methods your bean calls. You use the field as you would the EJB Local References field, except that the reference you name here points to the remote interface of a bean running in the another JVM.
An environment entry, stored in your bean's runtime environment, is a named data value that depends on policy or procedure at the deployment site. Environment entries can alter the behavior of an enterprise bean at deployment time without modifying the source bean's code. Any values that you set here in the property sheet can be overridden at deployment time in the deployment descriptor of an EJB module or an application.
For example, the Account bean can use the environment entry overdraftAllowed (of type boolean). This variable might indicate whether or not a particular bank that uses the Account bean allows customers to overdraw their account balances. The Account bean looks up the value of overdraftAllowed to decide what should happen if a customer's request causes an overdraft.
To add an environment entry, do as follows for each environment:
1. Click the Environment Entry field and then the ellipsis (...) button.
The Environment Entry property editor appears.
The Add Environment Entry dialog box appears.
The following two fields are mandatory.
You can also complete the other two fields.
Use this field to specify any administered object your bean needs to use, such as a JMS destination (a queue or topic). The resource environment reference is the queue's or topic's logical name. This logical name must map to the name that appears in your bean class's InitialContext.lookup method. When your been needs the resource that you specify in this field, an instance of the resource is created by the factory mentioned in the next section.
To add a resource environment reference, do as follows for each object that you want your bean to use:
1. Click the Resource Environment Reference field and then the ellipsis (...) button.
The Resource Environment References property editor appears.
The Add Resource Environment Reference dialog box appears.
The following fields are mandatory.
This field contains the name of the factory that creates a connection to a resource that your been needs. This resource might be a datasource (such as a relational database), an administered object (such as a queue or topic), a JavaMail session, a URL, or a J2EE connector (which lets you connect your bean to another application system or EIS). The information in the Resource Reference field must correspond to a JNDI lookup method call in your bean class code.
To add a resource factory reference, do as follows for each resource that your bean needs:
1. Click the Resource Factory Reference field and then the ellipsis (...) button.
The Resource Factory References property editor appears.
The Add Resource Reference dialog box appears.
The following fields are mandatory.
javax.naming.InitialContext myContext = new javax.naming.InitialContext(); javax.sql.DataSource mySource = (javax.sql.DataSource) myContext.lookup("java:comp/env/jdbc/myDataBase"); |
The following field is optional.
If your enterprise bean does its own security checking, that is, if it checks to see if the user has the authority to use your bean to perform a task, you must provide security-role references in this field. (A message-driven bean needs no security role; it merely propagates whatever security information came from a client in a message. Any needed security checking is done later by either the container or the enterprise bean from which the message-driven bean requests work.)
To use this field, you must also have provided corresponding code (programmatic security) in your bean class. For example, your code might include the following method from the javax.ejb.EJBContext interface:
In that case, you also need to add all applicable role names as security-role references in this property sheet.
Security roles can also be defined at the module level. For more information, refer to Building J2EE Applications.
To add a security role at the bean level, do as follows:
1. Click the Security Role Reference field and then the ellipsis (...) button.
The Security Role References property editor appears.
The Add Security Role Reference dialog box appears.
The tabbed pane for the J2EE reference-implementation server (the J2EE RI, or simply the RI) shows properties that are automatically assigned when you use the EJB Builder to create an enterprise bean. These properties contain default values that are appropriate for developing and testing your beans. However, before an entity bean is deployed as part of an application, some of the values must be changed and some blank fields must be filled.
If you're looking at the J2EE RI-related properties of a message-driven bean, a session bean, or an entity bean that manages its own persistence (a BMP bean), you see little data. However, a great deal of information is needed for the J2EE RI-related property fields of an EJB module that contains one or more CMP beans. There, you see the IDE's generated instructions to the container on how to intercede between the bean and its underlying data storage.
First, let's consider the property-field values that should go into the J2EE RI tabbed pane for individual enterprise beans. Then, starting in Creating an EJB Module, we will explore the process of creating an EJB module around enterprise beans, and then, in the case of CMP beans, setting their database-related properties at the EJB-module level.
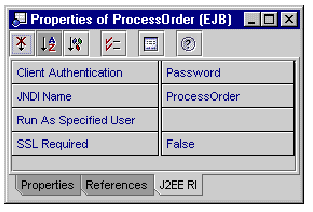
For a session bean, a CMP bean, or a BMP bean, this tabbed pane displays the Client Authentication, JNDI Name, Run As Specified User, and SSL Required properties. The J2EE RI properties tabbed pane for a session bean called ProcessOrder is shown next.
Supply values in these fields as follows:
When deploying a CMP entity bean to the RI, you first create an EJB module, then you handle the bean's relationships with its underlying data storage at the level of the EJB module. See Setting Database-related Properties for CMP Entity Beans for details.
A message-driven bean's J2EE RI tabbed pane also contains fields that describe what kinds of messages the bean consumes.
Supply values in these fields as follows:
To set database-related properties for CMP beans, you must first have or create an EJB module around the CMP beans. EJB modules are discussed next.
Perhaps you have designed an enterprise bean to work on its own, or perhaps you have designed several beans to work cooperatively. In either case, you might want to package your enterprise beans in an EJB module to be sure that the right beans are together, and that all necessary information about the beans' operating requirements is packaged with them.
Enterprise beans don't have to be in the same module to work together; they can be in different modules as long as they are in the same JVM. However, sometimes it's convenient to keep cooperating beans together in the same module.
An EJB module is a logical entity in the IDE, a symbolic representation of its physical counterpart, which is an EJB JAR (a Java archival file with the extension .jar). The EJB module tracks the list of beans that need to be included in an EJB JAR, along with the connections between the beans and the properties that need to be set in the deployment environment. An EJB module is the smallest unit of enterprise beans that can be deployed to an application server.
As you can see in the IDE's Explorer window, an EJB module node also represents the module's deployment descriptor, which lists the enterprise beans that compose the module and specifies where the beans' source code is loaded. The beans in an EJB module can be in the same directory or in several directories, even in different filesystems. Neither the beans nor copies of them actually reside in the EJB module.
Here are some general guidelines for deciding how many enterprise beans to package in a single EJB module. (For details, refer to the documentation for the Java 2 Platform, Enterprise Edition.) You might want to package your beans for any of the following results.
To create an EJB module around a single enterprise bean, do as follows:
1. In the Explorer window, right-click the bean's logical node and choose Create New EJB Module.
2. In the New EJB Module dialog box, rename the module if necessary.
3. Select a location for the module from the tree view of your filesystem.
To create an EJB module around multiple cooperating enterprise beans, follow the steps above, but use the Control or Shift key to select at the same time all the beans you want in the module.
Another way to create an EJB module around several beans is to right-click the beans' Java package, and choose New J2EE EJB Module. The IDE creates a new, empty EJB module in the package. Right-click the module node and choose Add EJB. In the file chooser that appears, use the Control or Shift key to select all the beans you want to include.
See the contents of the module by expanding its node in the Explorer.
If you need to have multiple CMP beans working together within the EJB module, it would have been best to start by using the EJB Builder wizard to create a set of related CMP beans from a database or database schema. At the same time, the wizard creates the surrounding EJB module. When you approach the task that way, the IDE automatically preserves all the relationships between the beans.
However, if you need to add one enterprise bean to a module you've already created, do as follows:
1. In the Explorer window, right-click the EJB module's node and choose Add EJB.
A file chooser appears, showing a tree view of your filesystem.
2. Select an enterprise bean from the tree view.
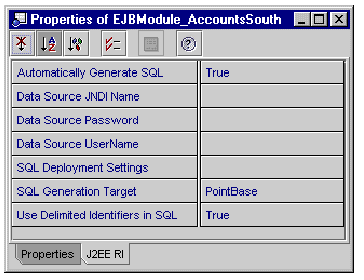
The RI-related properties for a CMP entity bean are provided at the level of the EJB module. FIGURE 8-2 shows the J2EE RI tabbed pane for an EJB module called EJBModule_AccountsSouth. This EJB module, as you will see a little later, contains several related CMP beans. Notice that the fields in this pane address the relationship between the beans and their underlying data storage, and the role that the container is to play in managing that relationship.
 [ D ]
[ D ]
|
Note - If you are going to use the IDE's testing feature on a CMP bean, you might want to wait until later to create that CMP bean's EJB module. The testing process creates an EJB module for you. This is not a module you can deploy in production, but one that lets you test your CMP bean's code and all its deployment settings. You might save time by running your CMP bean through the testing process, finding out how the properties you set there work, and afterward replicating those settings in a "real" EJB module that you generate for production purposes, following the instructions in this section. For information on testing enterprise beans, see Chapter 9. |
For all CMP beans, complete the following fields:
Depending on how you created the CMP bean or beans in the EJB module, and on whether you want your CMP beans to use an existing database table, you treat the rest of the RI-related property fields differently.
When you have used the EJB Builder wizard to create a CMP bean, and you leave the default value True in the Automatically Generate SQL field, the J2EE RI plugin provides the SQL statements that it will need to manage the bean's associated persistent records in the underlying database. The plugin uses the bean's methods and fields, and also any EJB QL code that you supplied for certain methods, to produce SQL specifically for the server's own use. This is true of all the servers installed in the IDE: Each uses the bean's code and your EJB QL to generate its own server-specific SQL.
The plugin also can regenerate its SQL statements whenever you add a CMP field, delete a CMP field, change the fields that make up the primary key, or change the bean's container-managed relationships. However, you can choose whether or not to use this SQL regeneration feature. If you do use it, that is, if you leave the value set to True, you shouldn't edit the SQL statements unless your EJB module contains a CMP bean with a version 1.x bean class. (In this case, see If Your EJB Module Contains an EJB 1.1 CMP Entity Bean for the one statement you will need to modify.)
The generated statements are designed to do as follows:
Guidelines follow for setting the database-related properties of CMP beans.
Perhaps your CMP beans don't need to use an existing database table, and you want the RI plugin to create a table for their use, for example during testing. In that case, you can leave the default settings as they are in the Automatically Generate SQL field and the Use Delimited Identifiers in SQL field.
|
Note - Turn off delimited identifiers only if you are sure that your bean name, CMP field names, and CMR field names are reserved words in the SQL database specified as the data source. |
Use the default setting in SQL Generation Target, or specify another database.
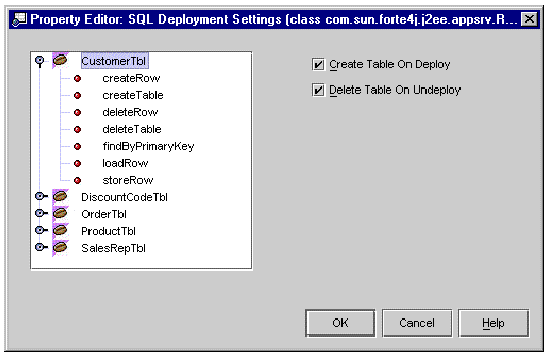
To see the default settings for table creation and drop, click the SQL Deployment Settings field and then the ellipsis (...) button. The SQL Deployment Settings property editor appears, as shown in FIGURE 8-3.
 [ D ]
[ D ]
Notice that the table-related settings appear when a bean node is selected.
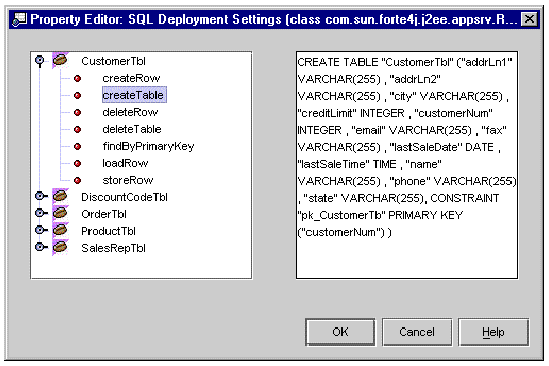
To see the default SQL statements that have been generated by the RI plugin for your CMP beans, expand a bean node in this property editor and select one of the bean's methods. The method's SQL statements appear, as shown in the example in FIGURE 8-4.
 [ D ]
[ D ]
You should leave the server's generated SQL statements as they are unless your EJB module contains a CMP bean with a version 1.x bean class. In that case, see If Your EJB Module Contains an EJB 1.1 CMP Entity Bean.
If your CMP beans need to use an existing database table (for example, if you generated the beans' infrastructure from a table, and you want to test the beans against that table), use the following settings:
|
(The database containing your table. This should be the same database that the Data Source JNDI Name is mapped to.) |
|
The value True in the Automatically Generate SQL field means that when you change your CMP beans' persistent fields and container-managed relationships, the RI plugin automatically regenerates your SQL statements and keeps them up to date. (For the one exception to this rule, see the next section.)
|
Note - Be sure that none of your beans (tables) or their fields (columns) have names that are reserved words in SQL. |
Click the SQL Deployment Settings field and then the ellipsis (...) button. In the property editor that appears, select each CMP bean that you will want to test against the existing table. For each of those beans, deselect the checkboxes for Create Table on Deploy and Delete Table on Undeploy. Deselected checkboxes mean that the RI plugin won't create any table for your bean to use, and that it won't drop any table when the bean's application is no longer running.
Again, you shouldn't have to adjust the generated SQL statements unless your EJB module contains an EJB 1.1 CMP bean.
In an application, you might include one or more CMP entity beans that were generated according to the previous EJB specification, using an earlier version of the Sun ONE Studio IDE. Or, a CMP bean in your application might be based on a bean class of version 1.x (for details on creating such a CMP bean, see ). If so, you can treat these CMP beans the same as you do EJB 2.0 CMP beans, with one important change. You must go to the generated SQL and adjust the WHERE clause in the finder method.
To make this edit, you should be in the EJB module's property sheet, the J2EE RI tabbed pane, and the SQL Deployment Settings field. Click that field and then the ellipsis (...) button, and the SQL Deployment Settings property editor appears.
Edit the WHERE clause as follows:
1. Find the EJB 1.1 CMP bean node and expand it.
2. Select the node for the bean's finder method.
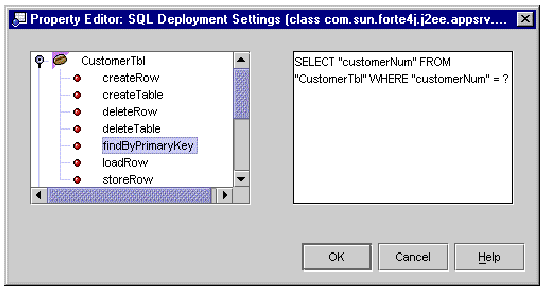
You see an SQL statement something like the one in FIGURE 8-5.
 [ D ]
[ D ]
Your edits in the WHERE clause are preserved when the RI plugin regenerates the SQL statements.
See Appendix B for more details on handling EJB 1.1 CMP entity beans in the current version of the IDE.
If you have occasion to change any of the SQL that the RI plugin generates for your CMPs, you might need to understand how the values of the CMP fields are ordered.
The container sends the values of the CMP fields to the database in alphabetic order. If your table columns do not have the same names as the CMP field names, you must put the columns in the same order as the alphabetic order of their mapped fields. For example, assume that your CMP bean class is named EmployeeEJB.
In this example, you would need to change the SQL code as follows:
The table column names are in the same alphabetic order as the mapped CMP fields (not the alphabetic order of the table columns). This is because the VALUES parameters are sent in that order.
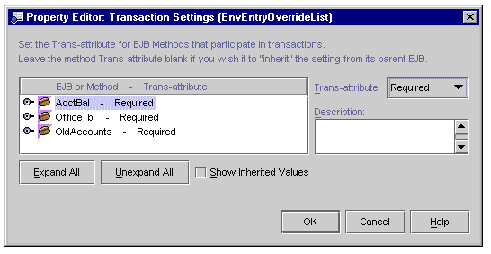
Transaction attributes tell the EJB container how to control a CMT bean's transactions. In a session bean that manages its own transactions (a BMT bean), you must explicitly code the bean's transactions. In a CMT bean, you include no explicit code for transactions; instead, you let the container control them based on transaction attributes you assign to your bean's methods.
By default, the IDE sets all bean methods to use the Required attribute. You can assign different transaction attributes at the bean level or at the method level. For example, if you don't want a particular method to be included in the context of a transaction, you can change that method's attribute from Required to Not Supported.
The transaction attributes are stored in the deployment descriptor, and they can be edited using the EJB module's property sheet. Before an EJB module that contains CMT beans is assembled into an application, you should make sure that the appropriate transaction attributes are specified for that module.
When you change a transaction attribute for an individual bean or for a method in a bean, the attribute is changed only for execution within that EJB module. The bean's source code has not been changed. If you reuse that bean within another EJB module, you can apply a different set of transaction attributes.
To change a CMT bean's transaction attributes within an EJB module, do as follows:
1. In the Explorer window, right-click the bean's EJB module and select Properties.
In the Properties tabbed pane, notice that the Transaction Settings field displays the value Container-transaction.
2. In the Properties tabbed pane, click the Container-transaction field, and click the ellipsis (...) button.
The Transaction Settings dialog box appears. Notice that the larger pane displays the module's enterprise beans that use CMT, each bean with a transaction attribute that applies to the entire bean.
While you're working in the Transaction Settings dialog box, you can take the opportunity to provide the application assembler a description of the transaction settings for individual beans or methods in the module. For example, you might want to explain why you've changed a particular transaction attribute in this EJB module.
3. Click OK when you're finished with transaction attributes.
In Specifying EJB Local References and Specifying EJB References, you saw how references between enterprise beans are declared at the level of the individual bean. Those references also can be overridden as follows:
This feature is handy if, for example, you want to package a particular enterprise bean in three different EJB modules to be used variously by one or more applications.
To use this feature, you must provide the EJB module (or application) two or more enterprise beans whose interfaces are the same. The feature works for local, remote, or local and remote interfaces, but the beans' interfaces must be identical, while the bean classes or properties (deployment information) can differ.
To override a bean reference within the EJB module, do as follows:
1. In the Explorer window, right-click the bean's EJB module and select Properties.
2. Click the applicable references field (EJB Local References or EJB References) and then click the ellipsis (...) button.
The appropriate property editor appears.
3. Find the enterprise bean whose reference you want to override and click the Override checkbox.
4. Click the Override Value field.
Below the Override Value field appears a combo box containing the names of the enterprise beans you can select from. An example is shown in FIGURE 8-6.
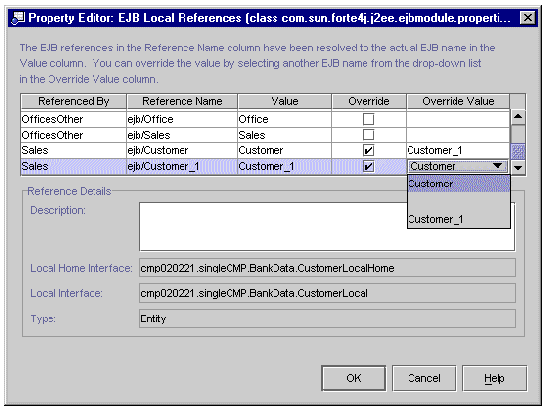 [ D ]
[ D ]
5. Select the reference you want the enterprise bean to use, and click OK.
To override a bean reference at the application level, do as follows:
1. In the Explorer window, right-click the bean's application and select Properties.
2. Click the applicable references field (EJB Local References or EJB References) and then click the ellipsis (...) button.
The appropriate property editor appears.
The property editors for EJB references and EJB local references are the same at the module and application level. Continue with the same steps as described in the previous section.
After creating the EJB module, if you will be handing off the module to another part of the organization for application assembly, you might want to create an EJB JAR. This file can be used to export the module and its contents for use in an application. Create the EJB JAR file as follows:
1. In the Explorer window, select the EJB module.
2. Right-click and select Export EJB JAR File.
The Output Window appears and shows you the progress as the module and its contents are compiled. Notice any error messages in this window.
After the EJB JAR file has been created, you can still adjust the module or its contents for use in this or another EJB JAR file.
One or more EJB modules can be placed in a J2EE application and deployed. For details on assembly and deployment, refer to Building J2EE Applications.
You might want to let the enterprise beans in an EJB module take advantage of the functionality offered by beans in another container. For example, if you have a session bean that needs to authenticate a user, you can add a JAR file containing beans that implement security checks. Add an existing EJB JAR file to your EJB module as follows:
1. In the Explorer's Filesystems pane, mount the filesystem that contains the JAR file.
2. Right-click your EJB module's mode and choose Properties.
3. In the module's property sheet, click the Extra Files field and then the ellipsis (...) button.
4. In the Source pane, navigate to the JAR file you want to add, select the file, and click Add.
The JAR file appears in the Files To Be Added pane.
When you deploy the EJB module, this JAR file is included in the module's EJB JAR file.
| Building Enterprise JavaBeans Components
| 816-7864-10 |
Copyright © 2002, Sun Microsystems, Inc. All rights reserved.