| Sun Netra CP3240 Advanced Mezzanine Card 10GbE Optic User’s Guide |
| C H A P T E R 1 |
|
Getting Started |
This chapter provides information and procedures needed to install and make the Sun Netra CP3240 AMC.2-OP operational. This chapter should be read before using the AMC.
In addition to this chapter, refer to the following safety documentation:

|
Caution - When the system is plugged in, energy hazards are present on the midplane. Do not reach into the enclosure while the power is on. |
|
|
Caution - Static electricity can damage electronic components. Wear a wrist strap grounded through one of the system’s ESD ground jacks when removing and replacing hot-swappable components. |
This chapter contains the following topics:
The following sections briefly describe the minimum system requirements and the configurable features. Links are provided to other chapters and appendices containing more detailed information.
The AMC can work in any ATCA carrier board with a single-width, mid-height AMC slot supporting the AMC.2 Type 5 (10GbE on ports 8-11) standard. This goes to the XFP module. Also, there is an AMC.2 Type E1 (1 GbE on port 0) connection to the SFP module.
See Appendix A for electrical and environmental requirements
The AMC might contain materials that require regulation upon disposal. Please dispose of this product in accordance with local rules and regulations. For disposal or recycling information, please contact your local authorities or the Electronic Industries Alliance at http://www.eiae.org/.
The AMC includes several connectors to interface with the host board and take its Ethernet interfaces outside the ATCA chassis. Refer to the Appendix B for complete connector descriptions and pin outs.
The AMC provides several jumper configuration options for features. Location figures and descriptions are provided in Chapter 3.
Check the shipping carton for damage. If the shipping carton or contents are damaged, notify the carrier and Sun. Retain the shipping carton and packing material for inspection by the carrier. Obtain authorization before returning any product to Sun. Refer to the Sun Netra CP3240 Advanced Mezzanine Card Getting Started Guide (820-7260) for return instructions.
|
|
Caution - The system is sensitive to static electricity. To prevent damage to the assembly, always connect an antistatic wrist strap between you and the system. |
|
|
Caution - Do not flex the AMCs; the surface-mounted components can break if the AMC is bent. |
To minimize the amount of AMC flexing, observe the following precautions:
The following shows the faceplate of the Sun Netra CP3240 AMC.2-OP, which is a fiber-optic AMC (XCP3240H-AMC10GO-Z).

This is where SFP modules may be plugged into the AMC to provide outside-the-chassis access to the 1000BASE-X Ethernet AdvancedTCA Base Interface.
This is where XFP modules may be plugged into the AMC to provide outside-the-chassis access to the 10GBASE-BX4 Ethernet AdvancedTCA Fabric Interface. The XFP port is active only on the middle AMC site.
The following tables give status information for all of the LEDs on the AMC.
TABLE 1-1 describes the LEDs defined by ATCA to monitor board status.
Note that the OOS LED will be lit when the board is powered but not booted. This includes all hot swap states M1 through M3. It will remain on until the IPMI software has received the e-Keying signal from the shelf manager.
TABLE 1-2 shows the different states of the Hot-Swap LED.
| Note - A board should be hot-swapped only when the LED is solid blue. |
This section describes how to remove and install AMCs.
If you want to remove only an AMC from a switch, use the following instructions.
If you want to remove the switch with the AMC installed, see the next section Section 1.6.2, Removing a Switch and AMC.
If you fail to do this before pulling the AMC’s hotswap latch, the OS might panic.
2. At the front of the switch, locate the AMC you want to remove.
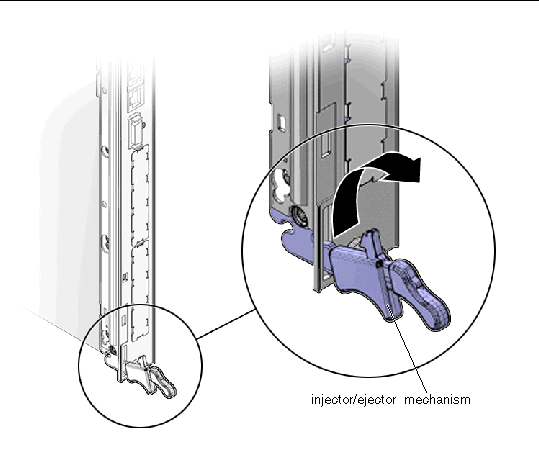
3. Initiate the hot-swap deactivation sequence by pulling the injector/ejector latch out half way (FIGURE 1-2).
The Hot-Swap LED starts blinking. Wait until the LED is solid blue.
4. When the hot-swap LED is solid blue, pull the injector/ejector latch out completely (FIGURE 1-2).
FIGURE 1-2 Deactivating the AMC


6. Replace the AMC with another AMC (FIGURE 1-7) or install a filler panel.
| Note - Be sure to follow handling instructions. See Section 1.3, Handling AMCs. |
|
|
Caution - Failure to fill all sites with AMCs or cover with filler panels can negatively impact the cooling of the system. |
Following are the instructions for removing a switch and installed AMC. For instructions on removing switch and RTM sets, refer to the Sun Netra CP3240 Switch Installation Guide (820-3251).
1. Move the front cable management bracket to the lower position (FIGURE 1-4).
FIGURE 1-4 Front Cable Management Bracket in Lower Position

2. Disengage the injector/ejector mechanisms at the top and bottom of the switch board to notify software that the board is about to be removed. Wait for the Hot-Swap LED to light.
FIGURE 1-5 Injector/Ejector on the switch (Open Position)
3. Disconnect all cables connected to the switch.
4. Loosen the two board retention screws that fasten the board to the enclosure.
5. Open the ejectors fully, rotating the handles outward until the board disengages from the midplane.
6. Slide the board evenly out of the enclosure.
7. Determine if you are going to replace the switch.
|
|
Caution - Failure to cover all open sites with filler panels can negatively impact the cooling of the system. |
Following are the instructions for installing an AMC. For instructions on installing switch and RTM sets, refer to the Sun Netra CP3240 Switch Installation Guide (820-3251).
1. At the front of the switch, locate the AMC site where you want to install the AMC.
2. Remove the filler panel, if necessary.
3. Obtain the AMC card from the ship kit.
| Note - Be sure to follow unpacking and handling instructions. See Section 1.2, Unpacking and Section 1.3, Handling AMCs. |
4. Perform any card-specific hardware procedures, if necessary.
5. Prepare the AMC by opening its injector/ejector latches.
FIGURE 1-6 Opening the Injector/Ejector Latches

6. Carefully align the edges of the board with the guides in the appropriate site.
It might be helpful to look into the enclosure to verify correct alignment of the rails in the guides.
|
|
Caution - Do not force the AMC into the site. If it does not fit properly, check to ensure that you have the correct matching AMC for the switch. |
7. Keeping the board aligned in the guides, slide the board in by pressing on the AMC faceplate until the AMC faceplate is flush with the switch faceplate.

8. Push the ejector latch in fully.
If system power is on and AMC is installed properly, the AMC board Hot-Swap LED lights up. The Hot-Swap LED blinks for several seconds, then goes off.
If the Hot-Swap LED does not go off after several seconds, push firmly on the injector/ejector handles to ensure that they are pushed in all the way.
|
|
Caution - Failure to fill all sites with AMCs or cover with filler panels can negatively impact the cooling of the system. |
| Sun Netra CP3240 Advanced Mezzanine Card 10GbE Optic User’s Guide | 820-7262-10 |
Copyright © 2009 Sun Microsystems, Inc. All rights reserved.
