|
| |
| Sun Java System Identity Synchronization for Windows 1 2004Q3 Installation and Configuration Guide | |
Chapter 3
Installing CoreThis chapter explains how to use the Identity Synchronization for Windows installation program and how to install the Identity Synchronization for Windows Core component.
The information is organized into the following sections:
Before You BeginBefore starting the Identity Synchronization for Windows installation process:
- Read Chapter 2, "Preparing for Installation." This chapter contains important information, such as installation prerequisites, checklists, and administrator privilege requirements.
- A Java Runtime Environment (JRE) is not provided with this product.
If necessary, you can download a Java Development Kit from the following location:
- On Windows systems only: You must close any open Service Control Panel windows before starting Core installation, or the installation will fail.
- If you still have Identity Synchronization for Windows version 1.0 (or 1.0 SP1) installed on your machine, read Chapter 7, "Migrating to Identity Synchronization for Windows 1 2004Q3."
Note
The Identity Synchronization for Windows 1.0 uninstall program will remove the SUNWjss package if it is not registered for use by another application (other than Identity Synchronization for Windows 1.0). In particular, this situation may occur on Solaris machines if you installed a zip version of Directory Server 5.2.2, where the uninstall program removes the jss3.jar file from /usr/share/lib/mps/secv1.
If you encounter this situation as you migrate to Identity Synchronization for Windows 11 2004Q3, the installer will report that a required file is missing, and log the file name to the installation log. When this happens, you must re-install the required patches (see Sun Java System Software Requirements) and restart the installation process.
- Identity Synchronization for Windows version 1.0 installed Message Queue for you, but version 1 2004Q3 does not. You should have already installed Message Queue 3.5 SP1 Enterprise Edition.
Starting the Installation ProgramThis section explains how to download, unpack (or unzip), and run the Identity Synchronization for Windows installation program on the following platforms:
On Solaris SPARC
Use the following steps to prepare and run the Identity Synchronization for Windows installation program on a Solaris SPARC operating system:
- Log in as root.
- Create a new directory by typing # mkdir isw12004Q3, and then change (cd) to that directory.
- If you have not already done so, download the product binaries file (isw-12004Q3.sparc-sun-solaris.tar.gz) to the installation directory.
- Use the following command to unpack the product binaries file:
# gunzip -dc isw-12004Q3.sparc-sun-solaris.tar.gz | tar -xvof -
- From the isw12004Q3 directory, change to the installer directory and then type ./runInstaller.sh to execute the installation program.
On Solaris x86
Use the following steps to prepare and run the Identity Synchronization for Windows installation program on a Solaris x86 operating system:
- Log in as root.
- Create a new directory by typing # mkdir isw12004Q3, and then change (cd) to that directory.
- If you have not already done so, download the product binaries file (isw-12004Q3.x86-sun-solaris.tar.gz) to the installation directory.
- Use the following command to unpack the product binaries file:
# gunzip -dc isw-12004Q3.x86-sun-solaris.tar.gz | tar -xvof -
- From the isw12004Q3 directory, change to the installer directory and then type ./runInstaller.sh to execute the installation program.
On Windows
Use the following steps to prepare and run the Identity Synchronization for Windows installation program on a Windows operating system:
- Log in as an Administrator.
- Create a new directory by typing # mkdir isw12004Q3
- Change (cd) to the isw12004Q3 directory.
- If you have not already done so, download the product binaries file (isw-12004Q3-windows.zip) to the installation directory.
- Unzip the isw-12004Q3-windows.zip file to an empty directory.
- From the isw12004Q3 directory, cd to the installer directory and then type setup.exe to execute the installation program.
The Identity Synchronization for Windows installation wizard is displayed.
Continue to the next section for Core installation instructions.
Installing CoreThis section explains the process for installing the Identity Synchronization for Windows Core on both Solaris and Windows operating systems.
Before you install Core, you should be aware of the following requirements:
- On Solaris systems: You must have root privileges to install and run Solaris services.
Note
You must install the program as root, but after installation you can configure the software to run Solaris services as a non-root user. (See Appendix C, "Running Services as Non-Root on Solaris.")
- On Windows 2000/2003 systems: You must have Administrator privileges to install Identity Synchronization for Windows.
- You must install Core into a directory that has an existing server root managed by an Administration Server (version 5 2004Q2 or higher) or the installation program will fail. (You can install Administration Server using the Directory Server 5 2004Q2 installation program.)
Use the installation wizard to install the Identity Synchronization for Windows Core components, as follows:
- When the Welcome screen is displayed, read the information provided and then click Next to proceed to the Software License Agreement panel.
- Read the license agreement, then select
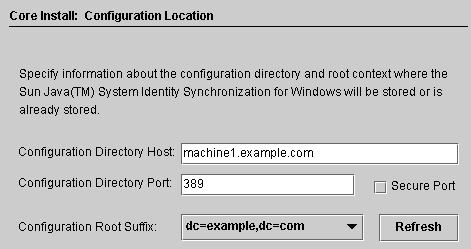
- The Configuration Location panel is displayed (Figure 3-1) so you can specify the configuration directory location.
Figure 3-1 Specifying the Configuration Directory Location
Provide the following information:
- Configuration Directory Host: Enter the fully qualified domain name (FQDN) of a Sun Java System Directory Server instance (affiliated with the local Administration Server) where Identity Synchronization for Windows configuration information will be stored.
You can specify an instance on the local machine or an instance that is running on a different machine.
Note
To avoid warnings about invalid credentials or host names, be sure to specify a host name that is DNS-resolvable to the machine on which the installation program is running.
- Configuration Directory Port: Specify the port where the configuration directory is installed. (Default port is 389.)
To enable secure communication, enable the Secure Port option and specify an SSL port. (Default SSL port is 636).
Once the program determines that the configuration directory is SSL-enabled, all Identity Synchronization for Windows components will use SSL to communicate with the configuration directory.
- Configuration Root Suffix: Select a root suffix from the menu in which to store the Identity Synchronization for Windows configuration.
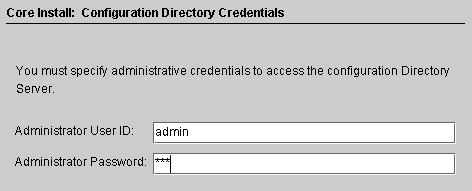
- Click Next to open the Configuration Directory Credentials panel.
Figure 3-2 Specifying Administrator’s Credentials
- Enter the configuration directory Administrator’s user ID and password.
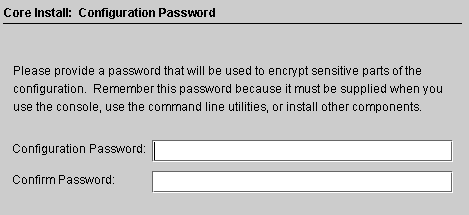
- When you are finished, click Next to open the Configuration Password panel.
Figure 3-3 Specifying a Configuration Password
- You must enter and confirm a password that will be used to encrypt sensitive configuration information, such as credentials. When you are done, click Next.
Note
Be sure you remember this password as it will be required any time you want to
For information about changing the configuration password see Using changepw.
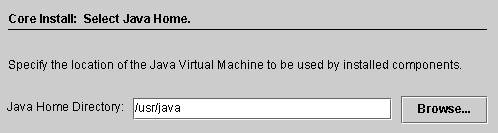
The Select Java Home panel is displayed (see Figure 3-4). The program automatically inserts the location of the Java Virtual Machine directory to be used by the installed components.
Figure 3-4 Specifying the Java Home Directory
- Verify the Java Home Directory (must be a JDK/JRE 1.4.2_04 or later):
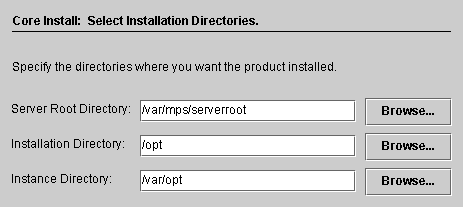
- If the location is satisfactory, click Next to proceed to the Select Installation Directories panel (Figure 3-5).
- If the location is not correct, click Browse to search for and select a directory where Java is installed, for example:
- Enter the following information in the text fields provided or click Browse to search for and select available directories:
- Server Root Directory: Specify the path and directory name of the Directory Server installation server root. The Console will be installed in this location.
Note
There is only one server root directory available on Windows operating systems, and all products will be installed in that location.
- Installation Directory (available only when you are installing Core on Solaris): Specify the path and directory name of the installation directory. Core binaries, libraries, and executables will be installed in this directory.
- Instance Directory (available only when you are installing Core on Solaris): Specify the path and directory name of the instance directory. Configuration information that changes (such as log files) will be stored in this directory.
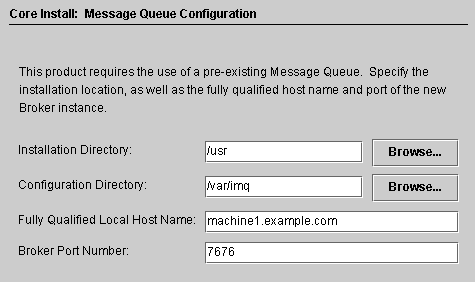
- Click Next to proceed to the Message Queue Configuration panel.
Figure 3-6 Configuring Message Queue
- Enter the following information in the text fields provided or click Browse to search for and select available directories:
- Installation Directory: Specify the path of the Message Queue installation directory.
- Configuration Directory: Specify the path and directory name of the Message Queue instance directory.
- Fully Qualified Local Host Name: Specify the fully qualified domain name (FQDN) of the local host machine. (There can only be one Message Queue broker instance running per host.)
- Broker Port Number: Specify an unused port number for the Message Queue broker to use. (Default port is 7676.)
- Click Next and the Ready to Install panel is displayed.
This panel provides information about the install, such as the directory where Core will be installed and how much space is required to install Core.
- If the displayed information is satisfactory, click Install Now to install the Core component (where the installation program installs the binaries, files, and packages).
- If the information is not correct, click Back to make changes.
An “Installing” message is displayed briefly, and then the Component Configuration panel is displayed while the installation program adds configuration data to the specified configuration Directory Server. This operation includes:
- Creating a Message Queue broker instance
- Uploading the schema to the configuration directory
- Uploading deployment-specific configuration information to the configuration directory
This operation will take several minutes and may pause periodically, so do not be concerned unless the process exceeds ten minutes. (Watch the progress bar to monitor the installation program’s status.)
- When the component configuration operation is complete, the Installation Summary panel is displayed to confirm that Identity Synchronization for Windows installed successfully.
You can click the Details button to see a list of the files that have been installed, and where they are located.
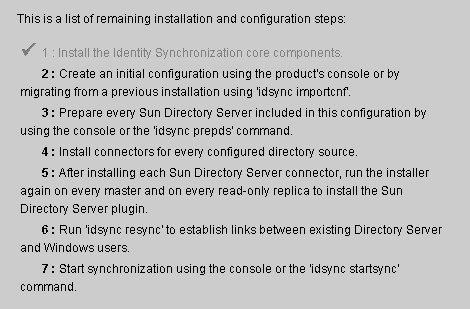
- Click Next and the program will determine the remaining steps you must perform to successfully install and configure Identity Synchronization for Windows.
A “Loading...” message, and then a Remaining Installation Steps panel each display briefly, and then the following panel (Figure 3-7) is displayed. This panel contains a “To Do” list of the remaining installation and configuration steps. (You also can access this panel from the Console’s Status tab.)
Figure 3-7 Identity Synchronization for Windows To Do List
The “To Do” panel will re-display throughout the installation and configuration process. The program greys-out all completed steps in the list.
Up to this point, the To Do list will contain a generic list of steps. After you save a configuration, the program provides a list of steps that are customized for your deployment (for example, which connectors you must install).
- After reading the list of steps, click Next and the Start Console Option panel is displayed to indicate you have finished the Core installation.
Figure 3-8 Starting the Console
- Next, you must configure the Core component, which you can do from the Sun Java System Console (the Start the Sun Java System Console option is enabled by default).
If you are migrating from Identity Synchronization for Windows version 1.0 or SP1 to Identity Synchronization for Windows 1 2004Q3, you can import an exported version 1.0 or SP1 configuration XML document using the idsync importcnf command line utility. For instructions, see Chapter 7, "Migrating to Identity Synchronization for Windows 1 2004Q3".)
- Click Finished.
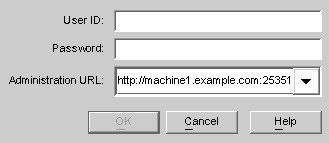
- If you elected to use the Console, the Sun Java System Console Login dialog box is displayed (see Figure 3-9).
Figure 3-9 Logging into the Console
You must enter the following information to log into the Console:
- User ID: Enter the Administrator’s user ID you specified when you installed the Administration Server on your machine.
- Password: Enter the Administrator’s password specified during Administration Server installation.
- Administration URL: Enter the Administration Server’s current URL location using the following format:
http://<hostname.your_domain.domain:port_number>
Where:
- After providing your credentials, click OK to close the dialog box.
- You will then be prompted for the configuration password. Enter the password and click OK.
When the Sun Java System Server Console window is displayed, you can start configuring Core. Continue to Chapter 4, "Configuring Core Resources" for instructions.