|
| |
| Sun Java System Identity Synchronization for Windows 1 2004Q3 Installation and Configuration Guide | |
Chapter 4
Configuring Core ResourcesYou must initially configure the Core resources immediately after installing the Identity Synchronization for Windows Core (as described in Chapter 3).
This chapter explains how to add and configure these resources using the Console, and is organized into the following sections:
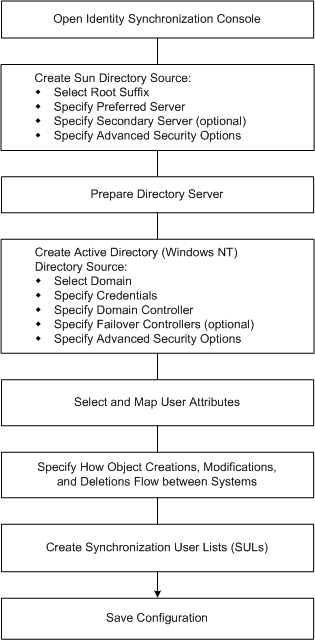
Configuration OverviewFigure 4-1 illustrates the steps you will use to configure the Core resources for your deployment.
Figure 4-1 Configuring Core Resources for Your Deployment
Opening the Identity Synchronization for Windows Console
Note
If you have not logged into the Sun Java System Server Console yet, return to (more...) for instructions.
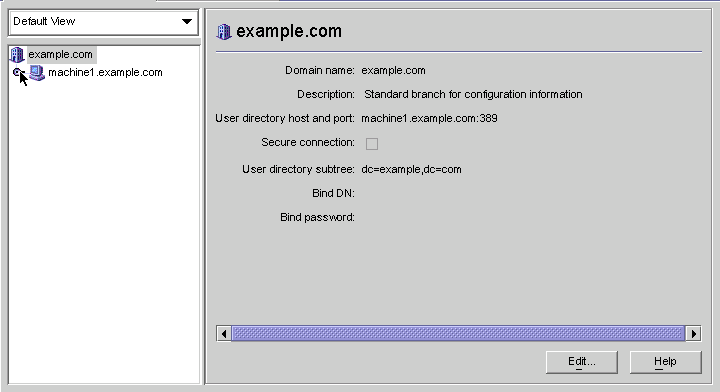
The Sun Java System Server Console window (Figure 4-2) lists all of the servers and resources under your control and provides information about your system.
Figure 4-2 Sun Java System Server Console
To open the Identity Synchronization for Windows Console:
- On the Servers and Applications tab, select the hostname node in the navigation tree that contains the Server Group to which the Identity Synchronization for Windows instance belongs.
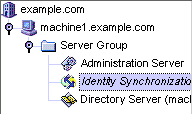
- Expand the Server Group node and select the Identity Synchronization for Windows node (see Figure 4-3).
Figure 4-3 Expanding the Server Group
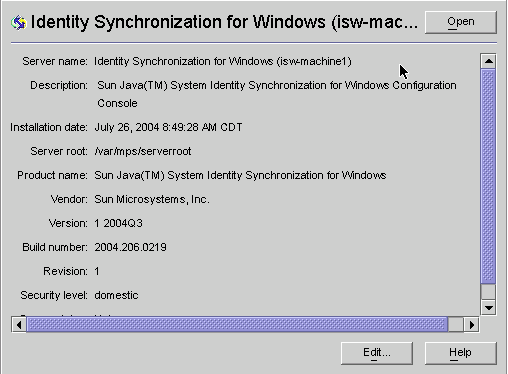
The information panel changes to provide information about Identity Synchronization for Windows and your system (for example, see Figure 4-4).
Figure 4-4 Identity Synchronization for Windows Information Panel
- Click the Open button (located in the upper-right corner of the panel).
Note
The Edit button (located at the bottom of the panel) enables you to edit the Server name and Description.
- You will be prompted to enter the configuration password that you specified during Core installation (see (more...) ). Enter the password and click OK.
The Identity Synchronization for Windows Console is displayed, as follows:
Figure 4-5 Identity Synchronization for Windows Console: Tasks Tab
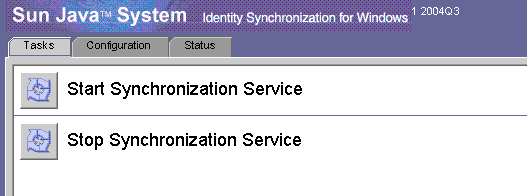
This window contains three tabs and a Status Bar:
- Tasks (Default): Use this tab to stop and start synchronization between your Sun and Windows systems. (Information about starting and stopping services is provided in Chapter 6, "Synchronizing Existing Users.")
- Configuration: Use this tab to configure your systems for synchronization.
- Status: Use this tab to do the following:
- Monitor the status of system components (such as Connectors).
- View the audit and error logs generated by Identity Synchronization for Windows during configuration and synchronization.
- Update and check the installation and configuration To Do list.
- Status Bar: Check this location for a brief system status.
Note
For more information about the Status tab, see Chapter 10.
- Select the Configuration tab (see Figure 4-6).
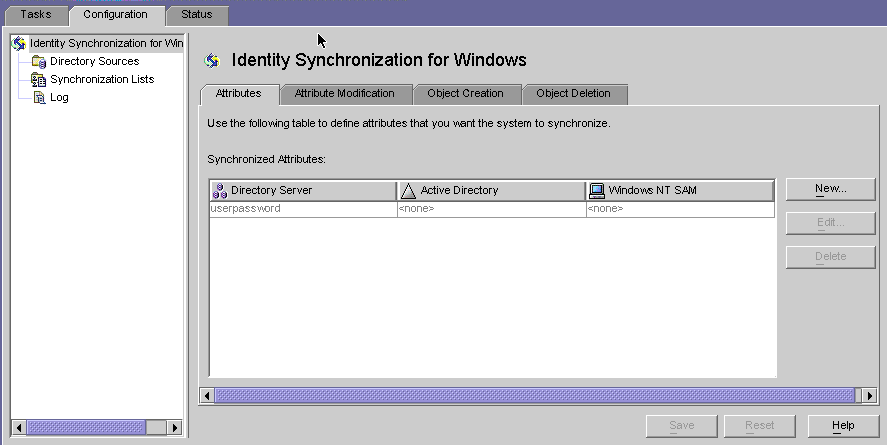
Figure 4-6 Identity Synchronization for Windows Console: Configuration Tab
The Configuration panel consists of the following tabs:
- Attributes: Use this tab to specify the attributes you want to synchronize between systems.
- Attribute Modification: Use this tab to specify how passwords, attribute modifications, and object disablements are propagated between systems.
- Object Creation: Use this tab to specify how newly created passwords and attributes are propagated between systems, and to specify initial values for the objects created by Identity Synchronization for Windows during synchronization.
- Object Deletion: Use this tab to specify how deleted passwords and attributes are propagated between systems.
You must configure at least one Sun Java System Directory Server directory source, and at least one Windows server directory source (either Active Directory or Windows NT). Proceed to the next section for instructions.
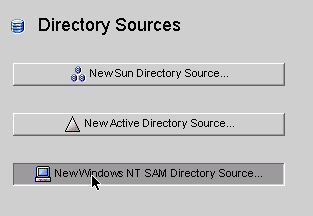
Creating Directory SourcesYou must create directory sources in the following order (based on which sources you will be synchronizing):
Note
At minimum, you must configure at least one Sun Java System Directory source and at least one Windows directory source (Active Directory and/or NT SAM).
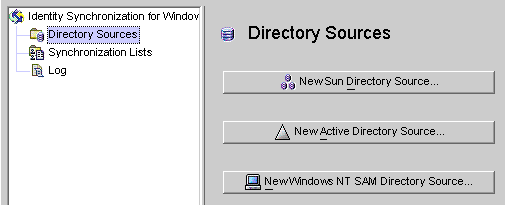
Select the Directory Sources node in the navigation tree and the Directory Sources panel is displayed (see Figure 4-7).
Figure 4-7 Accessing the Directory Sources Panel
Creating a Sun Java System Directory Source
Use the following steps to create a new Sun Java System directory source:
- Click the New Sun Directory Source button to invoke the Define Sun Java System Directory Source wizard.
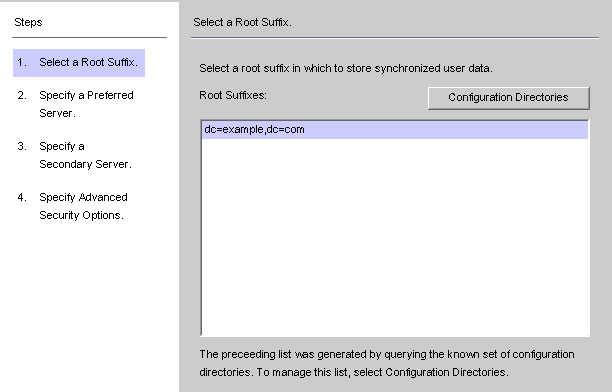
Figure 4-8 Selecting a Root Suffix
The program queries a known set of configuration directory sources and displays existing root suffix (also referred to as naming contexts) in the list pane.
By default, the program knows about the configuration directory where you installed the product, and the root suffixes known by the configuration directory will be listed in the list pane.
- Select the root suffix where your users are located from the list pane. (If several root suffixes are listed, select the one where your users are located.) Click Next and proceed to Step 3.
If the root suffix you want to synchronize with is not affiliated with a configuration directory registered with Identity Synchronization for Windows, then you must specify a new configuration directory, as follows:
- Click the Configuration Directories button to specify a new configuration directory.
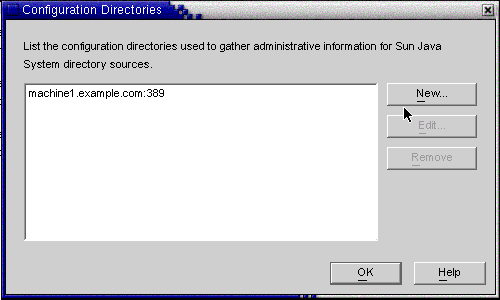
- When the Configuration Directories dialog box is displayed (Figure 4-9), click the New button to open the New Configuration Directories dialog box.
Figure 4-9 Selecting a New Configuration Directory
- Enter the following information, and then click OK to save your changes and close the dialog box.
- Host: Enter the fully qualified host name.
For example: machine1.example.com
- Port: Enter a valid, unused LDAP port number. (Default is 389.)
Enable the This port uses SSL box if Identity Synchronization for Windows is using an SSL (Secure Socket Layer) port to communicate with the configuration directory.
- User DN: Enter your Administrator’s (bind) distinguished name.
For example:
uid=admin,ou=Administrators,ou=TopologyManagement,o=NetscapeRoot
- Password: Enter your Administrator’s password.
The wizard will query the specified configuration directory to determine all of the directory servers managed by that directory.
Note
Identity Synchronization for Windows only supports one root suffix per Sun Java System Directory Server source.
- Click OK to close the Configuration Directories dialog box and the newly selected configuration directory’s root suffixes are displayed in the list pane.
By default, Directory Server creates a root suffix whose prefix corresponds to the components of the machine’s DNS domain entry. It uses the following suffix:
dc=<your_machine’s_DNS_domain_name>
That is, if your machine domain is example.com, then you should configure the suffix dc=example, dc=com for your server. The entry named by the chosen suffix must already exist in the directory.
- Select the root suffix, and click Next.
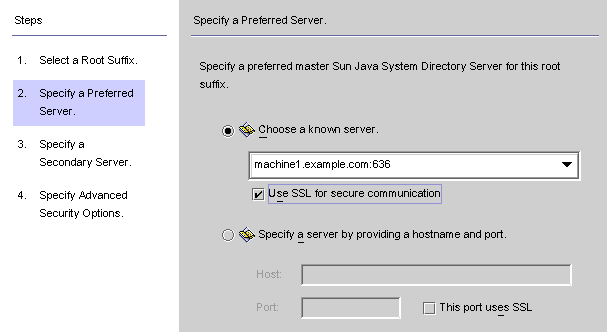
The Specify a Preferred Server panel is displayed (see Figure 4-10).
Figure 4-10 Specifying a Preferred Server
Identity Synchronization for Windows uses the preferred Directory Server to detect changes made at any Directory Server master. The preferred server also acts as the primary location where changes made on Windows systems are applied to the Sun Java System directory system.
If the preferred server fails, the secondary server can store these changes until the preferred server comes back online.
- Use one of the following methods to select a preferred server:
- Enable the Choose a known server button, and then select a server name from the drop-down list.
Enable the Use SSL for secure communication box if you want the Directory Server to communicate using SSL. However, if you enable this feature there are some additional setup steps you must perform after installation. For more information, see Enabling SSL in Directory Server.
- Enable the Specify a server by providing a fully qualified hostname and port button, and then type the server’s Host name and Port into the text fields provided.
Enable the This port uses SSL box if the port you specified uses SSL.
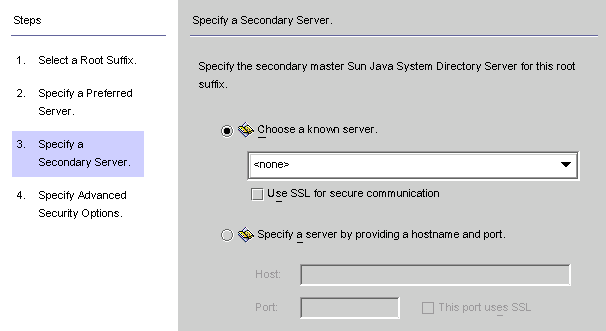
- Click Next and the Specify a Secondary Server panel is displayed.
Figure 4-11 Specifying a Secondary Server
- To specify a secondary Directory Server, select a name from the drop-down list or enter the information manually (use the same procedures you used to specify the preferred server), and then click Next.
Note
The Directory Server must be running or the server name will not appear in the drop-down list. If the server is down temporarily, enter the server information manually.
- If you do not want to use a secondary server, just click Next.
Note
- Do not use the same host name and port for both the preferred and the secondary servers in a Sun directory source.
- If you enable the Secure Port feature, there are additional setup steps you must perform after installation. For more information, see Enabling SSL in Directory Server.
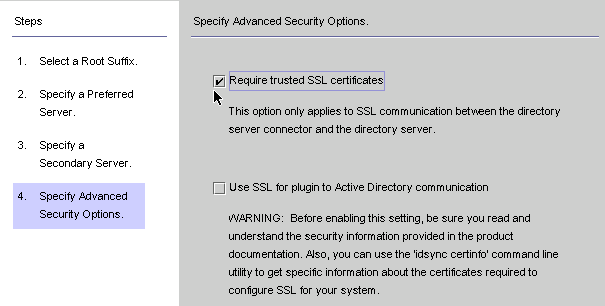
The Specify Advanced Security Options panel is displayed, as follows:
Figure 4-12 Specifying Advanced Security Options
As part of the installation process, you must install the Directory Server Plugin on each Directory Server (any master, replica, or hub) where users will bind or where passwords will be changed.
When the Directory Server Plugin synchronizes passwords and attributes to Active Directory, it must bind to Active Directory to search for users and their passwords. In addition, the Plugin writes log messages to the central log and into the Directory Server’s log. By default these communications are not accomplished over SSL.
- If you want to use secure SSL communication, read the warning notes provided, and then enable one or both of the following options:
- To use secure SSL communication between the Directory Server Plugin and Active Directory, enable the Use SSL for Plugin to Active Directory communication box.
Note
- If you enable these features, then additional setup is required after installation. See Chapter 11, "Configuring Security" for more information.
- You can use the use the idsync certinfo command line utility to determine which certificates you must add for each Directory Server Plugin and/or Connector certificate database. See Using certinfo
- If your primary and secondary Directory Servers are part of a multimaster replication (MMR) deployment, refer to Appendix E, "Installation Notes for Replicated Environments" for more instructions.
- When you are finished with the Specify Advanced Security Options panel, click Finish.
The program adds the selected directory sources (s) to the navigation tree under Directory Sources and the Prepare Directory Server Now? dialog is displayed.
You must prepare the Directory Server to be used by Identity Synchronization for Windows. You can choose to perform this task now, or you can do it later — but you must prepare the Directory Server before you install the Connectors. (Instructions for installing Connectors are provided in Chapter 5).
- If you want to prepare the Directory Server now, click Yes to open the wizard, and then proceed to the next section, Preparing the Directory Server.
- If you prefer to perform this process later, click No and proceed to Creating an Active Directory Source.
Preparing the Directory Server
This section explains how to prepare the Sun Java System Directory Server source for use by Identity Synchronization for Windows.
Preparing the Directory Server
Note
- As an alternative to using the Console, you can use the idsync prepds command line utility to prepare the Directory Server. For more information, see Using prepds.
- To prepare the Directory Server using the idsync prepds command line utility, you must know which hosts and suffixes you will be using and you must have Directory Manager’s credentials.
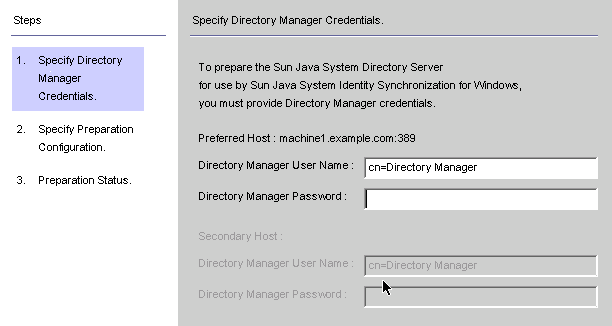
You can use the Prepare Directory Server wizard (Figure 4-13) to prepare the Directory Server.
Figure 4-13 Entering Your Directory Manager Credentials
To access this wizard, use one of the following methods:
To prepare your Directory Server source:
- Enter the following credentials for the Directory Manager account.
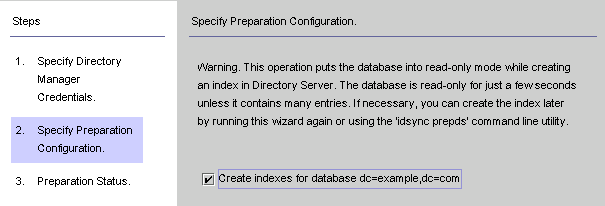
- When you are done, click Next and the Specify Preparation Configuration panel is displayed (Figure 4-14).
Figure 4-14 Specifying the Preparation Configuration
Read the warning, and then decide whether to create the Directory Server indexes now or later.
- The Preparation Status panel is displayed to provide information about the Directory Server preparation progress.
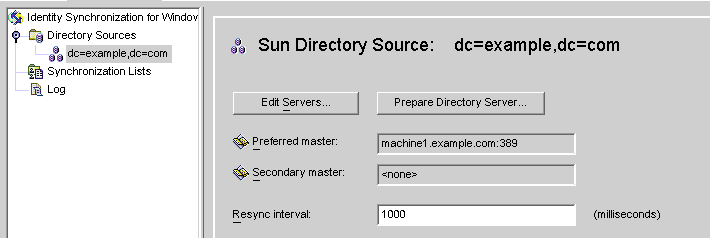
- Return to the Configuration tab in the Console. Select the Sun Directory source node in the navigation tree to view the Sun Directory Source panel (see Figure 4-15).
Figure 4-15 Sun Directory Source Panel
From this panel, you can perform the following tasks:
- Edit servers: Click this button to reopen the Define Sun Java System Directory Source panel where you can change any of the server configuration parameters. If necessary, review the instructions provided for Creating a Sun Java System Directory Source.
- Prepare Directory Server: Click this button and follow the instructions for Preparing the Directory Server to prepare a Directory Server.
If anything changes on the Directory Server after you initially prepare the server (for example, if an index is deleted or you lose the Retro-Changelog database), you can re-prepare the server.
- Resync interval: Specify how often you want the Directory Server Connector to check for changes. (Default is 1000 milliseconds.)
- Add a Directory Server directory source for each user population in your Sun Java System Directory Server enterprise that you want to synchronize.
When you are finished, you must create at least one Windows directory source:
- To create an Active Directory directory source, continue to the next section, Creating an Active Directory Source.
- To create a Windows NT directory source, continue to Creating a Windows NT SAM Directory Source.
Creating an Active Directory Source
You should add an Active Directory directory source for each Windows domain in your network that you want to synchronize.
Each Active Directory deployment has at least one global catalog that knows about all the global information across all Active Directory domains.
Note
It is possible for each Active Directory server to be a global catalog and a deployment can have multiple global catalogs, but you only need to specify one global catalog.
Perform these steps if there are Windows Active Directory servers in your network:
- Select the Directory Sources node in the navigation tree, and then click the New Active Directory Source button on the Directory Sources panel.
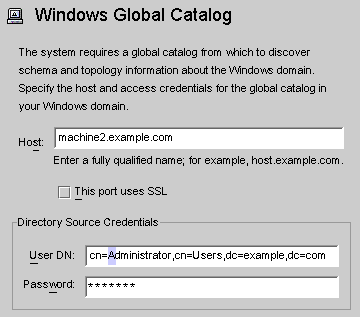
The Windows Global Catalog dialog box is displayed (Figure 4-16).
Figure 4-16 Windows Global Catalog
- Enter the following information and then click OK:
- Host: Enter the fully qualified host name of the machine that holds the global catalog for the Active Directory forest.
For example: machine2.example.com
- This port uses SSL: Enable this option if Identity Synchronization for Windows is using an SSL port to communicate with the global catalog.
- User DN: Enter your fully qualified Administrator’s (bind) distinguished name. (Any credentials that enable you to browse the schemas and determine which Active Directory domains are available on your system will suffice.)
For example: cn=Administrator,cn=Users,dc=example,dc=com
- Password: Enter a password for the specified user.
- The Define Active Directory Source wizard is displayed, as follows:
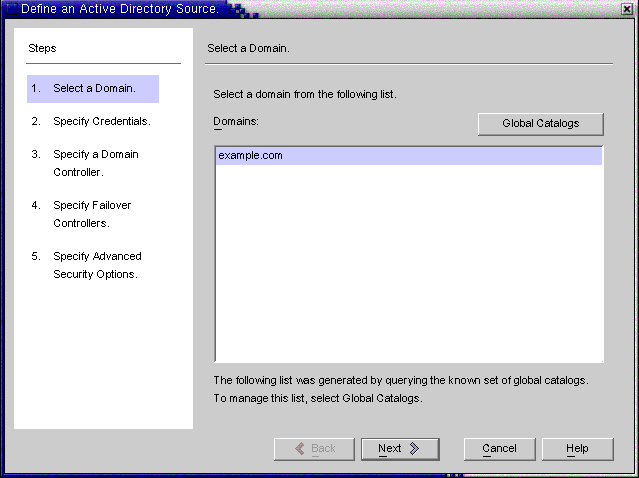
Figure 4-17 Define an Active Directory Source Wizard
This wizard queries the Active Directory global catalog to determine what other domains exist, and displays those domains in the Domains list pane.
- Select a name from the list pane to specify an Active Directory domain, click OK, and proceed to Step 5.
If the domain you want to use is not displayed in the list, you must add the global catalog that knows about that domain using the following steps:
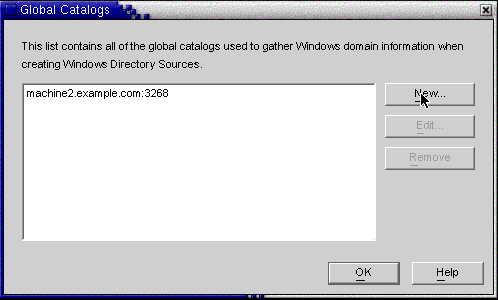
- Click the Global Catalogs button and the Global Catalogs wizard is displayed (Figure 4-18).
Figure 4-18 Specifying a New Global Catalog
- Click the New button.
- When the Windows Global Catalog dialog box is displayed, provide the global catalog’s Host name and your Directory Source credentials (as described on (more...) ), and then click OK
- The new global catalog and port, are displayed in the Global Catalogs list panel. Select the catalog name, and then click OK.
- Repeat these steps if you want to add more global catalogs (domains) to the system.
- When you are done, click the Next button in the Select a Domain pane.
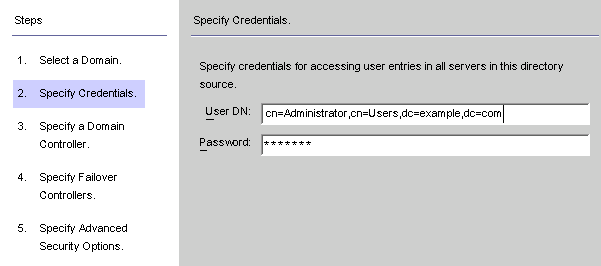
- When the Specify Credentials panel is displayed, review the value in the User DN field.
Figure 4-19 Specifying Credentials for This Active Directory Source
If the program did not automatically enter the Administrator’s distinguished name in the User DN field (or you do not want to use the Administrator’s credentials) enter a User DN and password manually.
When configuring an Active Directory source, you must provide a user name and password that the Active Directory Connector can use to connect to Active Directory.
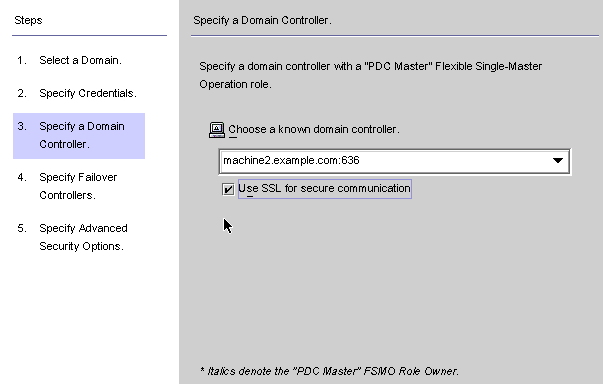
- Click Next to open the Specify a Domain Controller panel.
Figure 4-20 Specifying a Domain Controller
Use this panel to select a controller to synchronize within the specified domain. (The domain controller is similar in concept to a Directory Server’s preferred server.)
If the selected Active Directory domain has multiple domain controllers, select the domain controller with the Primary Domain Controller FSMO role for synchronization.
By default, password changes made at all domain controllers will be replicated immediately to the Primary Domain Controller FSMO role owner, and if you select this domain controller, Identity Synchronization for Windows will synchronize these password changes immediately to the Directory Server.
In some deployments, the AvoidPdcOnWan attribute may be set in the Windows registry because there is a significant network “distance” to the PDC, which will delay synchronization significantly. (See Microsoft Knowledge Base Article 232690 for more information.)
- Select a domain controller from the drop-down list.
- If you want the Identity Synchronization for Windows Connector to communicate with the domain controller over a secure port, enable the Use a Secure Port box.
Note
The program automatically installs the CA certificate in the Active Directory Connector if you are using Microsoft certificate server. If you are not, then you must manually add the CA certificate in the Active Directory Connector (see Enabling SSL in the Active Directory Connector). Also, if you change your flow settings after initial configuration these procedures apply as well.
- When you are done, click Next.
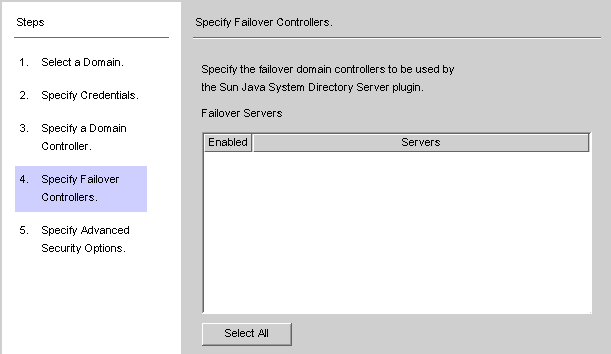
The Specify Failover Controllers panel is displayed (see Figure 4-21). You can use this panel to specify any number of failover domain controllers.
Figure 4-21 Specifying Failover Controllers
The Active Directory Connector communicates with only one Active Directory domain controller, and Identity Synchronization for Windows does not support failover changes applied by that Connector. However, the Directory Server Plugin will communicate with any number of domain controllers when validating password changes to Directory Server.
If Directory Server tries connecting to an Active Directory domain controller and that domain controller is not available, Directory Server will iteratively try connecting to the failover domain controller(s) specified.
- Select one or more of the server names listed in the Failover Servers list pane (or click the Select All button to specify all of the servers in the list), and then click Next.
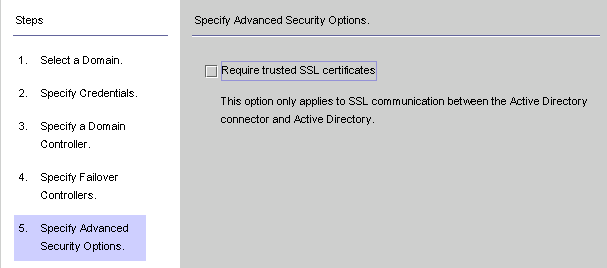
- The Specify Advanced Security Options panel is displayed (Figure 4-22).
The Require trusted SSL certificates option is active (available for selection) only if you enabled the Use SSL for Secure Communication box on the Specify a Domain Controller panel (see Figure 4-20).
Figure 4-22 Specifying Advanced Security Options
- If the Require trusted SSL certificate box is disabled (Default setting), the Active Directory Connector will connect to Active Directory over SSL and does not verify that it trusts the certificates passed by Active Directory.
Disabling this option simplifies the set-up process because you do not have to put an Active Directory Certificate in the Active Directory certificate database.
- If you enable the Require trusted SSL certificate box, the Active Directory Connector will connect to Active Directory over SSL and it must verify that it trusts the certificates passed by Active Directory.
Note
You must add Active Directory Certificates to the Active Directory Connector’s certificate database. For instructions, see Adding Active Directory Certificates to the Connector’s Certificate Database.
- When you are finished with the Advanced Security Options panel, click the Finish button.
The program adds the newly specified Active Directory directory source to the navigation tree under Directory Sources.
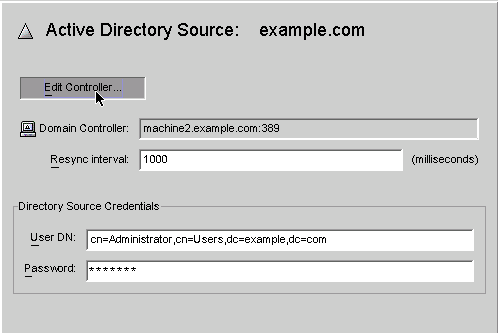
- Select the Active Directory directory source node to view the Active Directory Source panel (Figure 4-23).
Figure 4-23 Active Directory Source Panel
From this panel, you can perform the following tasks:
- Edit Controllers: Click this button to reopen the Specify a Domain Controller panel where you can change any of the domain controller configuration parameters. If necessary, review the instructions provided for Creating an Active Directory Source.
- Resync Interval: Specify how often you want the Active Directory Connector to check for changes. (Default is 1000 milliseconds.)
- Directory Source Credentials: Change the specified User DN and/or password.
When you are finished creating Active Directory directory sources:
- To create a Windows NT directory source, continue to the next section, Creating a Windows NT SAM Directory Source.
- To create and map attributes to be synchronized, continue to Selecting and Mapping User Attributes.
Creating a Windows NT SAM Directory Source
To deploy Identity Synchronization for Windows on a Windows NT platform, designate the NT SAM directory source as follows:
- Select the Directory Sources node in the navigation tree, and then click the New Windows NT SAM Directory Source button.
Figure 4-24 Directory Sources Panel
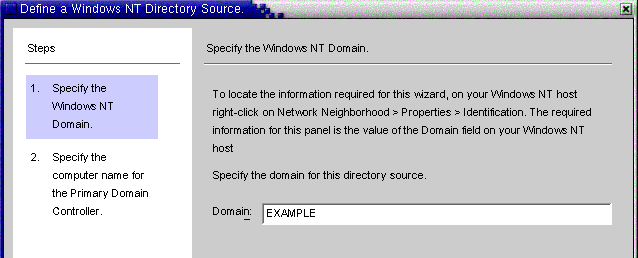
- When the Define a Windows NT SAM Directory Source panel is displayed (see Figure 4-25), follow the instructions for locating the Windows NT domain name, and enter the unique NT directory source domain name in the Domain field. When you are done, click Next.
Figure 4-25 Specifying a Windows NT SAM Domain Name
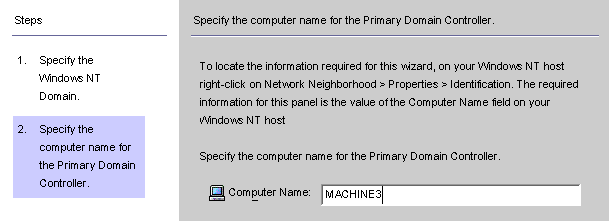
- When the Specify the Computer Name for the Primary Domain Controller panel is displayed (see Figure 4-26), follow the instructions for locating the Primary Domain Controller computer name, and enter the information in the Computer Name field.
Figure 4-26 Specifying a Name for the Primary Domain Controller
- Click Finish.
The program adds the newly specified Windows NT SAM directory source to the navigation tree under Directory Sources. Select the new directory source node to view the Windows NT SAM Source panel (see Figure 4-27).
Figure 4-27 Windows NT SAM Directory Source Panel
From this panel, you can perform the following tasks:
- Edit: Click this button to reopen the Specify a Domain Controller panel where you can change any of the domain controller configuration parameters. If necessary, review the instructions provided for Creating an Active Directory Source.
- Resync interval: Specify how often you want Identity Synchronization for Windows to check for changes made on Windows NT. (Default is 1000 milliseconds.)
- Add a Windows NT directory source for each Windows NT machine in your network.
When you are finished creating Windows NT SAM directory sources, you are ready to create and map attributes to be synchronized, continue to Selecting and Mapping User Attributes for instructions.
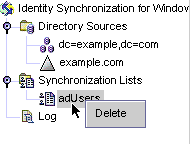
Deleting Directory Sources
Note
If you have already installed the connector associated with a directory source, you must uninstall the connector before you delete the directory source.
If you must delete a directory source, use the following steps:
- Before you can delete the directory source, you must first delete all of the Synchronization User Lists (SULs) associated with that source.
- Right-click the directory source node listed under Directory Sources in the navigation tree.
- When the pop-up menu displays, select Delete to remove the directory source.
Selecting and Mapping User AttributesAfter you have created and configured your Directory Server and Windows directory sources, you must decide which user attributes you want to synchronize and then map those attributes between systems.
The information in this section is organized as follows:
Selecting and Mapping Attributes
There are two types of attributes:
- Significant: Attributes that are synchronized between systems when you create or modify user entries.
- Creation: Attributes that are synchronized between systems only when you create user entries.
Some creation attributes are mandatory based on the schema used for each platform. These attributes are required for password synchronization and they must be mapped to Sun attributes to successfully create a user object class entry on the Active Directory server.
This section explains how to select user attributes for synchronization and how to map these attributes (one-to-one) so that when you specify an attribute for Directory Server the equivalent attribute will display in your Active Directory and/or Windows NT environment (and vice versa), and the companion Windows attributes will have their values synchronized.
To select and map attributes for synchronization:
- Select the Identity Synchronization for Windows node at the top of the navigation tree (see Figure 4-29).
Figure 4-29 Attributes Tab
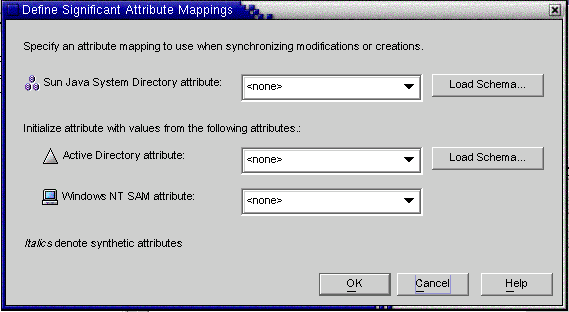
- Select the Attributes tab and then click the New button.
The Define Significant Attribute Mappings dialog box is displayed (Figure 4-30). Use this dialog box to map attributes from Directory Server to your Windows Systems (Active Directory and/or Windows NT).
Figure 4-30 Defining Significant Attribute Mappings
Note
Which creation attributes are mandatory for Directory Server (or for Active Directory) will depend on the objectclass configured for your Sun-side (or Active Directory-side) user entries.
- Select an attribute from the Sun Java System attribute drop-down list
(for example cn), and then select the equivalent attribute from the Active Directory attribute and/or Windows NT SAM attribute drop-down menus.- When you are finished, click OK.
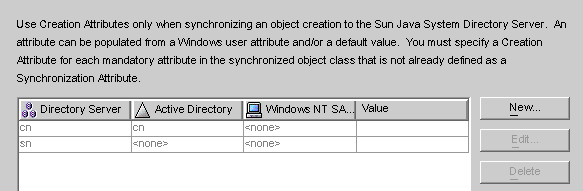
A finished Synchronized Attributes table might look something like the following example, which shows the userpassword, cn, and telephonenumber Directory Server attributes mapped to unicodepwd, cn, and telephonenumber Active Directory attributes.
Figure 4-31 Completed Synchronized Attributes Table
Note
The program automatically uses inetOrgPerson as the default objectclass for Sun Java System Directory Server, and you loaded the Active Directory schema when you specified the global catalog. So you do not use the Load Schema buttons unless you want to change the default schema.
If you want to change the default schema source, see Changing the Schema Source for instructions.
Creating Parameterized Default Attribute Values
Identity Synchronization for Windows allows you to create parameterized default values for attributes using other creation or significant attributes.
To create a parameterized default attribute value, you embed an existing creation or significant attribute name — preceded and followed by percent symbols (%<attribute_name>%) — in an expression string. For example, homedir=/home/%uid% or cn=%givenName% %sn%.
When you create these attribute values:
- You can use multiple attributes in a creation expression (cn=%givenName% %sn%).
- If A=%B%, then B can have one default value only.
- You can use the backslash symbol (\) for quoting (for example, diskUsage=0\%).
- Do not use expressions that have cyclic substitution conditions (for example,
if you specify description=%uid%, you cannot use uid=%description%..)Changing the Schema Source
The program automatically provides default schema sources, but allows you to change the default schema.
Use the following procedure to change the default schema source:
- Click the Load Schema button on the Define Significant Attribute Mappings dialog box.
The Select Schema Sources panel is displayed (Figure 4-32).
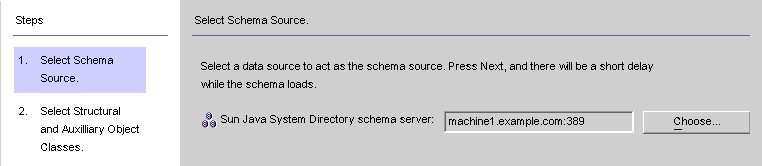
Figure 4-32 Selecting Schema Sources
Use this panel to specify from which Sun Java System Directory Server schema server you want to read the schema. This schema contains the object classes that are available on your system, and object classes define which attributes are available for users on your system.
The program adds your configuration directory to the Sun Java System Directory schema server field by default.
- To select a different server, click the Choose button.
The Select a Sun Schema Host dialog box is displayed. This dialog box contains a list of the configuration directories that gather administrative information about your directory sources.
From this dialog box, you can:
- Create new configuration directories and add them to the list.
Click New, and when the New Configuration Directory dialog box displays; specify a Host, Port, User DN, and Password. Click OK when you are done.
- Edit existing directories.
Click Edit, and when the Edit Configuration Directory dialog box displays, you can change the Host, Port, User DN, and/or Password. Click OK when you are done.
- Remove directories from the list.
Select a directory name from the list and then click the Remove button.
- Select a server from the list and click OK when you are done. (Generally, one of your Sun synchronization host(s) is a good choice as a schema source.)
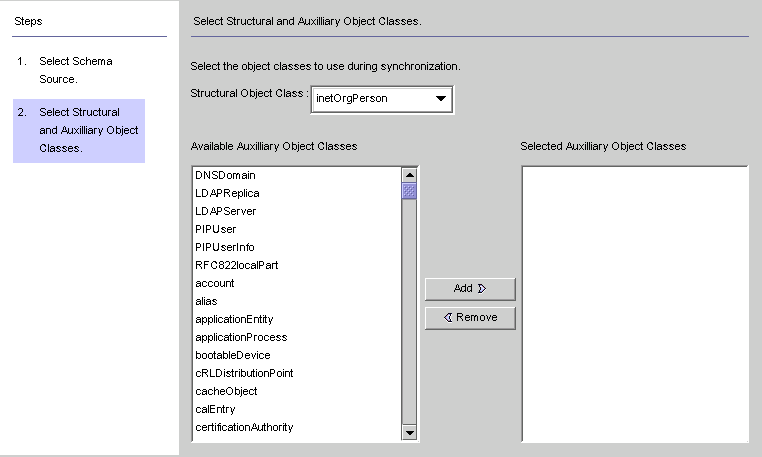
- Click the Next button and the Select Structural and Auxiliary Object Classes panel is displayed (Figure 4-33).
Figure 4-33 Selecting Structural and Auxiliary Object Classes
Use this panel to specify the object classes to synchronize, as follows:
- Structural Object Class: Every entry that is created or synchronized from the selected Directory Server must have at least one structural object class.
- Auxiliary Object Classes: These object classes augment the selected structural class and provide additional attributes for synchronization.
To specify structural and auxiliary object classes:
- Select a structural object class from the drop-down list. (Default is inetorgperson.)
- Select one or more object classes from the Available Auxiliary Object Classes list pane, and then click Add to move your selection(s) to the Selected Auxiliary Object Classes list pane.
The selected object class(es) determine which Directory Server source attributes will be available for selection as significant or creation attributes.
The object class(es) also determine the mandatory creation attributes.To delete selections from the Selected Auxiliary Object Classes list, click the object class name and then click the Remove button.
- When you are done, click Finish and the program loads the schema and selected object classes.
Propagating User Attributes Between SystemsAfter you create and map the user attributes you want to synchronize, you must tell Identity Synchronization for Windows how to propagate (flow) the attribute creations, modifications, and deletions between your Sun and Windows Systems.
By default, Identity Synchronization for Windows
This section explains how to configure attribute synchronization between systems. The information is organized as follows:
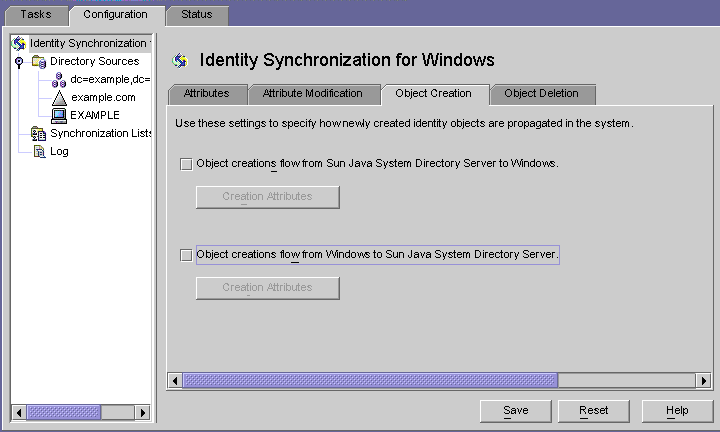
Specifying How Object Creations Flow
Use the following steps to specify how object creations should flow between Directory Server and Active Directory systems:
- Click the Object Creation tab.
Figure 4-34 Selecting and Propagating Creations
- You can enable or disable the flow of creations as follows:
- Enable Object creations flow from Sun Java System Directory Server to Windows to propagate creations from the Directory Server environment to your Windows servers.
- Enable Object creations flow from Windows to Sun Java System Directory Server to propagate creations from the Windows environment to your Directory Servers.
- Enable both options for bidirectional flow.
- Disable both options to prevent user creations from propagating from one system to the other. (Default)
- To add, edit, or delete creation attributes to synchronize between systems, click the Creation Attributes button located under the selected option(s).
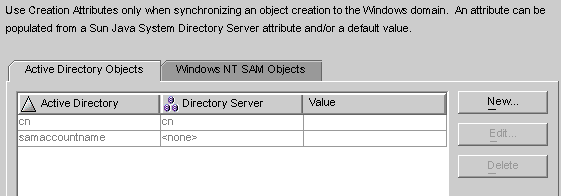
The Creation Attribute Mappings and Values dialog box displays
(see Figure 4-35 and Figure 4-36).Figure 4-35 Creation Attributes Mappings and Values: Directory Server to Windows
Figure 4-36 Creation Attributes Mappings and Values: Windows to Directory Server
You can use either dialog box to do the following:
- Specify new creation attributes ((more...) )
Note
To satisfy schema constraints regarding required attributes for user object classes, you may have to specify additional attributes to flow through the system during a user creation.
Additional attributes are not necessary if you specified the required attributes as modification attributes (as described in Selecting and Mapping User Attributes.
- Edit existing attributes (see (more...) )
- Remove existing attributes (see (more...) )
Specifying New Creation Attributes
The following instructions explain how to add and map creation attributes from Active Directory to Directory Server. (The procedure for adding and mapping creation attributes flowing from Directory Server to Windows and from Windows to Directory Server is similar.)
- Click the New button in the Creation Attribute Mappings and Values dialog box.
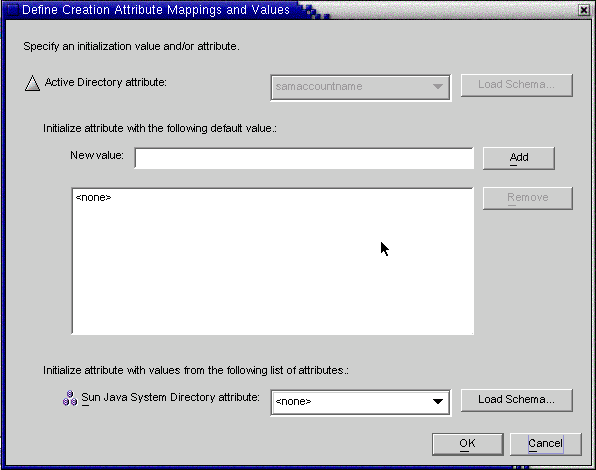
The Define Creation Attribute Mappings and Values dialog box is displayed (Figure 4-37).
Figure 4-37 Defining Creation Attribute Mappings and Values
- Select an attribute value from the Active Directory attribute drop-down list.
Figure 4-38 Selecting a New Active Directory Attribute
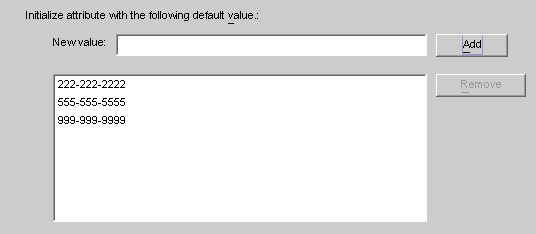
Identity Synchronization for Windows allows you to initialize an attribute with multiple values — if the attribute itself accepts multiple values.
For example, if your company has three fax telephone numbers, you can specify the facsilimiletelephonenumber attribute for both Sun Java System Directory Server and Active Directory, and specify the three numbers.
You must know which attributes will accept multiple values. If you try adding multiple values to an attribute that does not accept them, an error will result during runtime when the program attempts to create the object.
- Enter a value in New value field and click Add.
The program adds the attribute value to the list pane. Repeat this step as many times as necessary to add multiple attribute values.
Figure 4-39 Specifying Multiple Values for a Creation Attribute
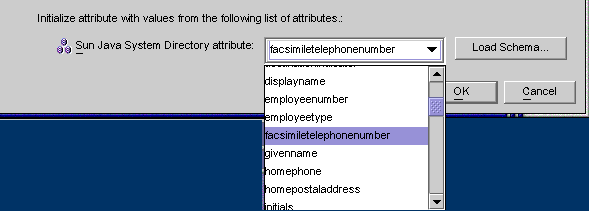
- To map the attribute to Directory Server, select an attribute name from the Directory Server attribute drop-down list.
Figure 4-40 Mapping the Directory Server Attribute
- When you are finished, click OK.
Based on the example, the finished Creation Attributes and Mappings table would look like the one in the following figure:
Figure 4-41 Completed Creation Attributes and Mappings Table
- To designate additional attributes, repeat these steps.
Editing Existing Attributes
To edit any of the creation attributes mapping or values,
- Select the Object Creation tab, and click on the Creation Attributes button located under the selected creation option.
- When the Creation Mappings and Values dialog box is displayed, select the attribute from the table, and then click the Edit button.
The Define Creation Mappings and Values dialog box is displayed.
- Use the drop-down menus to change the existing mapping between Directory Server and Active Directory (or Windows NT).
For example, if you have Sun Java System Directory Server’s homephone attribute mapped to Active Directory’s othertelephone attribute. You could use the Active Directory attributes drop-down list to change the mapping to homephone.
- You can also add or remove attribute values:
- When you are done, click OK to apply your changes and close the Define Creation Mappings and Values dialog box.
- Click OK again to close the Creation Mappings and Attributes dialog box.
Removing Attributes
To remove creation attributes mappings or values,
- Select the Object Creation tab, and click the Creation Attributes button located under the selected creation option.
- When the Creation Mappings and Values dialog box is displayed, select the attribute from the table, and then click the Delete button.
The attribute is removed from the table immediately.
- When you are done, click OK to close the Creation Mappings and Attributes dialog box.
Specifying How Object Modifications Flow
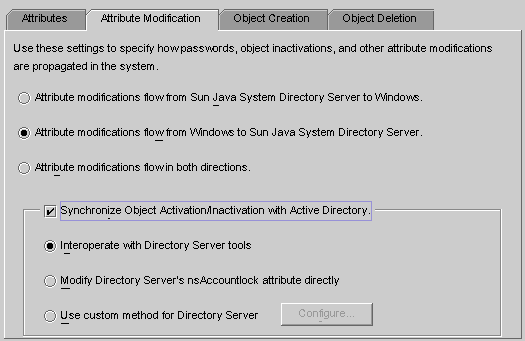
Use the Attribute Modification tab (Figure 4-42) to control how modifications made to user attributes and passwords will be propagated (flow) between your Sun and Windows systems.
Figure 4-42 Attribute Modification Tab
You use this tab to configure the following:
- Specify the direction in which modifications flow between Directory Server and Windows directory sources.
- Control whether object activations and inactivations (enables and disables on Active Directory) will be synchronized between Directory Server and Active Directory directory sources, and specify the method in which user accounts are activated and inactivated.
Specifying Direction
Select one of the following buttons to control how changes made in the Directory Server and Windows environments will be propagated between systems.
- Attribute modifications flow from Sun Java System Directory Server to Windows: Propagates changes made in the Directory Server environment to your Windows servers.
- Attribute modifications flow from Windows to Sun Java System Directory Server (Default): Propagates changes made in the Windows environment to your Directory Servers.
- Attribute modifications flow in both directions: Propagates changes bidirectionally (from one environment to the other environment).
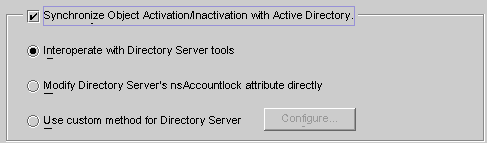
Configuring and Synchronizing Object Activations and Inactivations
If you enable the Synchronize Object Activations/Inactivations with Active Directory box (see Figure 4-43) you can synchronize object activations and inactivations (known as enables and disables on Active Directory) between Directory Server and Active Directory directory sources.
Figure 4-43 Synchronizing Object Activations and Inactivations
To synchronize object activations/inactivations:
- Enable the Synchronize Object Inactivations between Directory Server & Active Directory box.
- Enable one of the following buttons to specify how Identity Synchronization for Windows will detect and synchronize object activations and inactivations:
- Interoperate with Directory Server tools (see (more...) )
- Modify Directory Server’s nsAccountLock attribute directly
(see (more...) )- Use custom method for Directory Server (see (more...) )
Interoperating with Directory Server Tools
Select this option if you use the Directory Server Console or command line tools to activate/inactivate an object.
- To activate objects, Identity Synchronization for Windows will remove the cn=nsmanageddisabledrole,<database suffix> value from the nsroledn attribute.
- To inactivate objects, Identity Synchronization for Windows will add the cn=nsmanageddisabledrole,<database suffix> value to the nsroledn attribute.
Table 4-1 describes how Identity Synchronization for Windows detects and synchronizes object activations/inactivations when you enable the Interoperate with Directory Server Tools option:
Modifying Directory Server’s NsAccountLock Attribute Directly
Use this method when Directory Server activations and inactivations are based on Directory Server’s operational attribute, nsAccountLock. This attribute controls object states as follows:
Table 4-2 describes how Identity Synchronization for Windows detects and synchronizes object activations/inactivations when you enable the Modify Directory Server’s nsAccountLock Attribute Directly option:
Using a Custom Method for Directory Server
Use this method when Directory Server activations and inactivations are controlled exclusively by an external application such as Sun Java™ System Access Manager (formerly Sun JES Identity Server).
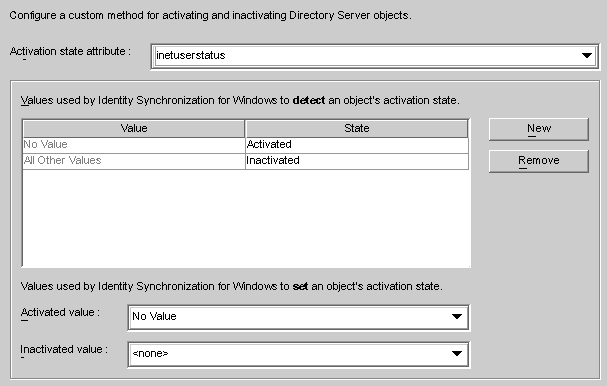
When you configure a custom method for Directory Server, you must specify
To configure a Custom method for activations and inactivations, click the Configure button and the Configure Custom Method for Directory Server dialog box is displayed (see Figure 4-44).
Figure 4-44 Configuring a Custom Method for Activations and Inactivations
This dialog contains the following features:
- Value and State table: Use this table to specify when values associated with the selected attribute are activated or inactivated.
- State column: Use this column to specify whether the Value entry (in the same row) corresponds to an object that is activated or inactivated.
- New button: Click this button to add new entries to the Value column.
- Remove button: Select an entry in the Value column, and then click this button to remove that entry.
- Activated value and Inactivated value drop-down lists: Use these two lists to specify values that Identity Synchronization for Windows will use to set an object’s state.
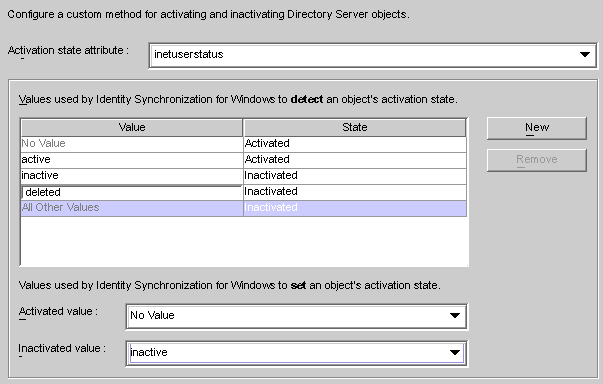
Synchronizing Activations and Inactivations
Use the following procedure to configure Identity Synchronization for Windows to detect and synchronize object states between Directory Server and Active Directory:
- Select an attribute from the Activation state attribute drop-down list.
- Click the New button to add attribute values to the Value column of the table.
- Click in the State column next to each of the Value entries and when the drop-down list is displayed, select Activated or Inactivated.
Figure 4-45 Selecting a State
For example, if you were using Access Manager:
Based on this example, Table 4-4 describes how Identity Synchronization for Windows will detect and synchronize activations/inactivations when you enable the Use Custom Method for Directory Server option (using the inetuserstatus example).
Setting Activations and Inactivations
As you populate the Value and State table with entries, Identity Synchronization for Windows automatically populates the Activated value and Inactivated value drop-down lists as follows:
Select a value from the Activated value and/or the Inactivated value drop-down lists to specify how Identity Synchronization for Windows will activate and/or inactivate an object when synchronizing from Active Directory.
- Activated value: Controls the object’s active state.
- Inactivated value: Controls the object’s active state.
- inactive or deleted: Identity Synchronization for Windows will set the object’s state to inactive in Directory Server.
- <none>: Not a valid setting. You must select a value.
Figure 4-46 illustrates a completed Configure Custom Method for Directory Server dialog box.
Figure 4-46 Example: Completed Dialog
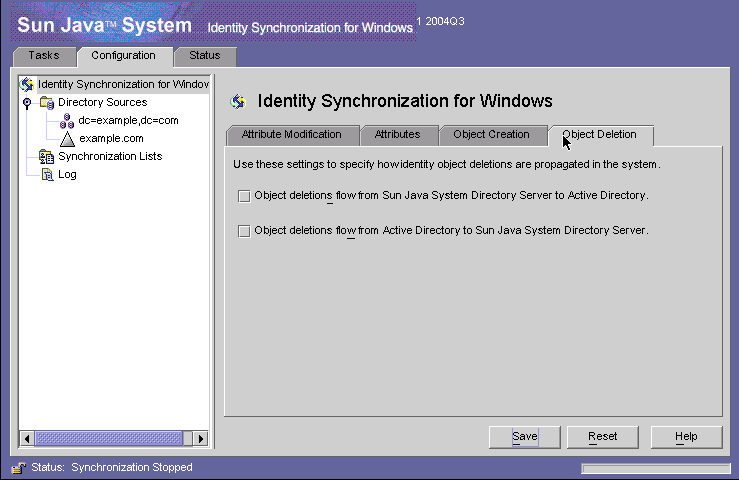
Specifying How Deletions Flow
Use Object Deletions tab to specify how deleted user entries should flow between Directory Server and Active Directory systems
- Select the Identity Synchronization for Windows node at the top of the navigation pane, and then click the Object Deletion tab.
Figure 4-47 Propagating User Entry Deletions
- Enable or disable the flow of deletions as follows:
- Enable Object deletions flow from Sun Java System Directory Server to Active Directory to propagate deletions from the Directory Server environment to your Active Directory servers.
- Enable Object deletions flow from Active Directory to Sun Java System Directory Server to propagate deletions from the Active Directory environment to your Directory Servers.
- Enable both options for bidirectional flow.
- Disable both options to prevent user deletions from propagating from one system to the other. (Default setting)
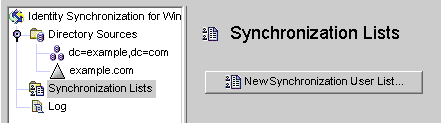
Creating Synchronization User ListsA Synchronization User List (SUL) specifies which users in two directory sources will be synchronized. Every entry in the SUL passes through the Connector and is evaluated against the constraints you configured for that SUL.
Each SUL contains two elements, one to identify which Directory Server users to synchronize and one to identify which Windows users to synchronize.
Note
To synchronize users in a Directory Server with multiple Active Directory domains, you must define one SUL for each Active Directory domain.
For more information about defining and configuring SULs (including components of a definition, how to define multiple SULs, how multiple SULs are processed, and how to configure multiple Windows domain support) refer to Appendix D, "Defining and Configuring Synchronization User Lists".
Both of the SUL elements contain three definitions that identify which users to synchronize:
To identify and link user types between servers:
- Select the Synchronization User Lists node in the navigation tree, and then click New Synchronization User List button.
Figure 4-48 Creating a New Synchronization User List
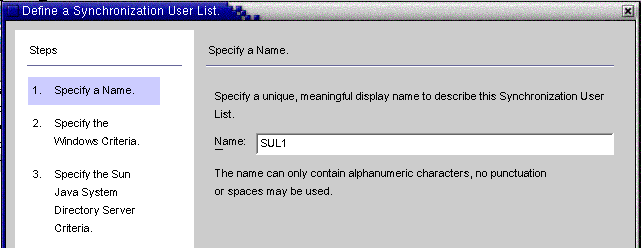
The Define a Synchronization User List wizard is displayed, as follows:
Figure 4-49 Specifying a Name for Your SUL
The program default for your first Synchronization User List is SUL1.
- If the default name is acceptable, click Next.
- If you want to use a different name, type a different name into the Name field and then click Next.
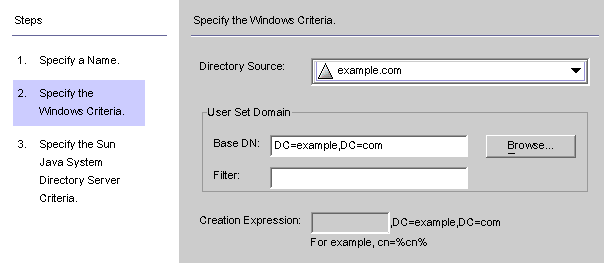
The Windows Criteria panel is displayed, as shown in Figure 4-50.
Figure 4-50 Specifying the Windows Criteria
- Select a Windows Directory Source from the drop-down list.
- A User Set Domain is the set of all the users to be synchronized. Enter the User Set Domain's Base DN, using one of the following methods:
- Type the name into the text field (for example, DC=example,DC=com).
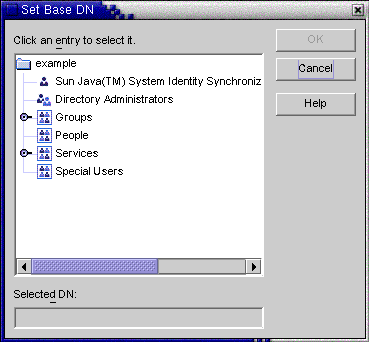
- Click the Browse button, to open the Set Base DN dialog box so you can look for, and select a Base DN.
Figure 4-51 Selecting a Base DN
All users under the specified Base DN will be included in this SUL, unless you explicitly exclude them using a filter.
- You can enter an equality, a presence, or a substring Filter to specify which users in this base DN are synchronized. For example, if you are using the same base DN for multiple synchronization user lists, you may want to use a filter to distinguish between them.
The equality filter syntax is similar to LDAP query syntax, except that equality substrings allow *, &, |, =, ! characters only. For example, you can use the following filter to exclude the Administrator from your SUL:
(!(cn=Administrator))
The program should populate the Creation Expression field automatically.
Note
A creation expression defines the parent DN and naming attribute used when new entries are propagated from Active Directory to Directory Server.
A creation expression is not allowed for Sun directories unless you configured user attribute creations to flow from Active Directory to Directory Server (See Specifying How Object Creations Flow).
- If the creation expression is missing or you want to change the existing entry, you can enter a creation expression for all Windows Active Directory synchronization user lists; for example:
cn=%cn%,cl=users,dc=example,dc=com
If you are going to change the creation expression, you must select an attribute that you will be synchronizing. If necessary, go back to the Object Creation tab and use the Creation Attribute button to add and map this attribute.
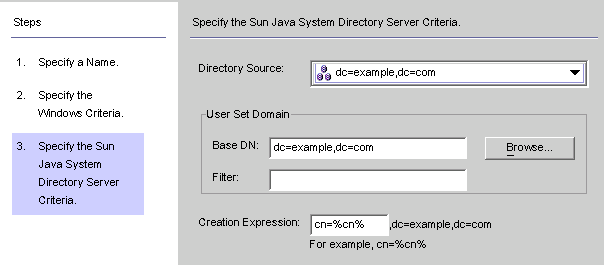
- Click Next to specify the Sun Java System Directory Server criteria.
- When the Specify the Sun Java System Directory Server Criteria panel is displayed repeat Step 2 through Step 5 to provide the Directory Server criteria.
Figure 4-52 Specifying Directory Server Criteria
Note
You cannot edit the Active Directory or Directory Server directory sources included in this SUL after you click the Finish button to create the SUL.
- When you are done, click Finish.
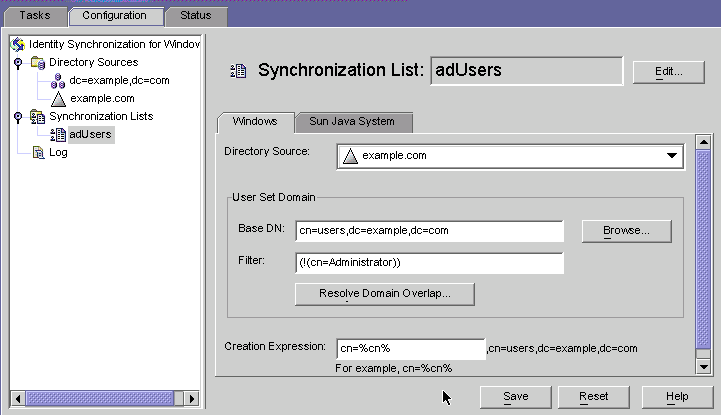
- The program adds your new SUL node to the navigation tree and the Synchronization User List panel is displayed on the Configuration Tab.
Figure 4-53 Synchronization List Panel
- In cases where a user matches multiple lists, click the Resolve Domain Overlap button to define a preference for the synchronization user list. (For more information, see Understanding Synchronization User List Definitions.)
- Create a Synchronization User List that includes every directory source in your network except for the Directory Server.
Saving a ConfigurationTo save your current configuration from any of the Console panels,
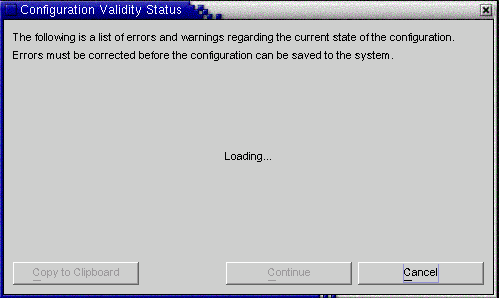
- Click Save to store your settings at this point.
- The Configuration Validity Status window is displayed as the program evaluates your configuration settings.
Figure 4-54 Configuration Validity Status Window
Saving your configuration may take a few minutes because the program rewrites the information out to the configuration directory and notifies the system manager.
The system manager (a Core component) is responsible for distributing your configuration settings out to the components that need the information.
- If your configuration is valid, click Continue to save the configuration.
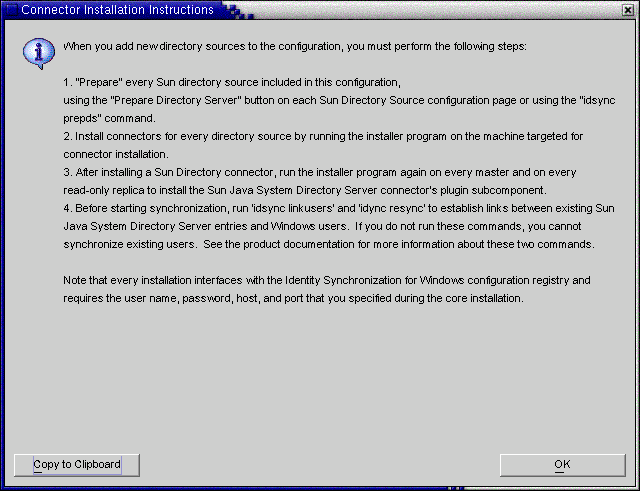
A Connector Installation Instructions dialog box is displayed (similar to the list in Figure 4-55), giving instructions about how to proceed with installing the Identity Synchronization for Windows Connectors and subcomponents.
This list has now been updated with a To Do list that is customized for your deployment. (Up to this point, the steps were generic.) Note that you can also access and update the To Do list from the Status tab on the Identity Synchronization for Windows Console.
Figure 4-55 Instructions for Installing the Connectors
- Read the information carefully and click OK.
After finishing the initial Core configuration, you are ready to install the Identity Synchronization for Windows Connectors and subcomponents. Continue to Chapter 5, "Installing Connectors and Directory Server Plugins" for instructions.