| Sun Netra CP3240 Switch User’s Guide |
| C H A P T E R 2 |
|
Using the Command-Line Interface |
The command-line interface (CLI) is a text-based way to manage and monitor the switch and system. You can access the CLI by using a direct serial connection or by using a remote logical connection with telnet or SSH.
For detailed information about using the CLI with the switch’s software commands, refer to the Sun Netra CP3240 Switch Software Reference Manual (820-3253).
This chapter describes the CLI syntax, conventions, and modes. It contains the following sections:
A command is one or more words that might be followed by one or more parameters. Parameters can be required or optional values.
Some commands, such as show network or clear vlan, do not require parameters. Other commands, such as network parms, have parameters for which you must supply a value. Parameters are positional--you must type the values in the correct order. Optional parameters will follow required parameters. Following are two examples.
In the preceding example, <ipaddr> and <netmask> are the required values for the command, and [gateway] is the optional value for the command.
In the second example, <loc> is the required parameter for the command.
The following conventions apply to the command name:
This reference manual lists each command by the command name and provides a brief description of the command. Each command entry contains the following information:
The show commands also contain a description of the information that the command shows.
The following conventions apply to parameters:
Parameter Value Types describes the conventions this document uses to distinguish between value types.
The following conventions apply to the values of the common parameters. Common Parameter Values describes common parameter values and formatting.
Sun Netra CP3240 switch software references physical entities such as cards and ports by using a slot/port naming convention. The Sun Netra CP3240 switch software also uses this convention to identify certain logical entities, such as Port-Channel interfaces.
The slot number has two uses. In the case of physical ports, it identifies the card containing the ports. In the case of logical and CPU ports, it also identifies the type of interface or port.
The port identifies the specific physical port or logical interface being managed on a given slot.
| Note - In the CLI, loopback and tunnel interfaces do not use the slot/port format. To specify a loopback interface, you use the loopback ID. To specify a tunnel interface, you use the tunnel ID. |
The no keyword is a specific form of an existing command and does not represent a new or distinct command. Almost every configuration command has a no form.
In general, use the no form to reverse the action of a command or reset a value back to the default. For example, the no shutdown configuration command reverses the shutdown of an interface.
Use the command without the keyword no to re-enable a disabled feature or to enable a feature that is disabled by default.
The behavior of the “?” and the help text are the same for the no keyword:
The CLI groups commands into modes according to the command function. Each of the command modes supports specific Sun Netra CP3240 switch software commands. The commands in one mode are not available until you switch to that particular mode, with the exception of the User EXEC mode commands. You can execute the User EXEC mode commands in the Privileged EXEC mode.
For detailed information about using the CLI with the switch’s software commands and modes, refer to the Sun Netra CP3240 Switch Software Reference Manual (820-3253).
The command prompt changes in each command mode to help you identify the current mode.
TABLE 2-5 lists the command modes, the prompts visible in each mode, and the exit method from that mode.
Topology is described in Mode-Based Topology.
Descriptions and hierarchy of each mode are in Mode-Based Command Hierarchy.
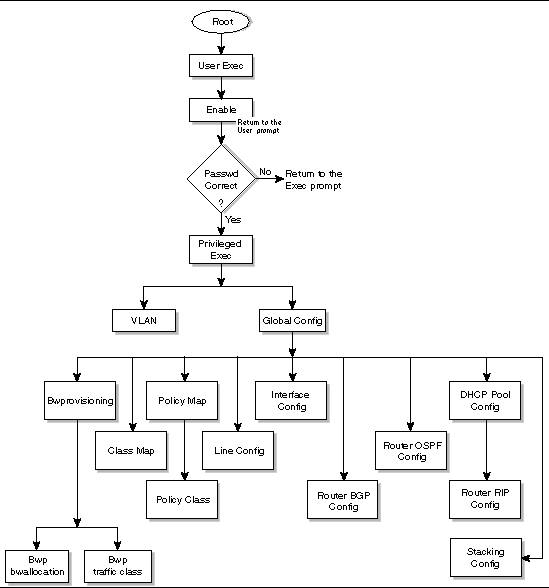
The CLI tree is built on a mode concept in which the commands are available according to the interface. Some of the modes in the mode-based CLI are depicted in FIGURE 2-1.
| Note - The User Exec commands are also accessible in the Privileged Exec Mode. |
| Note - Access to all commands in the Privileged Exec mode and below is restricted through a password. |
The commands in one mode are not available until the operator switches to that particular mode, with the exception of the User Exec mode commands. The User Exec mode commands can also be executed in the Privileged Exec mode.
The commands available to the operator at any time depend upon the mode. Entering a question mark (?) at the CLI prompt displays a list of the currently available commands and descriptions of the commands.
When the operator logs in to the CLI, the User Exec mode is the initial mode. The User Exec mode contains a limited set of commands. The command prompt shown at this level is $ Switch>
To have access to the full suite of commands, the operator must enter the Privileged Exec mode. The Privileged Exec mode requires password authentication. From Privileged Exec mode, the operator can issue any Exec command, enter the VLAN mode or enter the Global Config mode. The command prompt shown at this level is $ Switch#
This mode permits the operator to make modifications to the running configuration. General setup commands are grouped in this mode. From the Global Config mode, the operator can enter the System Config mode, the Physical Port Config mode, the Interface Config mode, or the protocol-specific modes. The command prompt at this level is $ Switch (Config)#
From the Global Config mode, the operator can enter the following protocol-specific modes configuration modes.
Many features are enabled for a particular interface. The Interface commands enable or modify the operation of an interface.
This mode allows you to enable or modify the operation of an interface and provides access to the router interface configuration commands.
Use this mode to set up a physical port for a specific logical connection operation.
In this mode, a physical port is set up for a specific logical connection operation. The Interface Config mode provides access to the router interface configuration commands. The command prompt at this level is $ Switch (Interface <slot/port>)#
The resulting prompt for the interface configuration command entered in the Global Configuration mode is $ Switch (Interface Loopback <id> and $ Switch (Interface Tunnel <id>.
This mode allows the operator to configure the console interface. The operator can configure the interface from the directly connected console or the virtual terminal used with Telnet. The command prompt at this level is $ Switch(line)#
Use the policy-map <policy-name> command to access the QoS policy map configuration mode to configure the QoS policy map.
$ Switch (Config)# policy map <policy-name>
Use the class <class-name> command to access the QoS policy-classmap mode to attach or remove a diffserv class to a policy and to configure the QoS policy class.
$ Switch (Config policy-map)# class <class-name>
$ Switch (Config-policy-classmap)#
This mode consists of class creation, deletion, and matching commands. The class match commands specify layer 2, layer 3, and general match criteria. Use the class-map <class-map-name> commands to access the QoS class map configuration mode to configure QoS class maps.
$ Switch (Config)# class-map <class-map-name>
In this mode, the operator is allowed to access the router OSPF configuration commands. The command prompt at this level is:
$ Switch (Config)# router ospf
In this mode, the operator is allowed to access the router OSPFv3 configuration commands. The command prompt at this level is:
In this mode, the operator is allowed to access the router RIP configuration commands. The command prompt at this level is:
In this mode, the operator is allowed to access the router BGP-4 configuration commands. The command prompt at this level is:
$ Switch (Config)# router bgp <1-65535>
In this mode, the operator is allowed to create a MAC Access-list and to enter the mode containing Mac Access-list configuration commands. The command prompt at this level is:
$ Switch (Config)# mac access-list extended <name>
$ Switch (Config-mac-access-list) #
In this mode, the operator is allowed to configure properties for the TACACS servers. The command prompt at this level is:
$ Switch (Config)# tacacs-server host <ip-addr>
Use the ip dhcp pool <pool-name> command to access the DHCP Pool Config mode.
$ Switch (Config)# ip dhcp pool <pool-name>
Use the ip dhcp pool <pool-name> command to access the DHCP Pool Config mode.
$ Switch (Config)# ip dhcpv6 pool <pool-name>
This mode groups all the commands pertaining to VLANs. The command prompt shown at this level is $ Switch (Vlan)#
This section captures the flow of operation for the CLI.
1. The operator logs in to the CLI session and enters the User Exec mode. In the User Exec mode, the $(exec)> prompt is displayed on the screen.
The parsing process is initiated whenever the operator types a command and presses Enter. The command tree is searched for the command of interest. If the command is not found, the output message indicates where the offending entry begins. For instance, if command node A has the command show arp brief but the operator attempts to execute the command show arpp brief, the output message is $(exec)> show arpp brief^. $%Invalid input detected at '^' marker.
If the operator has given an invalid input parameter in the command, the message conveys to the operator that an invalid input was detected. The layout of the output is:
After all the mandatory parameters are entered, any additional parameters entered are treated as optional parameters. If any of the parameters are not recognized, a syntax error message is displayed.
2. After the command is successfully parsed and validated, the control of execution goes to the corresponding CLI callback function.
3. For mandatory parameters, the command tree extends until the mandatory parameters make the leaf of the branch. The callback function is invoked only when all the mandatory parameters are provided. For optional parameters, the command tree extends until the mandatory parameters and the optional parameters make the leaf of the branch. However, the callback function is associated with the node where the mandatory parameters are fetched. The callback function then takes care of the optional parameters.
4. Once the control has reached the callback function, the callback function has complete information about the parameters entered by the operator.
Command completion finishes spelling the command when you have typed enough letters of a command to uniquely identify the command word. You can execute the command by pressing the Enter key (command abbreviation) or you can complete the command word by pressing the Tab or spacebar keys (command completion).
The value “Er” designates that the requested value was not internally accessible. This should not happen and indicates that the software is not handling this instance correctly.
The value of “-----” designates that the value is unknown.
If you enter a command and the system is unable to execute it, an error message appears. CLI Error Messages describes the most common CLI error messages.
CLI Editing Conventions describes the key combinations you can use to edit commands or increase the speed of command entry. You can access this list from the CLI by entering help from the User or Privileged EXEC modes.
Enter a question mark (?) at the command prompt to display the commands available in the current mode.
Enter a question mark (?) after each word you enter to display available command keywords or parameters.
If the help output shows a parameter in angle brackets, you must replace the parameter with a value.
If there are no additional command keywords or parameters, or if additional parameters are optional, the following message appears in the output:
You can also enter a question mark (?) after typing one or more characters of a word to list the available command or parameters that begin with the letters, as shown in the following example:
You can access the CLI by using a direct-console connection or by using a telnet or SSH connection from a remote management host.
For the initial connection, you must use a direct connection to the console port. You cannot access the system remotely until the system has an IP address, subnet mask, and default gateway. You can set the network configuration information manually, or you can configure the system to accept these settings from a BOOTP or DHCP server on your network. For more information, see Network Interface Commands.
The CLI enables the user to type single-line annotations at the command prompt for use when writing test or configuration scripts and for better readability. The exclamation point (!) character flags the beginning of a comment. The comment flag character can begin a word anywhere on the command line and all input following this character is ignored. Any command line that begins with the character ! is recognized as a comment line and ignored by the parser.
Some examples of comments are provided in the following code.
| Sun Netra CP3240 Switch User’s Guide | 820-3252-11 |
© 2007 Diversified Technology, Inc. All Rights Reserved. © 2009 Sun Microsystems, Inc. All rights reserved.