| Sun Dual 10GbE XFP PCIe ExpressModule User’s Guide |
| C H A P T E R 4 |
|
Network Configuration |
This chapter describes how to edit the network host files after you install the Sun Dual 10GbE XFP PCIe ExpressModule on your system. This chapter contains the following sections:
After installing the driver software, you must create a hostname.nxgenumber file for the ExpressModule’s Ethernet interface. You must also create both an IP address and a host name for the ExpressModule’s Ethernet interface in the /etc/hosts file.
|
1. At the command line, search the /etc/path_to_inst file for nxge interfaces.
# grep nxge /etc/path_to_inst # "/pci@7c0/pci@0/pci@9/network@0" 0 "nxge" # "/pci@7c0/pci@0/pci@9/network@0,1" 1 "nxge"# |
In this example, the device instance is from a Sun Dual 10GbE XFP PCIe ExpressModule installed in slot 1.
Ensure to write down your device path and instance, which in the example is
"/pci@7c0/pci@0/pci@9/network@0" 0. Your device path and instance will be similar. You need this information to make changes to the nxge.conf file. See Setting Parameters Using the nxge.conf File.
2. Set up the ExpressModule’s nxge interface.
Use the ifconfig command to assign an IP address to the network interface. Type the following at the command line, replacing ip-address with the ExpressModule’s IP address:
Refer to the ifconfig(1M) man page and the Solaris documentation for more information.
3. (Optional) Create a setup that remains the same after you reboot.
If you want a setup that remains the same after you reboot, create an
/etc/hostname.nxgenumber file, where number is the instance number of the nxge interface you plan to use.
To use the ExpressModule’s nxge interface in the Step 1 example, create an
/etc/hostname.nxge0 file, where 0 is the number of the nxge interface. If the instance number were 1, the filename would be
/etc/hostname.nxge1.
| Note - Do not create an /etc/hostname.nxgenumber file for a Sun Dual 10GbE XFP PCIe ExpressModule interface you plan to leave unused. |
Follow these guidelines for the host name:
The following example shows the /etc/hostname.nxgenumber file required for a system called zardoz that has an nxge driver (zardoz-11).
4. Create an appropriate entry in the /etc/hosts file for each active nxge interface.
# cat /etc/hosts # # Internet host table # 127.0.0.1 localhost 129.144.10.57 zardoz loghost 129.144.11.83 zardoz-11 |
Before you can boot and operate a diskless client system across a 10-Gigabit Ethernet network, you must first install the Sun Multithreaded 10GbE and QGE Networking software packages into the root directory of the diskless client. You can find the Sun Multithreaded 10GbE and QGE Networking software packages at the following web site:
http://www.sun.com/products/networking/ethernet/10gigethernet/support.xml
Refer to the Solaris Advanced Installation Guide and the System Administration Guide for more information about installing and administering diskless client systems.
| Note - The x86 version of the Solaris Operating System does not support diskless clients. |
|
1. Locate the root directory of the diskless client on the host server.
The root directory of the diskless client system is commonly installed in the host server’s /export/root/client-name directory, where client-name is the diskless client’s host name. In this procedure, the root directory is:
2. Download the software for the ExpressModule onto the server’s drive.
3. Use the pkgadd -R command to install the software packages to the diskless client’s root directory on the server.
Install the software packages to the client’s root directory.
4. Create a hostname.nxgenumber file in the diskless client’s root directory.
Create an /export/root/client-name/etc/hostname.nxgenumber file for the 10-Gigabit Ethernet interface. See Configuring the Network Host Files for instructions.
5. Edit the hosts file in the diskless client’s root directory.
Edit the /export/root/client-name/etc/hosts file to include the IP address of the 10-Gigabit Ethernet interface. See Configuring the Network Host Files for instructions.
6. Set the MAC address on the server side and rebuild the device tree if you want to boot from the 10-Gigabit Ethernet port.
7. Boot the diskless client from the 10-Gigabit Ethernet port:
The Solaris Advanced Installation Guide describes the full procedure for installing the Solaris Operating System over the network. The following procedure assumes that you have created an install server, which contains the image of the Solaris CD. You also must have set up the client system to be installed over the network.
Before you can install the Solaris Operating System on a client system with a 10-Gigabit Ethernet ExpressModule, you must first add the Sun Multithreaded 10GbE and QGE Networking software packages to the install server.
| Note - Refer to the Solaris Advanced Installation Guide for more information about installing the Solaris Operating System over the network. |
|
1. Prepare the install server and client system to install the Solaris Operating System over the network.
The Solaris Advanced Installation Guide describes how to create the install server and set up the client systems.
2. Find the root directory of the client system.
The client system’s root directory can be found in the install server’s
/etc/bootparams file. Use the grep command to search this file for the root directory.
# grep client-name /etc/bootparams client_name root=server-name:/netinstall/Solaris_10/Tools/Boot install=server-name:/netinstall boottype=:in rootopts=:rsize=32768 |
In this example, the root directory for the Solaris 10 client is /netinstall. In Step 4, you would replace root-directory with /netinstall.
| Note - If the root directory is not found in the /etc/bootparams file, refer to the Solaris Advanced Installation Guide for configuration instructions. |
3. Download the Sun Multithreaded 10GbE and QGE Networking driver onto the install server’s hard drive.
The package is a folder, SUNWnxge.v or SUNWnxge.u, which you can download from the following web site:
http://www.sun.com/products/networking/ethernet/10gigetherne/support.xml
4. >>On the install server, install the Sun Multithreaded 10GbE and QGE Networking software to the client’s root directory, as determined in Step 2.
Replace root-directory with the location of the client’s root directory.
# cd location where you downloaded the packages # ls SUNWnxge* # pkgadd -R root-directory/Solaris_10/Tools/Boot -d . SUNWnxge.v |
| Note - If the preceding commands do not work correctly, refer to the documentation for your version of the Solaris Operating System. |
| Note - Perform the following steps on the client system. |
5. Shut down and halt the client system.
Use the shutdown command to obtain the OpenBoot (ok) prompt.
6. At the ok prompt, use the show-nets command to find the device path of the 10-Gigabit Ethernet device.
The show-nets command lists the system devices. You should see the full paths and names of the network devices, similar to the example below.
7. At the ok prompt, boot the client system using the full device path of the 10-Gigabit Ethernet device, for example:
8. Proceed with the Solaris Operating System installation.
Refer to the Solaris Advanced Installation Guide for more information about installing the Solaris Operating System over the network.
9. After installing the Solaris Operating System, install the Sun Multithreaded 10GbE and QGE Networking software on the client system.
The software installed in Step 4 is required to boot the client system over the 10-Gigabit Ethernet interface. You now need to install the software in order for the operating system to use the client’s 10-Gigabit Ethernet interfaces in normal operation.
Before installing the Sun Multithreaded 10GbE and QGE Networking driver, ensure that the client system does not already have the driver installed. Use the pkginfo command to see if the Sun Multithreaded 10GbE and QGE Networking software packages are installed on the client system.
See Chapter 2 for instructions on installing the required software packages.
10. Confirm that the network host files have been configured correctly during the Solaris installation.
Although the Solaris software installation creates the client’s network configuration files, you might need to edit these files to match your specific networking environment. See Configuring the Network Host Files for more information about editing these files.
11. Show the configuration information for all data-links or the specified data-link.
By default, the system is configured to have one data-link for each known network device.
|
1. Obtain the MAC address from the target Sun Dual 10GbE XFP PCIe ExpressModule.
2. Set up the PXE boot server with the MAC addresses.
3. Choose one of the ExpressModule ports as the boot interface.
4. Plug the Ethernet cable to the ExpressModule port.
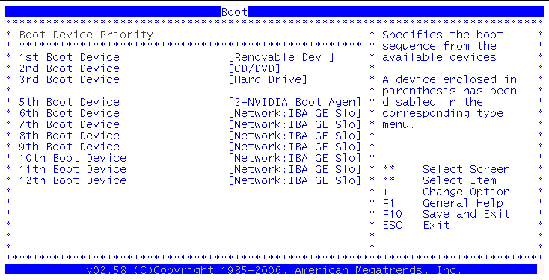
6. Press the F2 key or the Control-E keys to go to the BIOS.
7. Ensure that the boot order of hard drive is higher than network devices.
8. Refer the boot-device-order image.
The reconfiguration boot attaches the driver to the ExpressModule. You can now configure the driver parameters for your Sun Dual 10GbE XFP PCIe ExpressModule.
9. Press the F10 key to save the boot configuration changes and exit.
The system should reboot after saving the boot configuration.
10. Press the F12 key to install the OS from the network.
If the cable is connected to the correct port, you should see the MAC address that you assigned to your PXE server displayed by BIOS.
11. Install and confibure the nxge driver (see Chapter 2 and Chapter 5.
| Sun Dual 10GbE XFP PCIe ExpressModule User’s Guide | 820-1606-12 |
Copyright © 2008 Sun Microsystems, Inc. All Rights Reserved.
 To Configure the Network Host Files