|
|
| Sun ONE Connector Builder 2.0 Installation and Getting Started Guide |
Lessons for Creating a DBMS Sample Resource AdapterThis module describes how to create the DBMS sample resource adapter. The following lessons are described in this module .
- Lesson 1 - Mount a Working Directory
- Lesson 2 - Define the Resource Adapter
- Lesson 3- Generate the DBMS Resource Adapter
- Lesson 4 - Customize the Generated Code for the DBMS Adapter
- Lesson 5 - Copy the JDBC API
- Lesson 6- Build and Package the DBMS Resource Adapter
Some adapters need to use general-purpose interfaces into the EIS rather than a set of fixed methods defined by an EIS API. An example of such an adapter is one for JDBC-compatible databases.
This module provides an overview to the process of defining, generating, and customizing the Sun ONE Connector Builder DBMS sample adapter. You can use this as a pattern for building other general-purpose resource adapters using the Sun ONE Connector Builder.
All the files required for generating the sample resource adapter are included with the Sun ONE Connector Builder software.
Lesson 1 - Mount a Working Directory
Mount a working directory where you want to generate the resource adapter.
To Mount a Working Directory
- Start IDE.
- Select File > Mount Filesystem > Local Directory
- Click Next.
- Mount a local working directory where you want to generate the resource adapter.
- Click Finish
Lesson 2 - Define the Resource Adapter
The Connector Builder Wizard is used to define the resource adapter.
The process consists of the following steps:
- Step 1 - Choose Template
- Step 2 - Specifying Adapter Location Information
- Step 3 - Entering Adapter General Information
- Step 4 - Specifying Configuration Properties
- Step 5- Choosing Authentication and Transactional Support
There are two ways to run the Connector Builder Wizard:
- via the IDE Explorer
- via the File menu
Step 1 - Choose Template
From IDE main menu
- Select File > New.
The following screen is displayed.
Choose Template Page
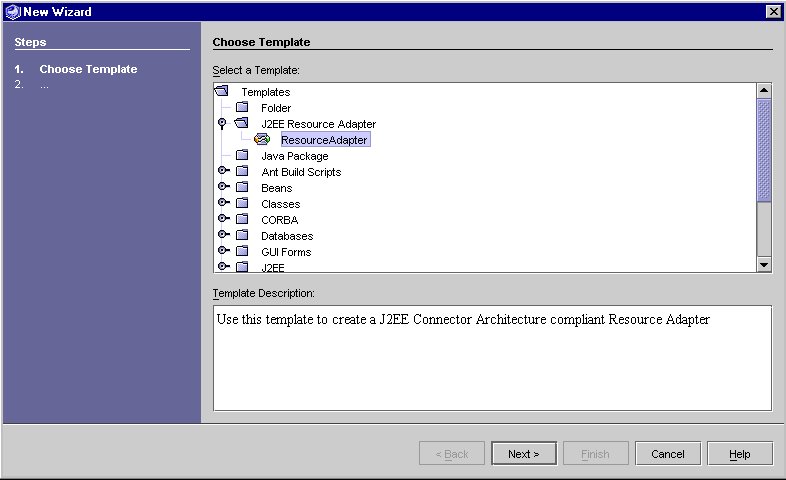
- From the list of templates displayed, select J2EE Resource Adapter > Resource Adapter.
- Click Next.
or
From the IDE Explorer Area
- In the IDE Explorer, select the folder where you want to generate the resource adapter and right-click.
- Select New > J2EE Resource Adapter > ResourceAdapter from the pop up menu.
The Adapter Location Information Page is displayed.
Step 2 - Specifying Adapter Location Information
- Browse to select the directory where you want the adapter files to be generated.
For the sample resource adapter we created and mounted a directory named"C:\DBMS_location".
This field can be modified using the Browse button. The adapter files are generated in a folder named <Adapter Logical Name> created within this directory. You cannot have two adapters with the same logical name in the same directory.
- Enter the Adapter Logical Name. For the sample resource adapter, enter the name "DBMS".
This field is required. The Adapter Logical Name is used to create the names of classes and files in the generated adapter. After you specify the adapter logical name field and press enter, the Wizard checks that the logical name is correct and unique in the specified directory. If both conditions are met, the Next button is enabled.
Adapter Location Information Page
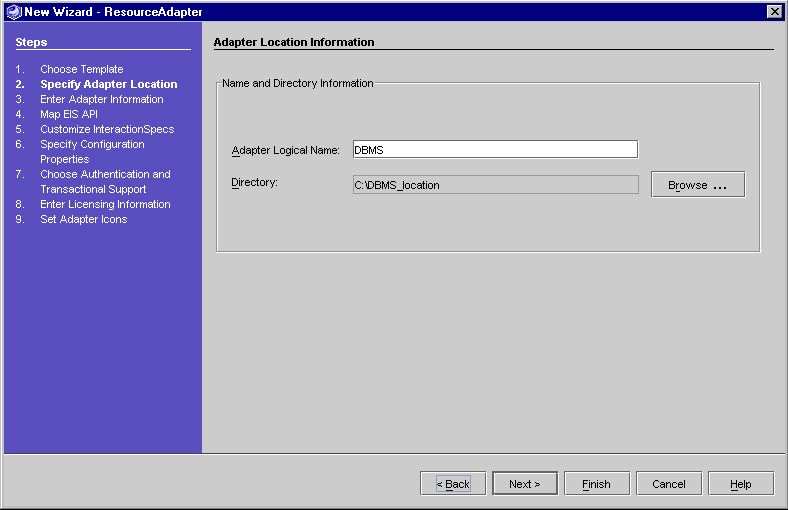
- Click Next. The "Adapter General Information Page" is displayed.
Step 3 - Entering Adapter General Information
The Wizard uses the Adapter Logical Name entered on the Adapter Location Information page to create defaults for the required fields.
- Adapter Name
- Adapter Package (converts upper case letter to lower case)
- EIS Name
- Enter information for all other fields (optional fields).
The Wizard creates default values of 1.0 for the Adapter Version and EIS Version.
You can modify any field in the Adapter General Information page.
Adapter General Information Page
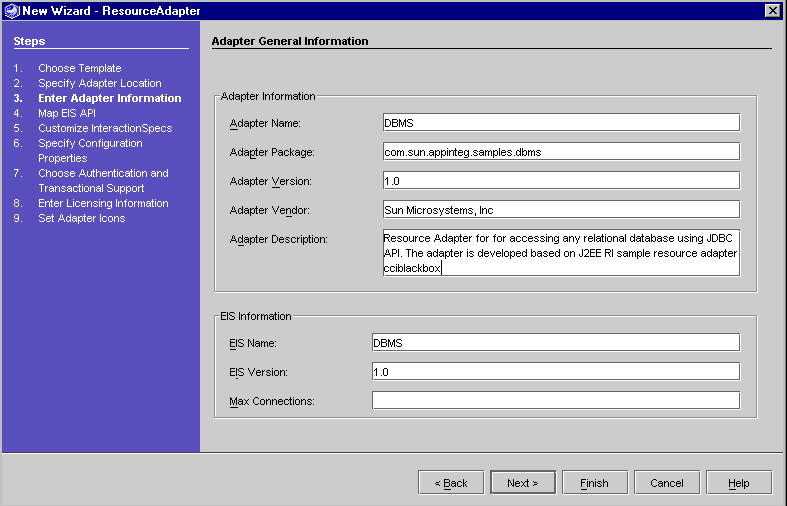
The following table lists the fields in the Adapter. The left column lists the attribute name and the right column provides the attribute value for the Sun ONE Connector Builder DBMS sample.
- Click Next to skip the Step 4, Step 5 screens of the Wizard and proceed to Step 6 -Specify Configuration Properties.
Step 4 - Specifying Configuration Properties
The configuration properties are used at run-time to create a connection with the EIS. The J2EE Connector Architecture specification describes two types of configuration properties. A property of the first type has a value that applies to all physical connections to a given EIS, regardless of the client that needs to use the physical connection. Common examples of this type of property include a URL, or host name and port number. The resource adapter always connects to the configured URL (or host and port number) to establish physical links to the EIS.
In contrast, the value of a property of the second type can change from one client's request for a physical connection to the next. Connections to a single EIS on behalf of two different users, for instance, would use different username and password values but the same URL value. The Sun ONE Connector Builder considers properties in this second category as "client properties." You can specify a value for such a property on the Configuration Properties page (see "Configuration Properties Editor"), but the resource adapter can override that default value at run-time when it requests a connection on behalf of a particular client application.
The Connector Builder generates certain classes differently depending on which properties are client properties and which are not. You indicate which properties should be treated as client properties by marking the Client Can Override checkbox in the Properties Table on the Configuration Parameters page.
Configuration Properties Editor
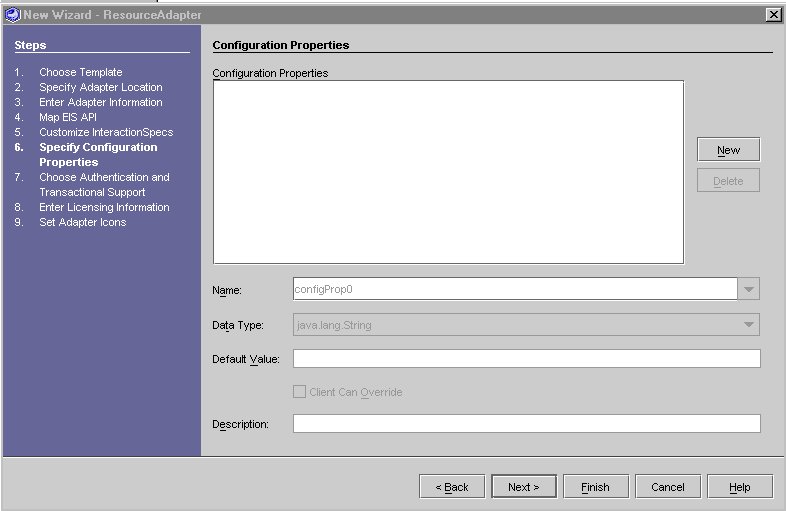
To Edit or Add a Configuration Property
- In the Configuration Properties Editor click New.
Configuration Property Editor
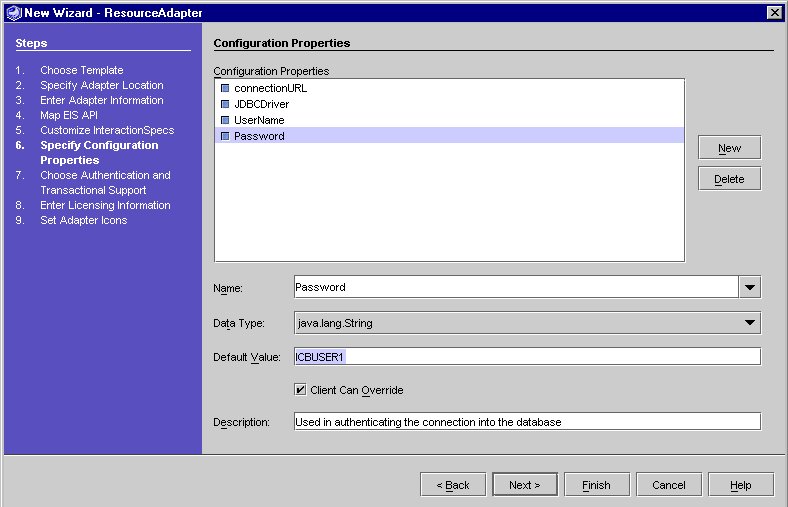
When you click New, the name of a new property appears in the list. By default, the name of the new property is configProp0, configProp1, configProp2...., (depending on how many properties are in your current list).
- Fill in the fields as described in the table below.
(Repeat 1,2 for each configuration property that you want to add.)
The following table lists the configuration properties. The left column lists the parameter. The right column provides a description.
The default values were set to work with the Oracle database running on a local host, for the DBMS sample resource adapter. The following configuration properties need to be entered:
- Click Next.
Step 5- Choosing Authentication and Transactional Support
The "Authentication and Transactional Support Panel" displays the Authentication and Transactional Support Information page.
- Select the Basic Password.
Authentication and Transactional Support Panel
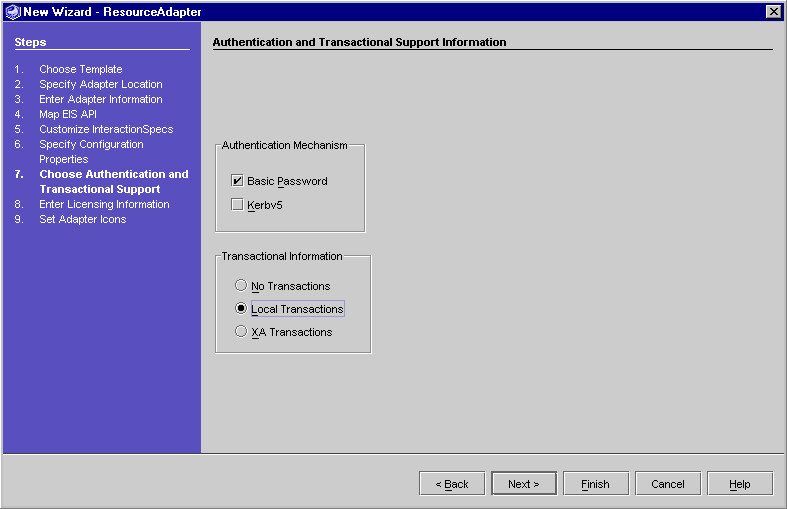
- Select Local Transactions
For information on inputting Licensing and Icon information refer to the module Lessons for Creating a COTS Sample Resource Adapter: Step 8 - Enter Licensing Information (Optional) and Step 9 - Set Adapter Icons (Optional).
Lesson 3- Generate the DBMS Resource Adapter
- Click Finish to generate the Resource Adapter.
When you click Finish, the adapter and JIO generators are invoked. Status messages are displayed in the status text area of IDE, indicating progress of the adapter generation. The messages displayed are "Generating Adapter...", "Generating Java Interaction Objects ..." and then "Adapter Generation is complete". The IDE output window displays a list of all the files generated and other notes about the generation process. In particular, special notes list mandatory customizations that you must implement to make the generated resource adapter work correctly with your EIS API.
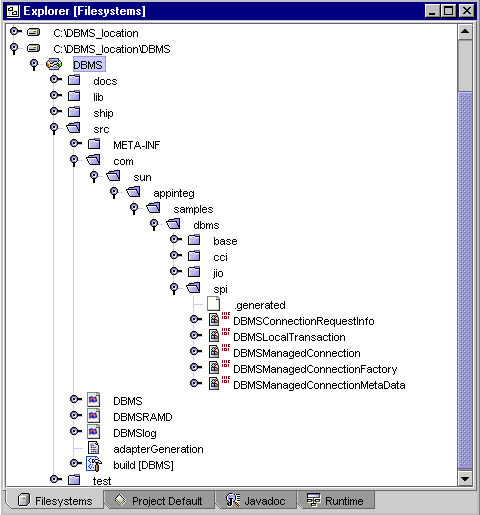
Once the adapter is generated, the adapter's root directory (which was specified as the Directory in Step 2 - Specifying Adapter Location Information) is mounted as a IDE filesystem, and appears within the Explorer area of IDE. If you expand this directory, you can see a "node" (DBMS) that represents the newly created adapter. The adapter node can also be expanded to show subdirectories of the adapter.
One of these subdirectories is src. After Sun ONE Connector Builder generates the resource adapter, the src directory contains a text file named adapterGeneration.txt which describes the results of the generation. The file lists the files created and also highlights special steps you should perform - such as certain mandatory customizations to the generated Java code - to complete the resource adapter.
The directory is as follows:
Generated Resource Adapter Directory Structure
Lesson 4 - Customize the Generated Code for the DBMS Adapter
As with any adapter that Sun ONE Connector Builder generates, the DBMS sample adapter must be customized.
In several places the adapter-specific customizations use type casting so the logic can refer to adapter-specific features. For example, DBMSConnection casts the ICONManagedConnection returned by ICONConnection.getManagedConnection to DBMSManagedConnection. This allows access to, among other things, the adapter-specific configuration property settings. This technique recurs throughout the adapter.
The customization points fall into two broad categories: customizations related to managing connections and transactions with the EIS, and customizations that affect how the EIS API is invoked. In the DBMS sample adapter, the EIS API invocation customizations illustrate the differences between customizations for specific vs. general-purpose adapters. These customizations are described below in the IndexedRecord, Mapping, Parameter, RecordFactory, Interaction, and InteractionSpec classes.
Customizing the DBMS Adapter
There are two types of customization that are required for creating the DBMS sample
Connection and Transaction Customizations
The following files need to be customized:
- DBMSManagedConnectionFactory.java
- DBMSManagedConnection.java
- DBMSLocalTransaction.java
- DBMSManagedConnectionMetaData.java
To Customize the Methods for the DBMS Adapter
DBMSManagedConnectionFactory.java
Select the DBMSManagedConnectionFactory.java class from DBMS/src/spi directory. Implementation needs to be provided for the generated matchConnection method. The Connector Builder framework uses this method in its implementation of ManagedConnectionFactory matchConnection, when it is trying to find an existing managed connection that is compatible with the user and password of a new request for a connection.
matchConnection(ICONManagedConnection mc, Subject sub, ICONConnectionRequestInfo cri)
The Connector Builder framework uses this method in its implementation of ManagedConnectionFactory matchConnection, when it is trying to find an existing managed connection that is compatible with the user and password of a new request for a connection.
To Customize the matchConnection Method
- Add the implementation code provided below.
The following is the implementation code for the matchConnection method:
DBMSManagedConnection.java
The managed connection represents a physical connection to the resource. In the DBMS adapter this physical connection is a java.sql.Connection instance to the database itself.
You need to add the following import statements:
import javax.resource.ResourceException;
import java.sql.SQLException;
import java.sql.DriverManager;
import java.sql.Connection;
You need to add the following Global Variable:
private DBMSManagedConnectionFactory typedMCF;
You need to customize three methods in this class. The following methods need to be implemented:
- createPhysicalConnection (String userName, char [] password)
- createPhysicalConnection(ConnectionRequestInfo cri)
- doDestroy()
createPhysicalConnection ()
The Connector Builder framework invokes the createPhysicalConnection method when it needs the adapter to create a new physical connection to the EIS. For DBMS, the adapter needs to create a new java.sql.Connection. The three variants of createPhysicalConnection first make sure that the driver class has been loaded. It uses the JDBCDriver configuration property defined on the adapter to get the name of the driver class to load. Then it uses java.sql.DriverManager to obtain a new connection to the database specified in the ConnectionURL configuration property. The three variants of createPhysicalConnection are provided with different authentication information. Each uses the information it has to try to establish the new connection to the database.
To Customize the createPhysicalConnection(String userName, char [] password) Method
- Add the implementation code provided below.
The following is the implementation code for the createPhysicalConnection(String userName, char [] password) method:
To Customize the createPhysicalConnection(ConnectionRequestInfo cri) Method
- Add the implementation code provided below.
The following is the implementation code for the createPhysicalConnection(ConnectionRequestInfo cri) method:
The above two variants of the createPhysicalConnection method use ensureTypedMCFSet() and ensureDriverReady() methods. You need to add these two methods to the class. See below for the signature and implementations of these two methods."
ensureTypedMCFSet()
This method makes sure that the value of the Managed Connection Factory is correctly set.
To Customize the ensureTypedMCFSet() Method
· Add the implementation code provided below.
The following is the implementation code for the ensureTypedMCFSet method:
ensureTypedMCFSet method
private void ensureTypedMCFSet() {
if (this.typedMCF == null) {
this.typedMCF = (DBMSManagedConnectionFactory) this.getManagedConnectionFactory();
}
}
ensureDriverReady()
This method loads the JDBC driver
To Customize the ensureDriverReady() Method
- Add the implementation code provided below.
The following is the implementation code for the ensureDriverReady method:
doDestroy()
When the Connector Builder framework decides it no longer needs a physical connection, it invokes doDestroy so the adapter-specific logic can end the physical connection. For the JDBC this means closing the JDBC connection itself. Note that the DBMSConnection.close method does not close the physical connection. That close method allows the application to declare that it has finished using that specific logical handle to a physical connection. Because connection pooling reuses managed connections (so as to reuse physical connections) the logical close should not itself trigger a physical shutdown of the JDBC connection.
To Customize the doDestroyMethod
- Add the implementation code provided below.
The following is the implementation code for the doDestroy method:
DBMSLocalTransaction.java
The local transaction class captures all adapter-specific aspects of transaction management into a single place. There is administrative work that the Connector Builder framework performs before and after invoking each of the public methods defined on com.iplanet.resource.spi.ICONLocalTransaction - begin, commit, and rollback - so the methods that the adapter developer has to provide are doBegin, doCommit, and doRollback.
The following three methods need to be implemented:
doBegin
JDBC transactions do not require an explicit start. By default, the JDBC commits occur automatically after each statement. To conform to the J2EE CA transaction model, an application uses the LocalTransaction implementation, rather than direct JDBC transaction control, to work with transactions. This means the application should use javax.resource.cci.Connection.getLocalTransaction and then invoke the LocalTransaction.begin method to start an explicit transaction. The doBegin implementation therefore has to turn off auto-commit for the JDBC connection.
To Customize the doBegin(ICONManagedConnection mc) Method
- Add the implementation code provided below.
The following is the implementation code for the doBegin(ICONManagedConnection mc) method:
doCommit
This method uses the JDBC connection commit method to commit the transaction, then turns auto-commit for the connection on to restore the default.
To Customize the doCommit(ICONManagedConnection mc) Method
- Add the implementation code provided below.
The following is the implementation code for the doCommit(ICONManagedConnection mc) method:
doRollback
This method uses the JDBC connection rollback method to rollback the transaction, then turns auto-commit for the connection on to restore the default.
To Customize the doRollback(ICONManagedConnection mc) Method
- Add the implementation code provided below.
The following is the implementation code for the doRollback(ICONManagedConnection mc) method:
DBMSManagedConnectionMetaData.java
The generated classes provide metadata about the managed connection that reports the default configuration property values provided when the adapter was created. Even so, the methods that the J2EE CA specification defines on ManagedConnectionMetaData typically report "live" information about the current EIS that the managed connection is actually using at the time. To reflect this, the DBMSManagedConnectionMetaData class should be customized. These additions are not mandatory, because the adapter would still function even if this logic were not added. But the adapter is more useful with the changes than without them.
The following four methods need to be implemented:
getEISProductName()
To Customize the getEISProductName() Method
- Add the implementation code provided below.
The following is the implementation code for the getEISProductName()method:
getEISProductVersion()
To Customize the getEISProductVersion() Method
- Add the implementation code provided below.
The following is the implementation code for the getEISProductVersion() method:
getMaxConnections()
To Customize the getMaxConnections() Method
- Add the implementation code provided below.
The following is the implementation code for the getMaxConnections() method:
getUserName()
To Customize the getUserName() Method
- Add the implementation code provided below.
The following is the implementation code for the getUserName() method:
EIS API-related Customizations
Adapters to specific EIS APIs often require no customization of the code that actually invokes the EIS API, but in adapters to general-purpose APIs just the opposite is true. This is true because a general-purpose EIS API typically provides a small number of methods that give access to a much larger number of tasks or procedures within the EIS. For example, the SAP API allows the application to invoke any of the RFCs or BAPIs defined in the SAP system through a very small number of methods. As another example, the sample DBMS resource adapter gives access, via JDBC, to any of the stored procedures that are defined within a database. In each case, the name of the EIS function being used is provided as a variable at run-time. This generality appears in the customized Interaction and InteractionSpec classes.
Not only is the name of the function or procedure handled generically and dynamically, but so must be the parameters to and from these EIS functions. Often, this handling requires the use of generic buffers which can hold a variety of types of data, or result sets in the case of JDBC results. The need for this generality prevents the Connector Builder from generating the input and output records. Instead, as the adapter developer you need to provide the record implementations, often by way of a RecordFactory.
Manual Customizations
There are a few classes that are not generated by the Connector Builder generator and have to be created manually. The source code for these classes should be copied from <connector_builder_install_root>/samples/dbms/adapters/DBMS/src/com/sun/appinteg/samples/dbms/cci directory tree and placed in the corresponding location of the DBMS adapter that is being generated.
The classes that have to be customized are:
DBMSIndexedRecord.java
As described in the connector architecture, indexed records provide what is basically an ordered collection of result records. You need to add new class which implements javax.resource.cci.IndexedRecord interface.
Mapping.java
This utility class maps between JDBC type codes and the ResultSet.getXXX methods.
Parameter.java
This utility class stores all the important properties of every parameter of a stored procedure.
DBMSInteractionSpec.java
The InteractionSpec represents a pattern of invoking one or more functions or procedures inside the EIS. You can customize this class so that it maintains information that can change from one invocation of an EIS API method to the next but can also be common across several such invocations.
The generated InteractionSpec includes the mandated functionName property, which the DBMS adapter uses for the stored procedure name. The DBMSInteractionSpec class extends the generated InteractionSpec class and was customized to support two additional properties relevant to JDBC: the schema and the catalog to be used in calling the stored database procedures. So, the DBMSInteractionSpec contains all the information needed to select the correct stored procedure and to invoke it in the correct context: the stored procedure name, the schema, and the catalog. This, combined with the input record's contents, enables the DBMSInteration class to call the stored procedure properly.
The sample DBMS resource adapter includes the DBMSRecordFactory class which provides instances of the DBMIndexedRecord class.
The classes that have to be customized are:
DBMSRecordFactory.java
The createIndexedRecord() method is customized to return an instance of DBMSIndexedRecord.
To Customize the createIndexedRecord(String recordName)Method
- Add the implementation code provided below.
DBMSInteraction.java
The Interaction represents a single invocation of an EIS function. It uses an InteractionSpec to know which specific one to invoke and uses the input and output records to exchange data with the EIS.
In some ways, the customizations in the generated InteractionSpec class lie at the heart of a general-purpose resource adapter. This is the component that combines the particular input values and the function name to be invoked and uses the EIS API to perform that function inside the EIS. The customized Interaction normally needs to obtain the physical EIS connection object and type cast it to expose the EIS-specific features you have added to it.
The customized DBMSInteraction class does precisely this, using the function name, catalog, and schema from the DBMSInteractionSpec and the values from the input DBMSIndexedRecord to compose a call to JDBC. It uses the EIS connection typecast to java.sql.Connection to actually perform the stored procedure call.
To Customize the execute(javax.resource.cci.InteractionSpec iSpec,javax.resource.cci.Record iRec,javax.resource.cci.Record oRec)Method
You need to add the following import statements.
import javax.resource.cci.*;
import java.sql.*;
import java.util.*;
import java.lang.reflect.*;
import java.sql.ResultSet;
- Add the implementation code provided below.
The following is the implementation code for execute(javax.resource.cci.InteractionSpec iSpec,javax.resource.cci.Record iRec,javax.resource.cci.Record oRec)method.
To Customize the execute(javax.resource.cci.InteractionSpec iSpec, javax.resource.cci.Record iRec)Method
- Add the implementation code provided below.
The following is the implementation code for execute(javax.resource.cci.InteractionSpec iSpec, javax.resource.cci.Record iRec)method:
To Customize the exec(String procName, String schema, String catalog,Record input, Record output) Method
This method gets the IN, OUT, INOUT parameters (for the stored procedures) using the DatabaseMetadata class.
- Add the implementation code provided below.
The following is the implementation code for exec(String procName, String schema, String catalog, Record input, Record output) method:
Lesson 5 - Copy the JDBC API
For the adapter to compile, the adapter is built using JDBC API. You need to copy the JDBC API (located under <connector_buider_install_root>/samples/dbms/adatpers/DBMS/lib) to
DBMS_location\DBMS\lib
This is a standard JDBC extension Package.
jdbc2_0-stdext.jar
You can choose the Import Files option to copy the JDBC extension package in the DBMS/lib directory.
- In Explorer, right click on DBMS_location\DBMS.
- Select Import Files from the contextual menu.
- Browse to the location where the JDBC extension package is located and click Add.
- Select the jdbc2_0-stdext.jar file, then click OK.
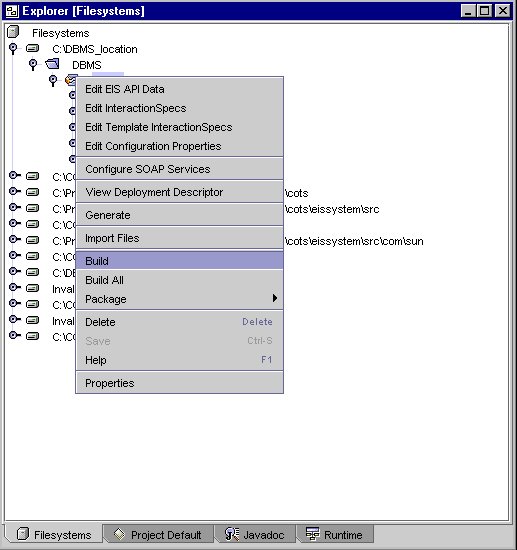
Lesson 6- Build and Package the DBMS Resource Adapter
The following steps are used to build and package the resource adapter code.
- Right click on the adapter node to bring up the contextual menu.
- Select Build.
The following screen displays the menu selection for running the Build option.
- Right click on the adapter node to bring up the contextual menu.
- Select Package.
This example built the DBMS sample connector that is now ready for deployment to the Application Server.
For more information about building and packaging the resource adapter, see Chapter 7 of the Sun ONE Connector Builder Developer's Guide.
Summary
If you followed the above sample steps you have successfully built the DBMS sample connector that is now ready for deployment to the Application Server.