|
|
| Sun ONE Connector Builder 2.0 Developer's Guide |
Modifying the Resource Adapter DefinitionThis module describes the following topics:
The Sun ONE Connector Builder adapter appears within IDE's Explorer area. To see the node for an adapter, expand its root directory.
Security permissions can not be set when you build the adapter using the wizard. These permissions are accessible only through using the contextual menu.
How to Modify Resource Adapter Definitions
The adapter can be modified using the contextual menu that is accessible by right-clicking the adapter node of the root directory. An editor is launched when you choose an action. You can then use this editor to change the definition or property.
Security permissions can not be set when you build the adapter using the Wizard. These permissions are accessible only through using the contextual menu.
The resource adapter definitions can be modified by either launching the appropriate Property Editor directly from the contextual menu or by choosing Properties on the contextual menu, and using the property sheet that is displayed. You can choose Properties by clicking the ellipsis button (...) steps next to the property value.
The steps for changing the resource adapter definitions are:
- Displaying the Adapter's Contextual Menu
- Choosing the Action
- Saving the Modifications
- Regenerating an Adapter
Displaying the Adapter's Contextual Menu
The adapter's contextual menu is accessible through the root directory within the Explorer area.
To Display the Adapter's Contextual Menu
- Right-clicking the adapter node of the root directory.
The Connector Builder contextual menu is displayed.
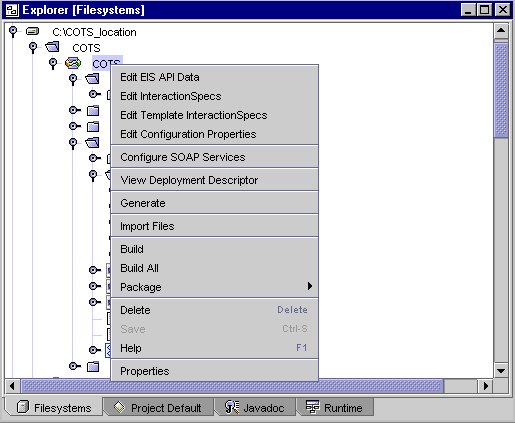
Choosing the Action
The following actions are available:
- Edit EIS API Data
- Edit InteractionSpec
- Edit Template InteractionSpec
- Edit Configuration Properties
- Configure SOAP Services
- View Deployment Descriptor
- Generate
- Import Files
- Build
- Build All
- Package
- Delete
- Save
- Help
- Properties
To Choose the Action
- Click on the appropriate action.
The editor is launched.
Edit EIS API Data
The Edit EIS API Data menu action displays the EIS API Definition editor. This editor is similar to the Adapter EIS API Mapping panel, Step 4 - Mapping EIS API, of the Connector Builder Wizard.
EIS API Definition Editor

This panel can be used to add or remove EIS API methods from the list of methods that the adapter will expose. In addition, connection objects can be identified, and parameter names can be customized using this screen. For detailed information on each of these possible modifications, refer to Step 4 - Mapping the EIS API of the Connector Builder Wizard.
Edit InteractionSpec
The Interaction specification is the generated Java class that represents each selected EIS API method. It enables a component to execute an interaction with an EIS instance.
To Edit an Interaction Spec
- Right-click on the adapter node within the Explorer area of the IDE.
The adapter's contextual menu is displayed.
- Select Edit InteractionSpecs
The following panel is displayed
Edit InteractionsSpecs
.
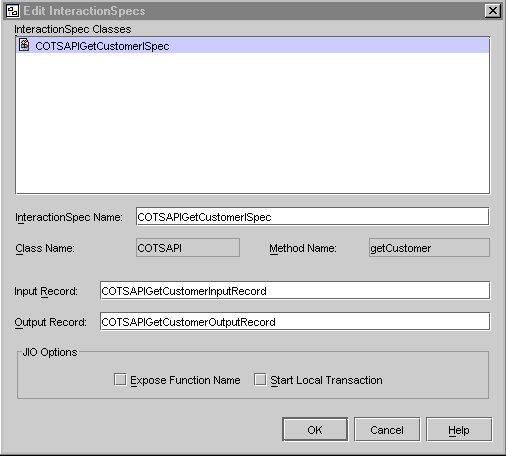
You can customize any of the following specifications:
- Click OK.
For detailed information on each of these possible modifications, refer to Step 5 - Customizing Interaction Specs of the Connector Builder Wizard.
Edit Template InteractionSpec
This feature allows you to create an InteractionSpec and related classes that are not mapped to an EIS API.
The screen that is used is similar to the EIS API Mapped InteractionSpecs page but you can add and delete InteractionSpecs using the appropriate buttons. This screen does not have classes or methods fields and allows you to provide your own Record classes.
To Edit a Template Interaction Spec
- Select Edit Template InteractionSpecs from the contextual menu.
The following page is displayed.
Edit Template InteractionSpecs
.
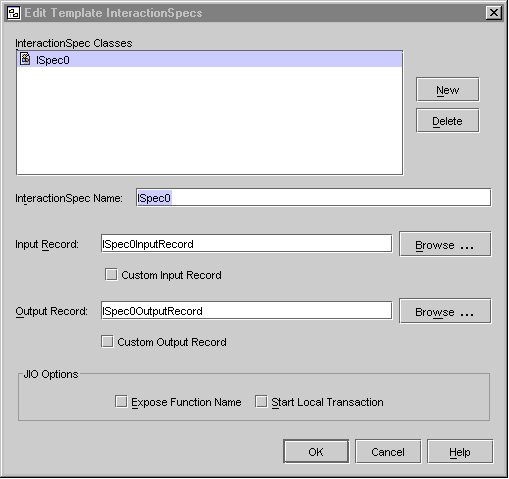
- Click New.
The default InteractionSpec Name, Input Record, and Output Record class name defaults are displayed in the appropriate text boxes.
- Modify any of the names but make sure that all class names for generated classes are unique and contain only valid Java identifiers.
- Provide custom Input and Output Record classes by either:
- entering the name of the class in the field and selecting the "Custom Output Record" check box.
If you enter a class name it must be a fully qualified class name such as javax.resource.Record
- browsing to select a class from the IDE filesystem.
An Input or Output Record Class is not generated if you provide a custom Input or Output Record class.
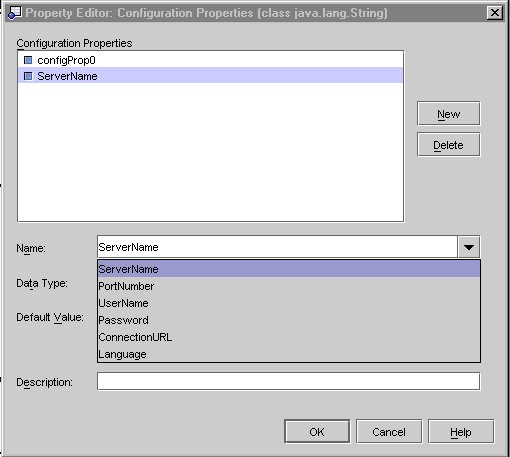
Edit Configuration Properties
The configuration properties are used at runtime to create a connection with the EIS system. The properties that are created are used in both generated resource adapter, getter and setter methods in the ManagedConnectionFactory implementation class and in the Deployment Descriptor.
To Edit Configuration Properties
- Select Edit Configuration Properties from the contextual menu.
The following is displayed.
Property Editor Configuration Properties page

- Click New.
A new property with the default name configProp(x) is created.
- Use the combo box to either type in the name of a new property or to select an existing property from the drop-down list.
- Refer to Step 6 - Specifying Configuration Properties in "Modifying the Resource Adapter Definition" for specific details on filling in the other fields.
Configure SOAP Services
Connector Builder can selectively expose resource adapter JIOs as XML-RPC based services; SOAP layer features that can be used only with Apache SOAP 2.2 runtime.
The following displays the SOAP Layer Editor
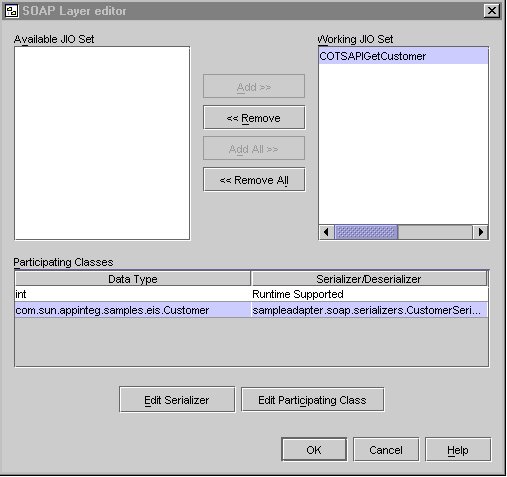
Refer to "Adding SOAP Services to the Resource Adapter" for more information about SOAP.
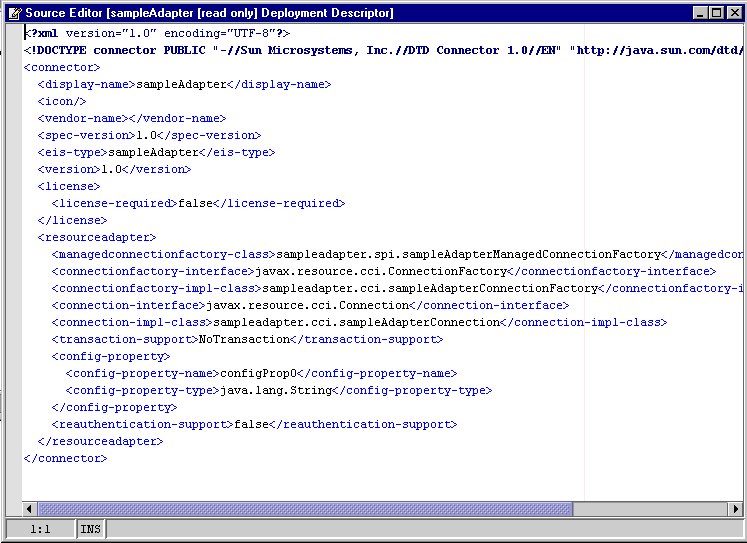
View Deployment Descriptor
The contents of the deployment descriptor depend on input you provide to the Connector Builder, either through the wizard or property editors.
From the contextual menu, select View Deployment Descriptor to display the deployment descriptor in the Source Code editor as a read-only file. An example of a deployment descriptor is shown in the following screen.
Generate
This option uses the updated adapter information to regenerate the adapter.
To Generate the Resource Adapter
- Right-click on the adapter node within the Explorer area of the IDE.
The adapter's contextual menu is displayed.
- Choose Generate.
The Resource Adapter is regenerated without any other confirmation messages.
- The adapter and JIO generators are invoked.
- SOAP services are generated, if they have been configured.
- Status messages are displayed in the status text area of the IDE, indicating progress of the adapter generation.
- The message "Adapter Generation is Complete" is displayed then the process has finished.
- The IDE's output window displays a list of all the files that were generated.
Import Files
Selecting this option displays a panel that allows you to copy files, such as libraries and jar files, into the lib directory of the adapter's directory structure. These files are required by the adapter at run-time. The files that are copied are packaged with the adapter.
To Import a File
- Right-click on the adapter node within the Explorer area of the IDE.
The adapter's contextual menu is displayed
- Choose Import Files from the menu.
The following is displayed.
Import Files Editor

- Select the file that you want to import.
- Click Add.
- Click OK.
Build
This runs the adapter's build script. All adapter classes, as well as user test cases (if they exist) are compiled. The resulting java classes are placed within the adapter's build directory.
To Build the Resource Adapter
- Right-click on the adapter node within the Explorer area of
The adapter's contextual menu is displayed.
- Choose Build from the drop-down list.
The adapter build script is run.
All adapter classes, as well as user test cases, if they exist, are compiled.
The resulting java classes are placed in the adapter's build directory.
This action is equivalent to expanding the adapter's src directory in the IDE Explorer area, and then double-clicking the build.xml
Build All
This deletes any existing compiled source files and then runs the adapter's build script. All adapter classes, as well as user test cases (if they exist), are compiled. The resulting java classes are placed within the adapter's build directory.
Package
The adapter must be built and packaged before it can be deployed and used.
After the generated files are compiled using Build or Build All, you use one of the following actions to package the resource adapter into a resource archive (.rar) file:
- Adapter only - Packages the adapter into a .rar file.
- Adapter with tests - Packages the adapter, along with its test cases, into a .rar file.
- Adapter with SOAP services - Packages the adapter, along with its generated SOAP services, into a .rar file. This option is enabled only if SOAP services have been created for this adapter.
- Adapter with SOAP services and tests - Packages the adapter, along with its test cases and generated SOAP services, into a .rar file. This option is enabled only if SOAP services have been created for this adapter.
See Building/Packaging the Generated Resource Adapter for more details.
Delete
This deletes the selected adapter including the entire adapter directory and files from the disk. After deleting the adapter, you need to manually unmount the directory containing the adapter to remove it from the IDE.
Save
This saves the current adapter definition to the disk. Save is automatically performed before each generation. Use this option if you are not ready to generate the adapter yet but would like to save your current changes to the adapter definition.
Help
This option loads the Java help files that are available iwth the Sun ONE Connector Builder software.
Properties
The adapter's properties' sheet provide access to all information gathered by the Connector Builder Wizard. All adapter data is modifiable using the property sheet, except for Adapter Logical Name and Adapter Package.
To Open the Property Sheet
- Select the adapter node in the IDE's Explorer area.
- Right-click the node and select Properties from the contextual menu.
The adapter Basic Properties sheet is displayed.
The following image contains a description of the Connector Builder Basic Properties. The left column lists the Property Name. The right column lists the property value.
Sample Properties Sheet
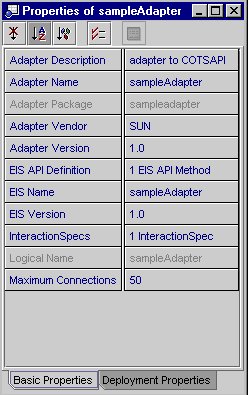
The adapter property sheet contains two tabs, one for basic properties and one for deployment properties. The property sheet toolbar at the top lets you choose how to display the properties in the selected tab (sorting options etc.).
Basic Properties Tab
The following table contains a description of the Connector Builder Basic Properties. The left-hand column lists the Property Name. The center column lists the Data Type. The right-hand column lists whether the property is read only.
All properties except those for the EIS API Definition and InteractionSpecs have string properties that can be changed using the same type of property editor.
To Change the String Values
- Click on the property value.
- Type the changes in the text box.
If more room is required, you can open a larger text editor by clicking the property's value and clicking the ellipsis (...) button that appears.
- Press OK.
To Change the EIS API Definition
This option is used to select additional methods of the EIS API classes to be exposed by the adapter.
To Open the Custom Editor
- Click on the ellipsis (...) button.
The following screen is displayed.
Property Editor EIS API Definition

- Change the EIS API Definitions.
The EIS API Definitions property editor is the same as the Mapping EIS API panel. See Step 4 - Mapping the EIS API in "Creating the Resource Adapter" .
- Press OK.
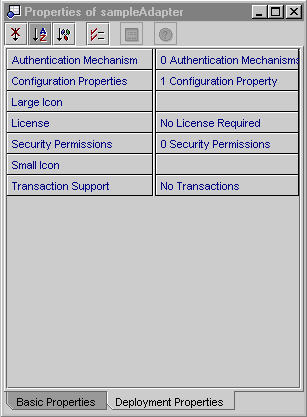
Deployment Properties Tab
Click the Deployment Property tab to display the following properties:
- Authentication Mechanism
- Configuration Properties
- Large Icon
- License
- Security Permissions
- Small Icon
- Transaction Support
The following screen contains a description of the Connector Builder Deployment Properties. The left column lists the Property Name. The right column lists the property value.
Sample Deployment Properties Sheet
To Change Authentication Mechanism
- Click on the ellipsis (...) of the Authentication property value.
The Property Editor Authentication Mechanism shown in the following screen is displayed.
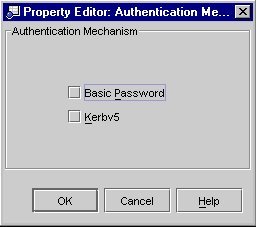
- Select the Authentication method or methods that you want to use.
- Click OK.
To Change Configuration Properties
- Click on the ellipsis (...) of the Configuration Properties value.
The Configuration Property Editor is displayed.
- Either type in a new property or select an existing property from the drop-down list displayed when you click the down arrow next to the Name combo box.
The following screen contains combo boxes that are used to input property values.
Configuration Properties Editor
- Modify the property and then press OK.
Modifying the Large and Small Icon
This can be used to change the image used as either the small or large icon. the Icon image must be in either GIF or JPEG format.
To Modify the Large or Small Icon
- Click on the ellipsis (...) button that appears in either the Small or Large Icon property value.
The Property Editor browser is displayed.
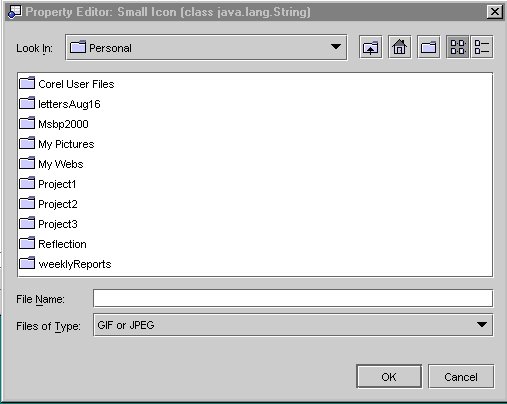
- Browse to select the image to use as an icon and then press OK.
Modifying or Adding Security Permissions
Security Permissions are the only property that can be added as well as modified only by using the Property Editor.
See the section, Security, in this module for a detailed discussion of this property.
Changing Transaction Support
This is used to select the Transaction Support that the adapter will support.
To Change Transaction Support
- Click on the down-arrow that is in the Transaction Support property value.
The following drop-down list is displayed.
No Transactions (default) - the resource adapter supports neither Local nor XA Transactions.
Local Transactions - the resource adapter supports transactions that are managed internal to the EIS.
XA Transactions - the resource adapter supports both local transactions that are controlled and coordinated by a transaction manager external to EIS.
- Select the support.
- Return to the Property Editor.
Saving the Modifications
After you finish modifying the adapter data, save these changes by selecting the Save option on the adapter's contextual menu, or by selecting either Save or Save All on IDE's File menu.
If you attempt to close the IDE before modifications have been saved, the IDE prompts you to either save or discard your changes.
Changes to adapter data are not reflected in the generated adapter code until you regenerate the adapter.
Regenerating an Adapter
To regenerate an adapter, select the Generate option from the adapter's contextual menu. Selecting this menu option automatically saves any changes that you have made.
Security
To prevent unauthorized access to business logic, resources, and data, the main factor to consider are the authentication and authorization mechanisms.
Resource Adapter Security Permissions allow the adapter developer a way to specify what application server permissions the resource adapter needs in order to execute inside the application server. The permissions specified go into the Deployment Descriptor.
The following table lists and defines the Security item. The left column lists the item and the right column defines the item.
For example, suppose you have the following grant entry:
grant {
permission Foo "foobar", signedBy "FooSoft";
}
Items that appear in a permission entry must appear in the specified order (permission, permission_class_name, "target_name", "action", and signedBy "signer_names"). An entry is terminated with a semicolon.
The case is unimportant for the identifiers (permission, signedBy, codeBase, etc.) but is significant for the permission_class_name or for any string that is passed in as a value.
To Add or Edit Security Permissions
- Select Security and click the ellipsis (...) button to open the Security Identity property editor.
The following is displayed.
Security Permissions Editor
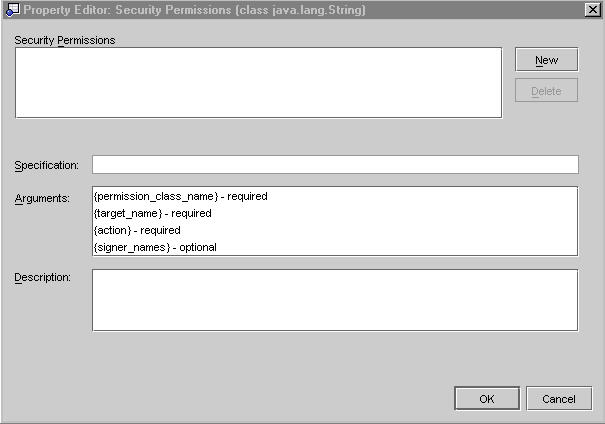
- Click New.
A new security permission item and icon appear in the list. The item is represented by the values in the Specification field, a string appears with the required format of the permission arguments that you must modify. The arguments are changed by modifying the string in the Specification text box.
Below the Specification field is a static, uneditable list describing each argument in the string and whether it is required or optional.
- Click OK.
There are NO validations performed on the information the user enters so the user is completely responsible for entering the correct information and maintaining the correct syntax.