| Sun Netra T5440 Server |
| C H A P T E R 3 |
This chapter provides instructions for installing the Sun Netra T5440 server into a 4-post or 2-post rack. Topics include:
Note - The 19-inch 4-post hardmount rack kit is included in the standard configuration of the Sun Netra T5440 server. |
Note - References to left and right are from your viewpoint as you face either the front or rear of the equipment. |
 | Caution - The server is heavy. Two people are required to lift and mount the server into a rack enclosure when following the procedures in this chapter. |
The Sun Netra T5440 server ships with a 19-inch, 4-post hardmount rack kit (see Hardmounting the Server in a 19-Inch 4-Post Rack for installation instructions). The following lists the four additional rackmount kit options that can be ordered from Sun. This chapter provides installation instructions for all of these rackmount kit options.
The hardmount rack kit for a 19-inch 4-post rack consists of:

Figure Legend
1 Side brackets
2 Screws
3 Rear plates
4 Rail guides
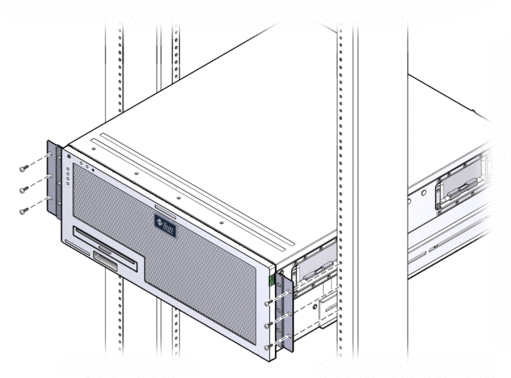
Get the front hardmount brackets from the rack kit (FIGURE 3-1).
Using eight of the supplied M5 x 8 mm flathead Phillips screws (four screws for each bracket), secure the front hardmount brackets to the sides of the server (FIGURE 3-2).

Install the rear mount support brackets at the rear of the server, extending the rear mount support brackets to the measured depth of the rack.
Use two to three of the supplied M5 x 8 mm panhead Phillips screws for each bracket, depending on the rack depth. If your rack is especially deep, you might only be able to secure the rear mount support brackets using two screws per side.

Lift the server to the desired location in the rack.
Tip - It is strongly suggested to use a mechanical lift for your safety and safe-handling of the server. |
Using three screws per side, secure the front hardmount brackets attached to the sides of the server to the front of the rack.
The size of the screws varies, depending on your particular rack.

At the rear of the rack, use the two captive screws to secure the two rear mount flanges to the rear mount support brackets that are attached to the server.
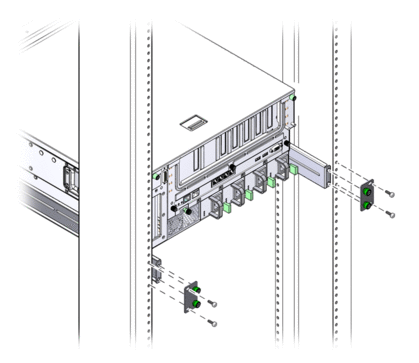
Using two screws for each rear mount support bracket, secure the rear mount support brackets to the rear of the rack.
The size of the screws vary, depending on your particular rack.
The sliding rail mount kit for a 19-inch 4-post rack consists of:

Note - The front-to-back rail spacing must be at least 755.7 mm (29.75 inches) and not more than 755.7 mm (29.75 inches) from the outside face of the front rail to the outside face of the back rail. If the spacing exceeds the maximum measurement, install the rail extenders as described in To Install the Long Bracket Extenders . |
|
Get the hardmount brackets and M5 x 8 mm flathead Phillips screws from the rack kit (FIGURE 3-6).
Using four of the supplied M5 x 8 mm flathead Phillips screws (two screws for each bracket), secure the hardmount brackets to the sides of the server (FIGURE 3-7).

Get the Telco slide assemblies from the rack kit (FIGURE 3-6).
Press in the button on each slide and pull the glide completely out of the slide (FIGURE 3-8).

Align the holes in the glides with the appropriate holes on the sides of the server and, using the eight screws from the ship kit (four screws for each side), secure the glides to the sides of the server (FIGURE 3-9).

Get the short brackets and long brackets from the rackmount kit (FIGURE 3-6).
Lift each short bracket to the desired position at the front of the rack and attach a short bracket to each of the front rack uprights (FIGURE 3-10).
Use two of the brass M6 collar screws and M6 cage nuts (if required) to secure each bracket.

Lift each long bracket to the desired position at the rear of the rack and attach a long bracket to each of the rear rack uprights (FIGURE 3-11).
To secure each bracket, use two of the brass M6 collar screws and M6 cage nuts (if required), exactly as you did for the front rack uprights in the previous step.
Note - If the dimension is greater than 755.7 mm, attach the rail extenders to the long brackets as described in To Install the Long Bracket Extenders. |

Extend a slide to line up the access holes with the front screw holes.
Using the M5 panhead screws (four for the short bracket and four for the long bracket), secure the slide onto the short and long brackets at the front and rear of the rack (FIGURE 3-12).

Repeat Step 9 and Step 10 for the slide on the other side of the rack.
Push the slides completely into the assembly on each side of the rack and release the stop catches.
Align the glides attached to the system with the slide assemblies in the rack.You might find that there is too much or too little room between the two slides mounted in the rack. The glides attached to the system also might not align correctly with the slides in the rack. If either situation occurs, loosen the M6 collar screws and cage nuts on the long and short brackets (Step 7 and Step 8), move them inward or outward to the appropriate points, then tighten the servers again.
Push in the slide buttons and slide the system all the way into the rack enclosure (FIGURE 3-13).
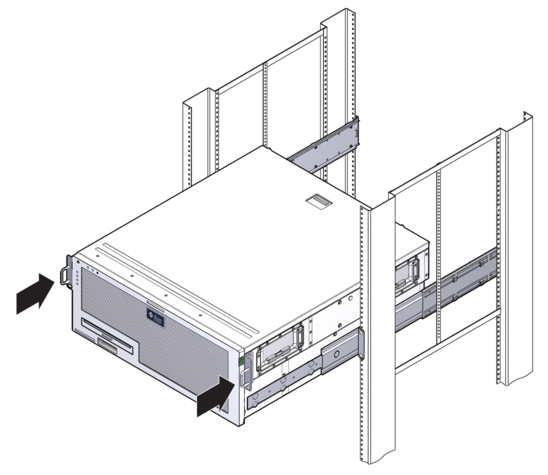
Using one screw per side, secure the front of the hardmount brackets that are attached to the sides of the server to the front of the rack (FIGURE 3-14).
The size of the screws varies, depending on your particular rack.

Use this procedure to attach the long bracket extenders to the long brackets and slide assemblies. See for mounting details when using this procedure.
Note - If the long brackets are already attached to the slide assembly, you might have to remove the long brackets and reinstall them using this procedure. |
Locate the long bracket extenders.
The extenders are shorter than the long brackets and do not have clip nuts attached.
Install two M5 panhead screws through the rear set of holes in the slide assembly and into the front clip nuts in the center slots of the long bracket.
Install two M5 panhead screws through one of the front set of holes in the slide assembly and into the matching clip nuts in the long bracket.
Install two M5 panhead screw through the front slots of the bracket extender and into the rear clip nuts in the center slots of the long bracket.
Install the two M5 panhead screws through the center slot of the bracket extender and into the matching clip nuts on the long bracket.

Secure the extender brackets and slide assemblies in the rack as shown in (FIGURE 3-16).
Adjust the rails to the proper length, tighten the screws on the extenders, and install four M6 collar screws (two in front bracket and two in the rear bracket) for each sliding rail assembly.
The hardmount kit for a 600 mm 4-post rack consists of:
You will also need the two hardmount brackets and two rear mount support brackets from the standard rackmount kit that came with the Sun Netra T5440 server server (FIGURE 3-17).

Get the two front hardmount brackets from the standard rack kit (FIGURE 3-17).
These front hardmount brackets came as part of the standard Sun Netra T5440 server server ship kit, not as part of the 600 mm four-post rackmount ship kit.
Using eight of the supplied M5 x 8 mm flathead Phillips screws (four screws for each bracket), secure the front hardmount brackets to the sides of the server (FIGURE 3-18).
Get the two rear mount support brackets from the standard rack kit (FIGURE 3-17).
These rear mount support brackets came as part of the standard Sun Netra T5440 server server ship kit, not as part of the 600 mm four-post rackmount ship kit.
Install the rear mount support brackets at the rear of the server, extending the rear mount support brackets to the measured depth of the rack (FIGURE 3-19).
Use two to three of the supplied M4 x 8 mm panhead Phillips screws for each bracket, depending on the rack depth. If your rack is especially deep, you may only be able to secure the rear mount support brackets using only two screws per side.
Using eight of the supplied M5 x 8 mm panhead Phillips screws (four screws for each adjuster bracket), attach the front adjuster brackets to the front hardmount brackets.

Using three screws per side, secure the front adjuster brackets to the front of the rack.
The size of the screws varies, depending on your particular rack.
At the rear of the rack, use the captive screws to secure the two rear mount flanges to the rear mount support brackets that are attached to the server.

Using two screws for each rear mount support bracket, secure the rear mount support brackets to the rear of the rack.
The size of the screws vary, depending on your particular rack.
The hardmount kit for a 23-inch 2-post rack consists of:

Get the side brackets from the rack kit (FIGURE 3-23).
Using eight of the M5 x 8 mm panhead Phillips screws (four for each side bracket), secure the side brackets to the sides of the server (FIGURE 3-24).
Note - Using eight of the M5 x 8 mm panhead Phillips screws (four for each side bracket), secure the side brackets to the sides of the server. |

Using three screws per side, secure the front hardmount brackets attached to the sides of the server to the front of the rack.
The size of the screws varies, depending on your particular rack.

The hardmount kit for a 19-inch 2-post rack consists of:
Get the side brackets from the rack kit (FIGURE 3-26).
Using eight of the M5 x 8 mm panhead Phillips screws (four for each side bracket), secure the side brackets to the sides of the server (FIGURE 3-27).
Note - The wide, flat side of the brackets are facing the rear of the server for this rackmount option, not the front. |

Using three screws for each bracket, secure the front of the server to the front of the rack.

| Sun Netra T5440 Server | E23168-01 |
Copyright © 2011, Oracle and/or its affiliates. All rights reserved.
 To Hardmount in a 19-Inch 4-Post
Rack
To Hardmount in a 19-Inch 4-Post
Rack