| Sun Netra T5440 Server |
| C H A P T E R 4 |
This chapter provides instructions for cabling the server. Topics include:
Note - Both AC and DC versions of the server must be installed in a restricted-access location. |
 | Caution - The Sun Netra T5440 must not be directly connected to Outside Plant cables. |
WARNING: The intra-building port(s) of the equipment or subassembly is suitable for connection to intrabuilding or unexposed wiring or cabling only. The intra-building port(s) of the equipment or subassembly MUST NOT be metallically connected to interfaces that connect to the OSP or its wiring. These interfaces are designed for use as intra-building interfaces only (Type 2 or Type 4 ports as described in GR-1089-CORE, Issue 4) and require isolation from the exposed OSP cabling. The addition of Primary Protectors is not sufficient protection in order to connect these interfaces metallically to OSP wiring.
Note - You must use an external Surge Protective Device (SPD) for the AC power input source of the server. |
The following list describes the server’s cable connections and ports:
Service processor management ports: There are two serial management ports for use with the ILOM system controller.
The service processor serial management port (labeled SER MGT) uses an RJ-45 cable and is always available. This is the default connection to the ILOM system controller.
The service processor network management port (labeled NET MGT) is the optional connection to the ILOM system controller. This port is not available until you have configured network settings for the system controller (through the service processor serial management port). See Enabling the Service Processor Network Management Port. The service processor network management port uses an RJ‐45 cable for a 10/100BASE-T connection. This port does not support connections to Gigabit networks.
Ethernet ports: Labeled NET0, NET1, NET2, and NET3. The Ethernet interfaces operate at 10 Mbps, 100 Mbps, and 1000 Mbps. The transfer rates for the Ethernet ports are given in TABLE 4-1.
TTYA serial port: The TTYA serial port has a DB‐9 connector, which is located at the lower right corner of the rear panel (FIGURE 4-1). A DB-9 to RJ-45 adapter cable is included in the shipping kit.
Use the DB-9 connector with a null
modem cable for serial devices. This port appears as ttya in
Solaris OS and OpenBoot messages.
This port is not connected to the service processor serial management port.
Use this serial port only for general purpose serial data transfers.
Use a null modem cable or an adapter to perform the crossovers given for each connector.
USB Ports: Two Universal Serial Bus (USB) 2.0 ports labeled USB 0 and USB 1 are provided on the front panel (FIGURE 4-2), and two USB 2.0 ports (USB 3 and 4) are provided on the rear panel (FIGURE 4-1). USB ports support hot-plugging. You can connect and disconnect USB cables and peripheral devices while the server is running, without affecting system operations.
You can only perform USB hot-plug operations while the OS is running. USB hot-plug operations are not supported when the OpenBoot PROM ok prompt is displayed or before the system has completed booting.
You can connect up to 126 devices to each of the four USB controllers, for a total of 504 USB devices per server.
Input AC/DC power cables: Do not attach power cables to the power supplies until you have finished connecting the data cables, and have connected the server to a serial terminal or a terminal emulator (PC or workstation). The server goes into Standby mode and the ILOM system controller initializes as soon as the input power cables are connected to the power source. System messages might be lost if the server is not connected to a terminal, PC, or workstation at this time.
FIGURE 4-1 shows the connectors on the rear panel of the Sun Netra T5440 server.
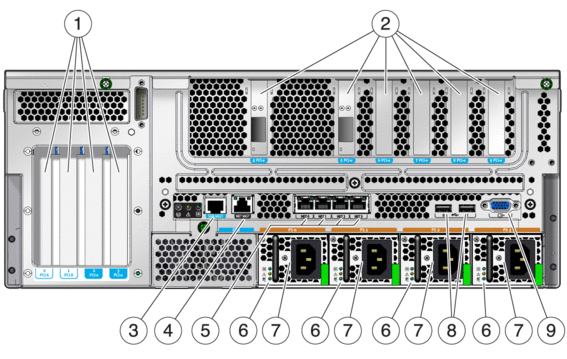
Figure Legend
1 PCI Slots 0-3: left to right: PCI-X Slot 0 (25 W maximum load), PCI-X Slot 1 (25 W maximum load), PCIe Slot 2 (25 W maximum load), PCIe Slot 3 (25 W maximum load)
2 PCI (or XAUI) Slots 4-9: left to right: PCIe or XAUI Slot 4 (15 W maximum load), PCIe or XAUI Slot 5 (15 W maximum load), PCIe Slot 6 (15 W maximum load), PCIe Slot 7 (15 W maximum load), PCIe Slot 8 (15 W maximum load), PCIe Slot 9 (15 W maximum load)
3 Service Processor Serial Management Port
4 Service Processor Network Management Port
5 Gigabit Ethernet ports left to right: NET0, NET1, NET2, NET3
6 Power supply 0 LEDs top to bottom: Output On LED (Green), Service Required LED (Yellow), Input Power OK LED (Green)
7 Power supplies (PSs): left to right: PS 0, PS 1, PS 2, PS 3
8 USB ports left to right: USB2, USB3
9 TTYA serial port
FIGURE 4-2 shows the status indicators on the front panel of the Sun Netra T5440 server.
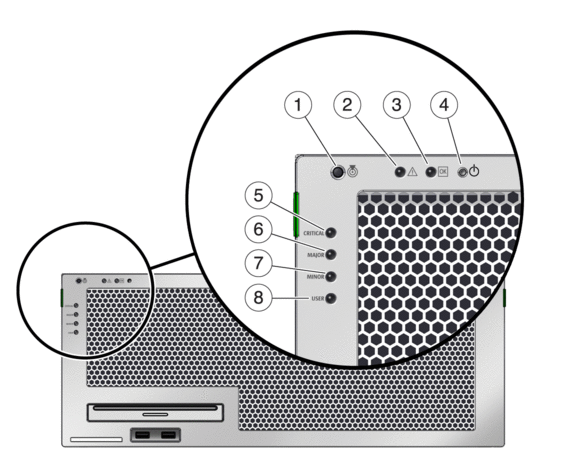
Figure Legend
1 Locator LED
2 Fault LED
3 Activity LED
4 Power button
5 Critical (Red) Alarm Status indicator
6 Major (Red) Alarm Status indicator
7 Minor (Amber) Alarm Status indicator
8 User (Amber) Alarm Status indicator
TABLE 4-3 provides the electrical specifications of the Sun Netra T5440 server.
To power on the server, you must connect and configure the network and serial ports. The procedures are given in the following sections.
The server also has serial and USB ports available for connections to optional devices (see Cable Connections and Ports).
Note - When you are finished connecting the cables to the server, ensure that the server can slide smoothly in and out of the rack without binding or damaging the cables.. |
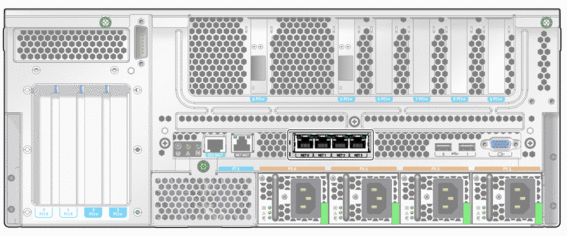
The service processor serial management port is marked SER MGT (FIGURE 4-3). It is the leftmost RJ-45 port on the rear panel.
Note - The cable and DB-9 RJ-45 adapters are for the host serial port, and not for the server SER MGT port. |
Use this port for server management. This port is needed to set up the service processor network management port, as detailed in Enabling the Service Processor Network Management Port.
Note - Use the service processor serial management port only for server management. It is the default connection between the service processor and a terminal or a computer. |
|
The service processor network management port is labeled NET MGT (FIGURE 4-4). It is located just to the right of the serial management (SER MGT) port on the rear panel.
Note - This port is not operational until you configure the network settings (through the serial managment port), as detailed in Configuring the Service Processor Network Management Port. |
Note - If you have access to a DHCP server on the network, you can see the service processor get an IP address because the DHCP client is enabled by default. |
Note - The service processor network management port is configured by default to retrieve network settings with Dynamic Host Configuration Protocol (DHCP) and allow connections using Solaris Secure Shell (SSH). You might need to modify these settings for your network. Instructions are given in Chapter 5. |
The server has four network connectors, marked NET0, NET1, NET2, and NET3 (FIGURE 4-5). These connectors are RJ-45 Gigabit Ethernet.
Connect a Category 5 cable from your network switch or hub to Ethernet Port 0 (NET0) on the rear of the chassis.
NET0 is the farthest left port in the 4-port network cluster in FIGURE 4-5.
Connect Category 5 cables from your network switch or hub to the remaining Ethernet ports, as needed.
The Ethernet ports are labeled left to right: NET 0, NET1, NET2, NET3.
Note - The LEDs located above each NET port are Link/Activity (left) and Speed (right) indicators for each port. |
Powering on the system for the first time requires special preparation and procedures. For example, if you have not prepared a display before connecting the AC power cable, system messages might be lost.
| Caution - Finish the hardware procedures in this chapter, but do not attach the AC power cable yet. |
Powering on the system for the first time requires special preparation and procedures. For example, if you have not prepared a display before connecting the AC power cable, system messages could be missed.
| Caution - The server goes into Standby mode and the service processor initializes as soon as the AC power cable is connected to the power source. |
Go to Powering On the System for the First Time for instructions on connecting the server to AC power.
This section provides DC power cabling and requirements information.
TABLE 4-4 lists DC power source requirements for each power supply in the Sun Netra T5440 server, and TABLE 4-5 lists DC power source requirements for the server as a whole.
The server must meet the following:
Power supply connections through the input connector: 12 AWG (between the Sun Netra T5440 server and the source). There are three conductors:
System ground conductor: 12 AWG (to be connected to the chassis)
Cable insulation rating: Minimum of 75°C (167°F), low smoke fume (LSF), flame retardant
Branch circuit cable insulation color: Per applicable National Electrical Codes
DC power source must meet TNV-2 requirements as defined by UL 60950-1 and IEC 60950-1
Note - Depending on the DC power source, the -48V (negative terminal) might be marked with a minus (-) symbol, and the -48V Return (positive terminal) might be marked with a positive (+) symbol. |
When attaching DC cables, keep the following requirement in mind:
Overcurrent protection devices must be provided as part of each equipment rack.
Circuit breakers must be located between the DC power source and the Sun Netra T5440 server. Use one 20 A fast trip DC-rated circuit breaker for each power supply unit.
Note - Overcurrent protection devices must meet applicable national and local electrical safety codes and be approved for the intended application. |
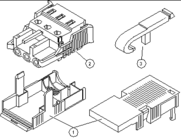
Identify the parts that you will use to assemble the DC input power cable (FIGURE 4-6).
The following DC connection parts are required to assemble one or more DC power input cables. These cables connect the -48V DC input source(s) to the power supply units.
Turn off power from the DC power source through the circuit breakers.
| Caution - Do not proceed with these instructions until you have turned off the power from the DC power source through the circuit breakers. |
Locate the three wires coming from the DC power source that will be used in the connection to your unit:
Strip 5/16 inches (8 mm) of insulation from each of the wires coming from the DC power source.
Do not strip more than 5/16 inches (8 mm) from each wire. Doing so leaves uninsulated wire exposed from the DC connector after the assembly is complete.
Open the cage clamp for this section of the DC input plug by taking one of the following actions:
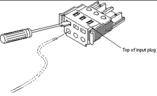
Insert the tip of the cage clamp operating lever into the rectangular hole directly above the hole in the DC input plug where you want to insert the first wire. Press down on the cage clamp operating lever (FIGURE 4-7).
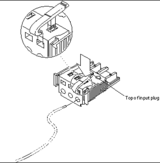
Insert a small slotted screwdriver into the rectangular hole directly above the hole in the DC input plug where you want to insert the first wire, and press down on the screwdriver (FIGURE 4-8).
Feed the exposed section of the appropriate wire into the rectangular plug hole in the DC input plug.
FIGURE 4-9 shows which wires should be inserted into each hole in the DC input plug.
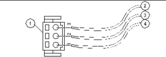
Figure Legend
1 Top of connector
2 From -48V return
3 From chassis ground (green/yellow)
4 From -48V
Repeat Step 13 and Step 16 for the other two wires to complete the assembly of the DC input power cable.
Repeat Step 8 through Step 17 to create as many DC input power cables as you need for your unit.
You need two DC input power cables for each of the power supplies.
If you need to remove a wire from the DC input plug, insert the cage clamp operating lever or a small screwdriver into the slot directly above the wire and press down (FIGURE 4-7 and FIGURE 4-8). Pull the wire from the DC input plug.
| Sun Netra T5440 Server | E23168-01 |
Copyright © 2011, Oracle and/or its affiliates. All rights reserved.
 To Connect the Service Processor Serial Management
Port
To Connect the Service Processor Serial Management
Port