|
| |
| Sun Java System Identity Manager 2005Q4M3 Administration | |
3
User and Account Management
This chapter provides information and procedures for managing users from the Identity Manager Administrator interface. You will learn about Identity Manager users and account management tasks, including:
- User account data, and how it is stored
- Accounts area of the Identity Manager Administrator Interface
- Account creation and editing capabilities, and other account-related tasks
- User account search features
- Password policies and user account passwords
- User self-service
- User authentication
- Bulk account actions
About User Account DataA user is anyone who holds an Identity Manager system account. Identity Manager stores a range of data for each user. Collectively, this information forms a user’s Identity Manager identity.
Viewed from the Create User page (Accounts tab) of the Administrator Interface, Identity Manager categorizes user data in four areas:
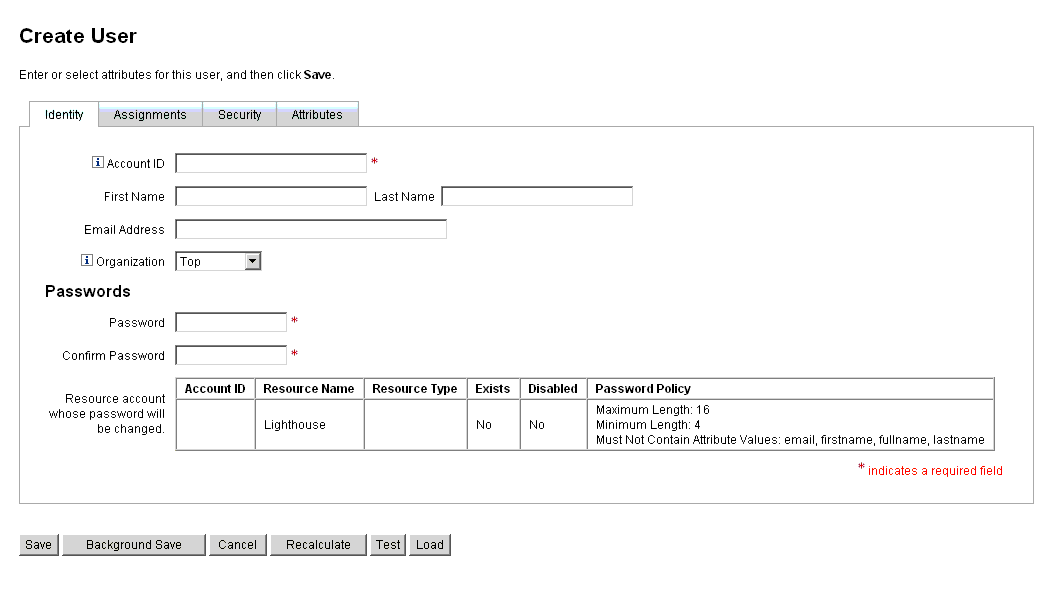
Identity
The Identity area defines a user’s account ID, name, contact information, governing organization, and Identity Manager account password. It also identifies the resources to which the user has access, and the password policy governing each resource account.
Note For information about setting up account password policies, read the section in this chapter titled Setting Password Policies.
The following figure illustrates the Identity area of the Create User page.
Figure 1. Create User - Identity
Assignments
The Assignments area sets limits for access to Identity Manager objects, such as resources.
Click the Assignments form tab to set up:
- Identity Manager account policy assignment — Establishes password and authentication limits.
- Roles assignment — Profiles a class of users. Roles define user access to resources through indirect assignment.
- Resources and resource groups access — Shows available resources and resource groups that can be directly assigned to the user, and resources that can be excluded from user access. These supplement resources that are indirectly assigned to the user through role assignment.
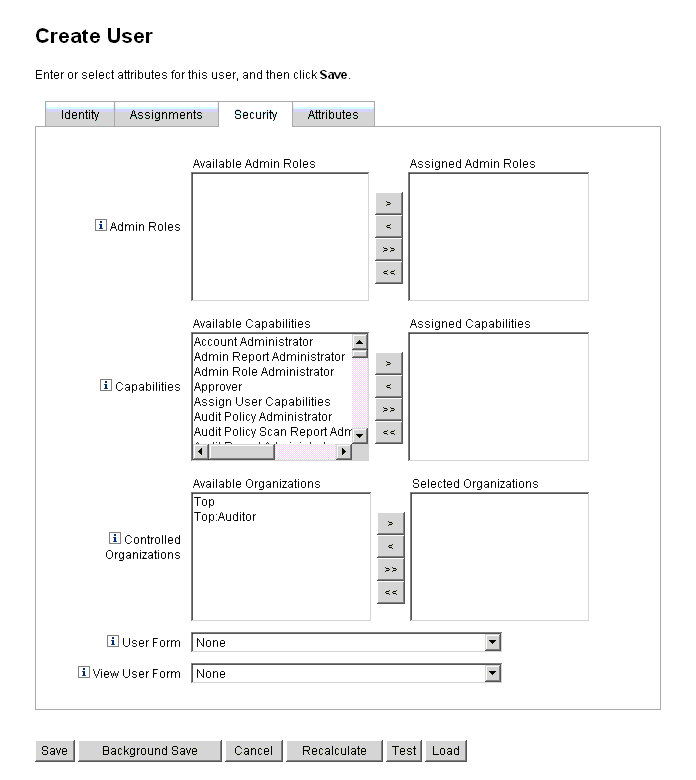
Security
In Identity Manager terminology, a user who is assigned extended capabilities is an Identity Manager administrator. The Security area establishes these extended administrative capabilities for the user, through assignment of:
- Admin roles — Combine a specific, unique set of capabilities and controlled organizations, facilitating coordinated assignment to administrative users.
- Capabilities — Enable rights in the Identity Manager system. Each Identity Manager administrator is assigned one or more capabilities, frequently aligned with job responsibilities.
- Controlled organizations — Assigns organizations that this user has rights to manage as an administrator. He can manage objects in the assigned organization and in any organizations below that organization in the hierarchy.
Figure 2. Create User - Security
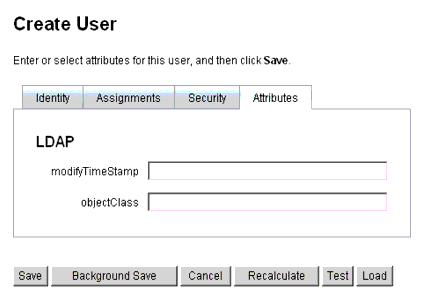
Attributes
The Attributes area defines account attributes associated with assigned resources. Listed attributes are categorized by assigned resource, and differ depending on which resources are assigned.
Figure 3. Create User - Attributes
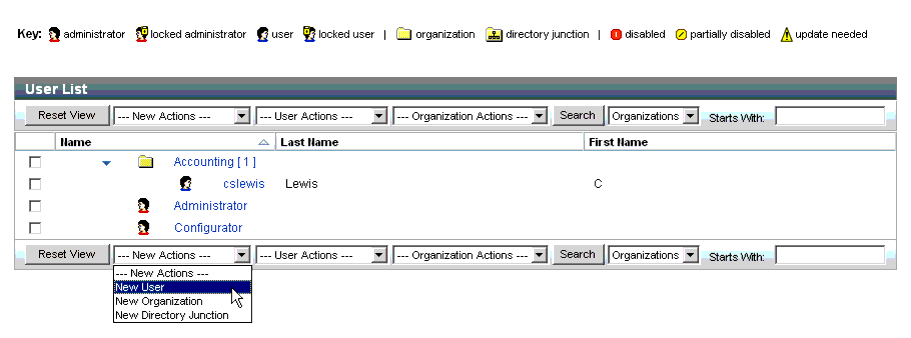
Accounts AreaThe Identity Manager accounts area lets you manage Identity Manager users. To access this area, select Accounts from the Administrator Interface.
The accounts list shows all Identity Manager user accounts. Accounts are grouped in organizations and virtual organizations, which are represented hierarchically in folders.
You can sort the accounts list by full name (Name), user last name (Last Name), or user first name (First Name).
Click the header bar to sort by a column. Clicking the same header bar toggles between ascending and descending sort order.
Note When you sort by full name (the Name column), then all items in the hierarchy, at all levels, are sorted alphabetically.
To expand the hierarchical view and see accounts in an organization, click the triangular indicator next to a folder. Collapse the view by clicking the indicator again.
Figure 4. Accounts List
Actions Lists in the Accounts Area
Use the actions lists (located at the top and bottom of the accounts area) to perform a range of actions. Actions list selections are divided among:
- New Actions — Create users, organizations, and directory junctions.
- User Actions — Edit, view, and change status of users; change and reset passwords; delete, enable, disable, unlock, move, update, and rename users; and run a user audit report.
- Organization Actions — Perform a range of organization and user actions.
Searching in the Accounts Area
Use the accounts area search feature to locate users and organizations. Select Organizations or Users from the list, enter one or more characters in the search area, and then click Search.
User Account Status
Icons that display next to each user account indicate current, assigned account status:
Working with User AccountsFrom the Administrator Interface Accounts area, you can perform a range of actions on these system objects.
Users
View
To view user account details, select a user in the list, and then select View from the User Actions list.
The View User page displays a subset of the identity, assignments, security, and attributes information selections made when editing or creating the user. The information on the View User page cannot be edited. Click Cancel to return to the Accounts list.
Create (New Actions List, New User Selection)
To create a user account, select New User from the New Actions list.
Tip If you want to create a user in an organization other than Top, select an organization folder, and then select New User from the New Actions list.
Selections available in one area may depend on selections you make in another.
The Create User page (also called the user form) is a multi-page form that lets you set up the user’s:
- Identity — Name, email, organization, and password details
- Assignments — Account policy, roles, and resources
- Security — Organizations and capabilities
- Attributes — Specific attributes for assigned resources
Note To better reflect your business processes or specific administrator capabilities, you can configure the user form specifically for your environment, For more information about the user form, see Identity Manager Workflows, Forms, and Views.
Click form tabs to navigate the Create User page. You can move among form tabs in any order. When your selections are complete, you have two options for saving a user account:
- Save — Saves the user account. If you assign a large number of resources to the account, this process could take some time.
- Background Save — This process saves a user account as a background task, which allows you to continue working in Identity Manager. A task status indicator displays on the Accounts page, the Find User Results page, and the Home page, for each save in progress.
Tip By moving your mouse over the user icon that displays within the status indicator, you can see details about the background save process.
Creating Multiple User Accounts (Identities)
You can create more than one user account on a single resource. When you create (or edit) a user, and then assign the user one or more resources, you can also request and define an additional account on that resource.
Edit
To edit account information, choose one of these actions:
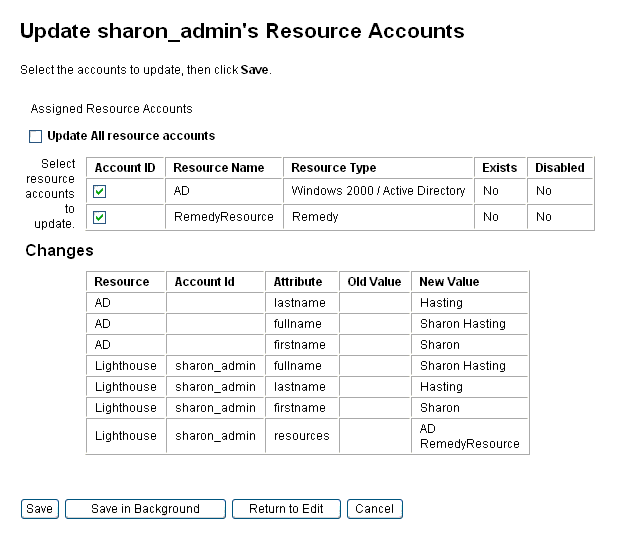
After you make and save changes, Identity Manager displays the Update Resource Accounts page. This page shows resource accounts assigned to the user and the changes that will apply to the account. Select Update All resource accounts to apply changes to all assigned resources; or individually select none, one, or more resource accounts associated with the user to update.
Figure 5. Edit User (Update Resource Accounts)
Click Save again to complete the edit, or click Return to Edit to make further changes.
Move Users (User Actions)
The Change Organization of User task allows you to remove a user from his currently assigned organization and then reassign, or move, the user to a new organization.
To move users to a different organization, select one or more user accounts in the list, and then select Move from the User Actions list.
Rename (User Actions)
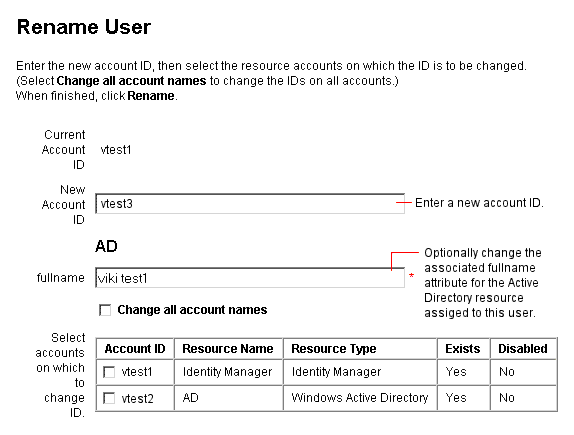
Typically, renaming an account on a resource is a complex action. Because of this, Identity Manager provides a separate feature to rename a user’s Identity Manager account or one or more resource accounts that are associated with that user.
To use the rename feature, select a user account in the list, and then select the Rename option from the User Actions list.
The Rename User page allows you to change the user account name, associated resource account names, and resource account attributes associated with the user’s Identity Manager account.
Note Some resource types do not support account renaming.
As shown in the following figure, the user has an assigned Active Directory resource. During the renaming process, you can change:
Disable Users (User Actions, Organization Actions
When you disable a user account, you alter that account so that the user can no longer log in to Identity Manager or to his assigned resource accounts.
Note For assigned resources that do not support account disabling, the user account is disabled through assignment of a new, randomly generated password.
Disabling Single User Accounts
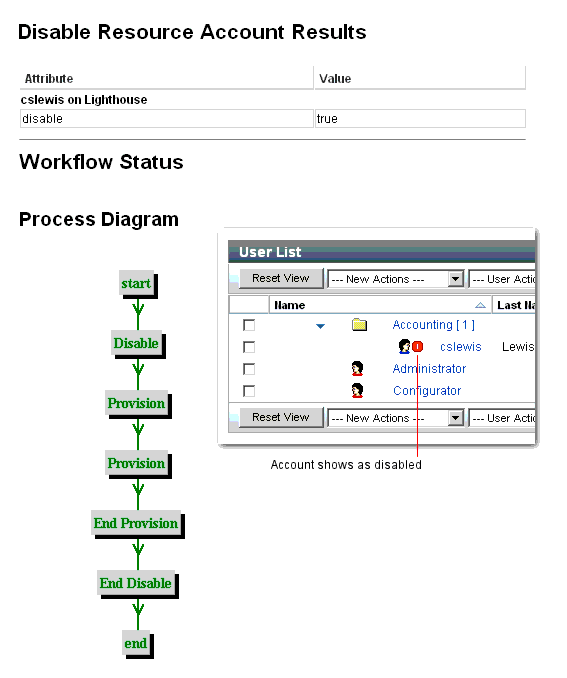
To disable a user account, select it in the list, and then select Disable from the User Actions list.
On the displayed Disable page, select the resource accounts to disable, and then click OK. Identity Manager displays the results of disabling the Identity Manager user account and all associated resource accounts. The accounts list indicates that the user account is disabled.
Figure 7. Disabled Account
Disabling Multiple User Accounts
You can disable two or more Identity Manager user accounts at the same time.
Select more than one user account in the list, and then select Disable from the User Actions list.
Note When you choose to disable multiple user accounts, you cannot select individually assigned resource accounts from each user account. Rather, this process disables all resources on all user accounts you select.
Enable Users (User Actions, Organization Actions)
User account enabling reverses the disabling process. For resources that do not support account enabling, Identity Manager generates a new, random password. Depending on selected notification options, it also displays that password on the administrator’s results page.
The user can then reset his password (through the authentication process), or a user with administrator privileges can reset it.
Enabling Single User Accounts
To enable a user account, select it in the list, and then select Enable from the User Actions list.
On the displayed Enable page, select the resources to enable, and then click OK. Identity Manager displays the results of enabling the Identity Manager account and all associated resource accounts.
Enabling Multiple User Accounts
You can enable two or more Identity Manager user accounts at the same time. Select more than one user account in the list, and then select Enable from the User Actions list.
Note When you choose to enable multiple user accounts, you cannot select individually assigned resource accounts from each user account. Rather, this process enables all resources on all user accounts you select.
Update Users (User Actions, Organization Actions)
In an update action, Identity Manager updates the resources that are associated with a user account. Updates performed from the accounts area send any pending changes that were previously made to a user to the resources selected. This situation may occur if:
- A resource was unavailable when updates were made.
- A change was made to a role or resource group that needed to be pushed to all users assigned to that role or resource group. In this case, you should use the Find User page to search for users, and then select one or more users on which to perform the update action.
When you update the user account, you can:
Updating Single User Accounts
To update a user account, select it in the list, and then select Update from the User Actions list.
On the Update Resource Accounts page, select one or more resources to update, or select Update All resource accounts to update all assigned resource accounts. When finished, click OK to begin the update process. Alternatively, click Save in Background to perform the action as a background process.
A confirmation page confirms the data sent to each resource.
Figure 8. Update Resource Accounts
Updating Multiple Accounts
You can update two or more Identity Manager user accounts at the same time. Select more than one user account in the list, and then select Update from the User Actions list.
Note When you choose to update multiple user accounts, you cannot select individually assigned resource accounts from each user account. Rather, this process updates all resources on all user accounts you select.
Unlock Users (User Actions, Organization Actions)
A user can be locked out of one or more resource accounts because his login retry attempts have exceeded the login limits established for that resource. The user’s effective Lighthouse account policy establishes the maximum number of failed password or question login attempts that can be made.
When a user is locked because he exceeds the maximum number of failed password login attempts, then he is not allowed to authenticate to any Identity Manager application interface, including the User interface, Administrator interface, Forgot My Password, BPE, SOAP, and console. If he is locked because he exceeds the maximum number of failed question login attempts, then he can authenticate to any Identity Manager application interface except Forgot My Password.
Failed Password Login Attempts
If locked due to failed password login attempts, a user account will remain locked until:
- An administrative user unlocks it. To successfully unlock the account, the administrator must be assigned the Unlock User capability, and must have administrative control of the user’s member organization.
- The current date and time is later than the user’s lock expiration date and time, if a lock expiration date and time was set. (The Lock Timeout value in the LIghthouse Account Policy sets lock expiration.)
Failed Question Login Attempts
If locked due to exceeding the maximum number of failed question login attempts, a user account will remain locked until:
- An administrative user unlocks it. To successfully unlock the account, the administrator must be assigned the Unlock User capability, and must have administrative control of the user’s member organization.
- The locked user, or a user with appropriate capabilities changes or resets the user’s password.
An administrator with appropriate capabilities can perform these operations on a user in locked state:
A user in locked state cannot log in to any Identity Manager application, including the Administrator interface, User interface, and BPE. This limitation applies irrespective of whether the user attempts to log in with his Identity Manager user ID and password, by providing his user ID and answers to authentication questions, or by passthrough to one or more resources.
To unlock accounts, select one or more user accounts in the list, and then select Unlock Users from the User Actions or Organization Actions list.
Deletion (User Actions, Organization Actions)
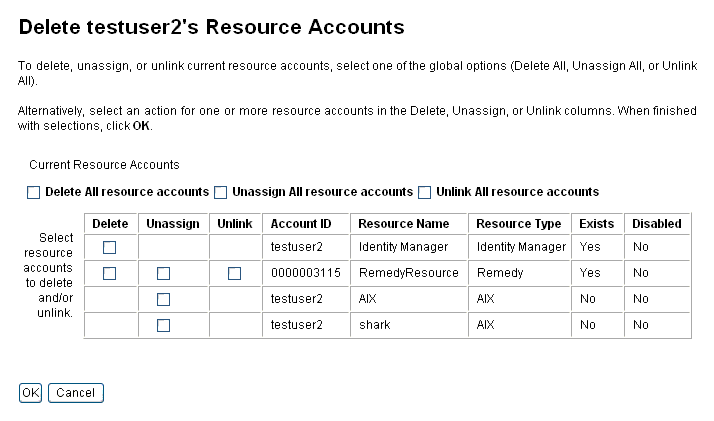
Delete actions include several options that remove Identity Manager user account access from a resource:
- Delete — For each resource selected, Identity Manager deletes the associated resource account. The selected resources are also unlinked from the Identity Manager user.
- Unassign — For each resource selected, Identity Manager removes the associated resource from the user's list of assigned resources. The selected resources are unlinked from the user. The associated resource account is not deleted.
- Unlink — For each resource selected, Identity Manager removes the associated resource account information from the Identity Manager user.
Note If you unlink an account that has been indirectly assigned to the user through a role or resource group, the link may be restored when the user is updated.
To begin a delete action, select a user account, and then select the appropriate deletion action from the User Actions or Organization Actions list.
Identity Manager displays the Delete Resource Accounts page.
Deleting the User Account and Resource Accounts
To delete an Identity Manager user account or resource accounts, make selections in the Delete column, and then click OK. To delete all resource accounts, select the Delete All resource accounts option, and then click OK.
Unassigning or Unlinking Resource Accounts
To unassign or unlink resource accounts from the Identity Manager user account, make individual selections in the Unassign or Unlink columns, and then click OK. To unassign all resource accounts, select the Unassign All resource accounts or Unlink All resource accounts option, and then click OK.
Figure 9. Delete User Account and Resource Accounts
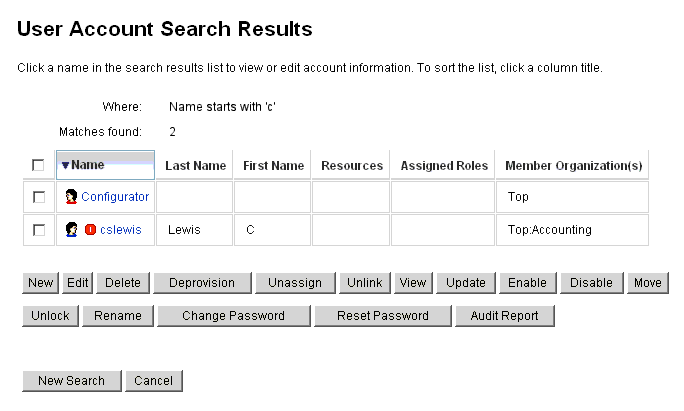
Finding AccountsThe Identity Manager find feature lets you search for user accounts. After you enter and select search parameters, Identity Manager finds all accounts that match your selections.
To search for accounts, select Accounts from the menu bar, and then select Find Users. You can search for accounts by one or more of these search types:
- Account detail, such as user name, email address, or last name, or first name. These choices depend on your institution's specific Identity Manager implementation.
- Resource account status, including:
- User account status, including:
- Update status, including:
- Assigned resource
- Role
- Organization
- Organizational control
- Capabilities
- Admin role
The search results list shows all accounts that match your search. From the results page, you can:
- Select user accounts to edit. To edit an account, click it in the search results list; or select it in the list, and then click Edit.
- Perform actions (such as enable, disable, unlock, delete, update, or change/reset passwords) on one or more accounts. To perform an action, select one or more accounts in the search results list, and then click the appropriate action.
- Create user accounts.
Figure 10. User Account Search Results
Setting Password PoliciesResource password policies establish the limitations for passwords. You can edit a password policy to set or select values for a range of characteristics.
To begin working with password policies, select Configure from the menu bar, and then select Policies.
To edit a password policy, select it from the Policies list. To create a password policy, select String Quality Policy from the New list of options.
Creating a Policy
Password policies are the default type for string quality policies. After naming and providing an optional description for the new policy, you will select options and parameters for the rules that define it.
Length Rules
Length rules set the minimum and maximum required character length for a password. Select to enable the rule, and then enter a limit value for the rule.
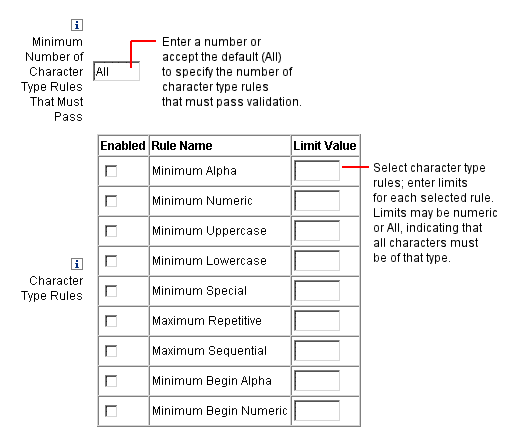
Character Type Rules
Character type rules establish the minimum and maximum characters of certain types and number that can be included in a password. These include:
Enter a numeric limit value for each character type rule; or enter All to indicate that all characters must be of that type.
Minimum Number of Character Type Rules
You also can set the minimum number of character type rules that must pass validation. The minimum number that must pass is 1. The maximum cannot exceed the number of character type rules that you have enabled.
Tip To set the minimum number that must pass to the highest value, enter All.
Figure 11. Password Policy (Character Type) Rules
Dictionary Policy Selection
You can choose to check passwords against words in a dictionary. Before you can use this option, you must:
You configure the dictionary from the Policies page. For more information about how to set up the dictionary, read the chapter titled Configuring Dictionary Support in Identity Manager Deployment Tools.
Password History Policy
You can prohibit re-use of passwords that were used immediately preceding a newly selected password.
In the Number of Previous Passwords that Cannot be Reused field, enter a numeric value greater than one to prohibit re-use of the current and preceding passwords. For example, if you enter a numeric value of 3, the new password cannot be the same as the current password or the two passwords used immediately before it.
You can also prohibit re-use of similar characters from passwords used previously. In the Maximum Number of Similar Characters from Previous Passwords that Cannot be Reused field, enter the number of consecutive characters from the previous password or passwords that cannot be repeated in the new password. For example, if you enter a value of 7, and the previous password was password1, then the new password cannot be password2 or password3.
If you enter a value of 0, then all characters must be different regardless of sequence. For example, if the previous password was abcd, then the new password cannot include the characters a, b, c, or d.
The rule can apply to one or more previous passwords. The number of previous passwords checked is the number specified in the Number of Previous Passwords that Cannot be Reused field.
Must Not Contain Words
You can enter one or more words that the password may not contain. In the entry box, enter one word on each line.
Note You can also exclude words by configuring and implementing the dictionary policy. For more information, read the chapter titled Configuration.
Must Not Contain Attributes
Select one or more attributes that the password may not contain. Attributes include:
Implementing Password Policies
Password policies are established for each resource. To put a password policy in place for a specific resource, select it from the Password Policy list of options, which is located in the Policy Configuration area of the Create or Edit Resource Wizard: Identity Manager Parameters pages.
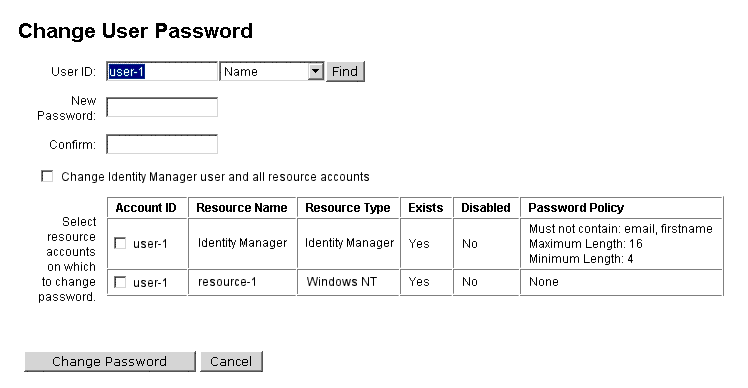
Working with User Account PasswordsAll Identity Manager users are assigned a password. When set, the Identity Manager user password is used to synchronize the user’s resource account passwords. If one or more resource account passwords cannot be synchronized (for example, to comply with required password policies), you can set them individually.
Changing User Account Passwords
To change a user account password:
Enter and confirm new password information, and then click Change Password to change the user password on the listed resource accounts. Identity Manager displays a workflow diagram that shows the sequence of actions taken to change the password.
Figure 12. Change User Password
Resetting User Account Passwords
The process for resetting Identity Manager user account passwords is similar to the change process. The reset process differs from a password change in that you do not specify a new password. Rather, Identity Manager randomly generates a new password (depending on your selections and password policies) for the user account, resource accounts, or a combination of these.
The policy assigned to the user – either by direct assignment or through the user’s organization – controls several reset options, including:
- How often a password may be reset before resets are disabled
- Where the new password is displayed or sent. Depending on the Reset Notification Option selected for the role, Identity Manager emails the new password to the user or displays it (on the Results page) to the Identity Manager administrator requesting the reset.
Password Expiration on Reset
By default, when you reset a user password, it is immediately expired. This means that after reset, the first time a user logs in, he must select a new password before gaining access. This default can be overridden in the form, such that the user's password will expire according to the expire password policy set in the Lighthouse Account Policy associated with the user instead.
For example, in the Reset User Password Form, you would set resourceAccounts.currentResourceAccounts[Lighthouse].expirePassword to a value of false.
There are two ways to expire a password via the Reset Option field in the Lighthouse Account Policy:
- permanent — The time period specified in the passwordExpiry policy attribute is used to calculate the relative date from the current date when the password is reset, and then set that date on the user. If no value is specified, the changed or reset password never expires.
- temporary — The time period specified in the tempPasswordExpiry policy attribute is used to calculate the relative date from the current date when the password is reset, and then set that date on the user. If no value is specified, the changed or reset password never expires. If tempPasswordExpiry is set to a value of 0, then the password is expired immediately.
Note The tempPasswordExpiry attribute applies only when passwords are reset (randomly changed); it does not apply to password changes.
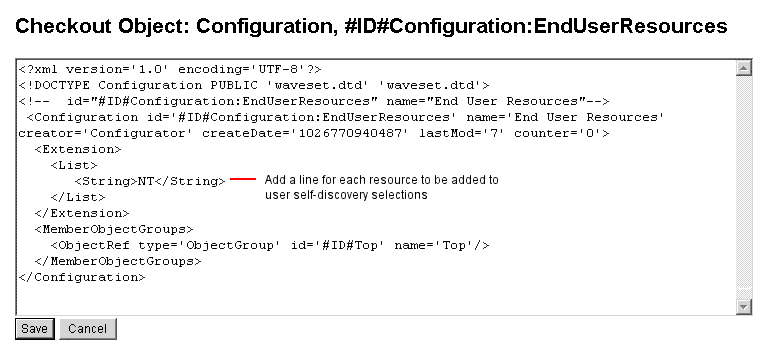
User Self-DiscoveryThe Identity Manager User Interface allows users to discover resource accounts. This means that a user with an Identity Manager identity can associate it with an existing, but unassociated, resource account.
Enabling Self-Discovery
To enable self-discovery, you must edit a special configuration object (End User Resources) and add to it the name of each resource on which the user will be allowed to discover accounts. To do this:
- Open the Identity Manager System Settings page (idm/debug).
- Select Configuration from the list of Configuration types, and then click List Objects.
- Click Edit next to End User Resources to display the configuration object.
- Add <String>Resource</String>, where Resource matches the name of a resource object in the repository.
Figure 13. End User Resources Configuration Object
- Click Save.
When self-discovery is enabled, the user is presented with a new menu item on the Identity Manager User Interface (Inform Identity Manager of Other Accounts) This area allows him to select a resource from an available list, and then enter the resource account ID and password to link the account with his Identity Manager identity.
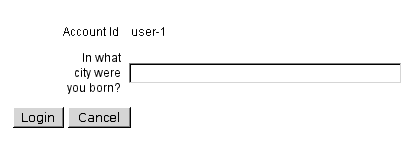
User AuthenticationIf a user forgets his password or his password is reset, he can answer one or more account authentication questions to gain access to Identity Manager. You establish these questions, and the rules that govern them, as part of an Identity Manager account policy. Unlike password policies, Identity Manager account policies are assigned to the user directly or through the organization assigned to the user (on the Create and Edit User pages).
To set up authentication in an account policy:
Important! When first set up, the user should log in to the Identity Manager User Interface and provide initial answers to his authentication questions. If these answers are not set, the user cannot successfully log in without his password.
Depending on the authentication rules set, you can require a user to answer:
- All authentication questions
- Any one of the authentication questions
- Randomly selected questions from the set; the number of questions is determined by a value you specify
- One or more questions selected in sequence from the set
Note You can verify your authentication choices by logging in to the Identity Manager User Interface, clicking Forgot Your Password?, and answering the presented question or questions.
Figure 14. User Account Authentication
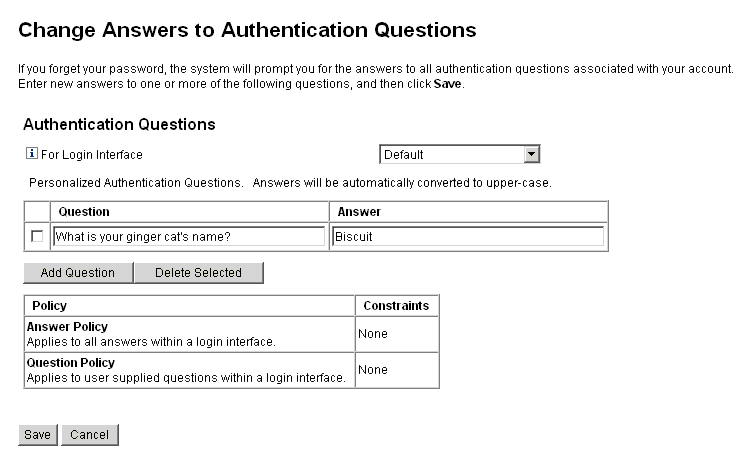
Personalized Authentication Questions
In the Lighthouse account policy, you can select an option to allow users to supply their own authentication questions in the User and Administrator interfaces. You can additionally set the minimum number of questions that the user must provide and answer to be able to log in successfully by using personalized authentication questions.
Users then can add and change questions from the Change Answers to Authentication Questions page.
Figure 15. Change Answers — Personalized Authentication Questions
Bypassing the Change Password Challenge after Authentication
When a user successfully authenticates by answering one or more questions, by default he is challenged by the system to provide a new password. You can configure Identity Manager to bypass the change password challenge, however, by setting the bypassChangePassword system configuration property, for one or more Identity Manager applications.
To bypass the change password challenge for all applications following successful authentication, set the bypassChangePassword property as follows in the system configuration object:
<Attribute name="ui">
<Object>
<Attribute name="web">
<Object>
<Attribute name='questionLogin'>
<Object>
<Attribute name='bypassChangePassword'>
<Boolean>true</Boolean>
</Attribute>
</Object>
</Attribute>
...
</Object>
...To disable it for a specific application, set it as follows:
<Attribute name="ui">
<Object>
<Attribute name="web">
<Object>
<Attribute name='user'>
<Object>
<Attribute name='questionLogin'>
<Object>
<Attribute name='bypassChangePassword'>
<Boolean>true</Boolean>
</Attribute>
</Object>
</Attribute>
</Object>
</Attribute>
...
</Object>
...
Bulk Account ActionsYou can perform several bulk actions on Identity Manager accounts, which allow you to act on multiple accounts at the same time. Bulk actions you can initiate are:
- Delete — Deletes, unassigns, and unlinks any selected resource accounts. Select the Target the Identity Manager Account option to delete each user’s Identity Manager account.
- Delete and Unlink — Deletes any selected resource accounts and unlinks the accounts from the users.
- Disable — Disables any selected resource accounts. Select the Target the Identity Manager Account option to disable each user's Identity Manager account.
- Enable — Enables any selected resource accounts. Select the Target the Identity Manager Account option to enable each user’s Identity Manager account.
- Unassign — Unlinks any selected resource accounts and removes the Identity Manager user account's assignments to those resources. Unassigning does not remove the account from the resource. You cannot unassign an account that has been indirectly assigned to the Identity Manager user through a role or resource group.
- Unlink — Removes a resource account’s association (link) with the Identity Manager user account. Unlinking does not remove the account from the resource. If you unlink an account that has been indirectly assigned to the Identity Manager user through a role or resource group, the link may be restored when the user is updated.
Bulk actions work best if you have a list of users in a file or application, such as an email client or spreadsheet program. You can copy and paste the list into a field on this interface page, or you can load the list of users from a file.
Many of these actions can be performed on the results of a user search. Search for users on the Find Users page under the Accounts tab.
Launching Bulk Account Actions
To launch bulk account actions, select or enter values, and then click Launch. Identity Manager launches a background task to perform the bulk actions.
Tip To monitor the status of the bulk actions task, go to the Tasks tab, and then click the task link.
Using Action Lists
You can specify a list of bulk actions using comma-separated values (CSV) format. This allows you to provide a mix of different action types in a single action list. In addition, you can specify more complicated creation and update actions.
The CSV format consists of two or more input lines. Each line consists of a list of values separated by commas. The first line contains field names. The remaining lines each correspond to an action to be performed on an Identity Manager user, the user's resource accounts, or both. Each line should contain the same number of values. Empty values will leave the corresponding field value unchanged.
Two fields are required in any bulk action CSV input:
- user — Contains the name of the Identity Manager user.
- command — Contains the action taken on the Identity Manager user. Valid commands are:
- Delete — Deletes, unassigns, and unlinks resource accounts, the Identity Manager account, or both.
- DeleteAndUnlink — Deletes and unlinks resource accounts.
- Disable — Disables resource accounts, the Identity Manager account, or both.
- Enable — Enables resource accounts, the Identity Manager account, or both.
- Unassign — Unassigns and unlinks resource accounts.
- Unlink — Unlinks resource accounts.
- Create — Creates the Identity Manager account. Optionally creates resource accounts.
- Update — Updates the Identity Manager account. Optionally creates, updates, or deletes resource accounts.
- CreateOrUpdate — Performs a create action if the Identity Manager account does not already exist. Otherwise, it performs an update action.
Delete, DeleteAndUnlink, Disable, Enable, Unassign,
and Unlink CommandsIf you are performing Delete, DeleteAndUnlink, Disable, Enable, Unassign, or Unlink actions, then the only additional field you need to specify is resources. Use the resources field to specify which accounts on which resources will be affected. It can have the following values:
- all — Process all resource accounts including the Identity Manager account.
- resonly — Process all of the resource accounts excluding the Identity Manager account.
- resource_name [ | resource_name ... ] — Process the specified resource accounts. Specify Identity Manager to process the Identity Manager account.
Following is an example of the CSV format for several of these actions:
command,user,resources
Delete,John Doe,all
Disable,Jane Doe,resonly
Enable,Henry Smith,Identity Manager
Unlink,Jill Smith,Windows Active Directory|Solaris ServerCreate, Update, and CreateOrUpdate Commands
If you are performing Create, Update, or CreateOrUpdate commands, then you can specify fields from the User View in addition to the user and command fields. The field names used are the path expressions for the attributes in the views. See
Identity Manager Workflows, Forms, and Views for information on the attributes that are available in the User View. If you are using a customized User Form, then the field names in the form contain some of the path expressions that you can use.Some of the more common path expressions used in bulk actions are:
- waveset.roles — A list of one or more role names to assign to the Identity Manager account.
- waveset.resources — A list of one or more resource names to assign to the Identity Manager account.
- waveset.applications — A list of one or more role names to assign to the Identity Manager account.
- waveset.organization — The organization name in which to place the Identity Manager account.
- accounts[resource_name].attribute_name — A resource account attribute. The names of the attributes are listed in the schema for the resource.
Example
Following is an example of the CSV format for create and update actions:
command,user,waveset.resources,password.password,password.confirmPassword,accounts[Windows Active Directory].description,accounts[Corporate Directory].location
Create,John Doe,Windows Active Directory|Solaris Server,changeit,changeit,John Doe - 888-555-5555,
Create,Jane Smith,Corporate Directory,changeit,changeit,,New York
CreateOrUpdate,Bill Jones,,,,,CaliforniaFields with More Than One Value
Some fields can have multiple values. These are known as multi-valued fields. For example, the waveset.resources field can be used to assign multiple resources to a user. You can use the vertical bar (|) character (also known as the “pipe” character), to separate multiple values in a field. The syntax for multiple values can be specified like this:
value0 | value1 [ | value2 ... ]
When updating multi-valued fields on existing users, replacing the current field's values with one or more new values may not be what you want. You may want to remove some values or add to the current values. You can use field directives to specify how to treat the existing field's values. Field directives go in front of the field value and are surrounded by the vertical bar character:
|directive [ ; directive ] | field values
You can choose from the following directives:
- Replace — Replace the current values with the specified values. This is the default if no directive (or just the List directive) is specified.
- Merge — Add the specified values to the current values. Duplicate values are filtered.
- Remove — Remove the specified values from the current values.
- List — Force the field's value to be handled as if it had multiple values, even if it only has a single value. This directive is not usually needed as most fields are handled appropriately regardless of the number of values. This is the only directive that can be specified with another directive.
Note Field values are case-sensitive. This is important when specifying the Merge and Remove directives. The values must match exactly to correctly remove values or avoid having multiple similar values when merging.
Special Characters in Field Values
If you have a field value with a comma (,) or double quote (“) character, or you want to preserve leading or trailing spaces, you must embed your field value within a pair of double quotes (“field_value”). You then need to replace double quotes in the field value with two double quote (") characters. For example, "John ""Johnny"" Smith" results in a field value of John "Johnny" Smith.
If you have a field value with a vertical bar (|) or backslash (\) character in it, you must precede it with a backslash (\| or \\).
Bulk Action View Attributes
When the Create, Update, or CreateOrUpdate actions are performed, there are additional attributes in the User View that are only used or available during bulk action processing. These attributes can be referenced in the User Form to allow behavior specific to bulk actions. The attributes are as follows:
- waveset.bulk.fields.field_name — These attributes contain the values for the fields that were read in from the CSV input, where field_name is the name of the field. For example, the command and user fields are in the attributes with path expressions waveset.bulk.fields.command and waveset.bulk.fields.user, respectively.
- waveset.bulk.fieldDirectives.field_name — These attributes are only defined for those fields for which a directive was specified. The value is the directive string.
- waveset.bulk.abort — Set this Boolean attribute to true to abort the current action.
- waveset.bulk.abortMessage — Set this to a message string to display when waveset.bulk.abort is set to true. If this attribute is not set, a generic abort message is displayed.
Correlation and Confirmation Rules
Use correlation and confirmation rules when you do not have the Identity Manager user name available to put in the user field of your actions. If you do not specify a value for the user field, then you must specify a correlation rule when launching the bulk action. If you do specify a value for the user field, then the correlation and confirmation rules will not be evaluated for that action.
A correlation rule looks for Identity Manager users that match the action fields. A confirmation rule tests an Identity Manager user against the action fields to determine whether the user is a match. This two-stage approach allows Identity Manager to optimize correlation by quickly finding possible users (based on name or attributes), and by performing expensive checks only on the possible users.
Create a correlation or confirmation rule by creating a rule object with a subtype of SUBTYPE_ACCOUNT_CORRELATION_RULE or SUBTYPE_ACCOUNT_CONFIRMATION_RULE, respectively.
Correlation Rules
Input for any correlation rule is a map of the action fields. Output must be one of:
A typical correlation rule generates a list of user names based on values of the fields in the action. A correlation rule may also generate a list of attribute conditions (referring to queryable attributes of Type.USER) that will be used to select users.
A correlation rule should be relatively inexpensive but as selective as possible. If possible, defer expensive processing to a confirmation rule.
Attribute conditions must refer to queryable attributes of Type.USER. These are configured as QueryableAttrNames in the Identity Manager UserUIConfig object.
Correlating on an extended attribute requires special configuration:
Confirmation Rules
Inputs to any confirmation rule are:
A confirmation rule returns a string-form Boolean value of true if the user matches the action fields; otherwise, it returns a value of false.
A typical confirmation rule compares internal values from the user view to the values of the action fields. As an optional second stage in correlation processing, the confirmation rule performs checks that cannot be expressed in a correlation rule (or that are too expensive to evaluate in a correlation rule). In general, you need a confirmation rule only when the:
A confirmation rule is run once for each matching user returned by the correlation rule.