
Follow the instructions in this chapter to replace the panels you removed from your cabinet and power on the system.
To replace the panels you removed, reverse the removal procedures given in the following sections:
Retract the stabilizer bar once you have replaced all the panels you removed.
Follow these procedures to power on the cabinet safely:

Figure 5-1 Control Panel
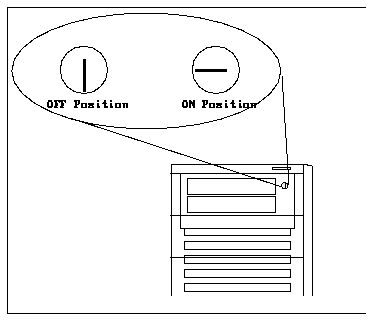
Figure 5-2 System Power Keyswitch
After you turn on the cabinet, you should see and hear several things happen:
Note - The system will power on 20 seconds after the key switch is turned on. This will allow the disk drives to spin up one at a time, which will minimize power surges.
After the CPU board completes the system self test, a message similar to the following will appear on your screen: [2])
-----------------------------------------------------

<<<< SPARCsystem 400 POST V4.1 >>
	... (various test messages) ...
SPARCsystem 400 Series (2 X xxxxx), No Keyboard
ROM Rev. -.-, --- MB Memory installed, Serial #---.
Ethernet address -:-:--:-:--:--, Host ID: ------.

-----------------------------------------------------
Caution -

Caution - Do not run SunDiagnostic Executive Release 1.2S on a 1.3 GB IPI disk drive.

You can use the Format Utility under SunOS 4.1 PSR A or SunDiag 2.1 or greater to read/write to a 1.3 GB IPI disk drive.
