This appendix describes various address space conflicts which may arise when
the SNC is added to a server that contains other hardware. These conflicts may
arise in the interrupt vector address space, the VME address space or the
DVMA space.
Sun Microsystems reserves a set of interrupt vectors in the kernel for other
devices. The range of these vectors is from 0xc8 to 0xff. By default the SNC
uses the interrupt vectors shown in the table below:
Table C-1
Interrupt Vectors for the Sun Network CoProcessor
SNC Interface Interrupt Vector
First SNC ne0 0xd4
Second SNC ne1 0xd5
Third SNC ne2 0xd6
Fourth SNC ne3 0xd7
Fifth SNC ne4 0xd8
Sixth SNC ne5 0xd9
Seventh SNC ne6 0xda
Eighth SNC ne7 0xdb
It is possible that other hardware previously installed in a server conflicts with
the interrupt vectors used by an SNC. If there is a conflict the system will show
evidence of spurious interrupts and even system panics. To correct the
situation you should change the interrupt vectors used by the SNC or the
device with which they conflict.
To change the interrupt vectors used by the SNC perform the following steps:
1. Change directory to/sys/sun{ 4 | 4m }/conf.

2. Edit the kernel configuration file. The name of the kernel can be found in
the message of the day file /etc/motd.

Note -
All of the interrupt vectors for hardware on a given system are defined
in the kernel configuration file. You can examine which vectors are being used
and make your modifications accordingly.
3. Find all of the device ne? lines that are similar to those shown below:

4. Change the interrupt vector numbers in the lines that begin with vector
to a value that will not conflict with other installed hardware.
5. Write and terminate the edit of the file.

6. Build the kernel configuration files for the new kernel:

7. Change directories to ../NAME_SNC

8. Make the kernel.

9. Remove the old kernel.

10. Move the kernel you have just created to the root directory. The kernel
can be over a megabyte in length. Be sure you have enough space for it.

11. If it does not already exist make a symbolic link to the kernel you just
moved.

12. Reboot the system to install the new SNC kernel.

The SNC uses a set of 16-bit VME addresses and a set of 32/24-bit VME
addresses. These addresses may conflict with the VME address used by other
boards already configured in your system. If there is a conflict, these addresses
must be changed.
SNC uses the 32-bit VME address space on Sun 600MP servers, and uses 24-bit
VME address space on all other Sun systems. It is possible that the SNC 32/24-
bit VME addresses may conflict with another vendor's board that uses either
32-bit or 24-bit VME addresses.
The default address space used by the SNC for 16 and 32/24-bit addresses is
shown below:
Table C-2
Default Address Space For The SNC
SNC 16-Bit VME Addresses 32/24-Bit VME Addresses
First (ne0) 0x6000 to 0x67ff 0x00a00000 to 0x00a7ffff
Second (ne1) 0x6800 to 0x6fff 0x00a80000 to 0x00afffff
Third (ne2) 0x5000 to 0x57ff 0x00b00000 to 0x00b7ffff
Fourth (ne3) 0x5800 to 0x5fff 0x00b80000 to 0x00bfffff
Fifth (ne4) 0x2000 to 0x27ff 0x00c00000 to 0x00c7ffff
Sixth (ne5) 0x2800 to 0x2fff 0x00c80000 to 0x00cfffff
Seventh (ne6) 0x3000 to 0x37ff 0x00d00000 to 0x00d7ffff
Eighth (ne7) 0x3800 to 0x3fff 0x00d80000 to 0x00dfffff
Note -
The following list of alternate addresses may be used. Any 16-bit VME
address may be used with any 24-bit address, assuming the configuration file
and switches on the board are set correctly.
Table C-3
Alternate Address Space For The SNC
SNC 16-Bit VME Addresses 32/24-Bit VME Addresses
Alternates 0x1000 to 0x17ff
Alternates 0x1800 to 0x1fff
Alternates 0x4000 to 0x47ff
Alternates 0x4800 to 0x4fff
Alternates 0x00800000 to 0x0087ffff
Alternates 0x00880000 to 0x008fffff
Alternates 0x00d00000 to 0x00d7ffff
Alternates 0x00d80000 to 0x00dfffff
Look at the address space used by other hardware to see that there is a VME
address space conflict. This should be defined in the hardware documentation.
It may help to examine the controller and device lines in the
configuration file. Cchange the switch settings on the boards to change the
SNC VME address space. If you change the switch settings for the VME
address space, you must change the kernel configuration files and rebuild the
kernel.
To change the VME address space used by the SNC:
1. Prepare the system for hardware adjustments.
a. Shutdown the system
b. Power down the system and unplug it.
c. Remove any cover panels that are in the way.
2. Perform the following steps.
a. Remove the SNC from the system.
Note -
The following examples give several alternative VME addresses and the
switch settings that correspond to them.
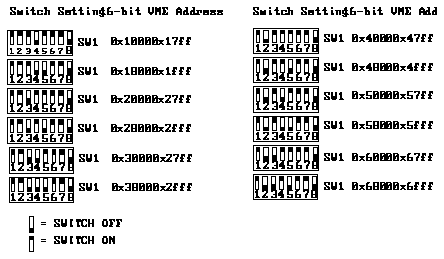
b. If the 16-bit VME address space for an SNC board conflicts with
existing devices in the system change the address jumpers on the
board. Make a note of the jumper setting and the 16-bit VME address
selected. See Figure C-2, note that jumpers marked in gray should not
be moved.

Figure C-1
SNC Jumper Settings for 16-bit VME Address Spaces
c. If the 16-bit VME address space for an switched SNC board conflicts
with existing devices in the system change Switch 1 on the board.
Make a note of the switch setting and the 16-bit VME address selected.
See Figure C-2.

Figure C-2
Switched SNC Switch Settings for 16-bit VME Address Spaces
Figure C-3 shows 32/24-bit VME addresses as set by the jumpers on an SNC. In
the figure, jumpers JP1 through JP13 correspond to the high-order 13 bits of 32-bit
VME addresses, and the JP9 through JP13 jumpers correspond to the high-order
five bits of 24-bit VME addresses.

Figure C-3
32-bit VME Address Jumper Assignments
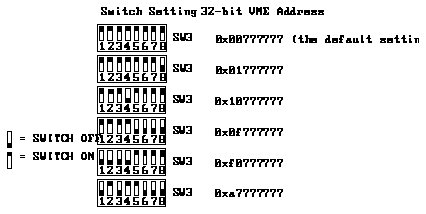
The ?????? notation in Figure C-3 corresponds to 32/24-bit VME addresses as
indicated by the setting of switch 2 on a switched SNC.

Figure C-4
sw3: 32-bit VME Address Switch Setting Example
Note -
All eight switches on switch 3 are significant.They change the high-
order eight bits of the 32-bit addresses that cause the SNC to respond.
Note -
Changing the value of switch 3 will not remove any 24-bit VME address
conflict that might exist. You should change the value of switch 3 only if you
encounter 32-bit VME address conflicts with the 32/24-bit VME addresses used
by the SNC. To change 24-bit VME addresses on the SNC, you must change
switch 2 only.
d. If the 32/24-bit VME address space conflicts with existing devices in
the system change Switch 2 on the board. Make a note of the switch
setting and the 24-bit VME address space selected. See Figure C-5, note
that the gray jumpers shown should not be changed when setting the
VME addresses.

Figure C-5
SNC Jumper Settings for 32/24-bit VME Address Space
e. If the 32/24-bit VME address space of a switched SNC board conflicts
with existing devices in the system change Switch 2 on the board.
Make a note of the switch setting and the 24-bit VME address space.
selected. See Figure C-6.

Figure C-6
SNC Switch Setting for 24-bit VME Address Space
3. Repeat the steps above for each SNC that conflicts with existing boards.
Replace the boards.
4. Power up and reboot the system.
5. Make appropriate changes to the kernel configuration file.
a. Change directories to /sys/sun{4 | 4m}/conf.

b. Edit the kernel configuration file. The name of the kernel can be found
in the message of the day file /etc/motd.

c. Find all of the device ne? lines that are similar to those shown
below:

d. If you changed the 16-bit VME address space on the SNC boards,
change the 0x6000, 0x6800, 0x5000, 0x5800, 0x2000, 0x2800,
0x3000, or 0x3800 VME addresses to their new values.
e. If you changed the 32/24-bit VME address space on the boards, change
the 0x00a00000, 0x00a80000, 0x00b00000, 0x00b80000,
0x00c00000, 0x00c80000, 0x00d00000, or 0x00d80000 VME
addresses to their new values.
f. Write and terminate the edit of the file.

6. Build and install an SNC kernel.
a. Change directory to /sys/sun{ 4 | 4m }/conf .

b. Build the kernel configuration files for the new kernel:

c. Change directories to ../filename.

d. Make the kernel.

e. Remove the old kernel.

f. Move the kernel you have just created to the root directory. The kernel
can be over a megabyte in length. Be sure you have enough space for it.

g. If it does not already exist make a symbolic link to the kernel you just
moved.

7. Reboot your system with the new kernel.

The SNC uses Direct Virtual Memory Access (DVMA) to transfer data between
itself and the host server. The size of the DVMA memory space used by SNC
hardware is not a configurable option. If the sum of all DVMA space used by
the peripherals installed in a server is greater than the amount available, some
of the peripherals in the server will not run correctly.
The issues associated with DVMA address space conflicts vary, depending on
whether you have installed the SNC in a SPARCserver 400 or SPARCserver
600.
C.3.1
DVMA Address Space Conflicts on SPARCserver 400
Solaris 1.x reserves about one megabyte of DVMA space for peripherals on
SPARCserver 400's. The following table shows the amount of DVMA address
space used by the SNC hardware.
Table C-4
DVMA Address Space Used by The SNC on SPARCserver 400
SNC's per Server Total DVMA Space Used (K bytes)
1 192
2 320
3 312
4 320
5 400
6 480
If the SPARCserver does not have the needed DVMA space, you must modify
the configuration of your server to allow more DVMA space for the installed
SNC(s).
C.3.2
DVMA Address Space Conflicts on SPARCserver 600
SunOS 4.1.2 has 6 Megabytes of DVMA (Direct Virtual Memory Access) space
available for use by VME32 peripheral devices on SPARCserver 600MP
systems. The use of DVMA space by various devices is not configurable. The
SNC driver maps in 416 kilobytes of DVMA space for each SNC board at boot
time. If the sum of all DVMA space requested by VME32 devices ever exceeds
6 Megabytes, some of those devices in your system will not run correctly. In
this case the only solution is to remove some VME32 device(s) from the
hardware configuration.


